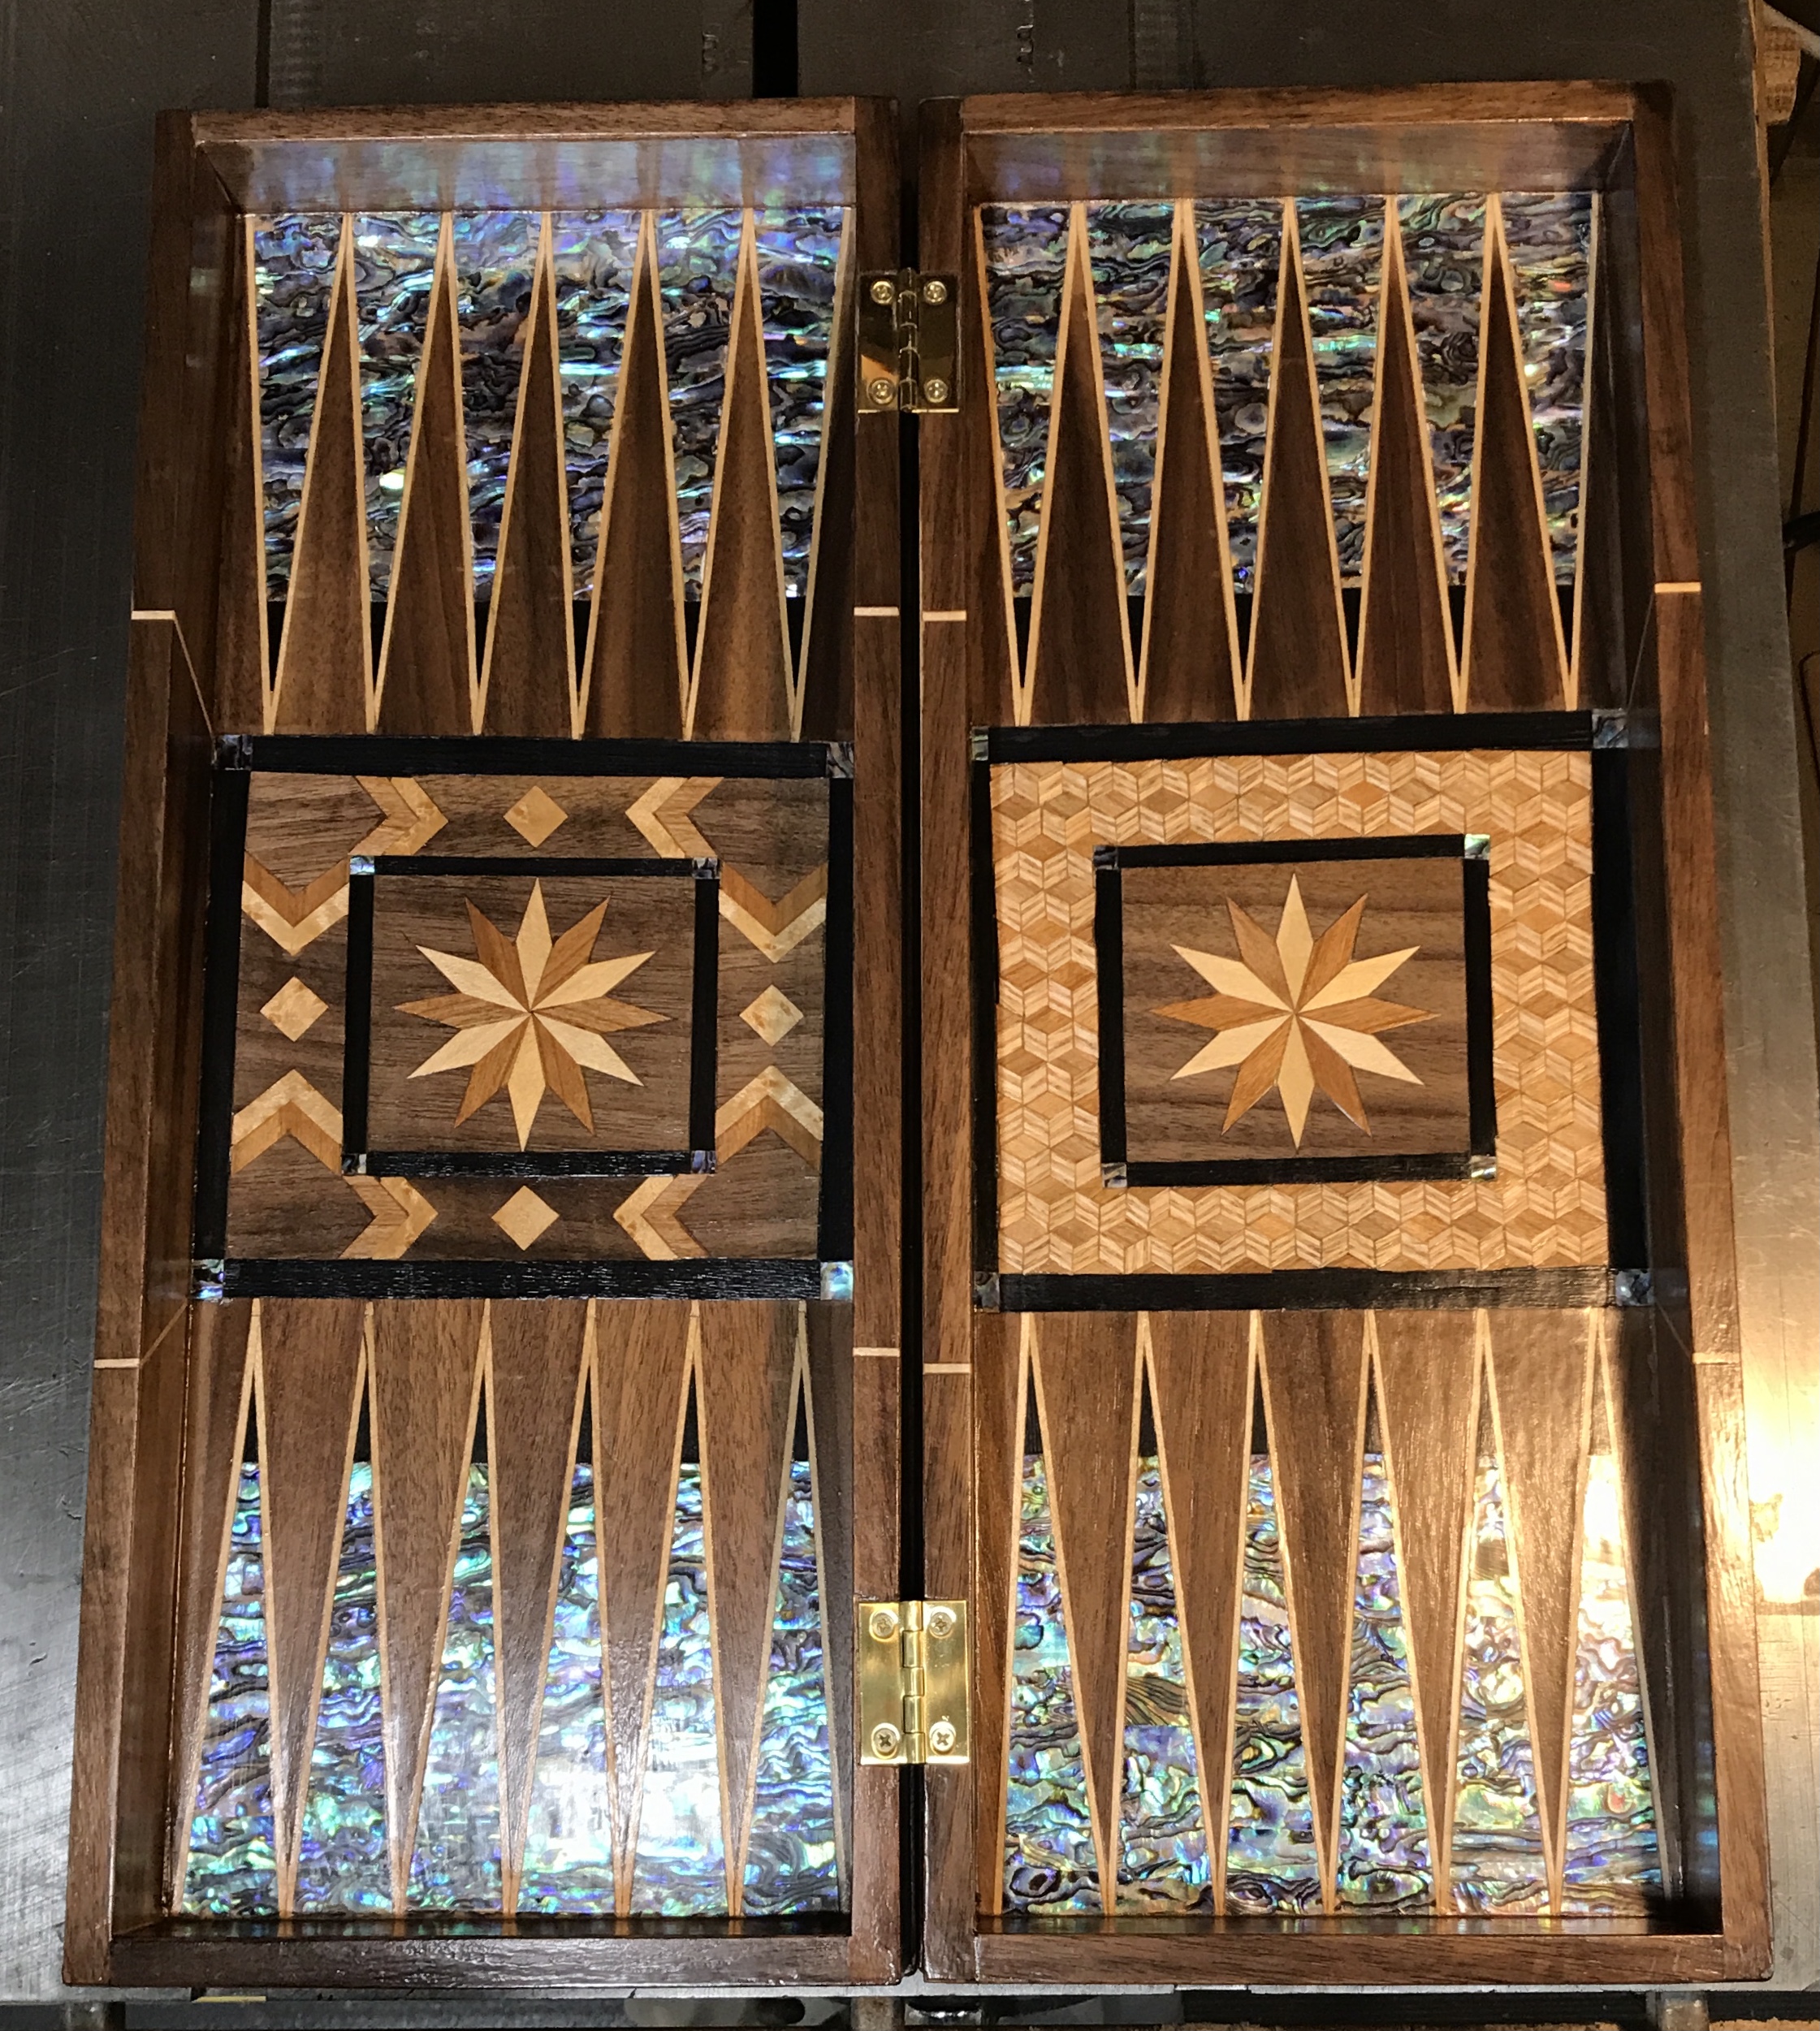
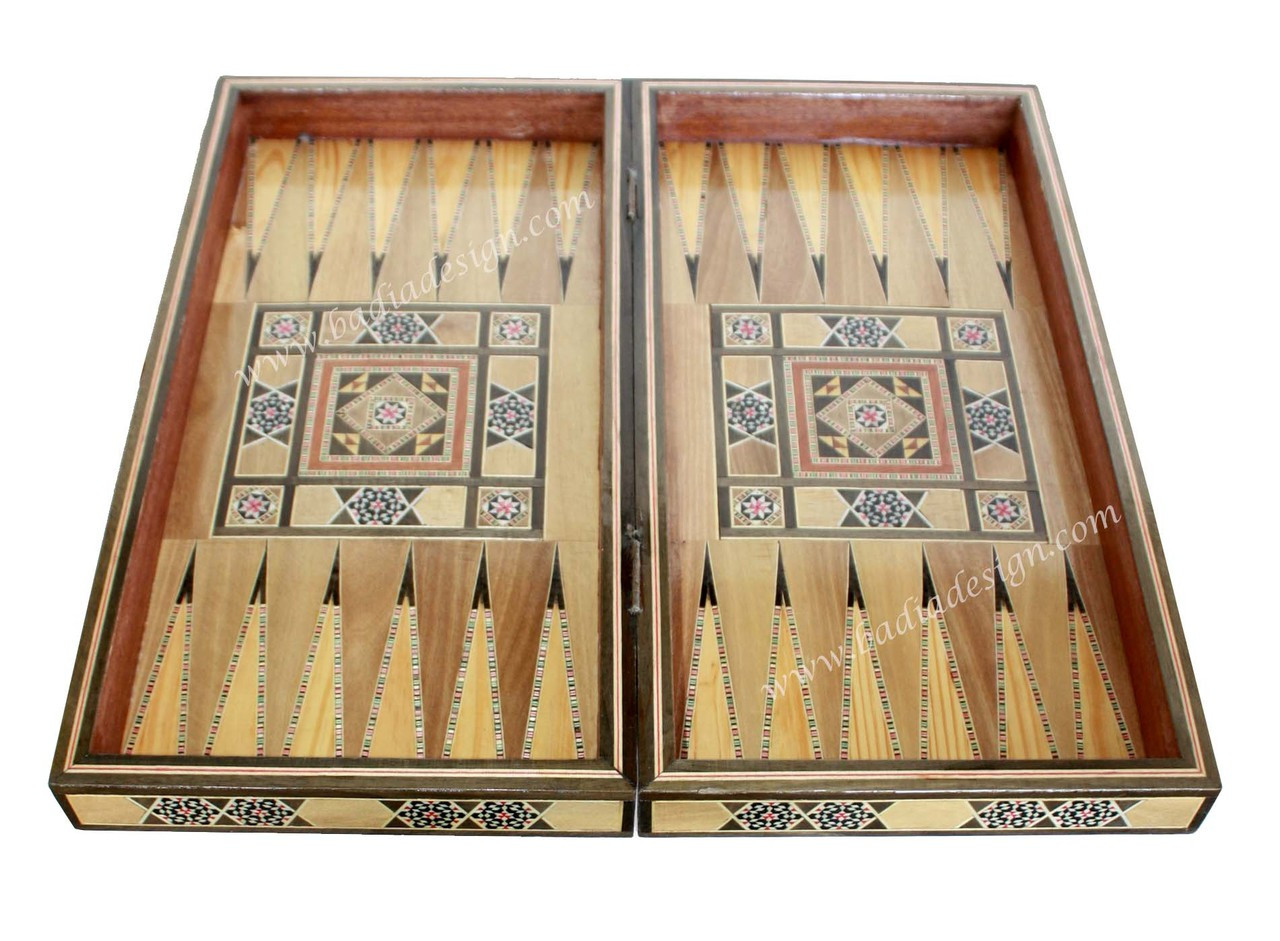
A brief communication with Daniel indicated he wanted to make a backgammon board. He decided it was too complicated. Maybe I can make one for him and take advantage of my recent course to decorate the box with parquetry designs. I looked at many boards on the internet and would like to make one that is somewhere between ornate and simple.
The first decision to make is size. Most boards are either 15" or 18" long on the inside. The 15" board leaves about 3" between the playing triangles. I would prefer a square area here for decoration, so will go with a board that is 18" long on the inside.
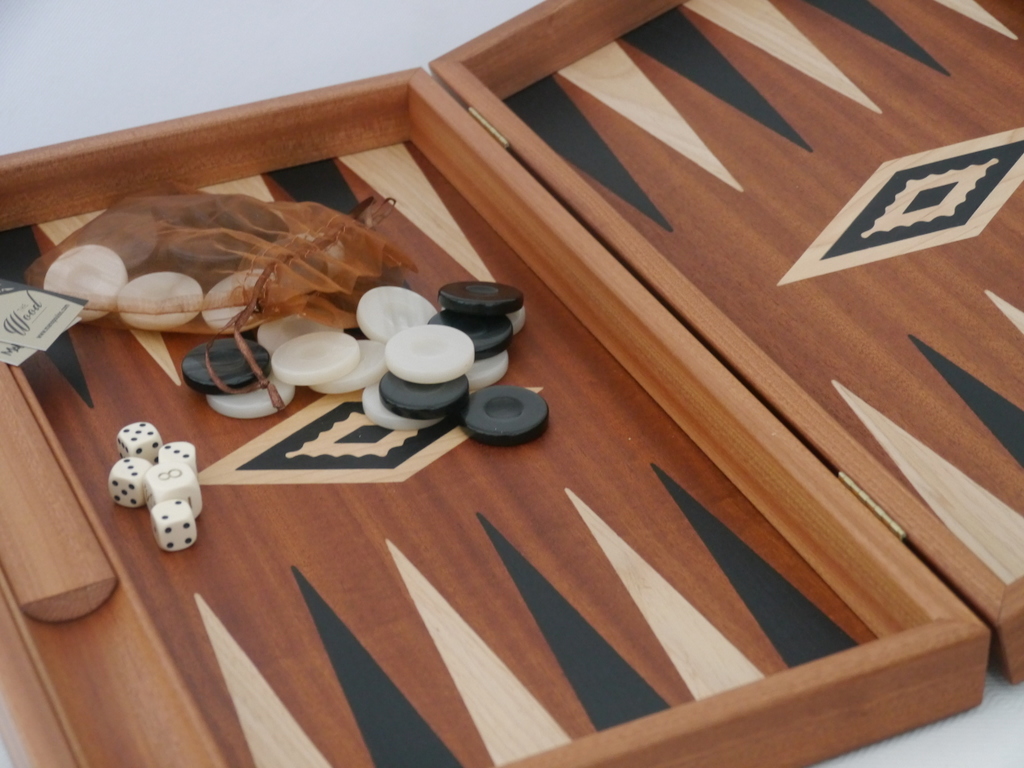
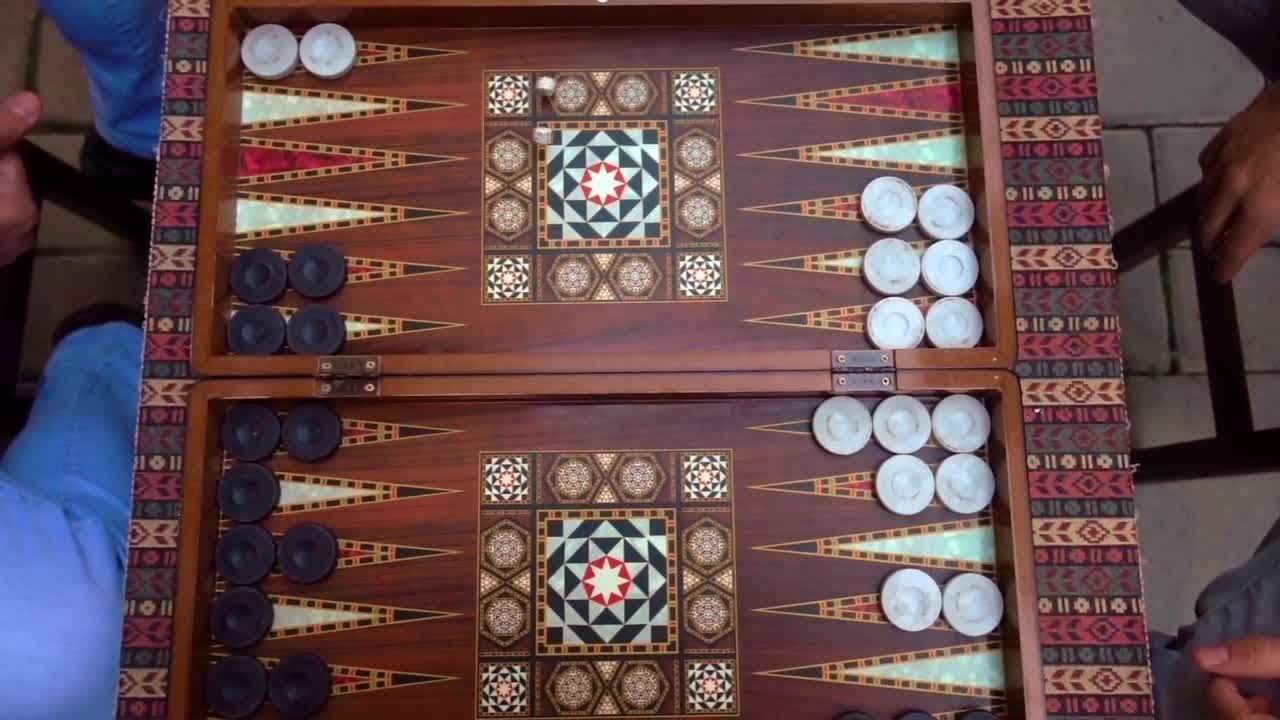
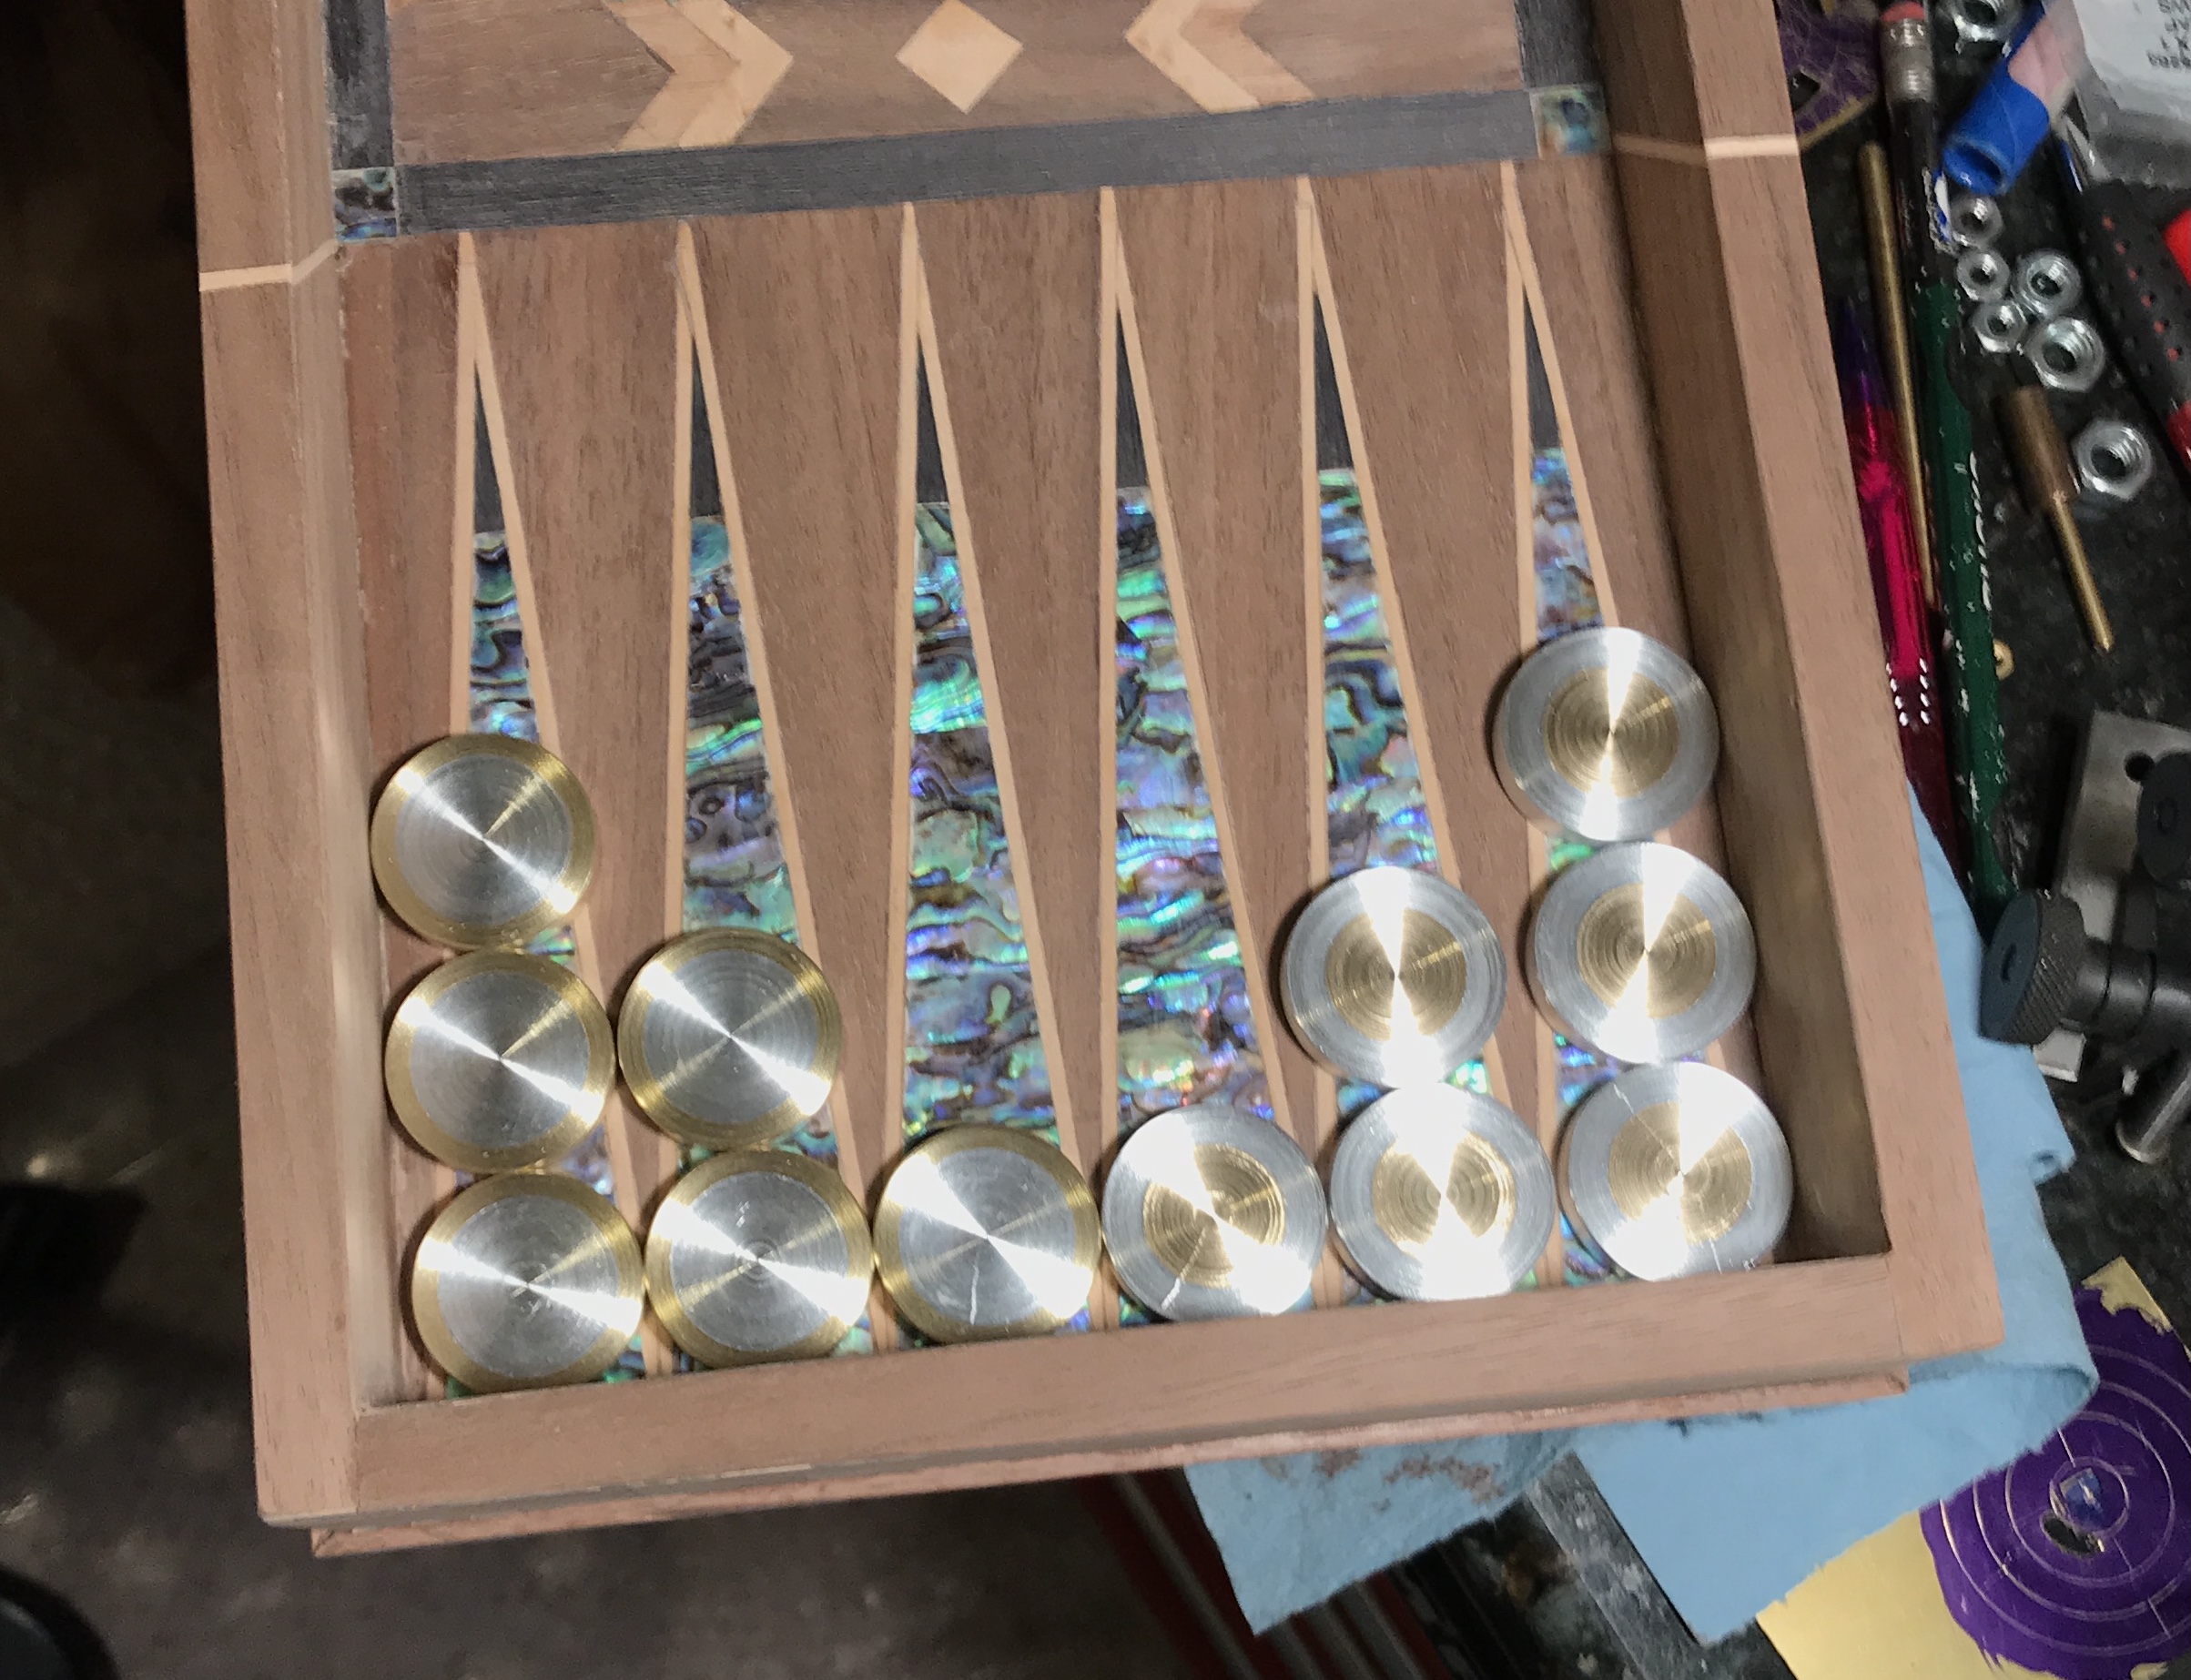
The triangles should probably be about 1 1/8" wide at the base. A 1 1/8" playing piece will fit snuggly. As seen in the photo below the playing pieces are touching. With six triangles plus a bit for comfort half of the board will need to be 6 13/16" wide on the inside (after veneering!!!). A depth of 1 1/4" - 1 1/2" sounds about right.
Before any design work takes place a brief discussion of the order of construction is in order. I briefly considered veneering the inside and outside of the box prior to putting it together. This raises all sorts of complications, but makes it easier to use the vacuum press for gluing. A much simpler path is applying veneer after the box has been made. Much of the veneering will be done with clamps and cauls instead of the vacuum press. The order of construction begins with making a box and cutting it in half lengthwise. The second step is veneering the inside and outside faces of the two box halves. This can be done in the vacuum press, if a closely fitting block of wood is placed inside the box. The third step is applying veneer to the inside and outside sides of the box. This is where cauls and clamps will be used. Veneering the sides before constructing the box sounds like a good idea, but I am not sure I can completely avoid veneer tearout when sawing the box in half.
The inside width needs to be 6 13/16" + 0.08" or 6 29/32". With 1 3/8" X 6 29/32" X 18 3/32" inside dimensions for the box without veneer. I can map out the amount of wood needed. The method of joining the sides to the faces needs to be determined. I am torn between doweling and rabbet joint, so I will use both. The sides of the box will be joined together to form a rectangle using butt joints with dowels. (Or as I prefer: plugged butts.) Then the two faces will be prepared and cut to fit with rabbets on all four of their outer edges.
1/2" thick wood will be used for sides and faces. I was leery of edge gluing 1/4" stock. The sides need to be 2 X 1 3/8" + 2 X (rabbet depth). The rabbet depth will be set at 1/4", so the sides need to be 3 1/4" wide plus the saw kerf when cutting the box in half. Let's go with 3 3/8"
To facilitate sanding the joints flush, the width of the rabbet should be slightly more than 1/2". This will allow the edges of the faces to sit proud of the sides. Consequently, minimal sanding will be needed to get everything flush.
The faces need to be 6 13/16" + 2 X 1/2" wide or 7 7/8" adding a bit for the wide rabbet. But wait, they need to be even wider to account for the veneer that will be glued to the insides of the sides. Veneer is 0.04" thick so the sides need to be about 3/32" larger, so let's just call them 8" wide. The length is 18" plus two rabbets for the ends plus two veneer allowances or 19 5/32". This includes an additional 1/16" so the rabbets can be wider than 1/2".
The dowels will go through the long sides and into the edges of the short sides. Therefore the short sides need to be the width of the inside of the face or 1/32" shy of 7". This provides the room for the veneer on the insides of the sides. The long sides need to be 19 3/32" to span the edges of the two ends.
I don't want to buy wood wide enough for the faces for two reasons. One, it is not readily available and two, it would be difficult to find any that is not warped. Since the width is 8", the faces will be made from 4" wide pieces glued up to form the 8" board. Of course the wood comes 1/2" narrower than nominal length. Six inch boards will be purchased for the faces. So two 4' long 1/2" X 6" boards will comprise the faces. The sides will be made from two 4' long 1/2" X 4" boards. Two ends can come from these two boards. There are sufficient 1/4" dowels for this project.
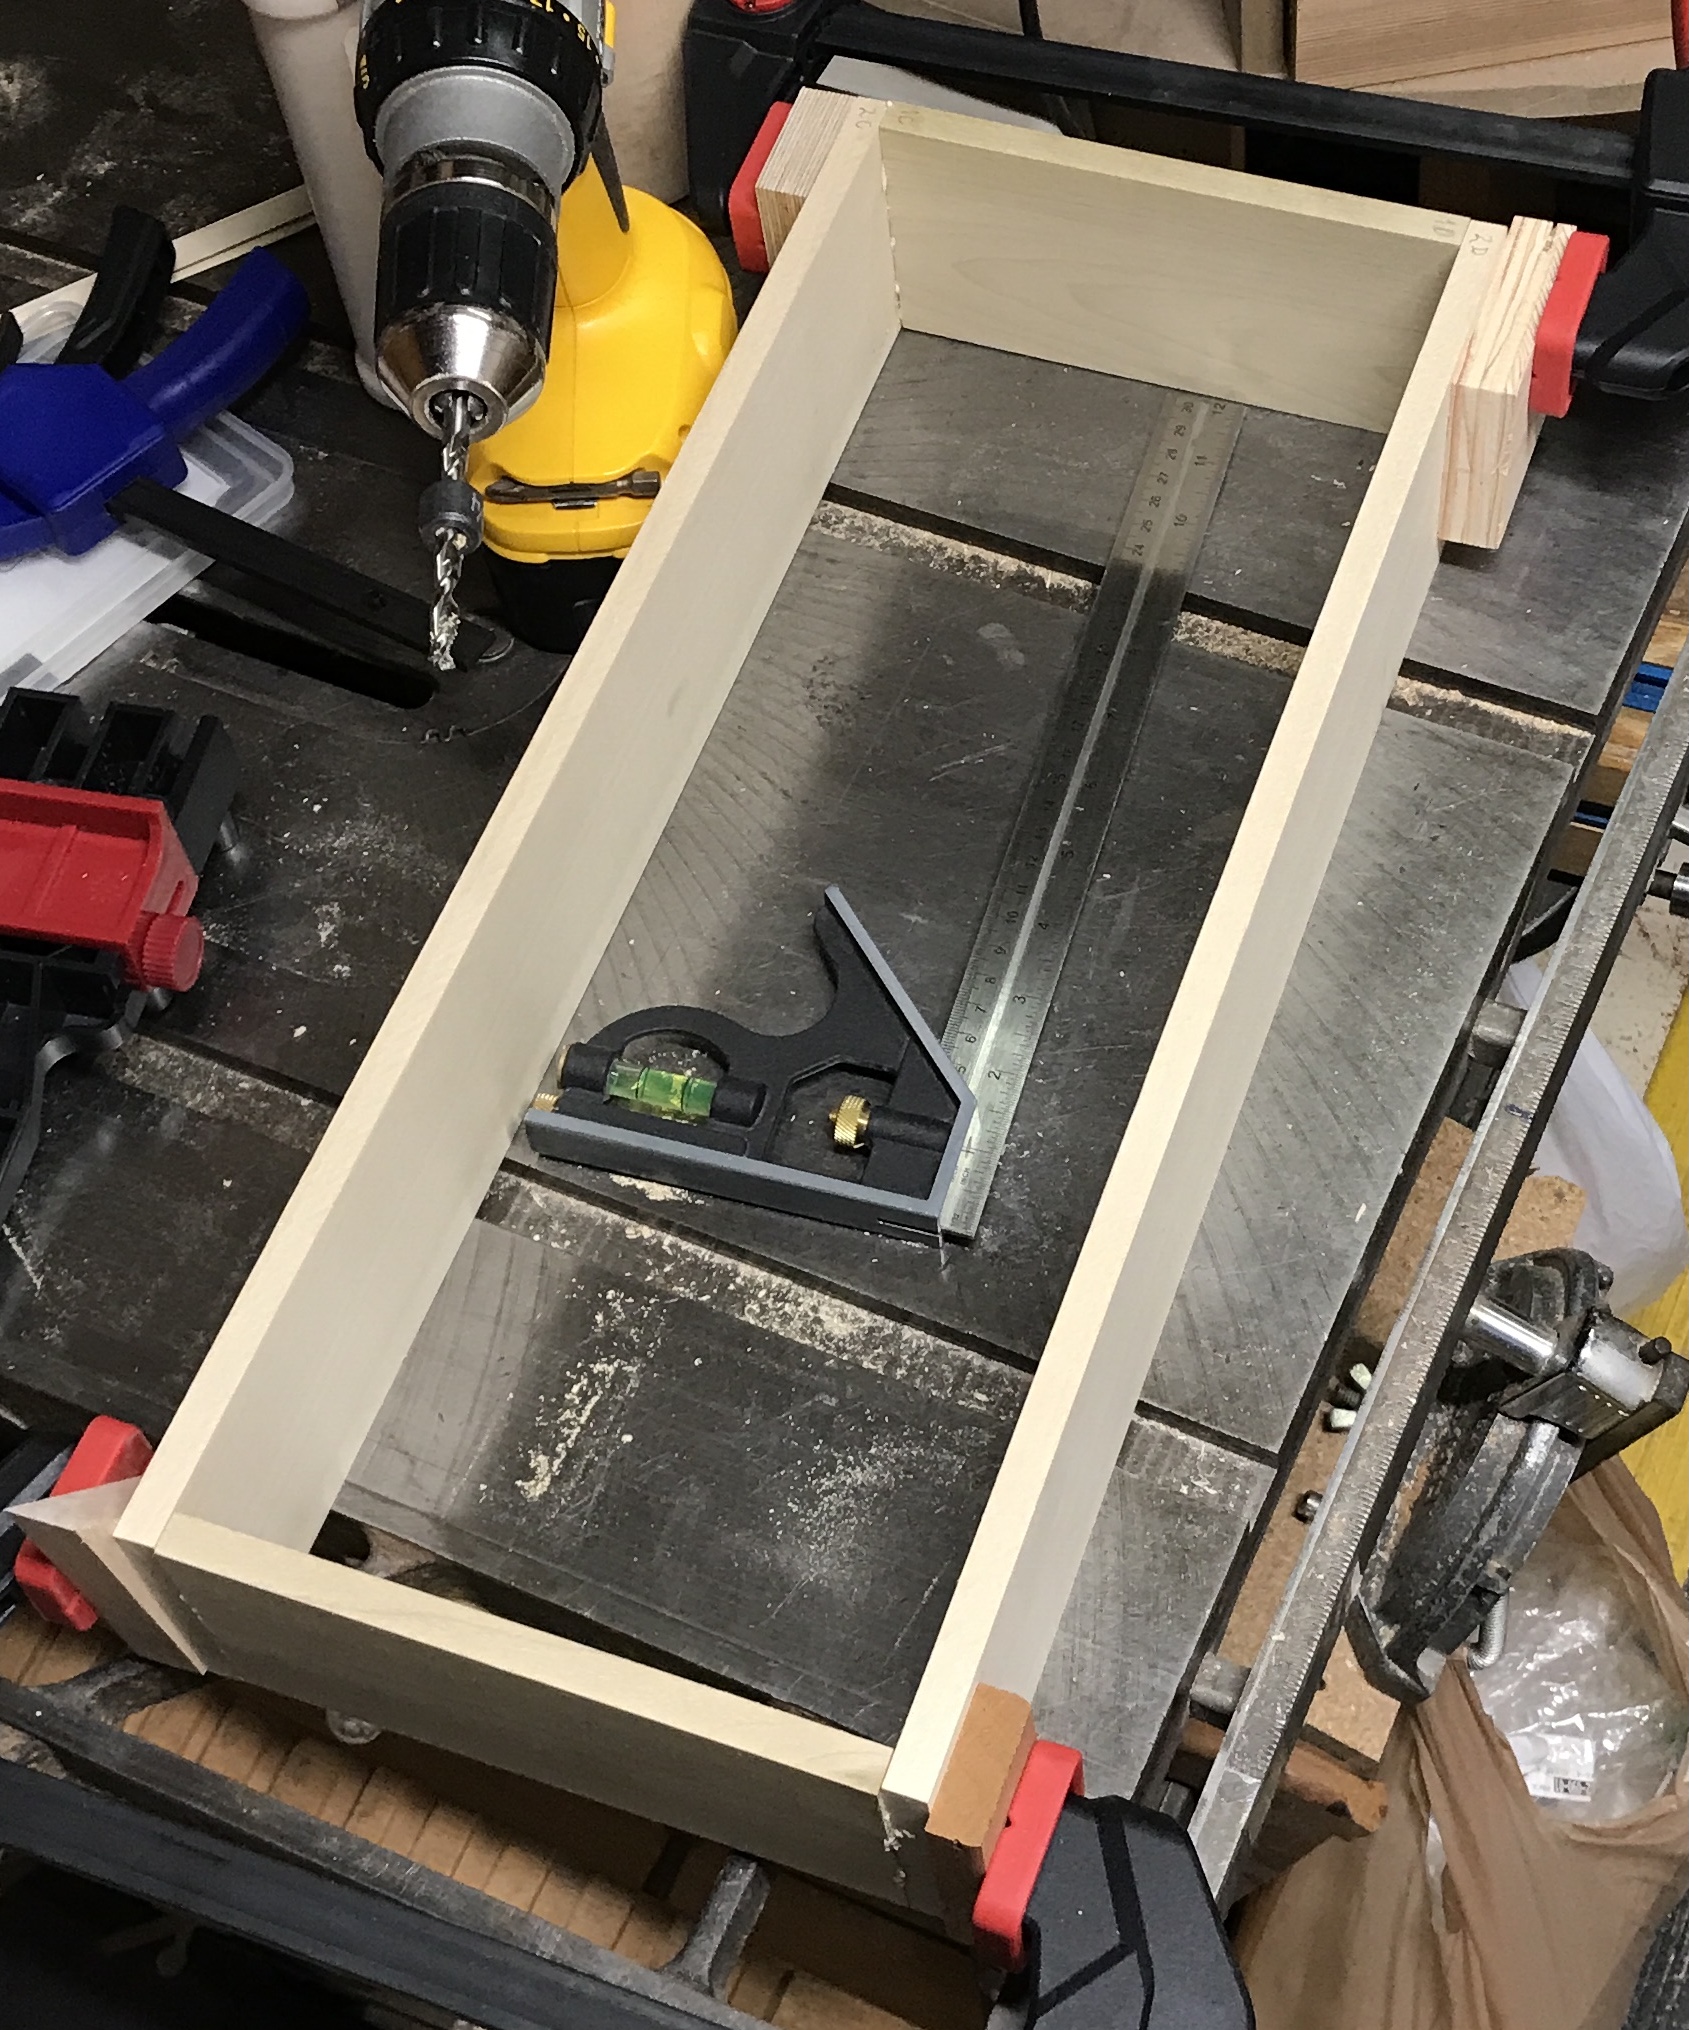
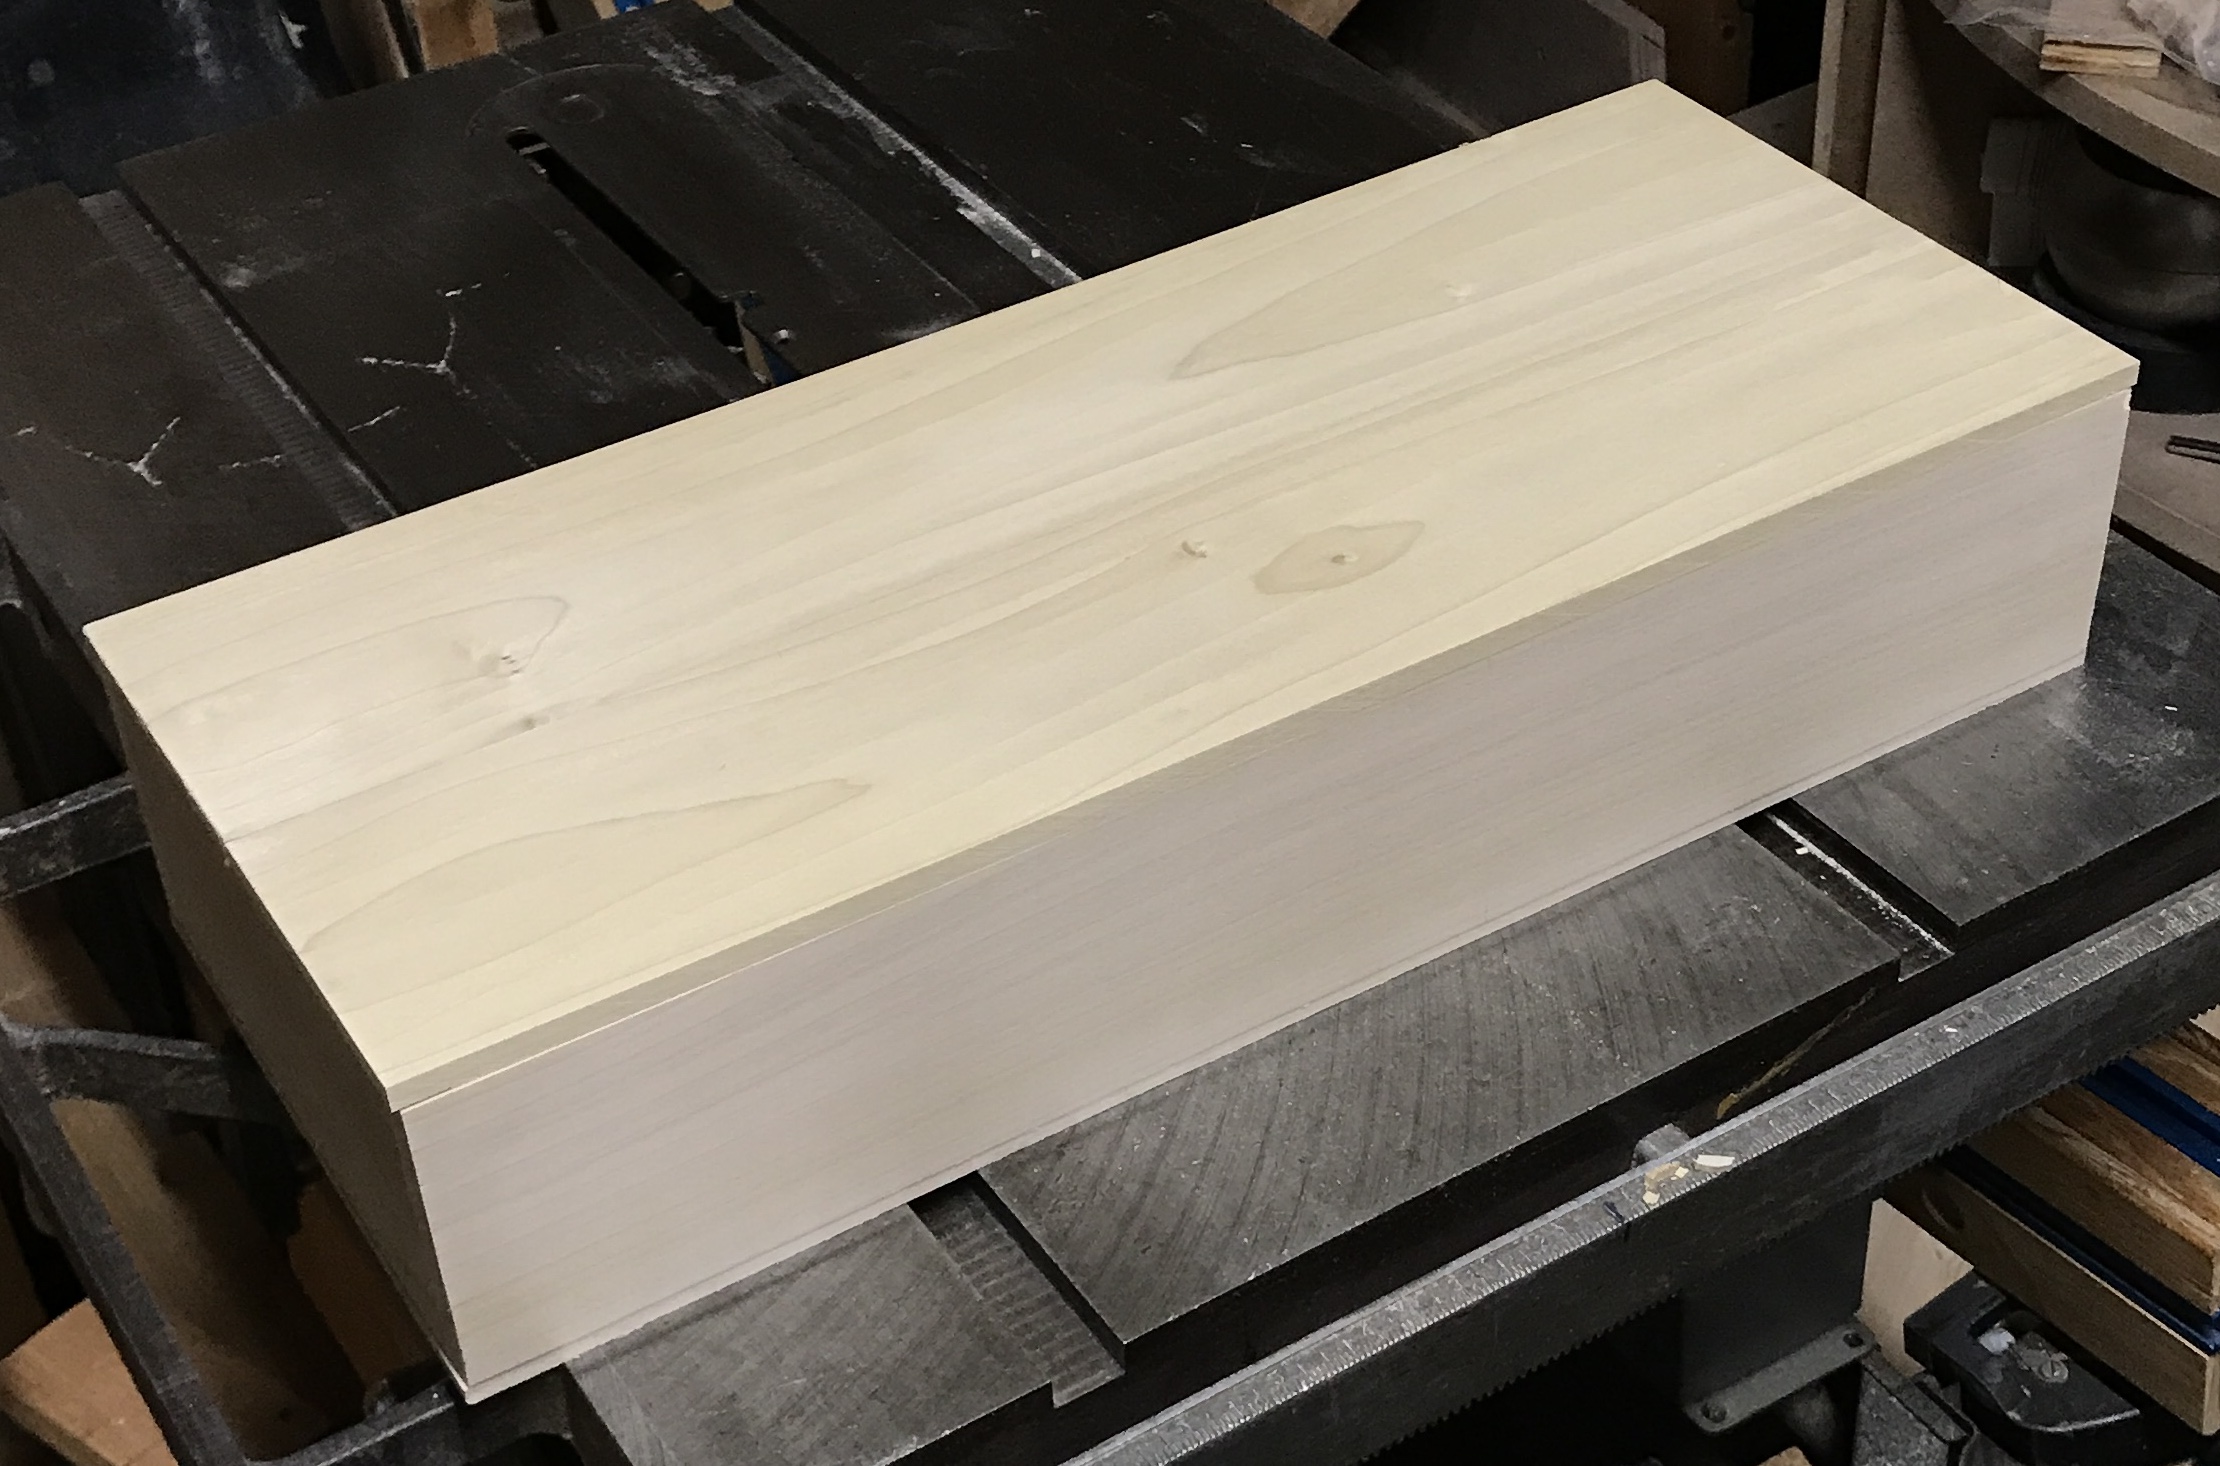
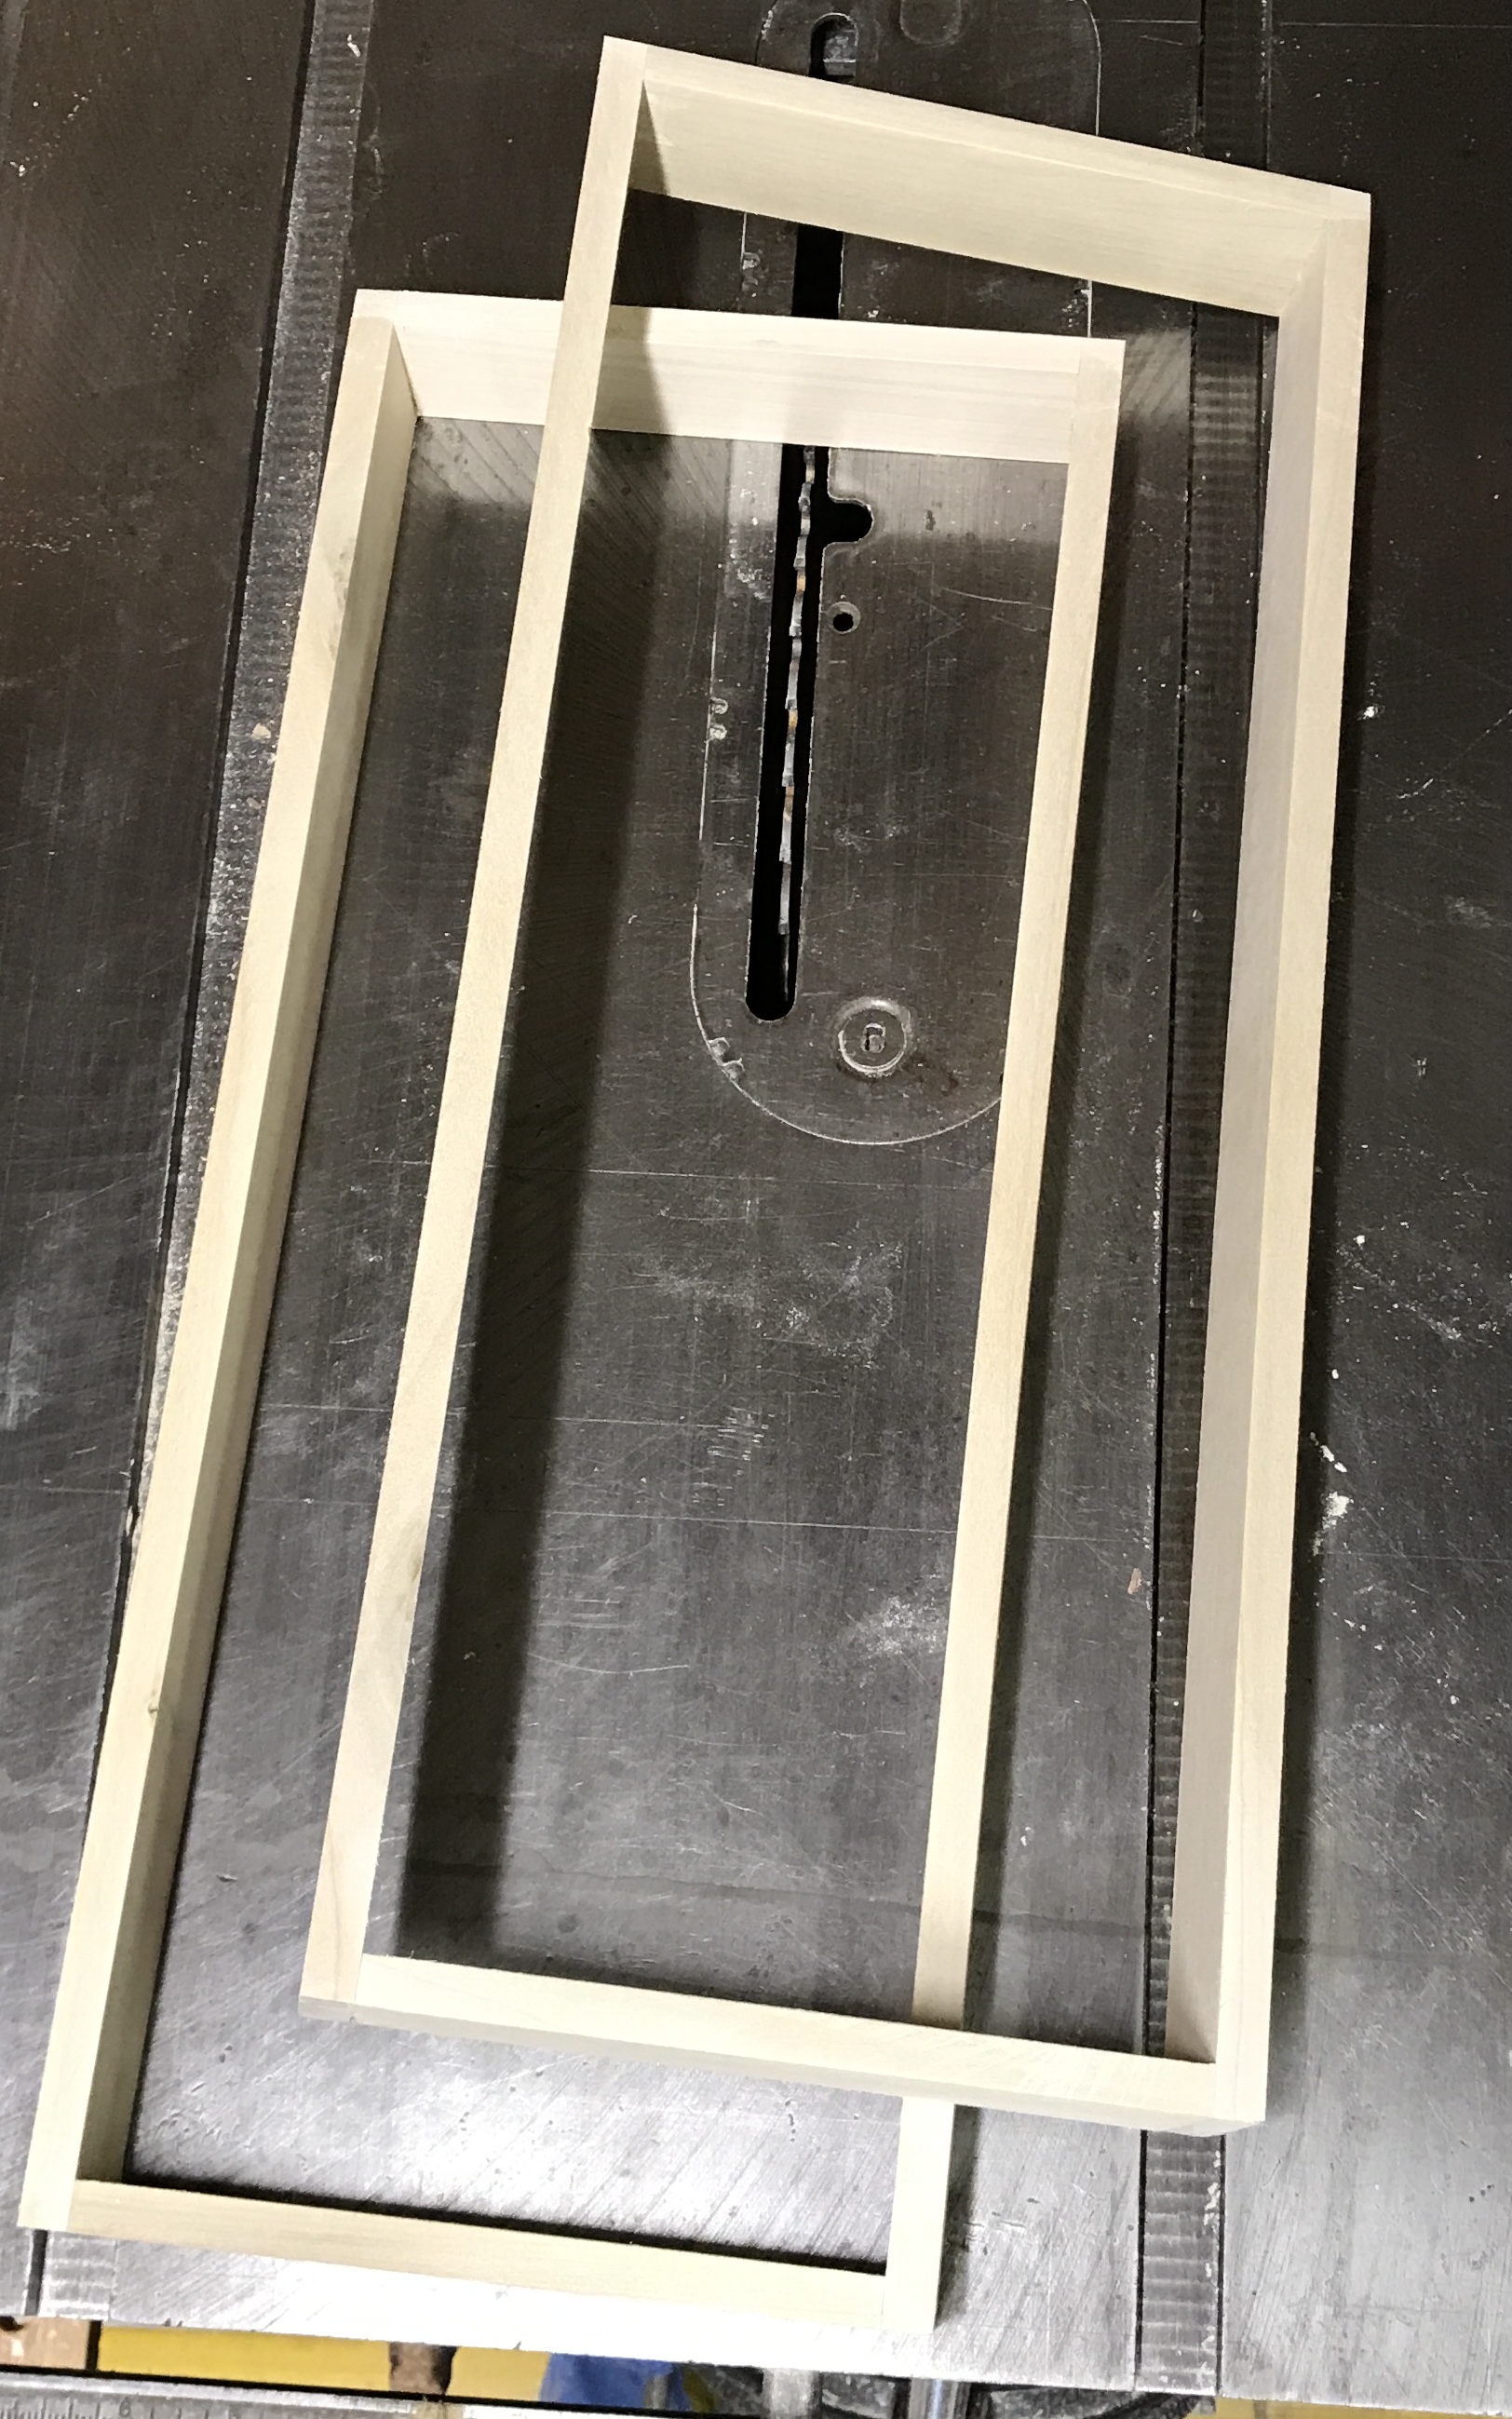
The wood was purchased at Menards this morning. The parts were cut to length. The sides were ripped to 3 3/8". The dowel jig was then used to drill the holes for the dowels. Glue was applied and various adjustments were made to get the box to come together. The holes were not as accurately aligned as I remember. This may be due to the thinner stock or my technique. The box is together and reasonably square. Planing will be needed to clean up the ends.
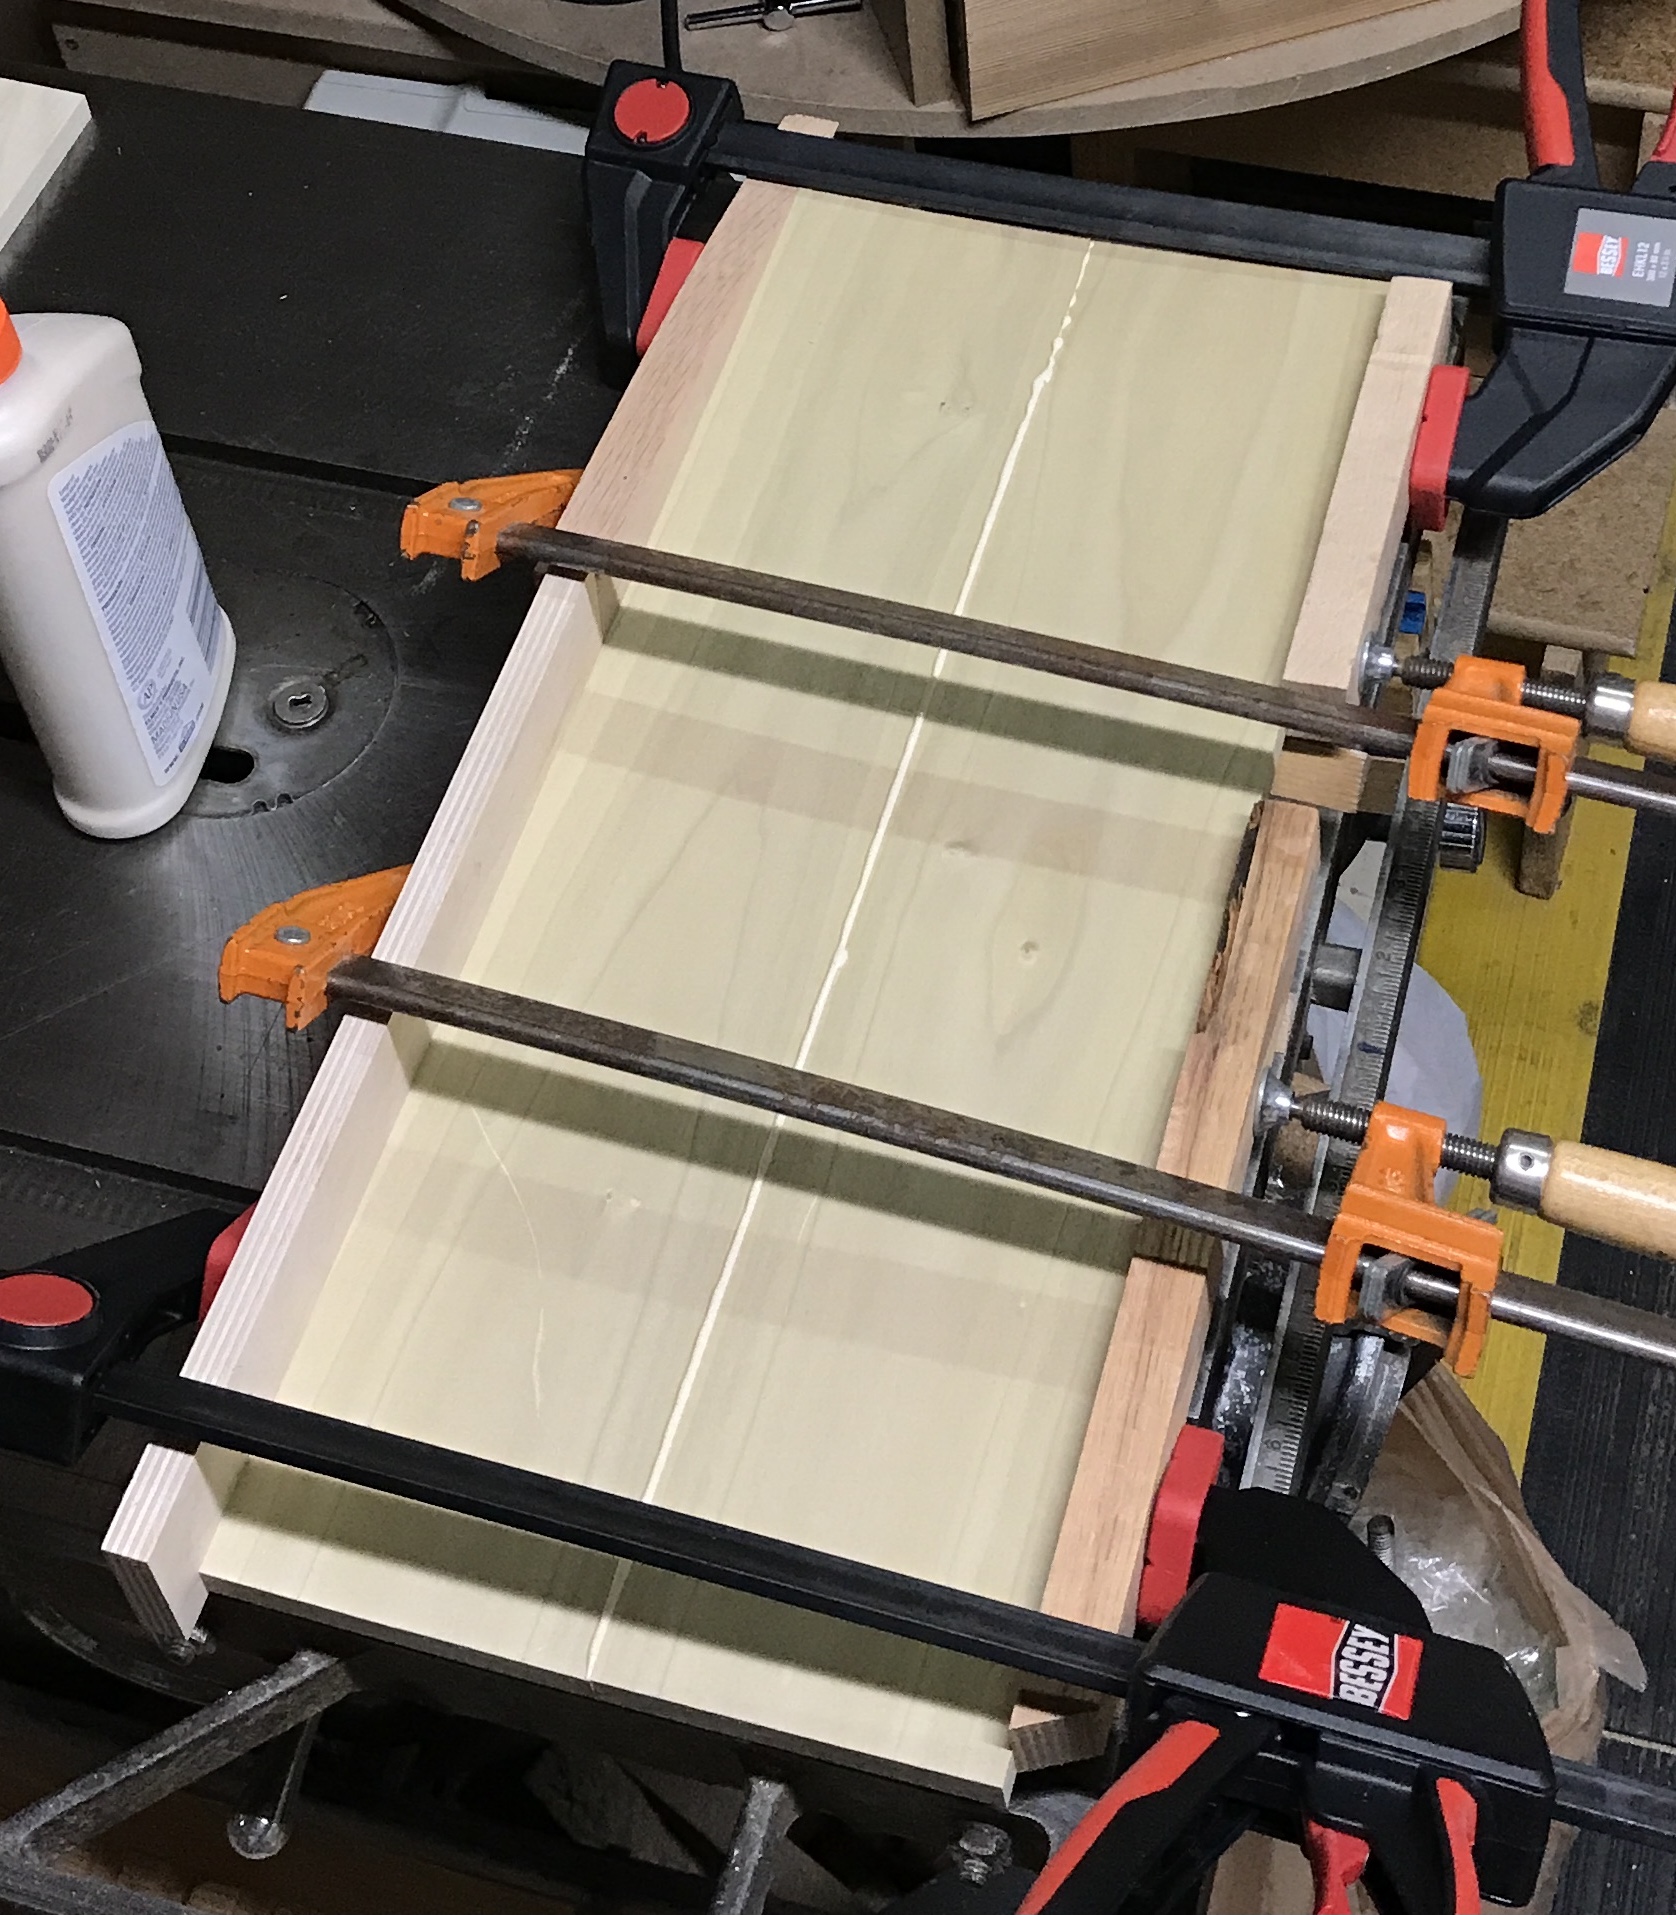
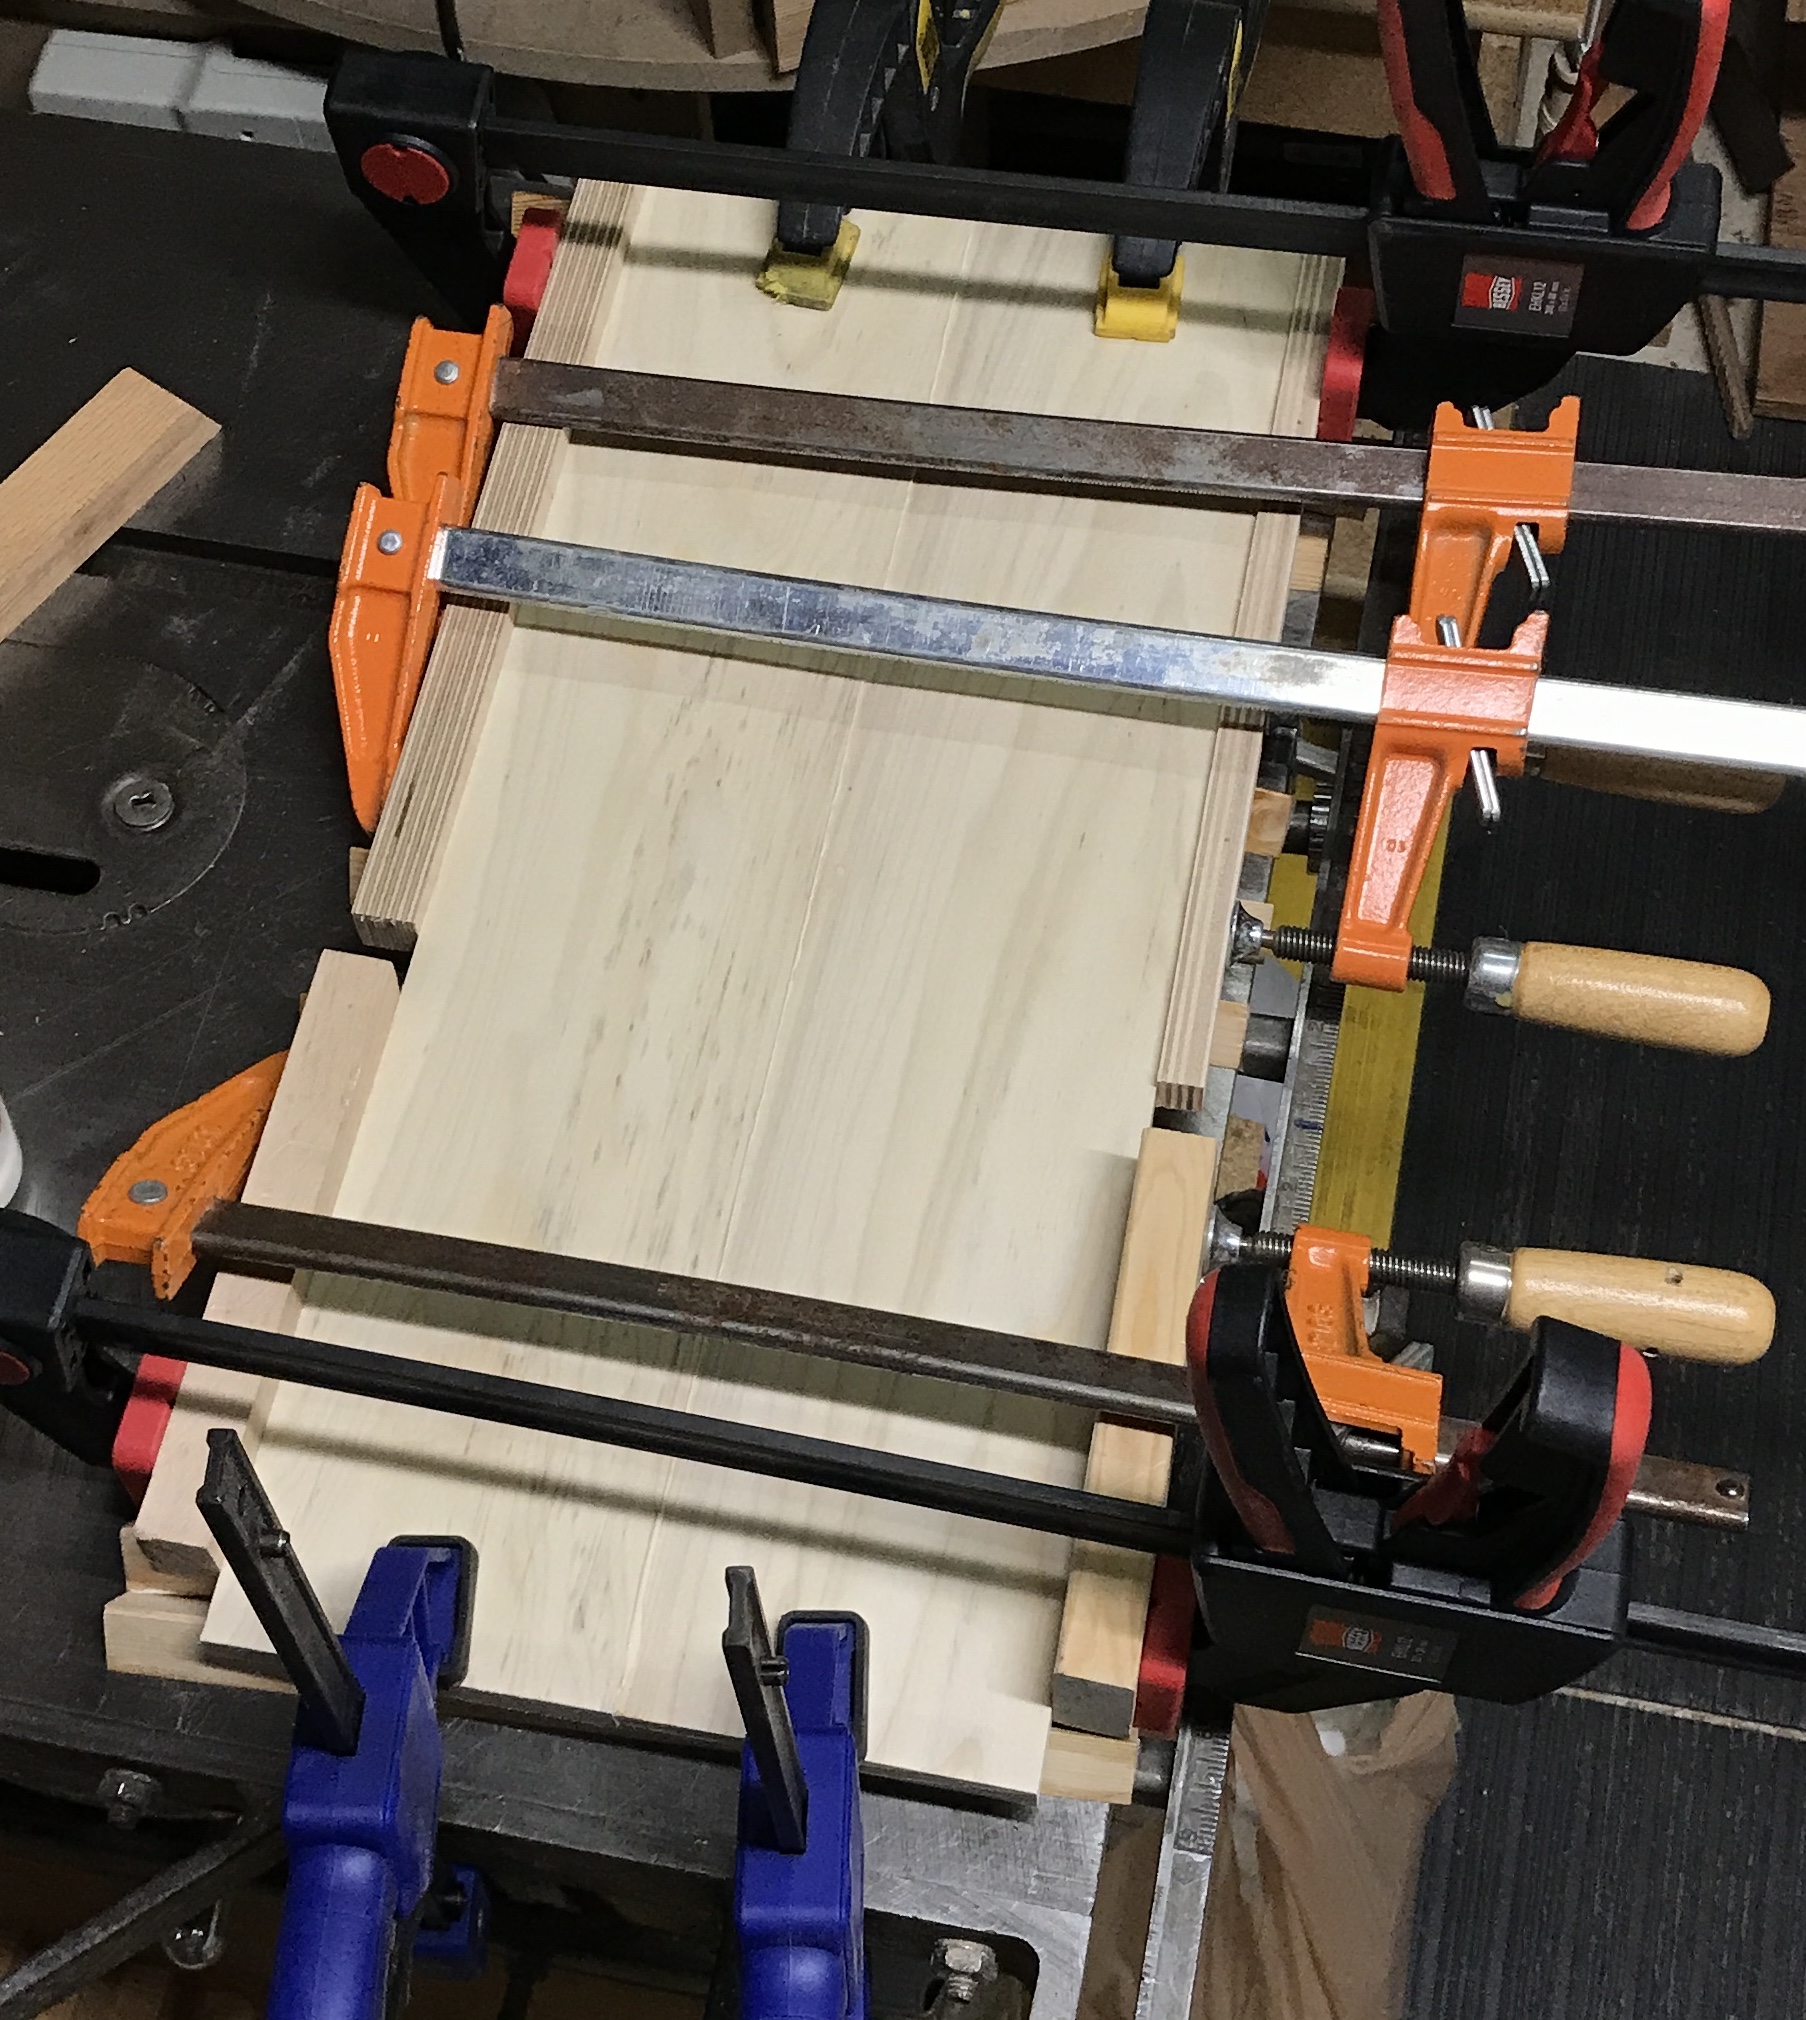
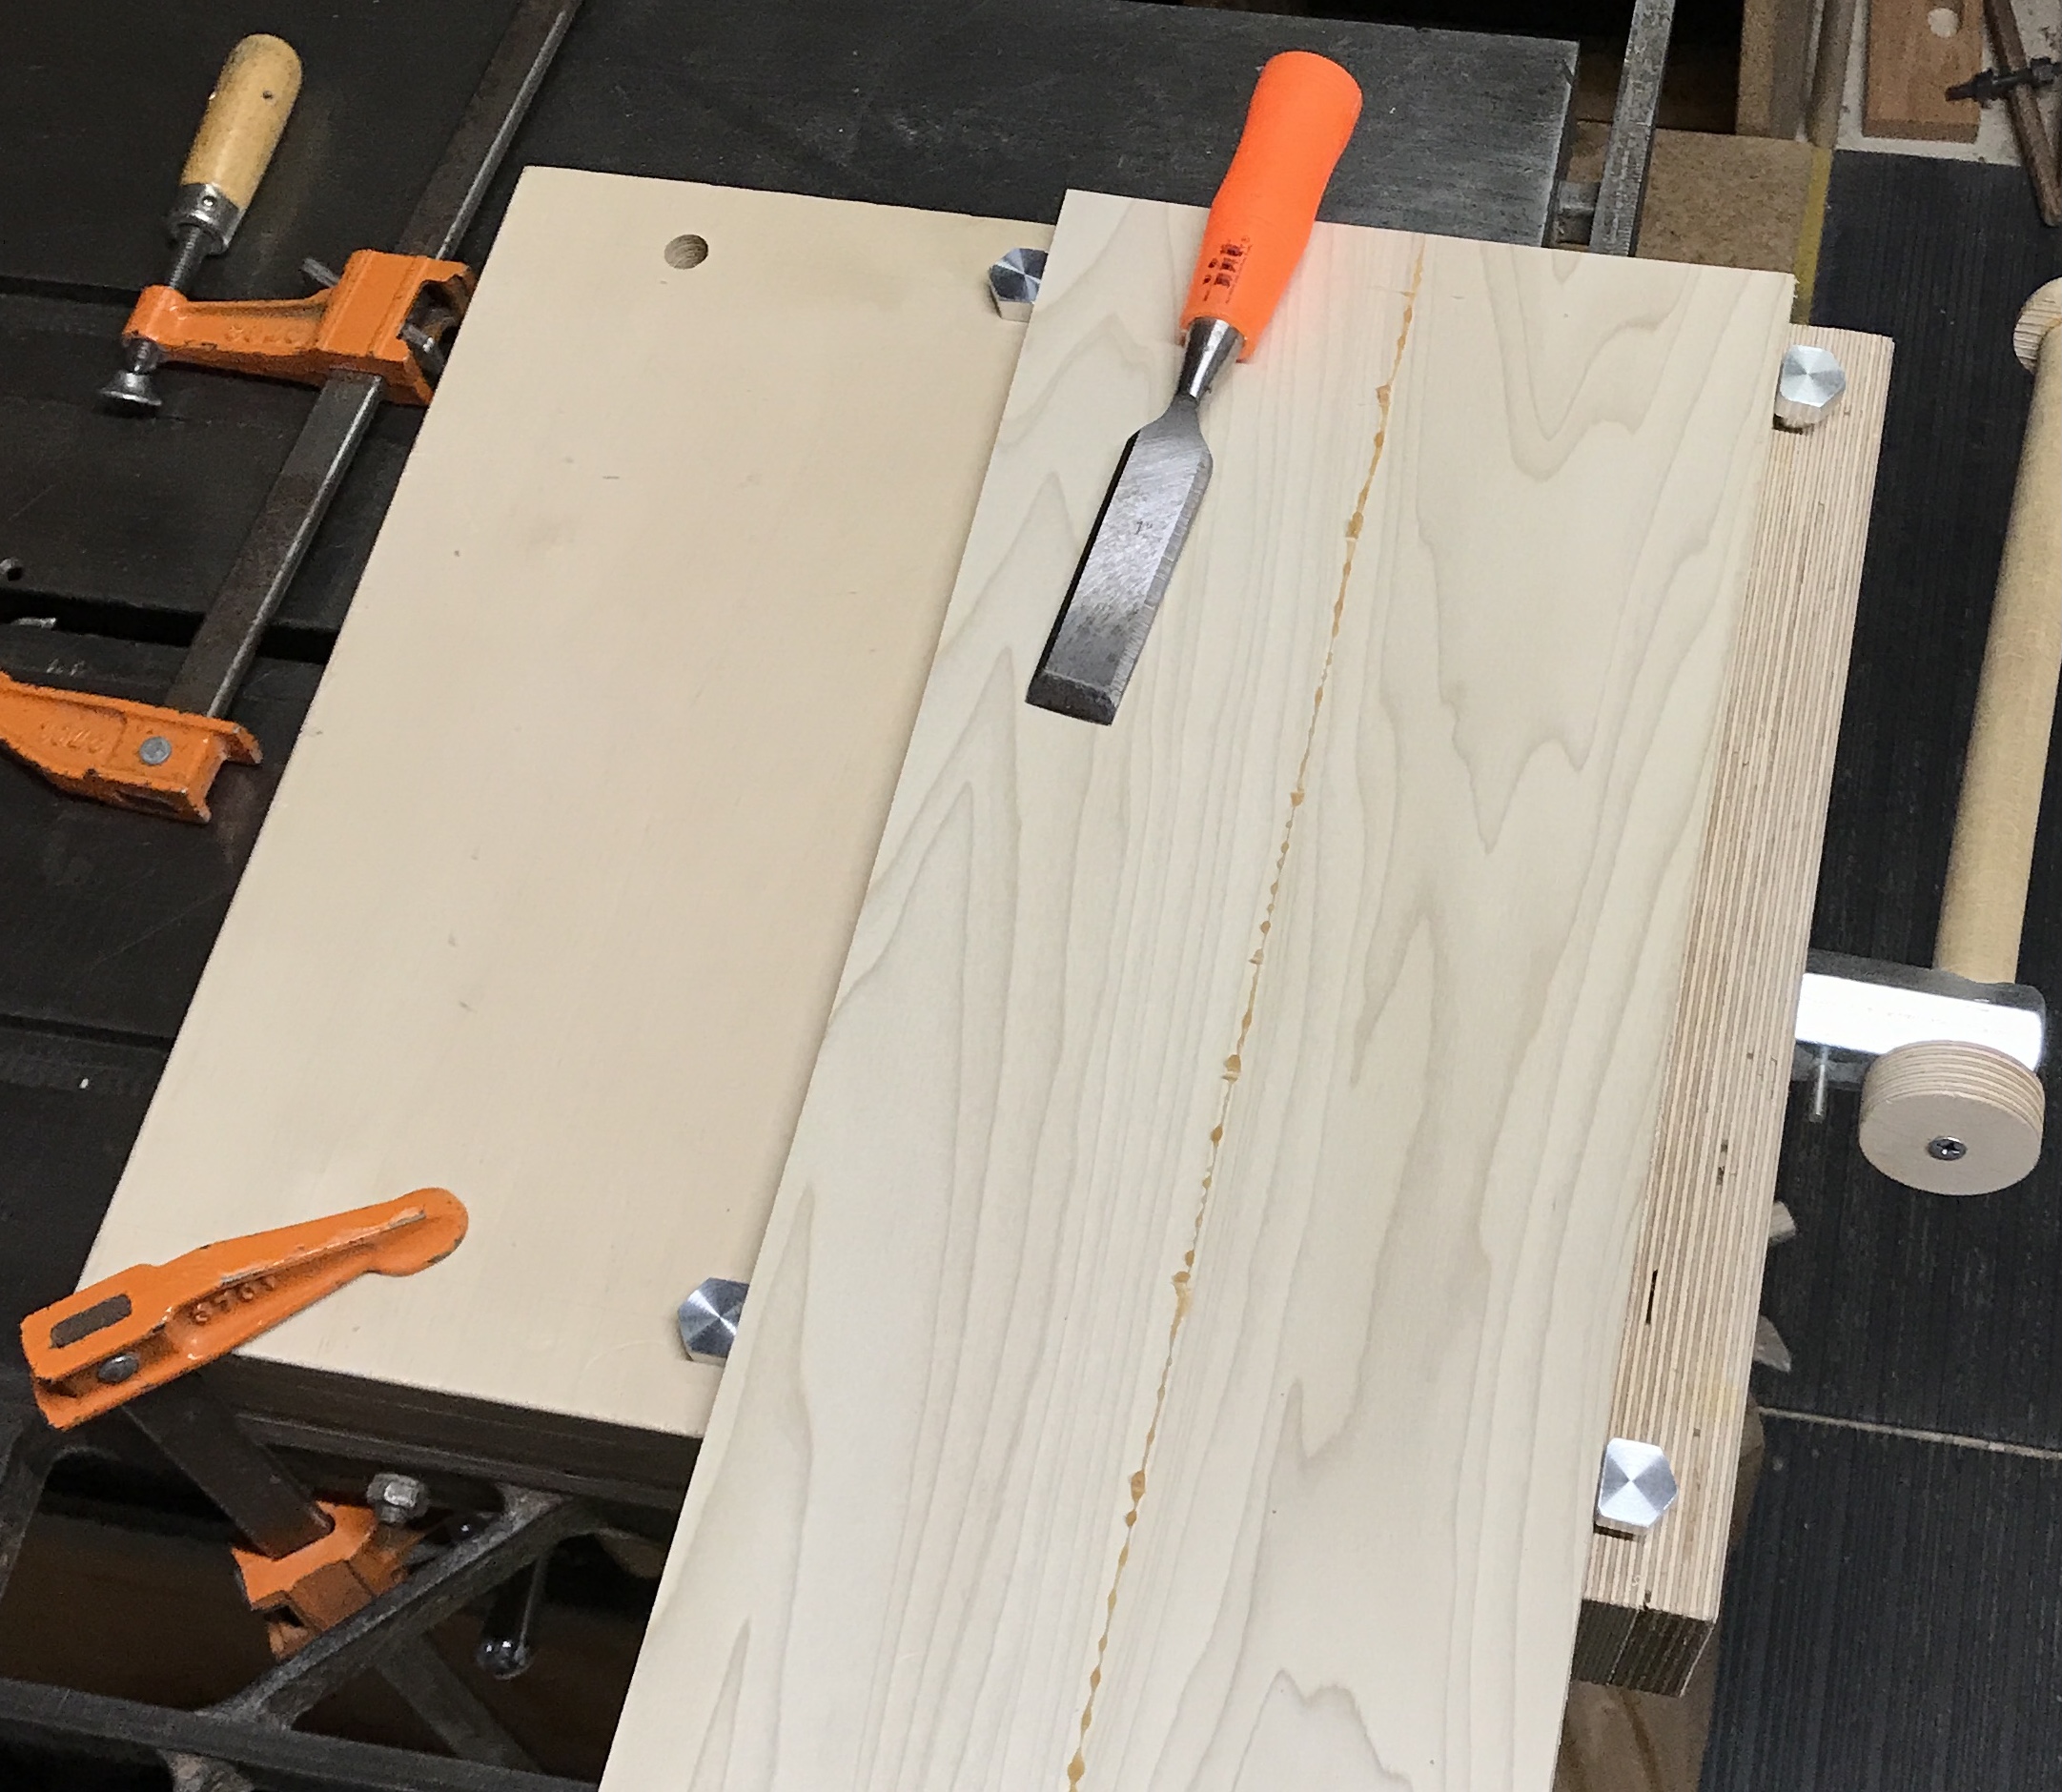
Four 19 5/32" boards were cut from the two 6" wide boards. These four boards were ripped to 4" wide. The boards were then edge glued in pairs. One of the boards was warped across its width. These two boards were glued with the warp going in opposite directions. The photo shows the first pair glued and clamped. I learned from the first pair to clamp the ends flat to the supports or the resulting board will have a significant warp. The second photo shows the second pair with end clamps.
The two assembled boards are far from flat. First, glue was removed with a wide chisel. It was time to haul out the plane. A straightedge was used to determine where the high spots were. The plane gave me a lot of trouble until I waxed the sole. Then it worked smoothly. A lot of wood was removed, sometimes from a hill in the middle and sometimes from the edges of a valley. The boards are thinner now, but are reasonably flat. Two hours of planing and scraping with the card scraper gave a smooth surface.
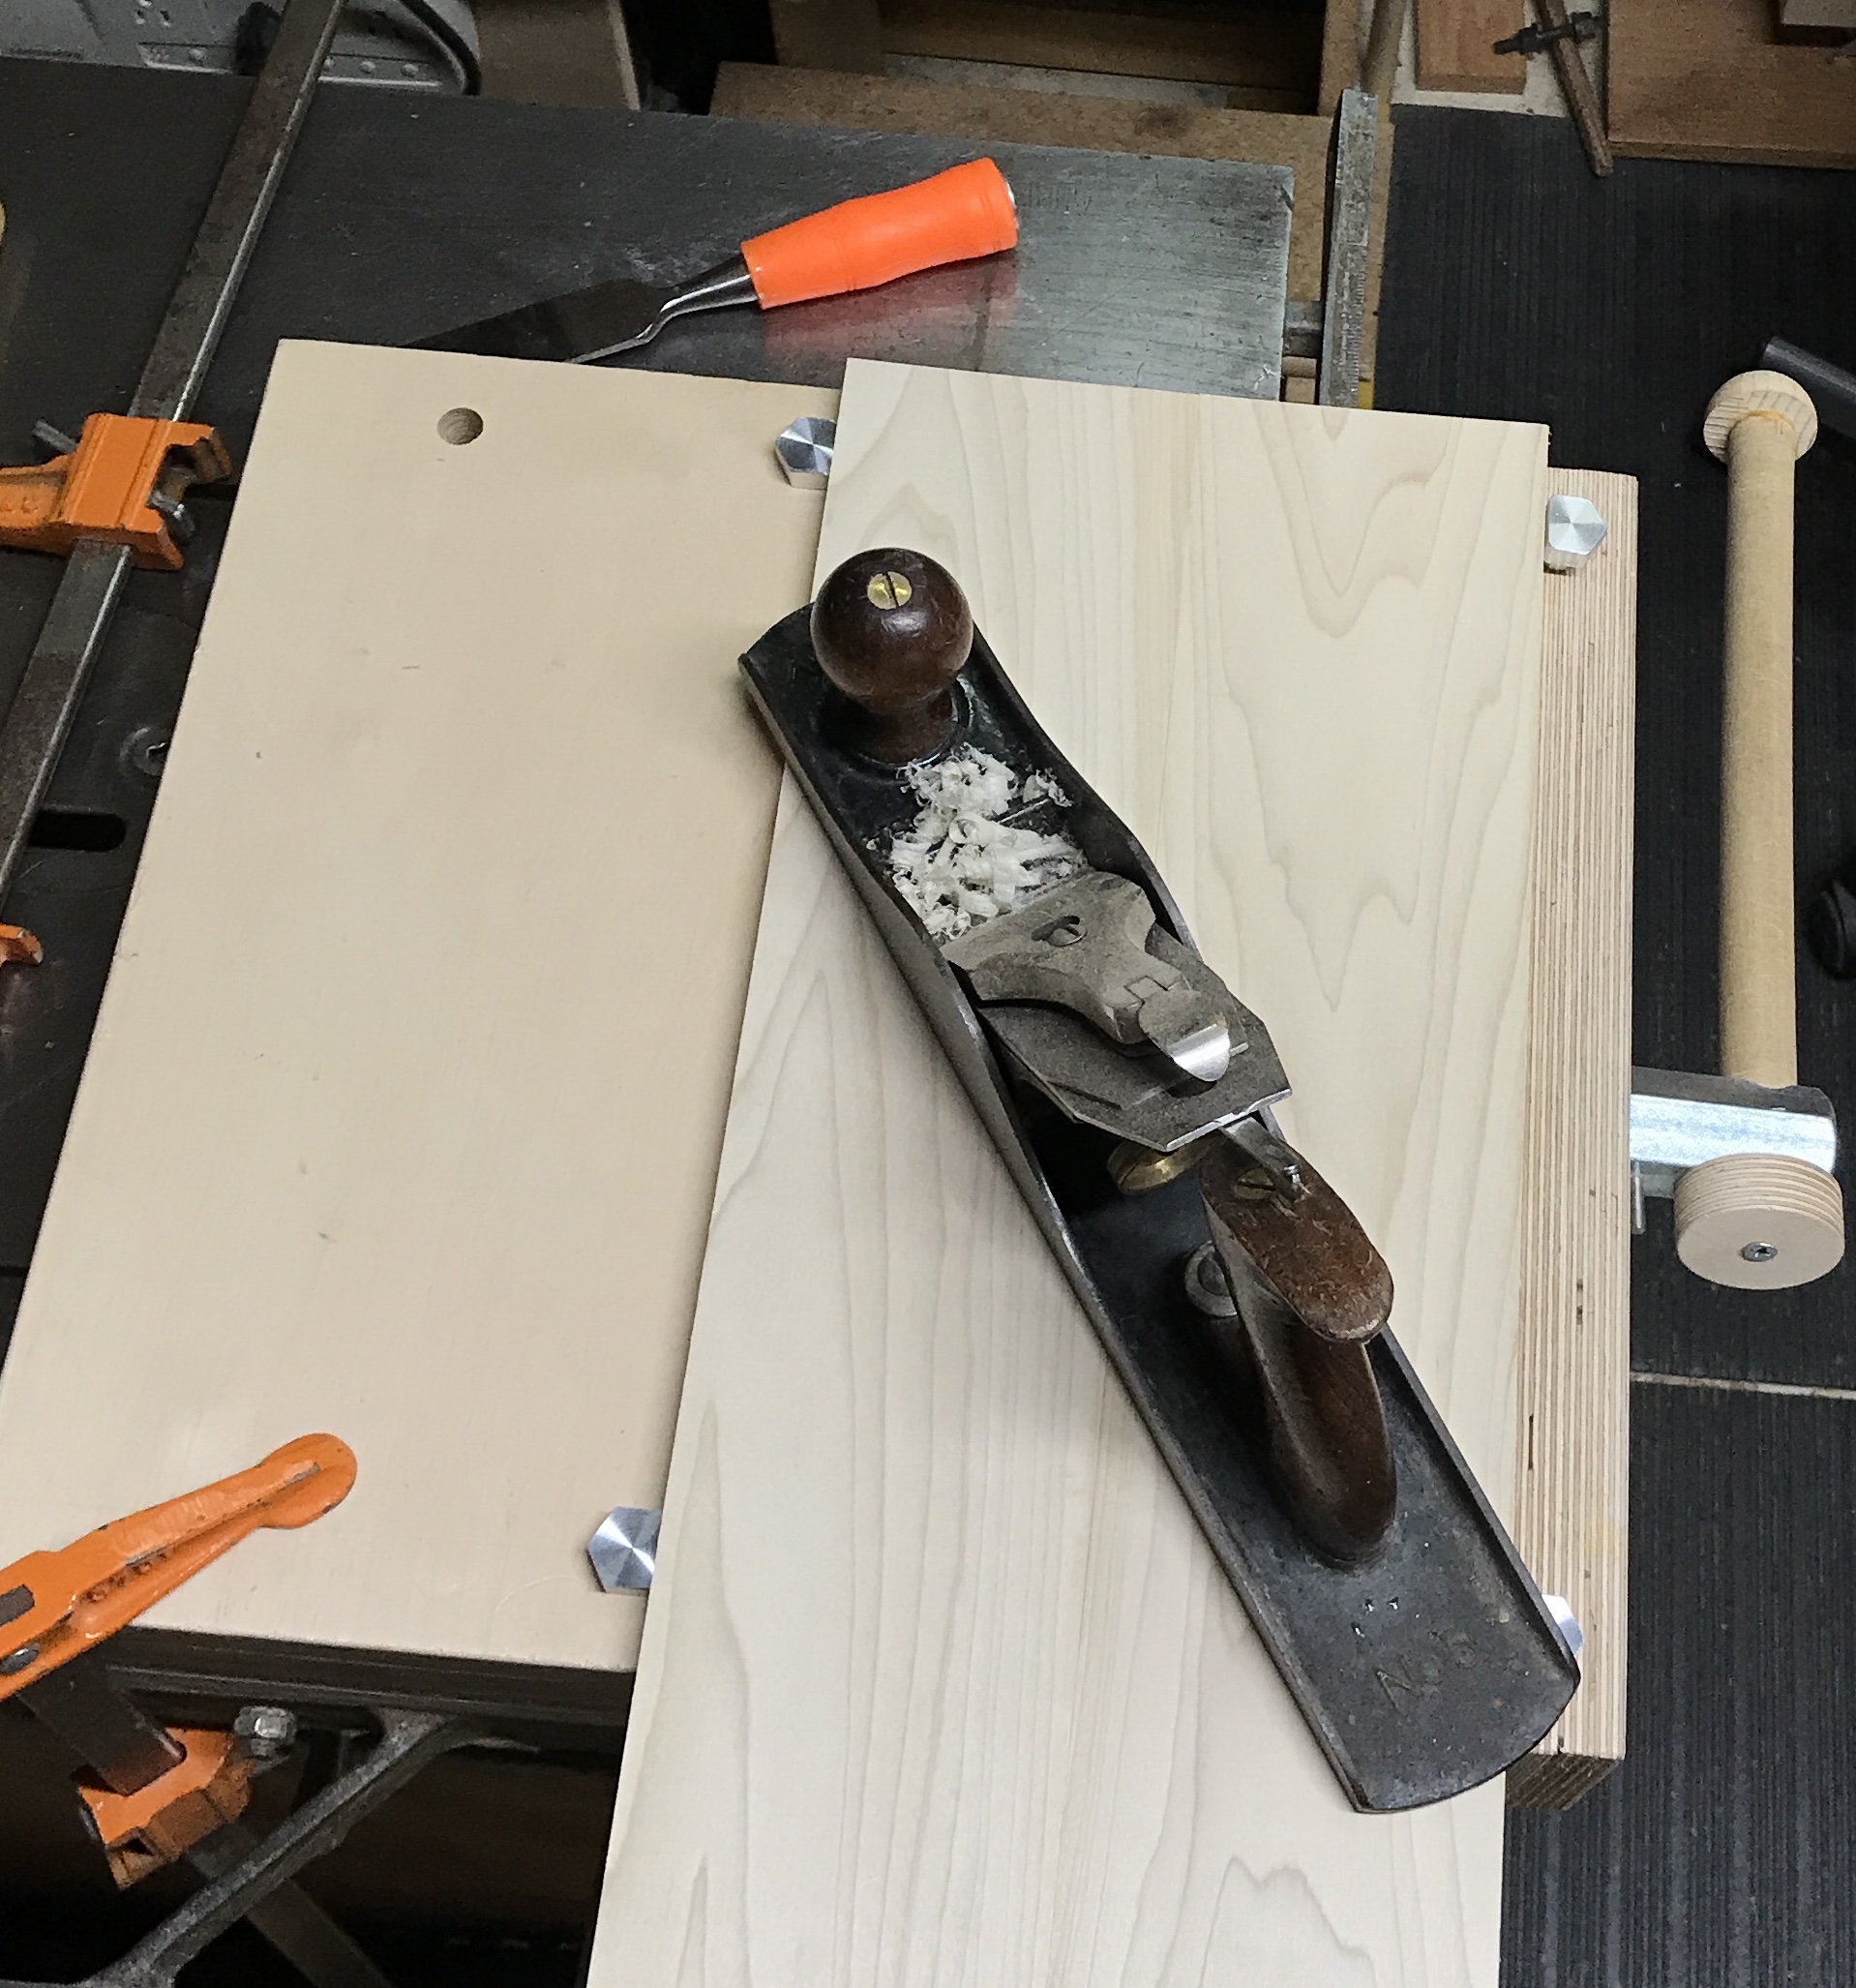
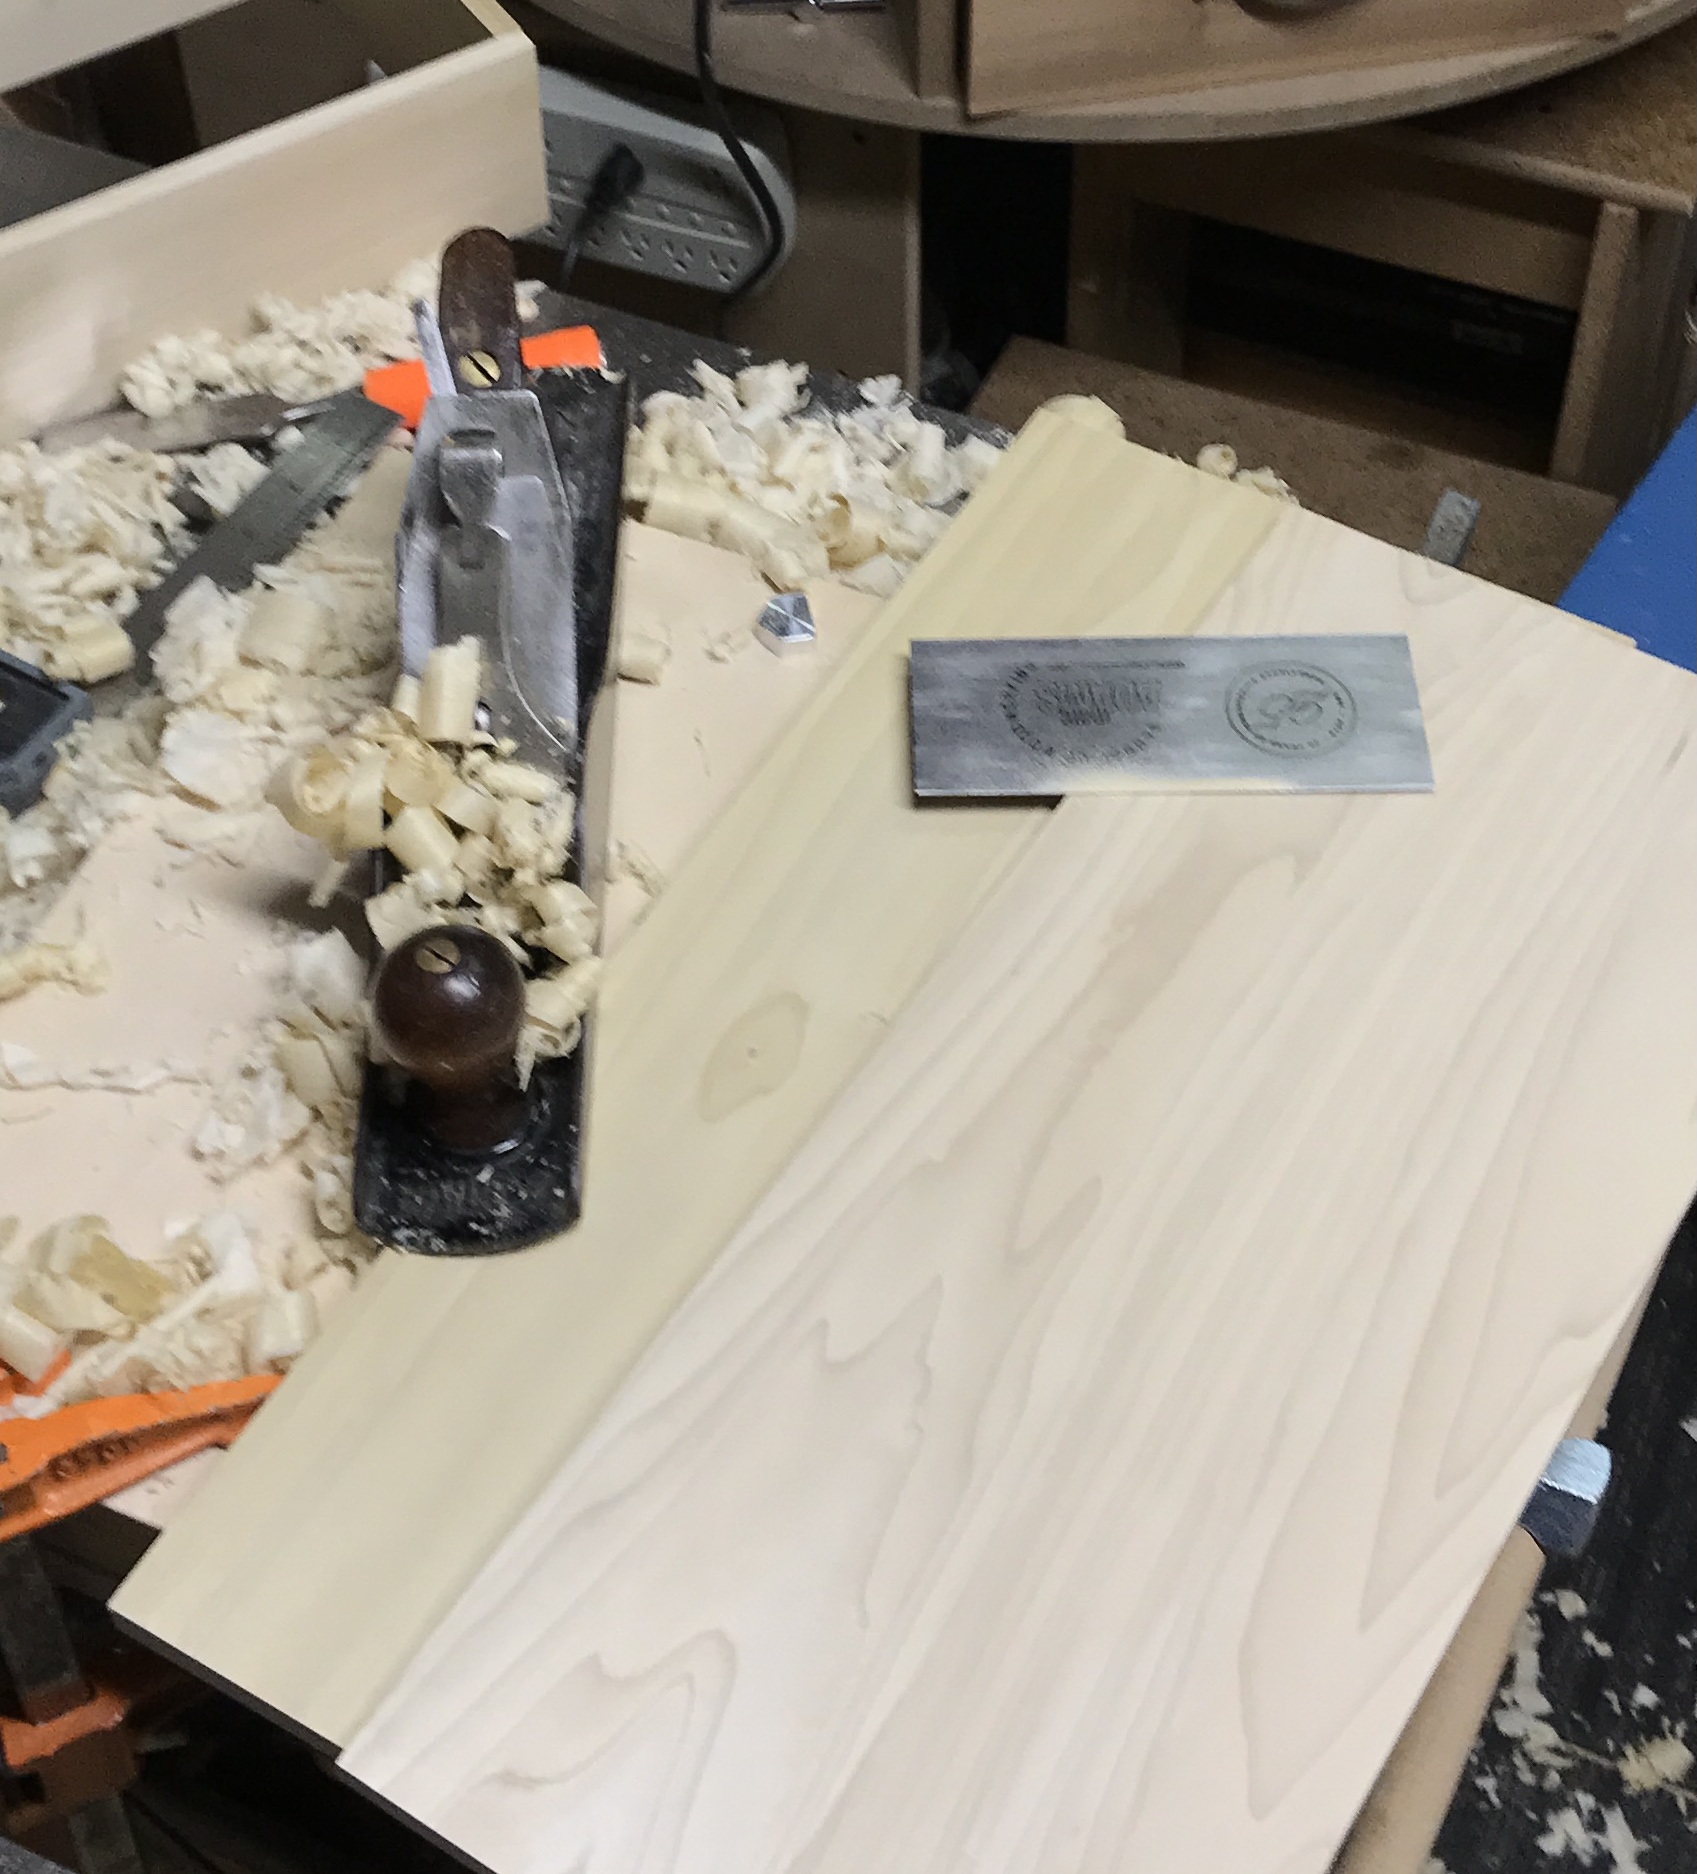
The homemade Sjöberg vise was used as shown in the photos above. Clamping the vise to the table was a challenge and not really solved by the approach above. What is needed are some clamp holes cut into the sides of the vise. This would be much more convenient and keep the clamps out of the way of the tools working the wood.
The next step is cutting the rabbets in the two just finished boards. The more I consider the order of steps, the more I am convinced to apply the veneer to the inside and outside faces of these boards prior to assembly. The assembly can be dry assembled to ensure a good fit. Putting the veneer on prior to assembly will be a much safer process. Then the box can be cut in half and the sides and edges veneered.
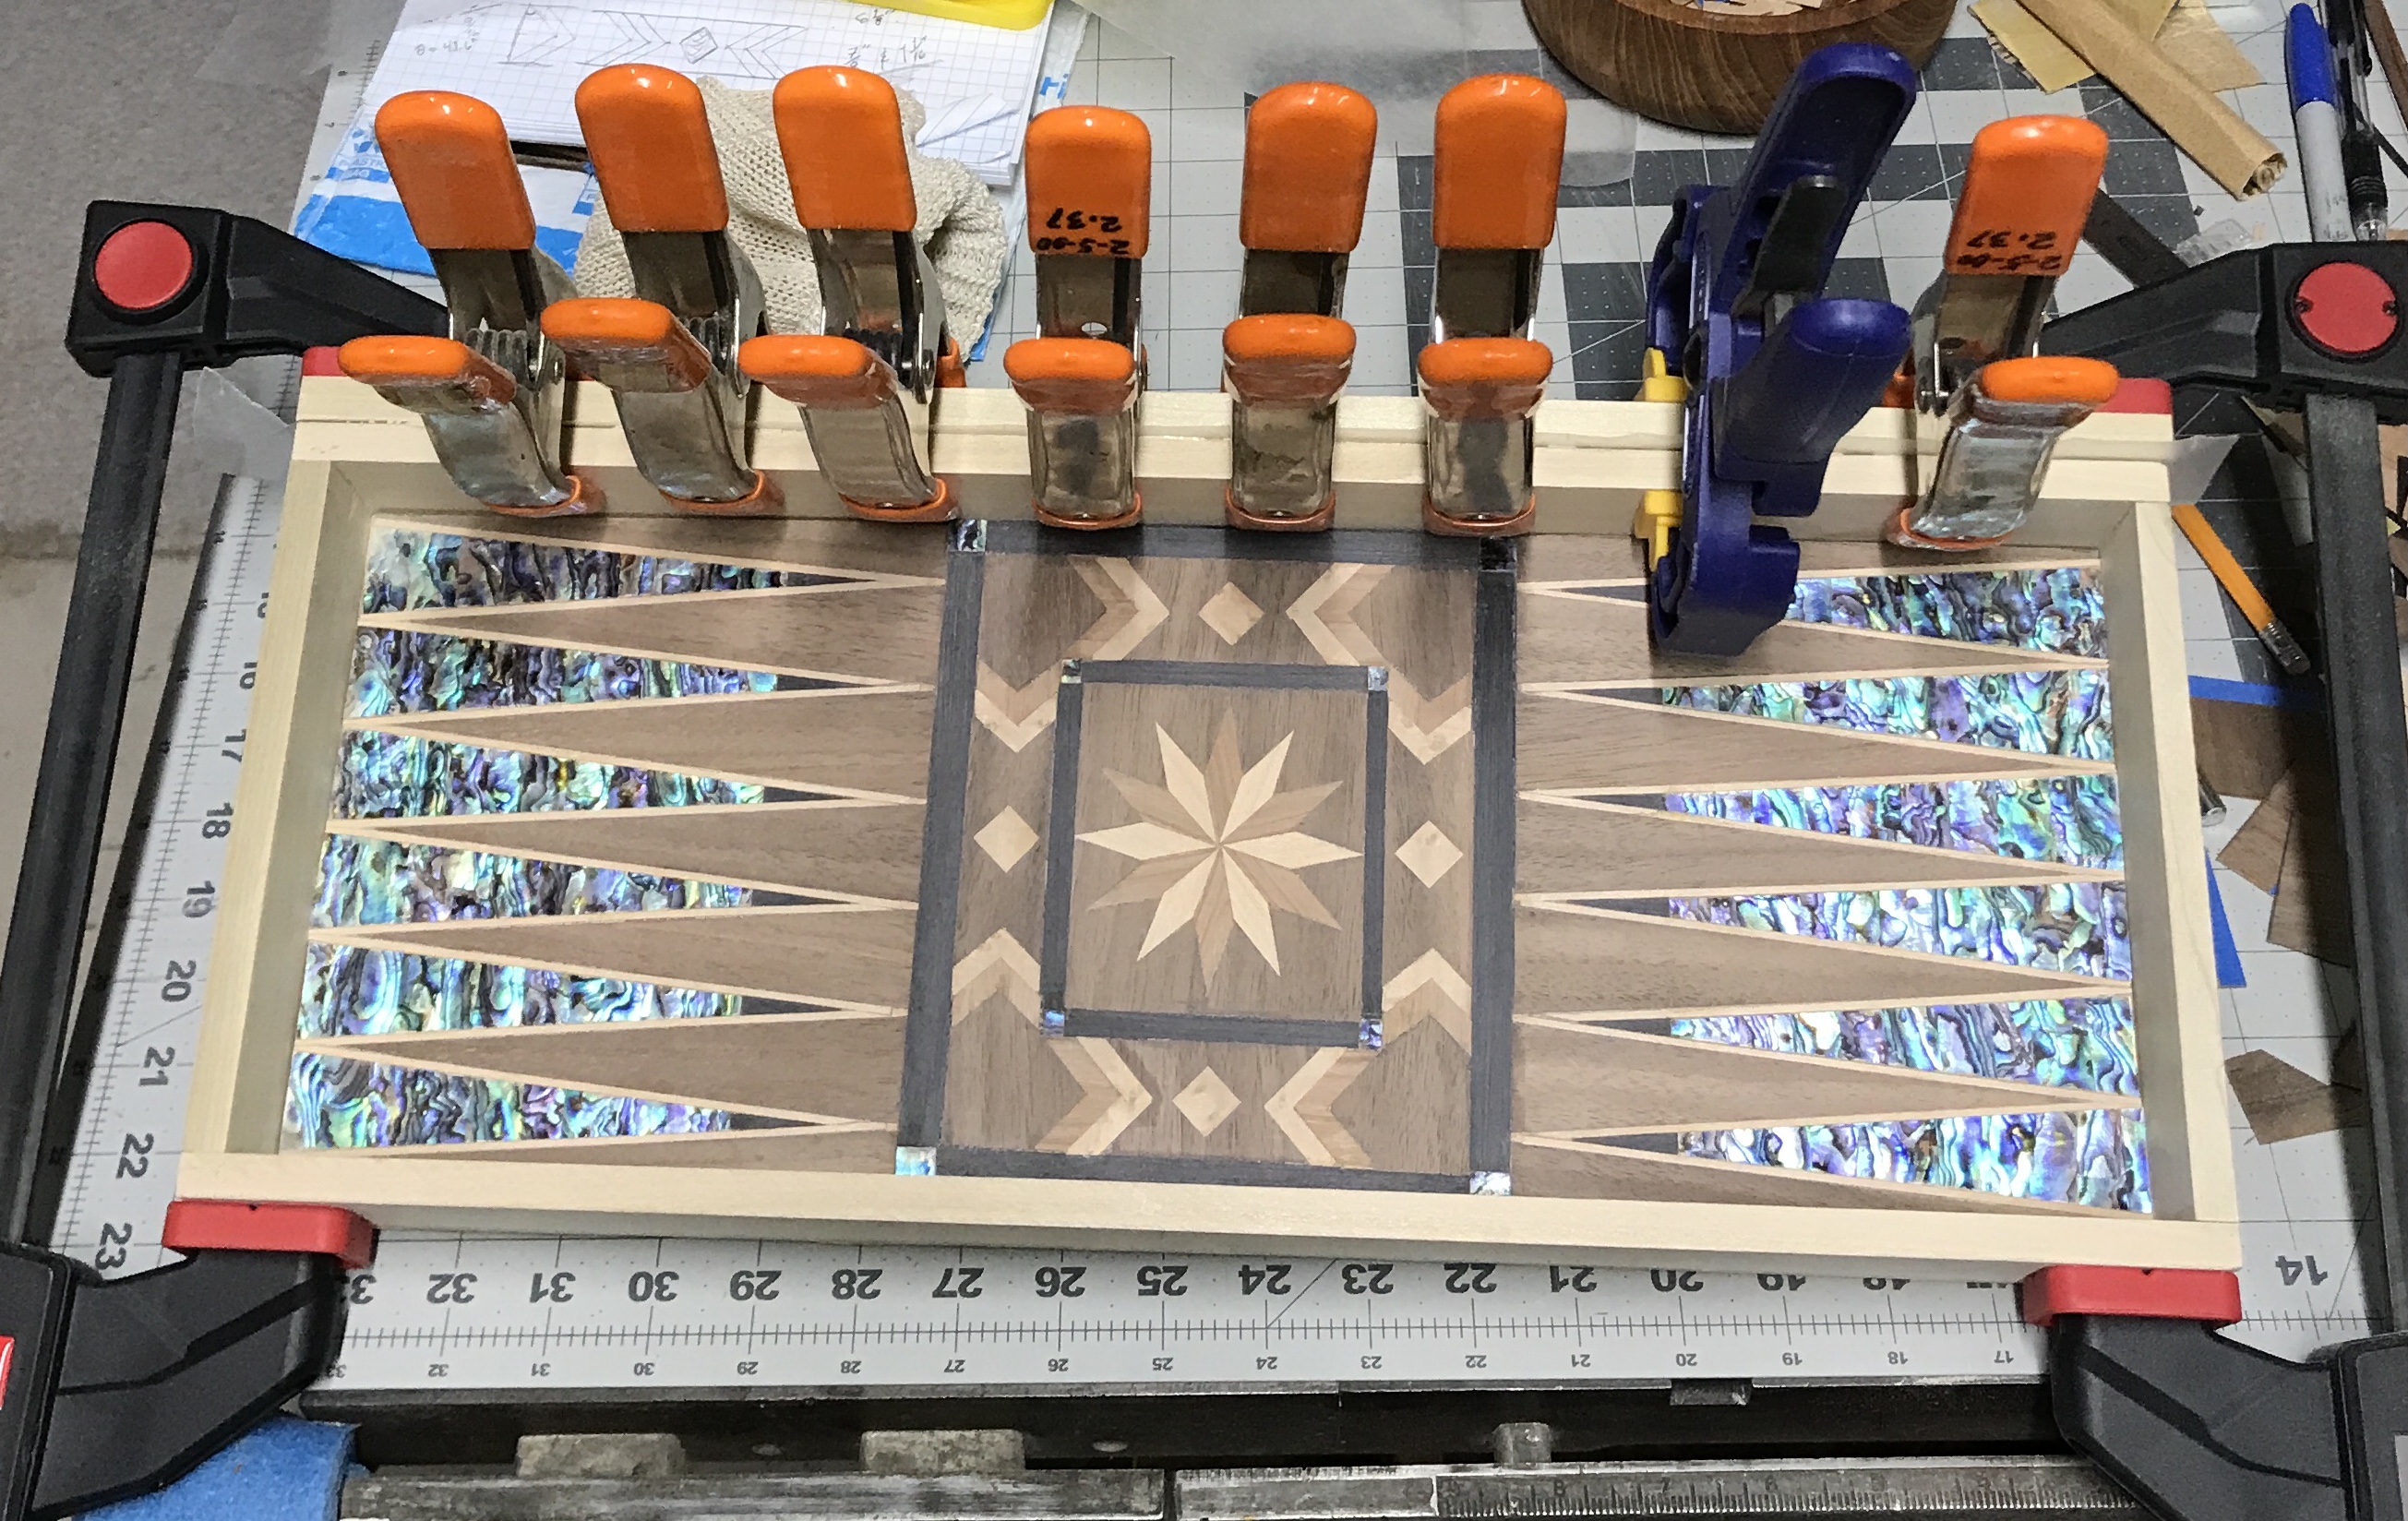
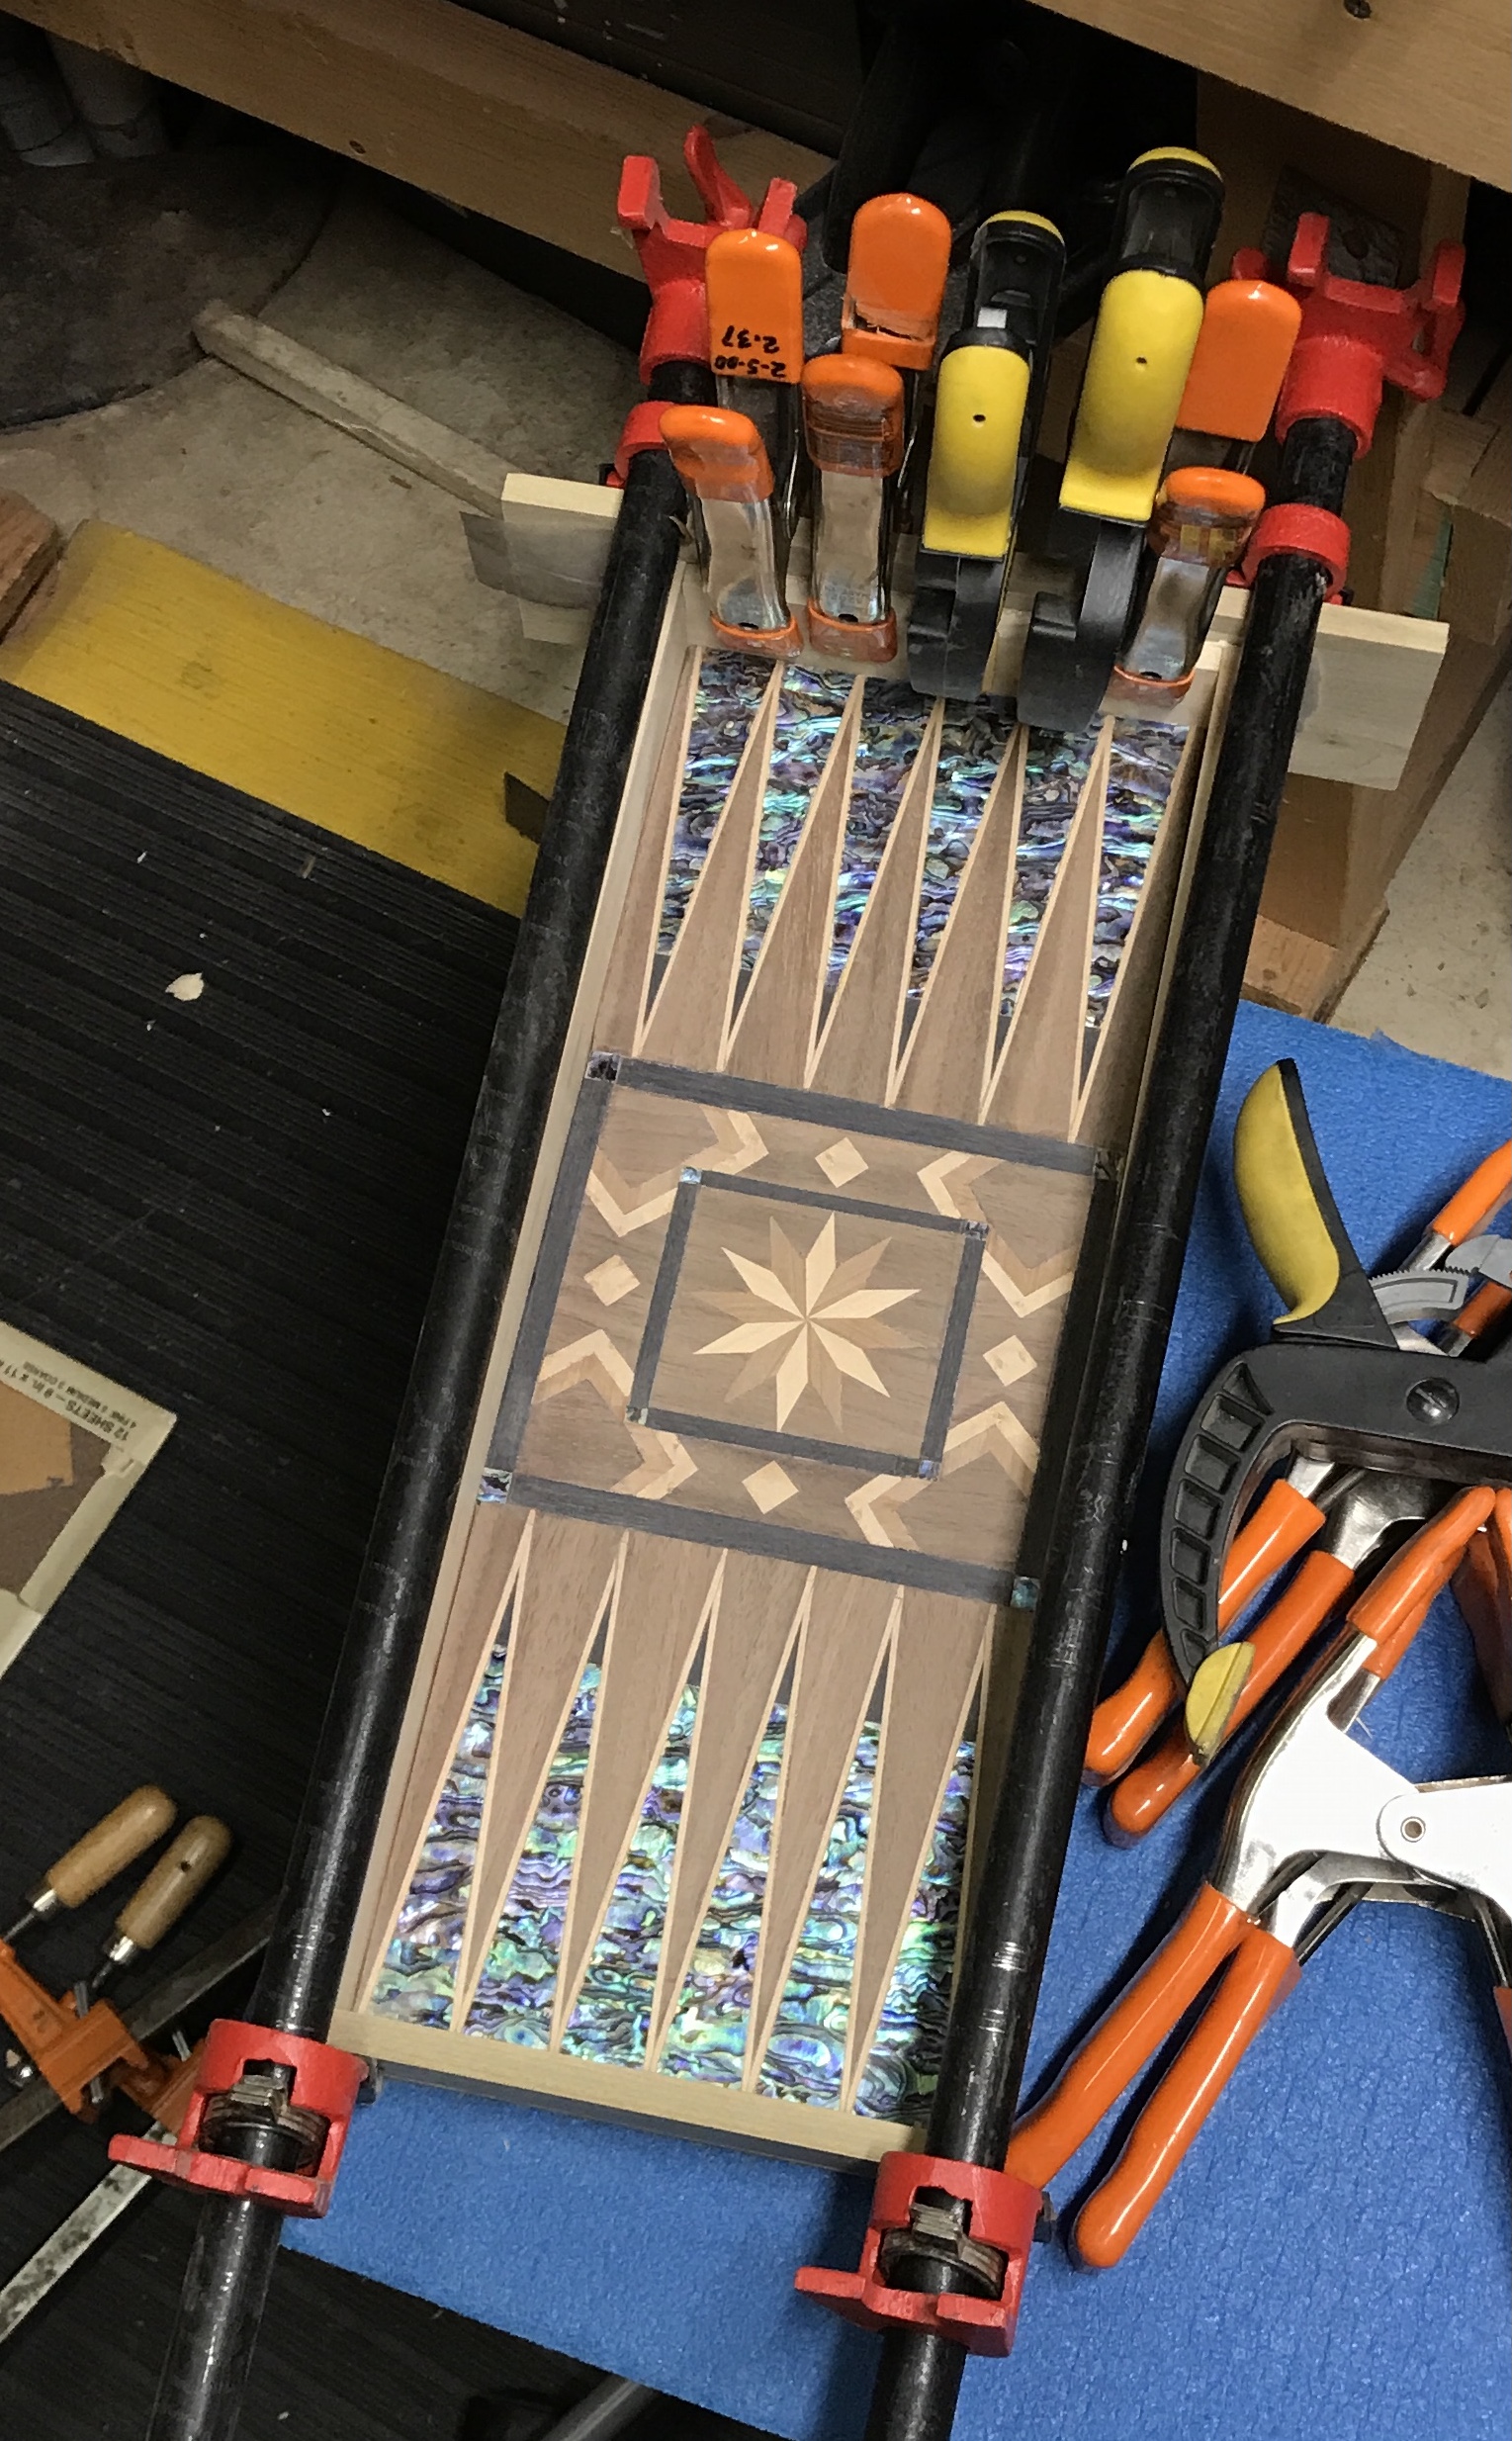
Over the past three days, while sick with a bad cold, I worked on designs for the area between the points. The six points are 1 1/8" wide and 6" long. These were laid out on two sheets of graph paper taped together. The points that will have pieces on them, "on points", may be two different colors. It is common to alternate the color of points. The plan for the points, though not sketched out, is to cut them out to fit as shown between the "out points". These two sets of points will be separated by very thin, 1/16", strips of contrasting veneer. Either the out points will be shortened or the corresponding inner bounding box sides will be narrowed to fit.
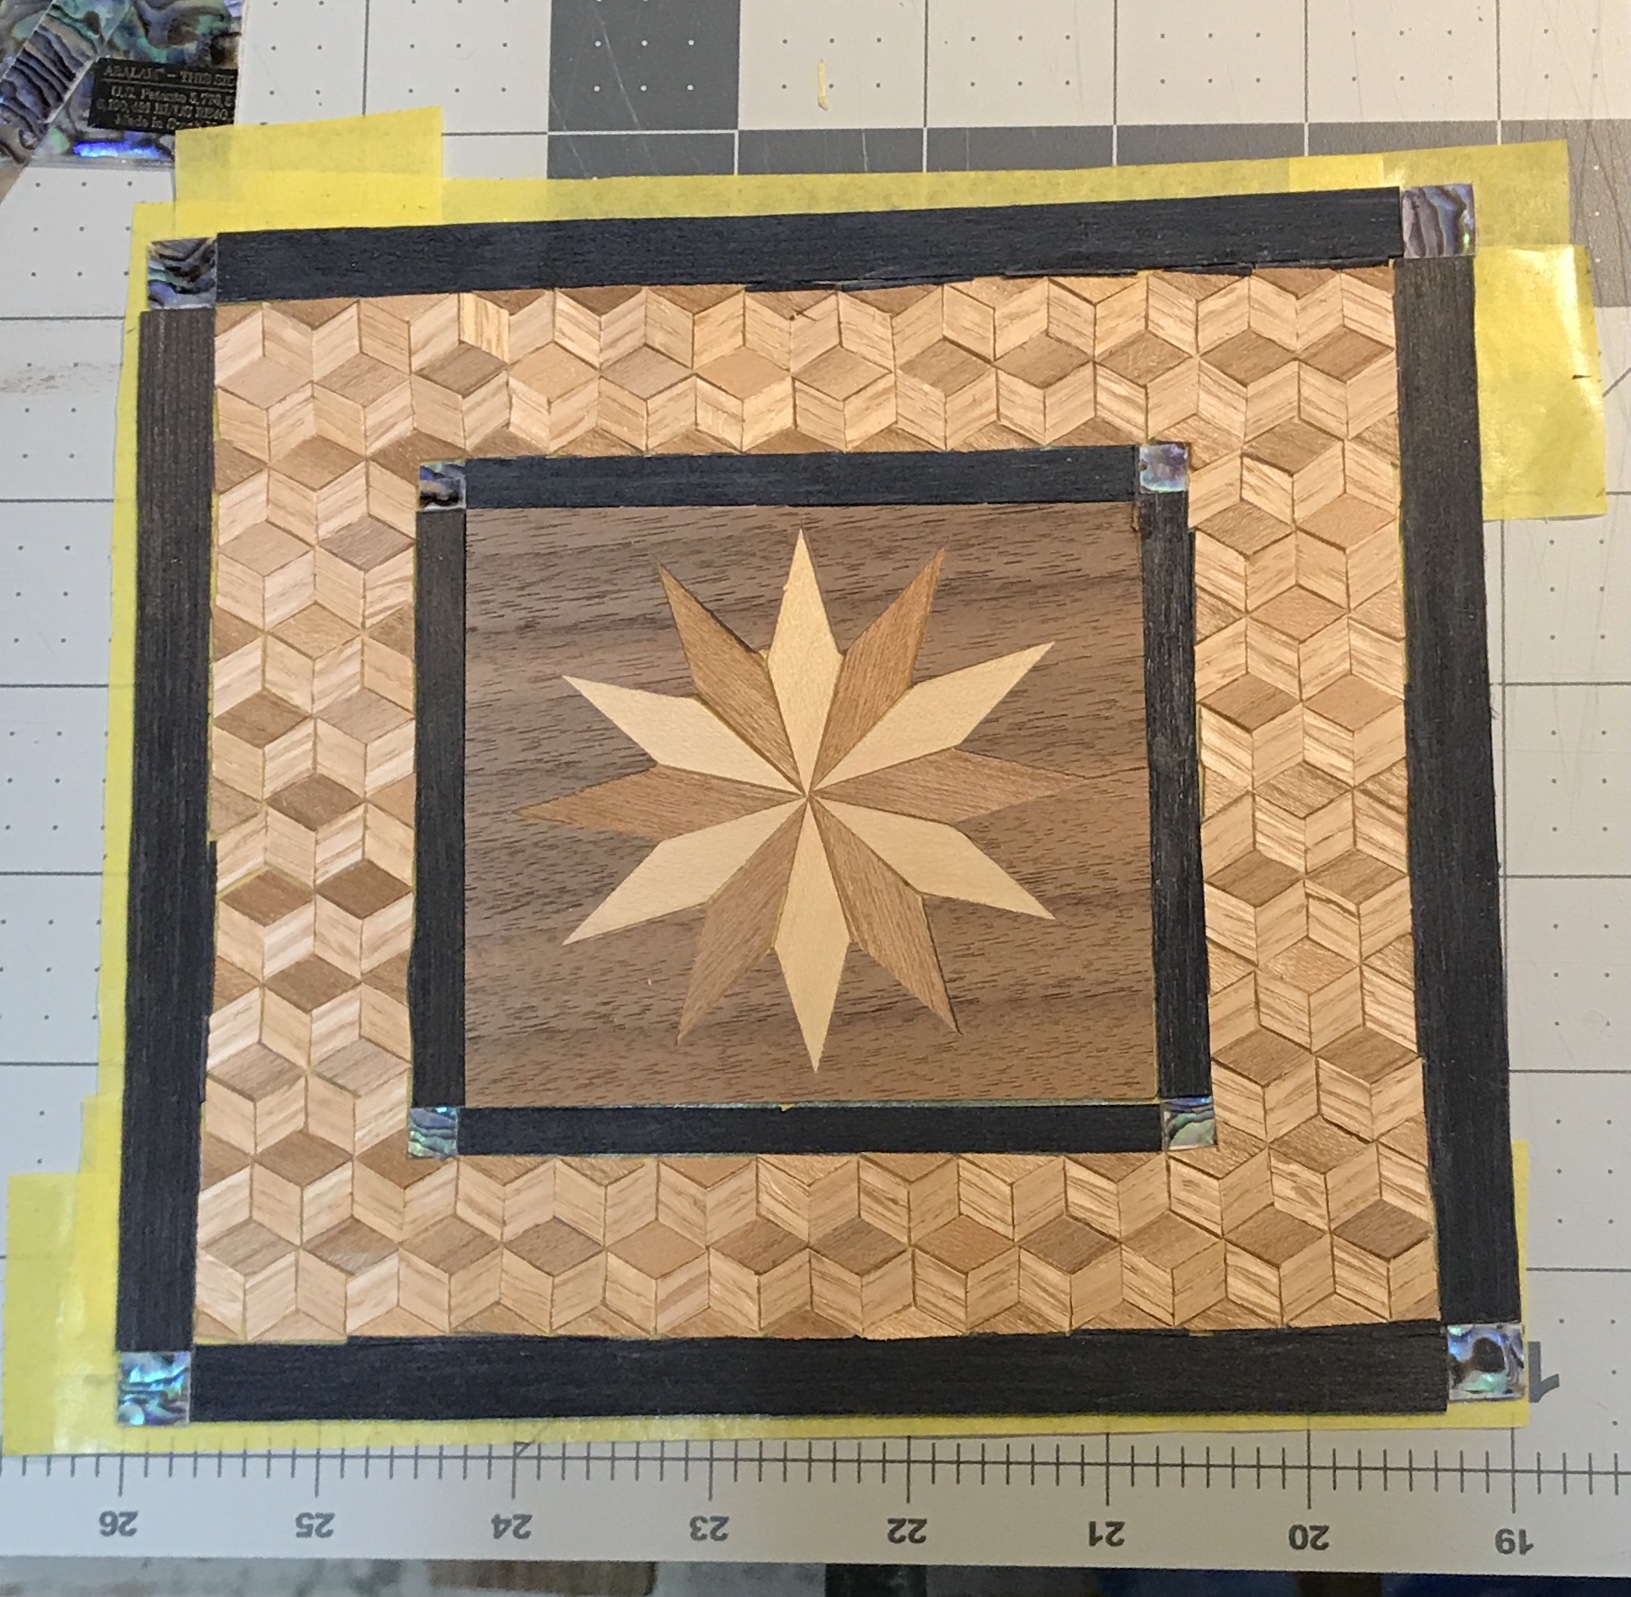
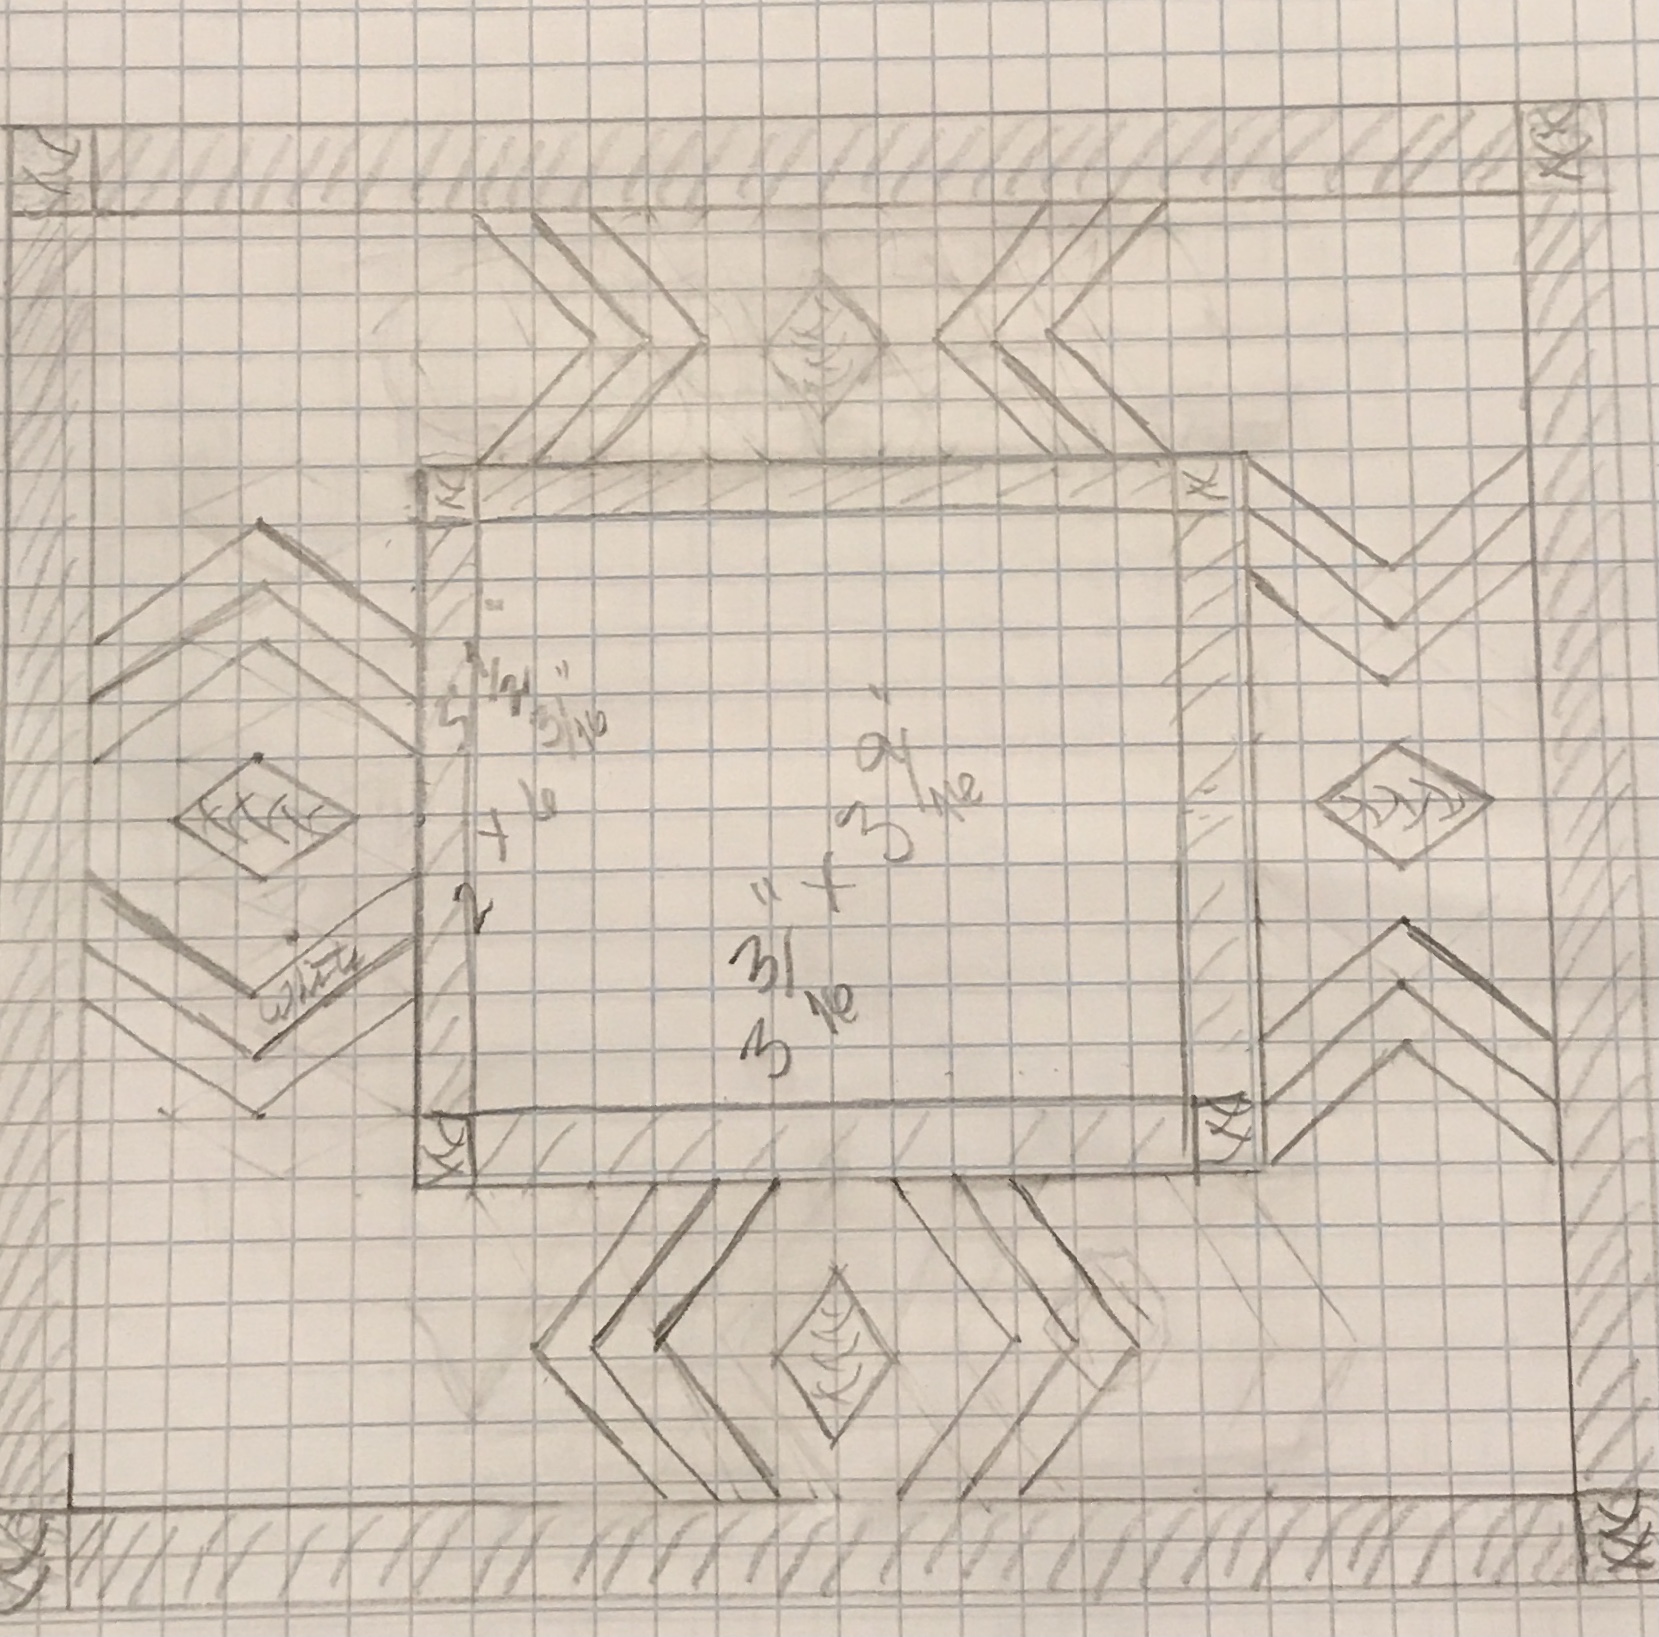
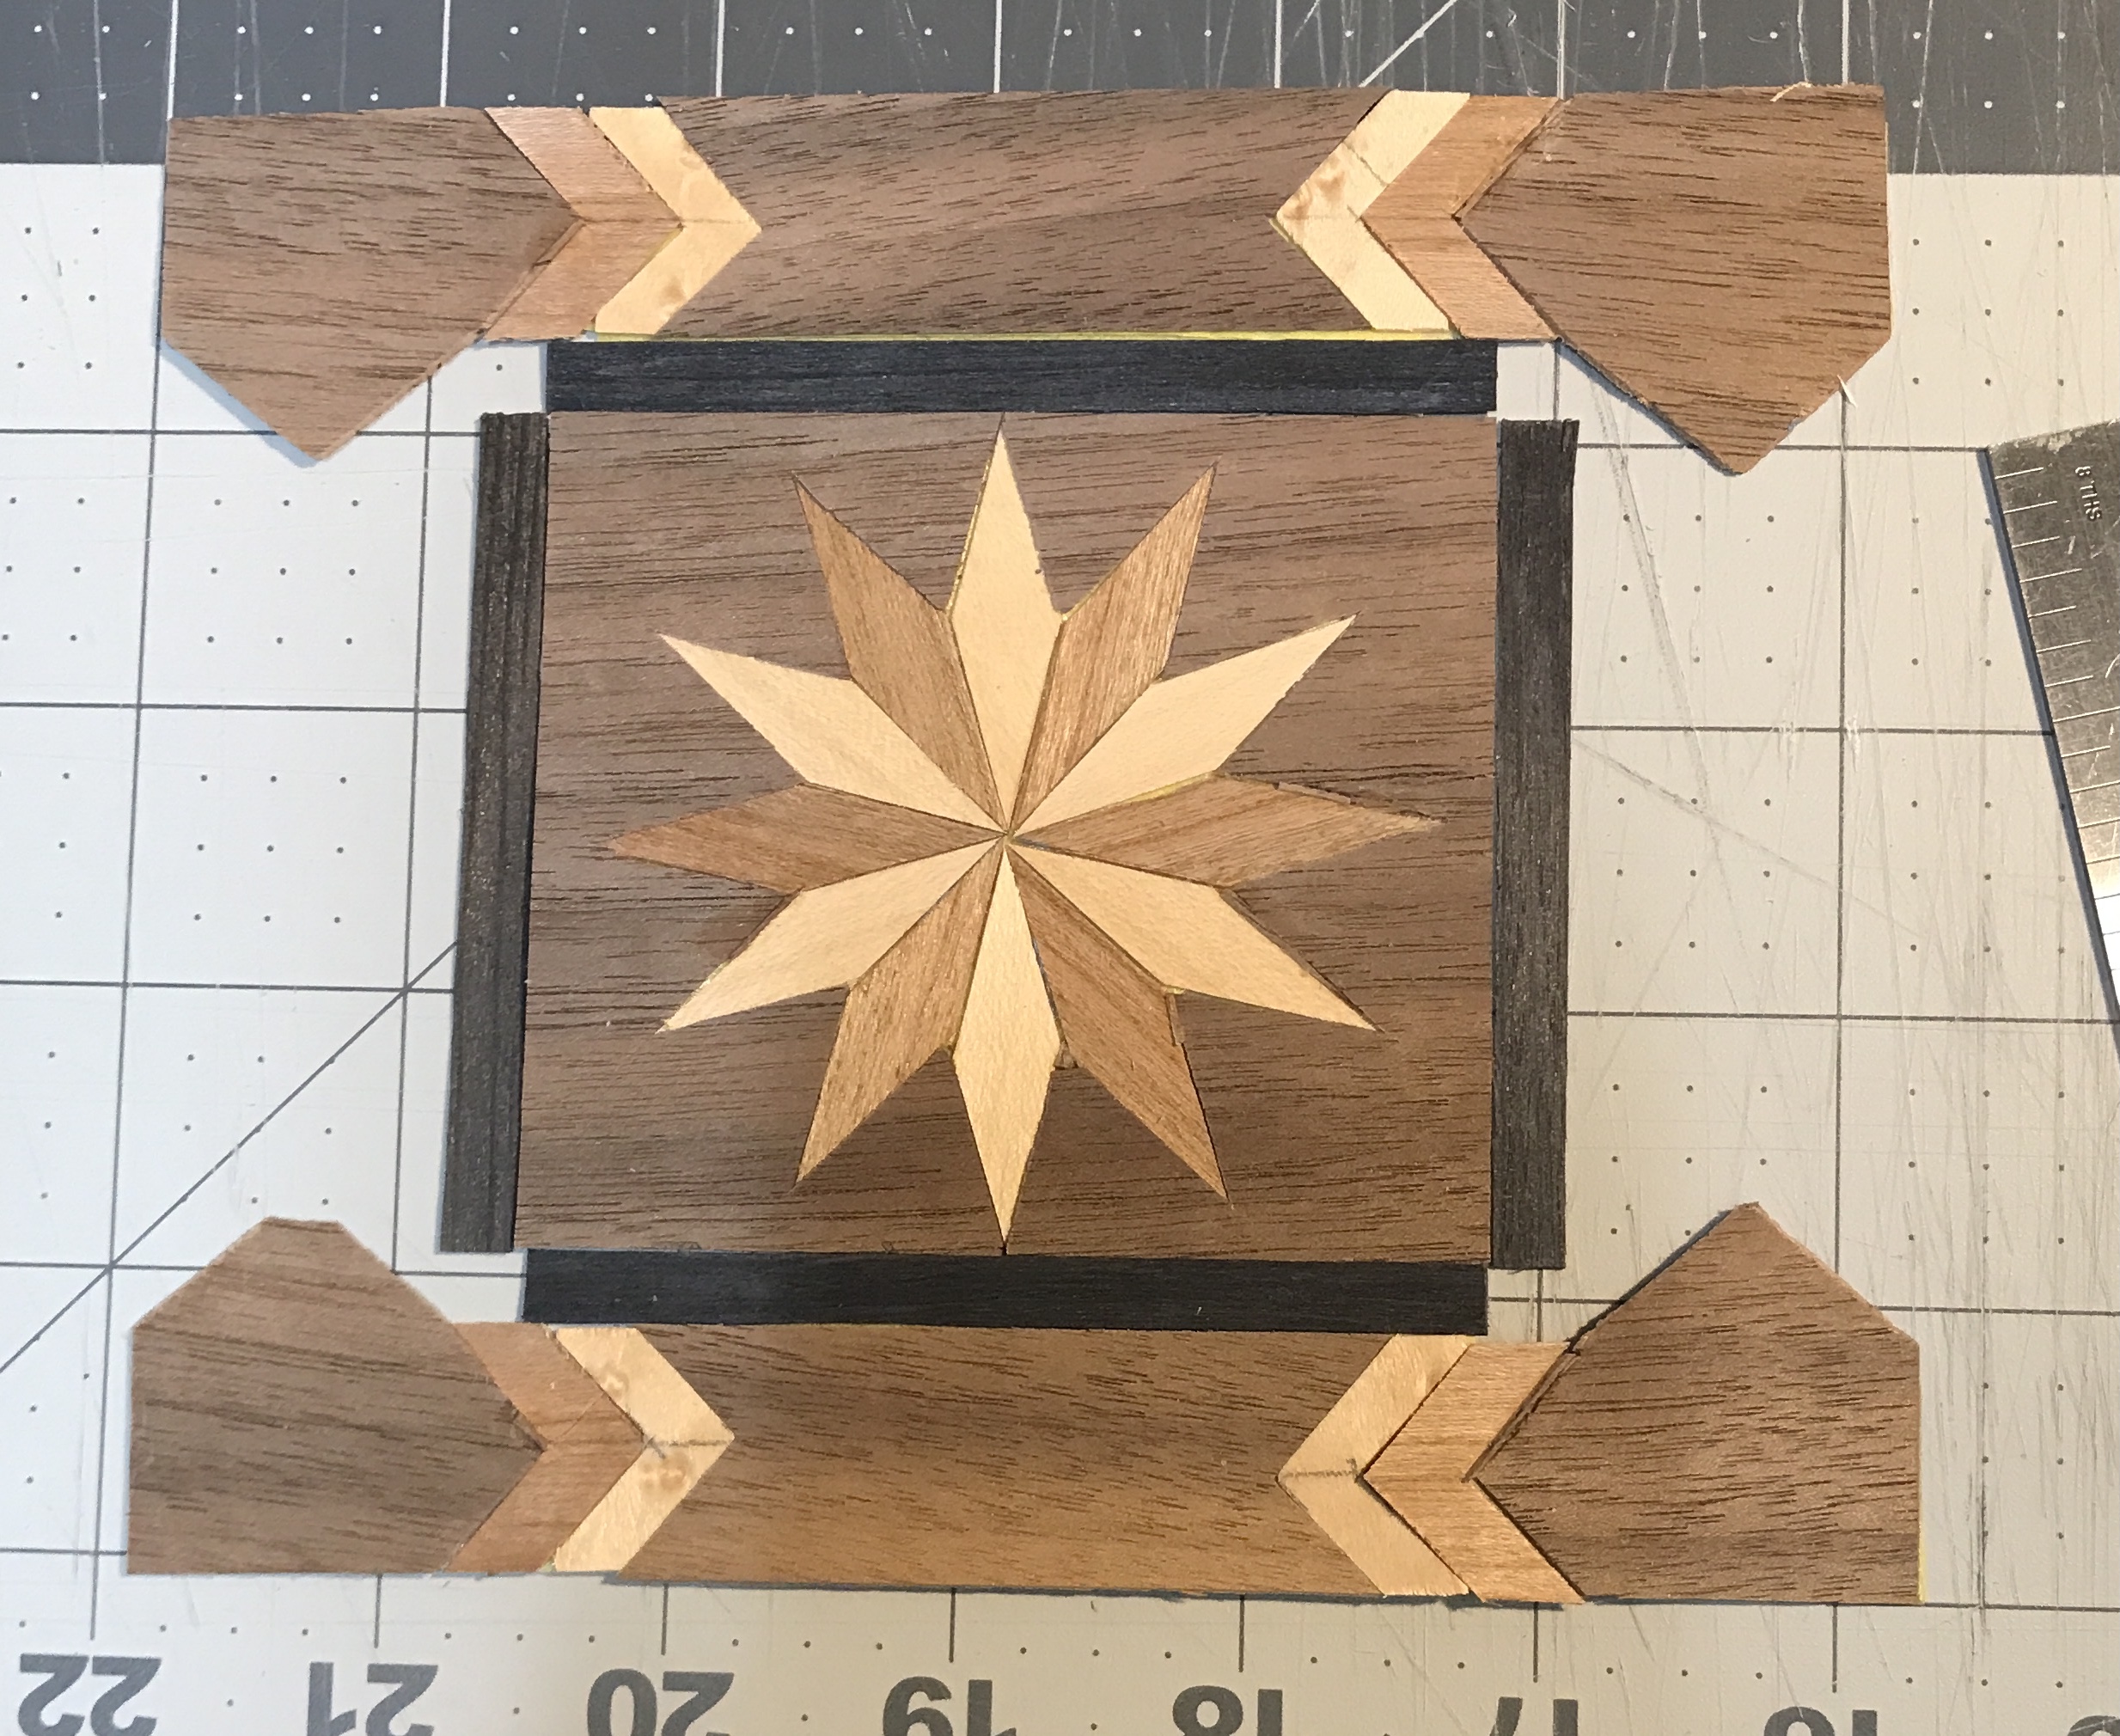
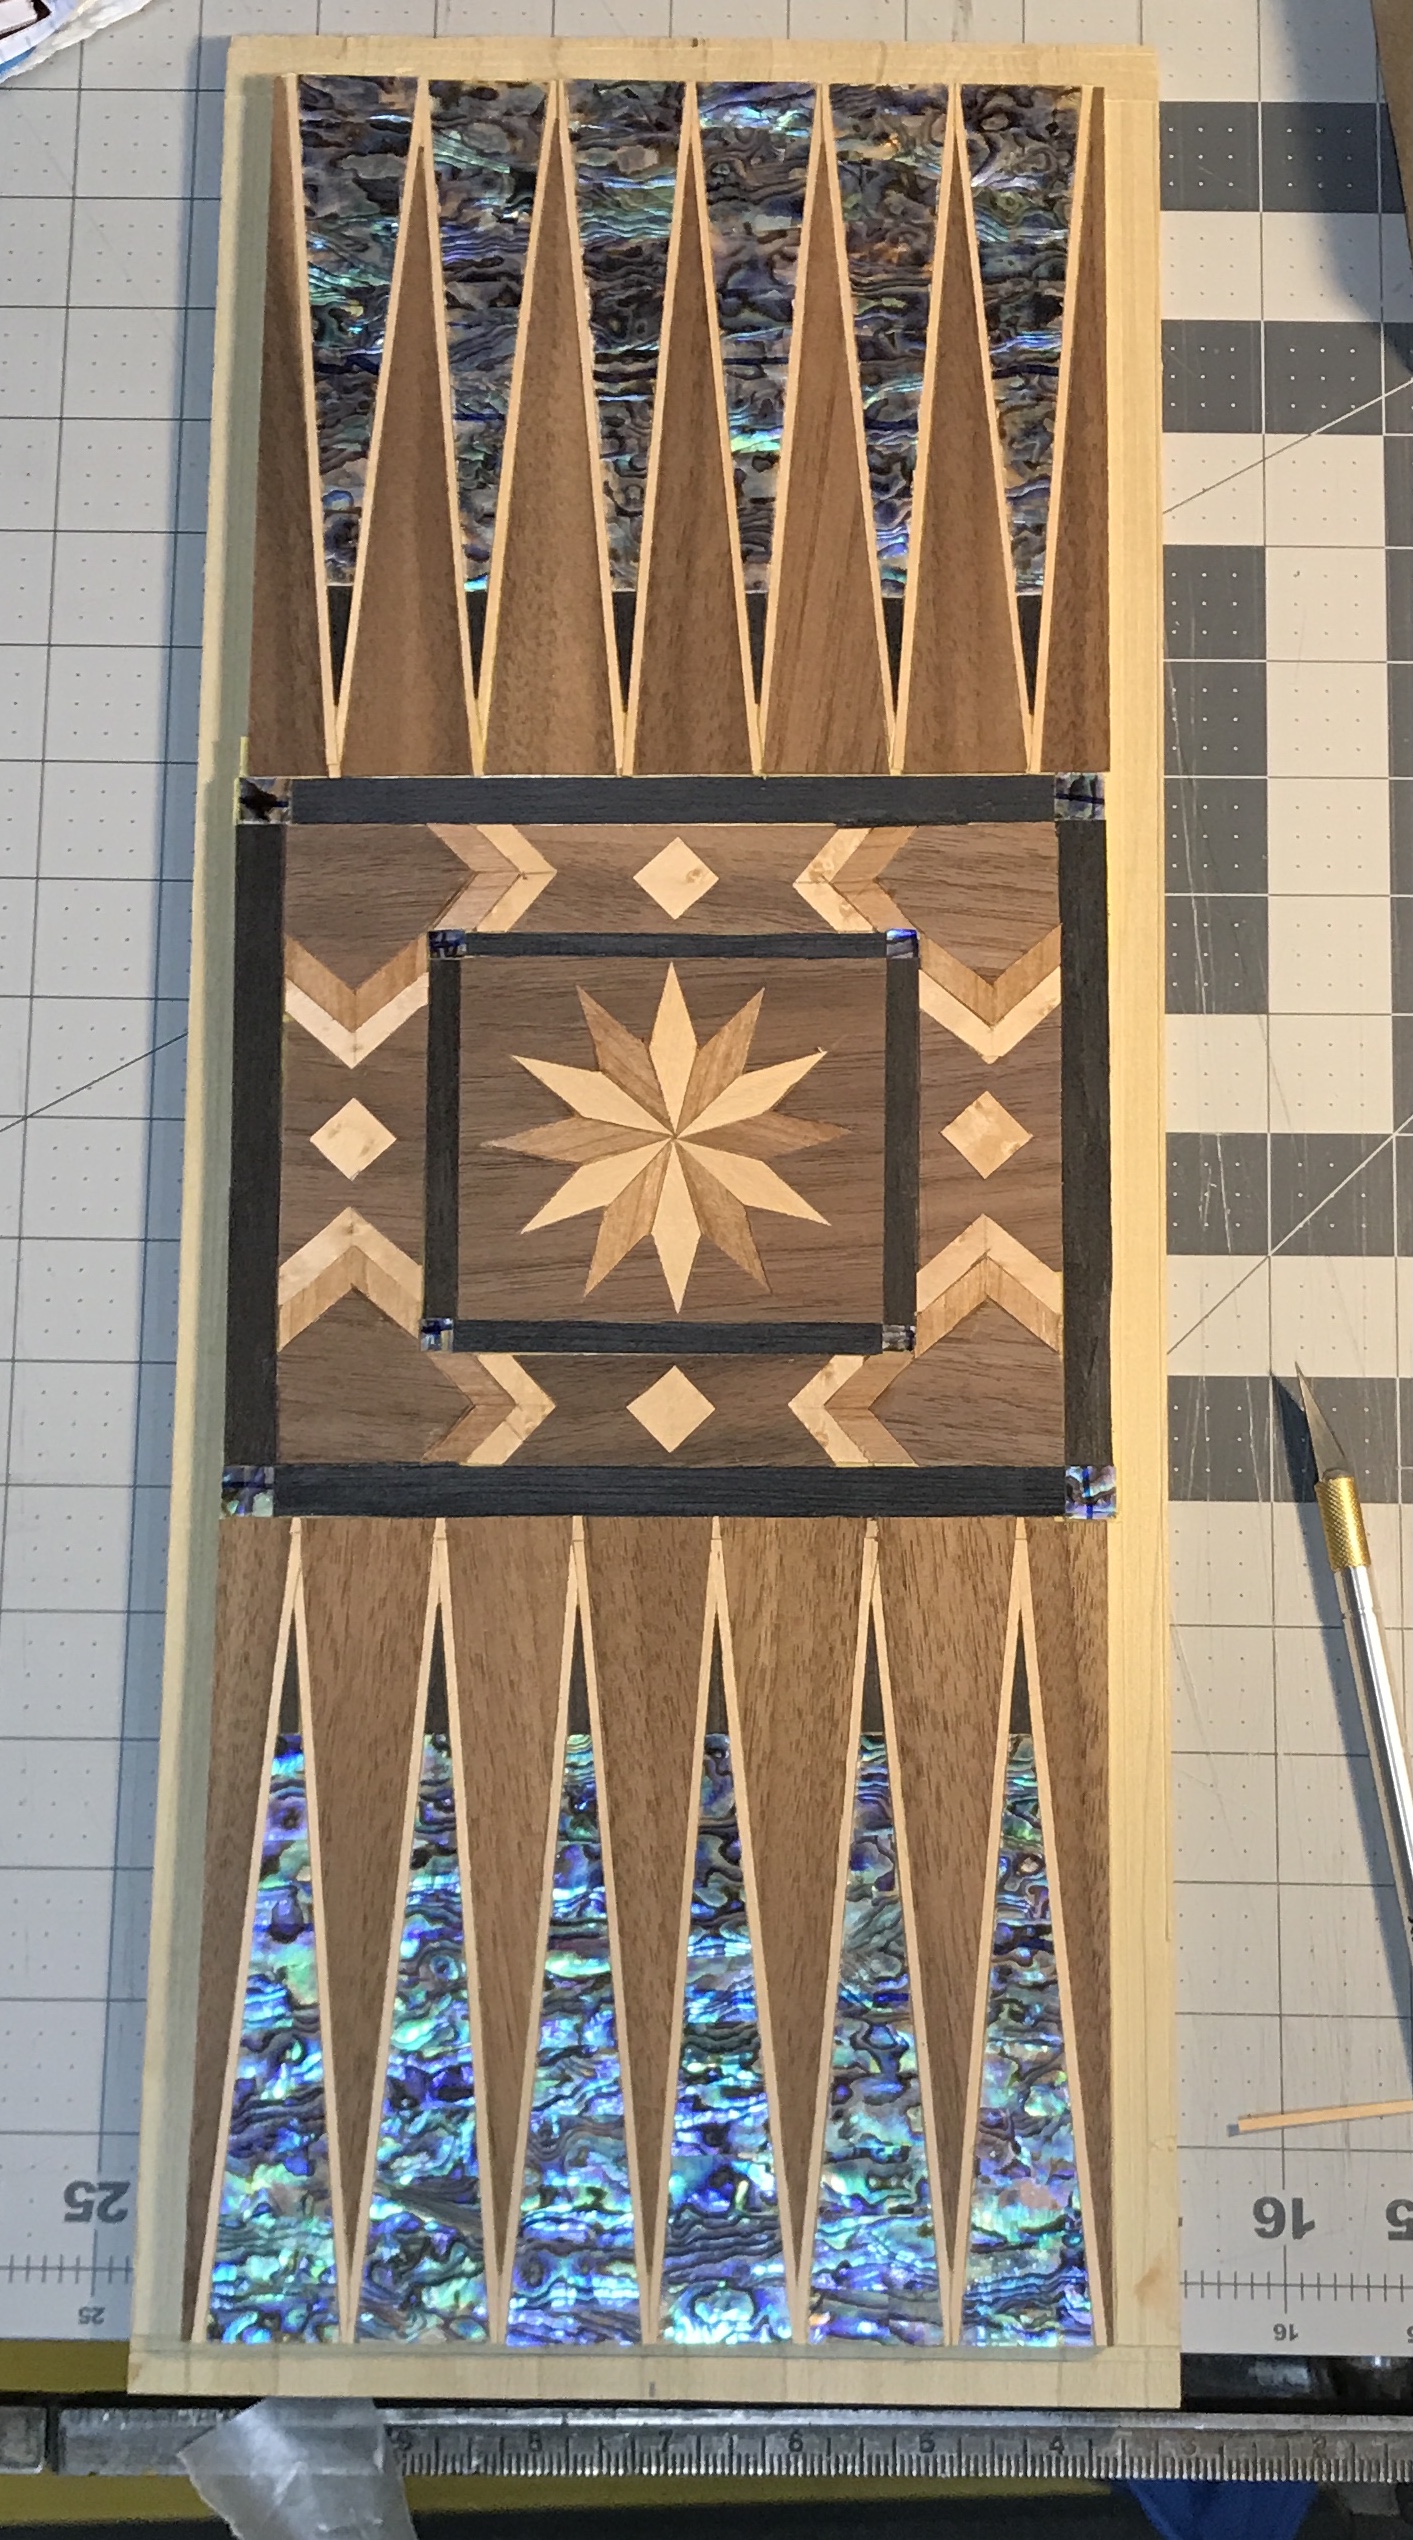
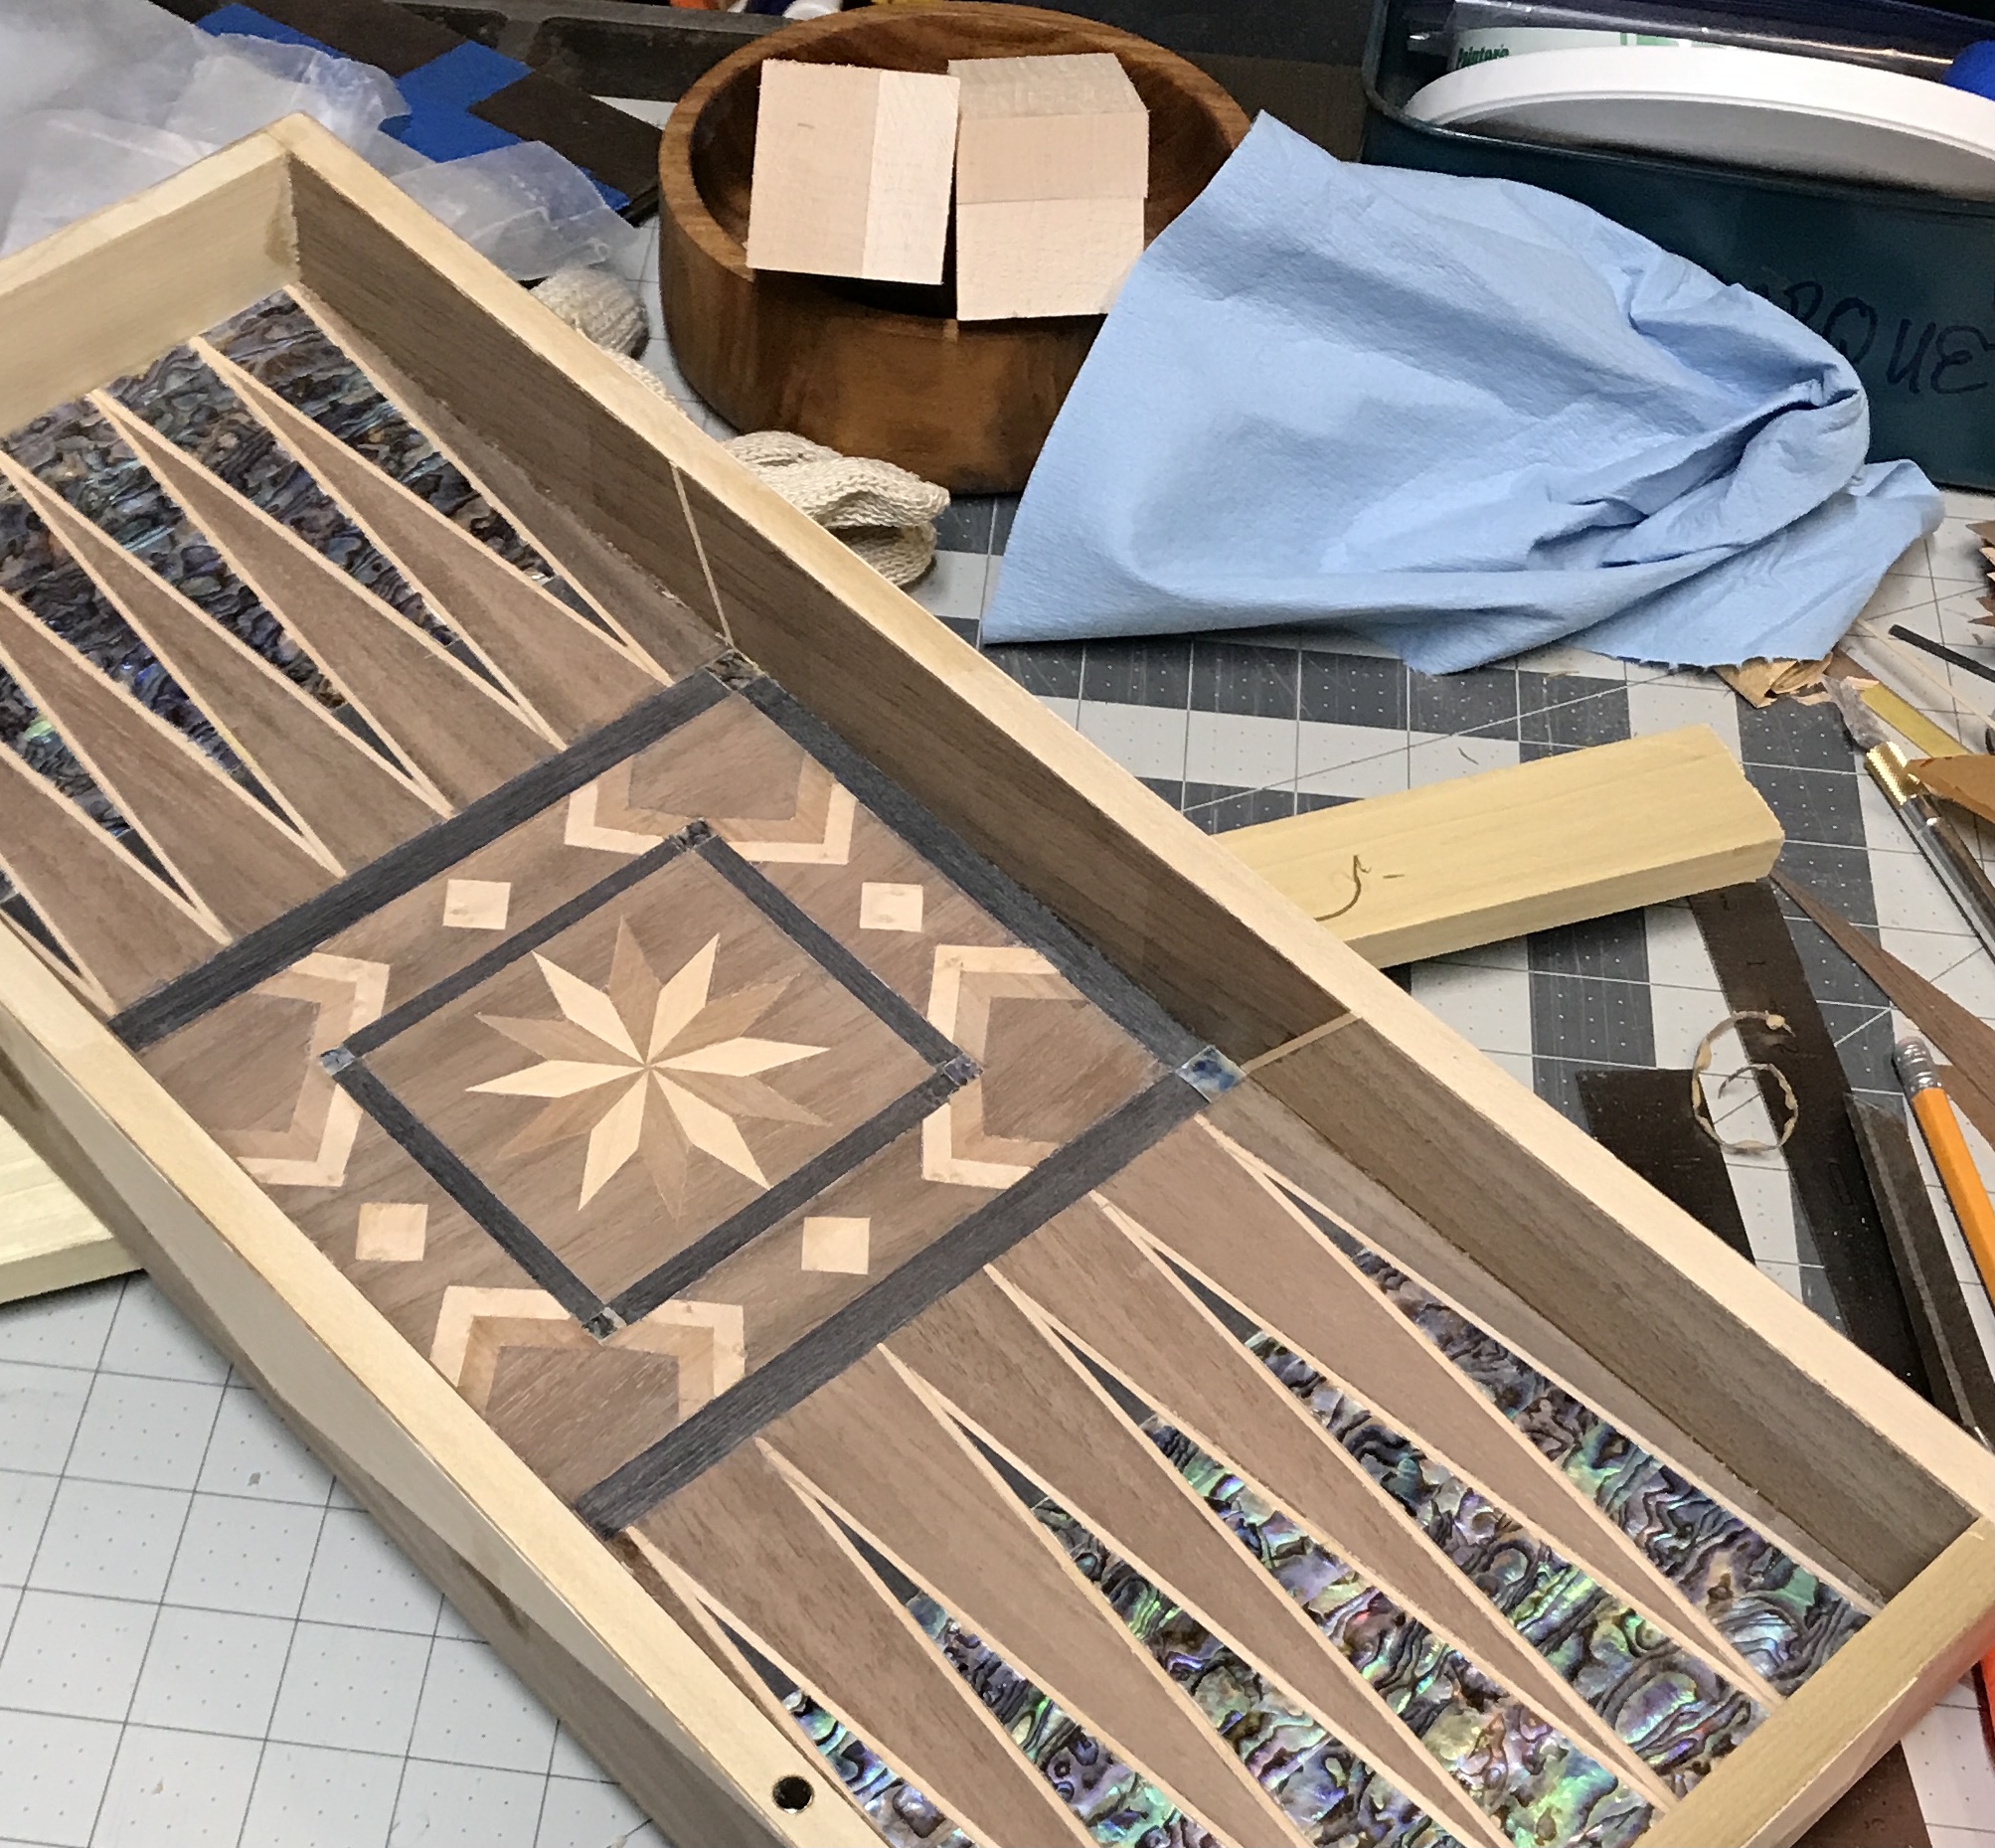
The central area as shown below will have a 1/4" bounding box. This reduces the area to be filled to 5 1/2" X 6 1/4". A 1" wide frame will contain some repeating design and the center will be as shown. It might be a bit fancier with four smaller points added around the star.
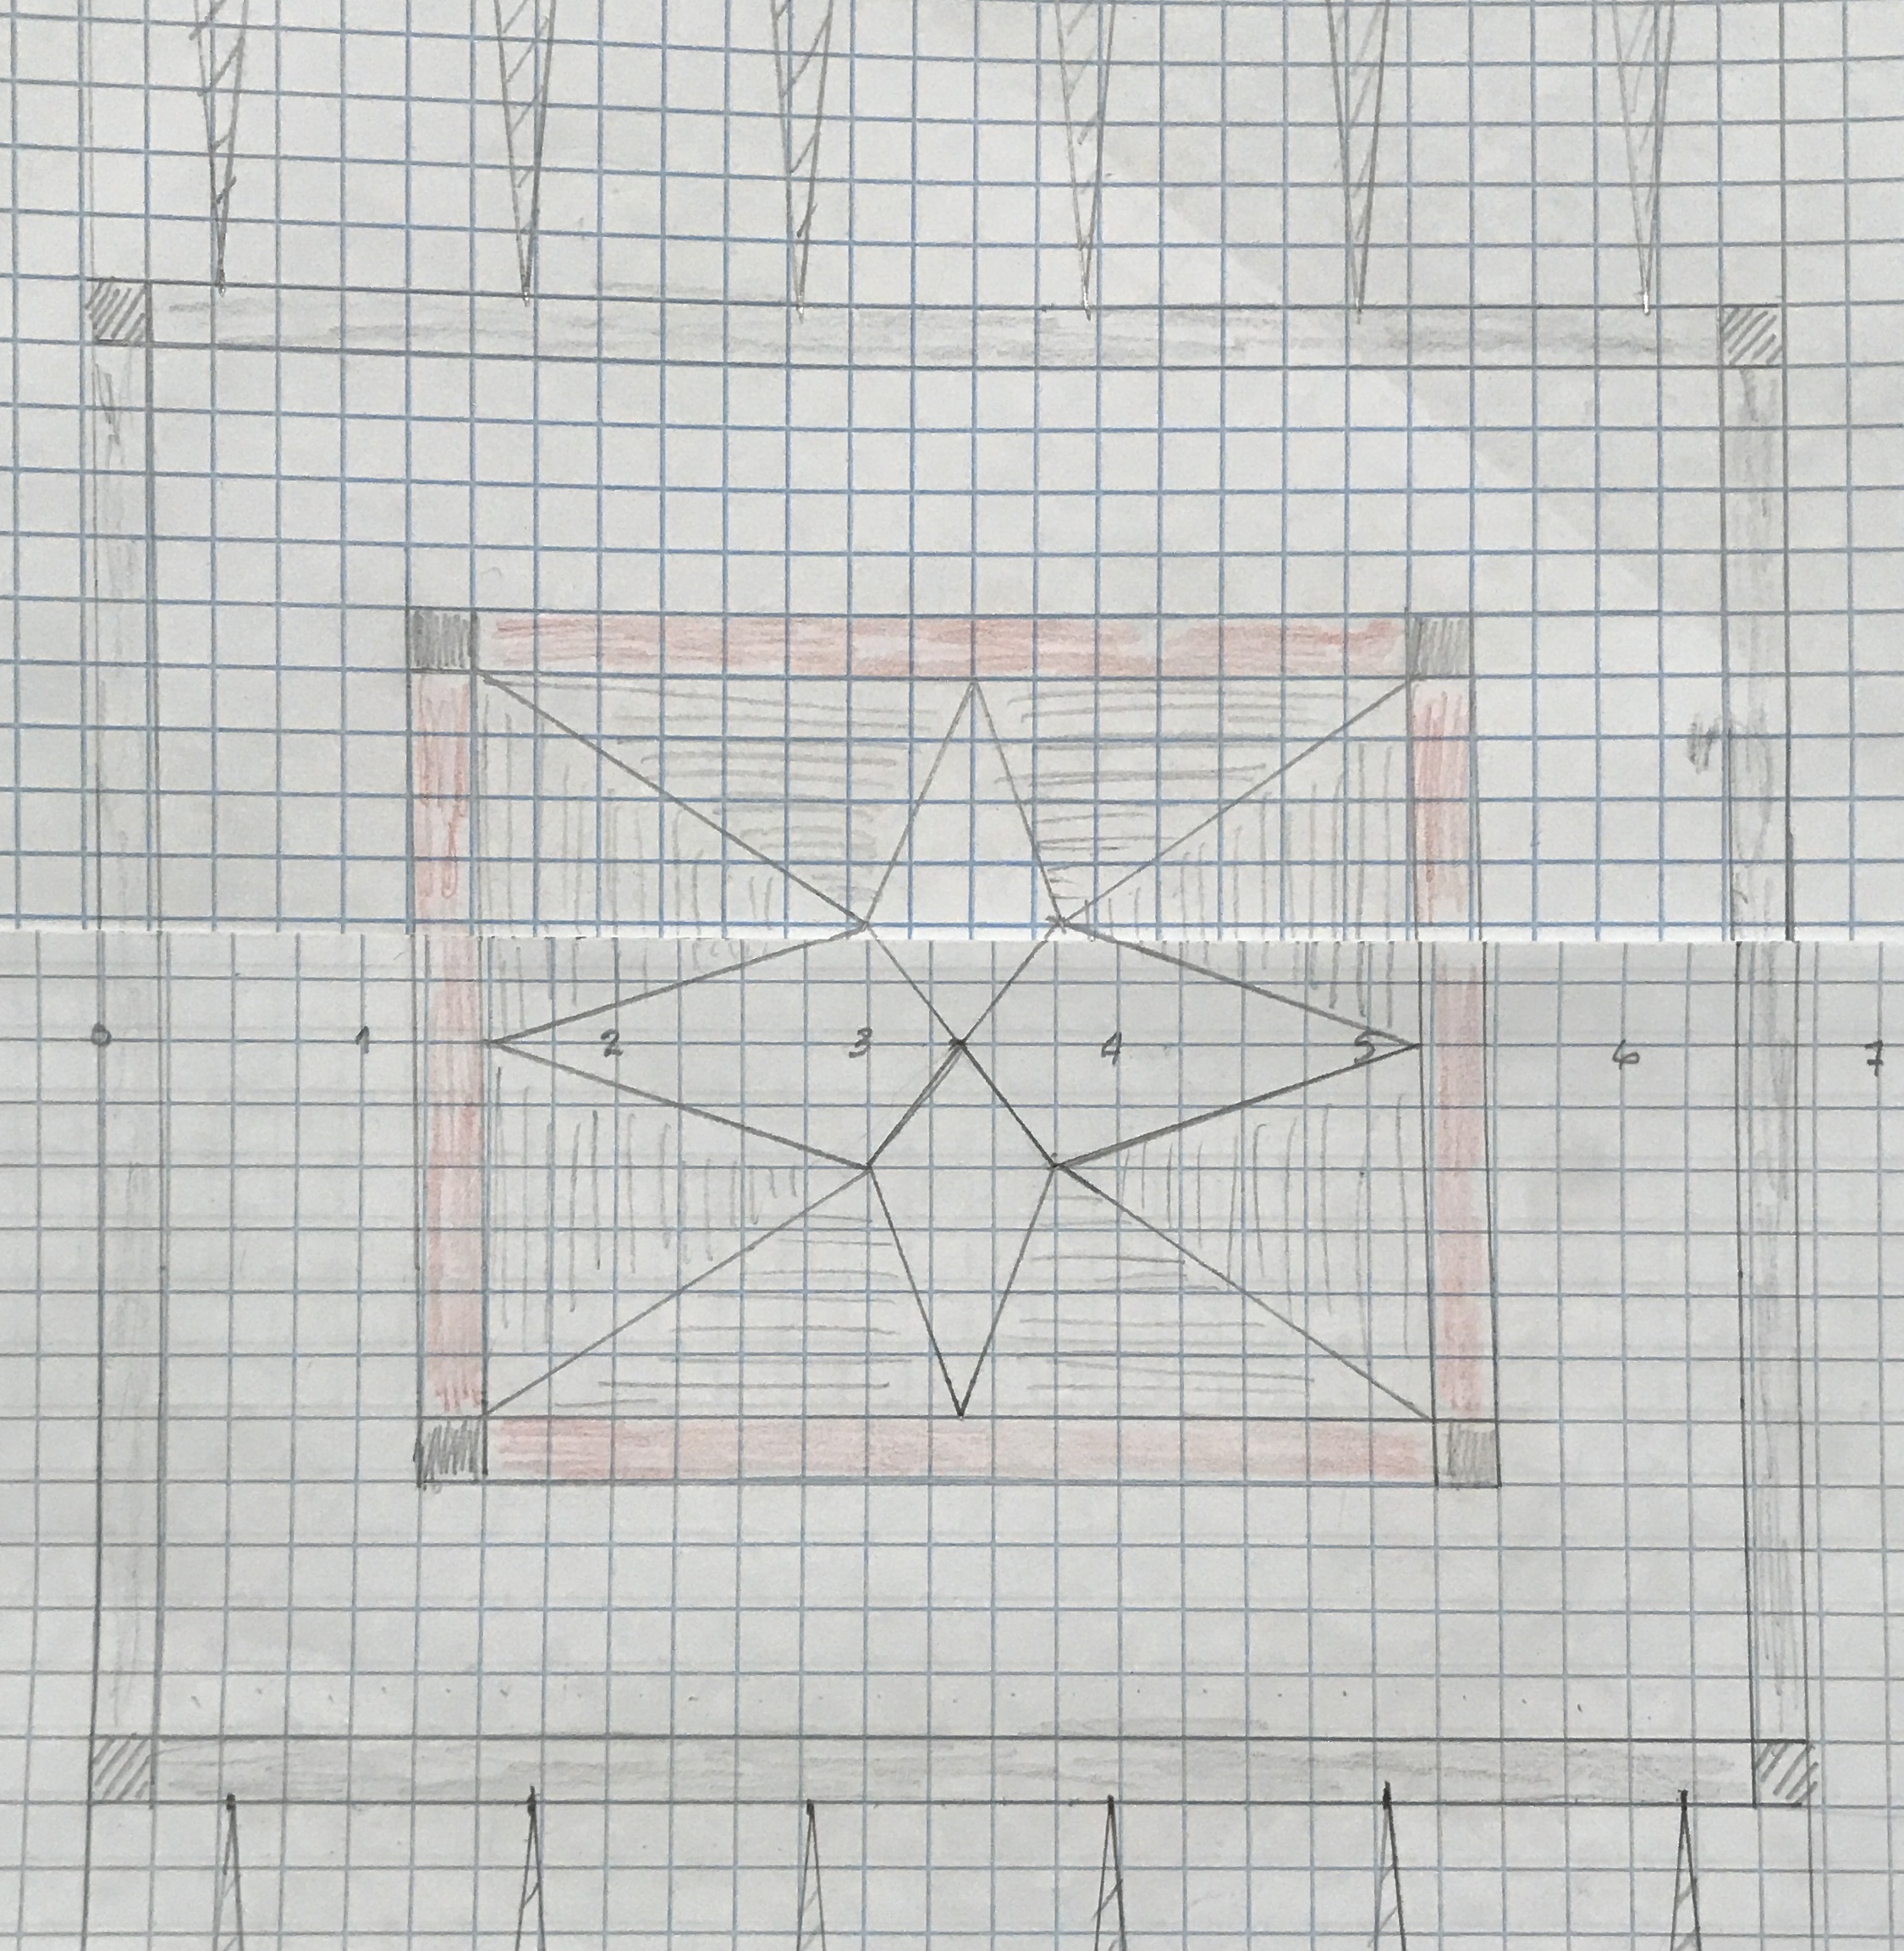
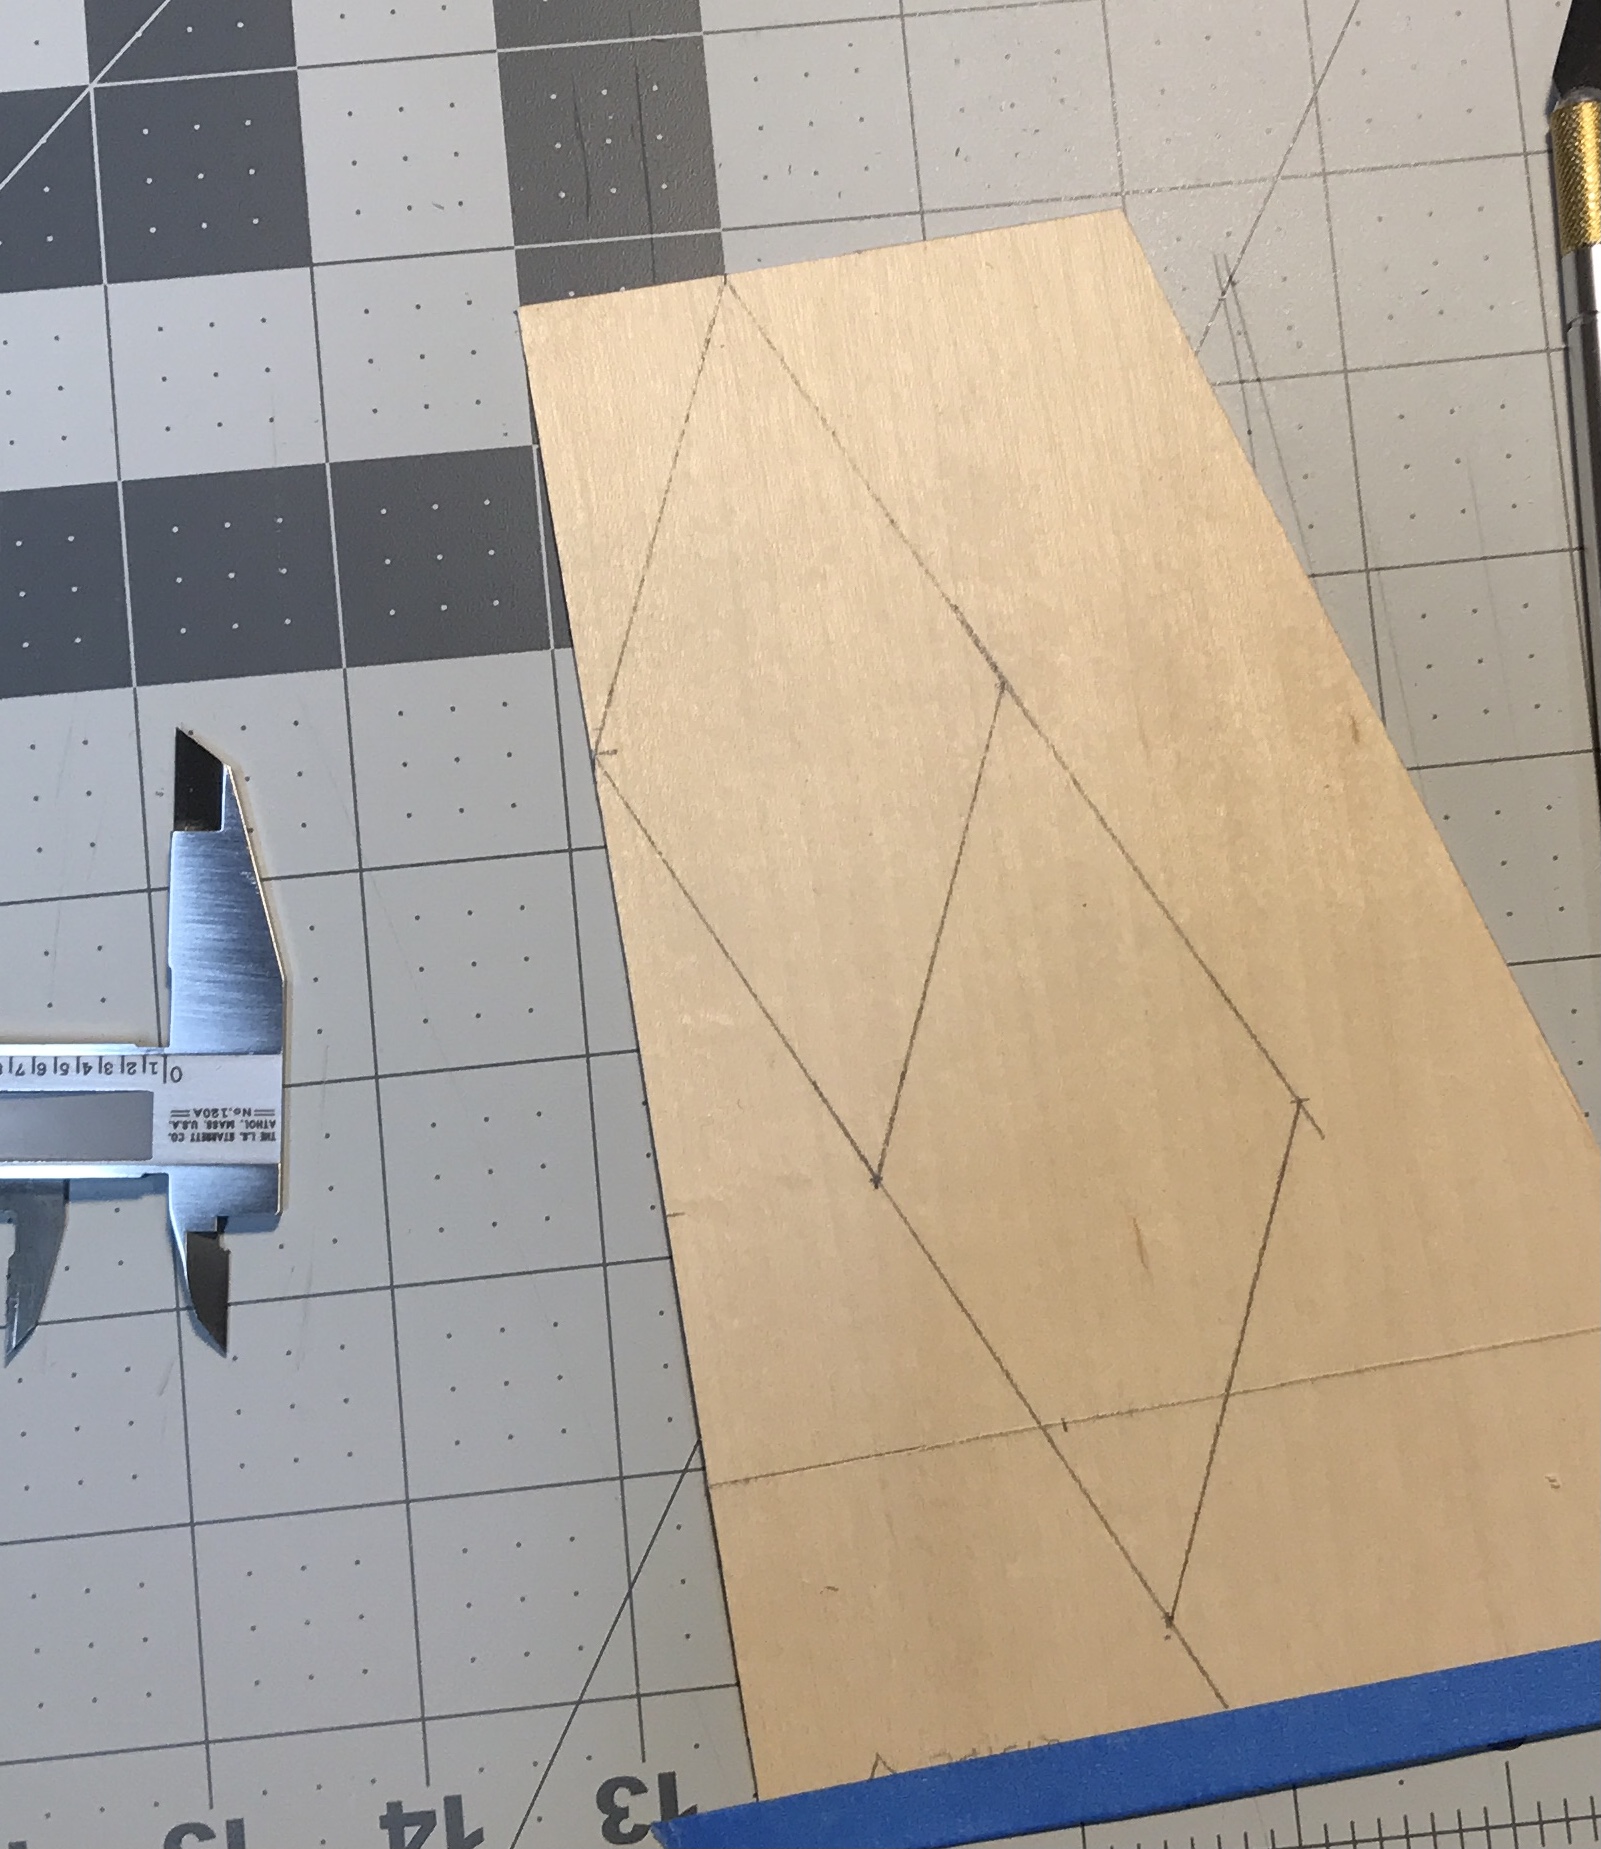
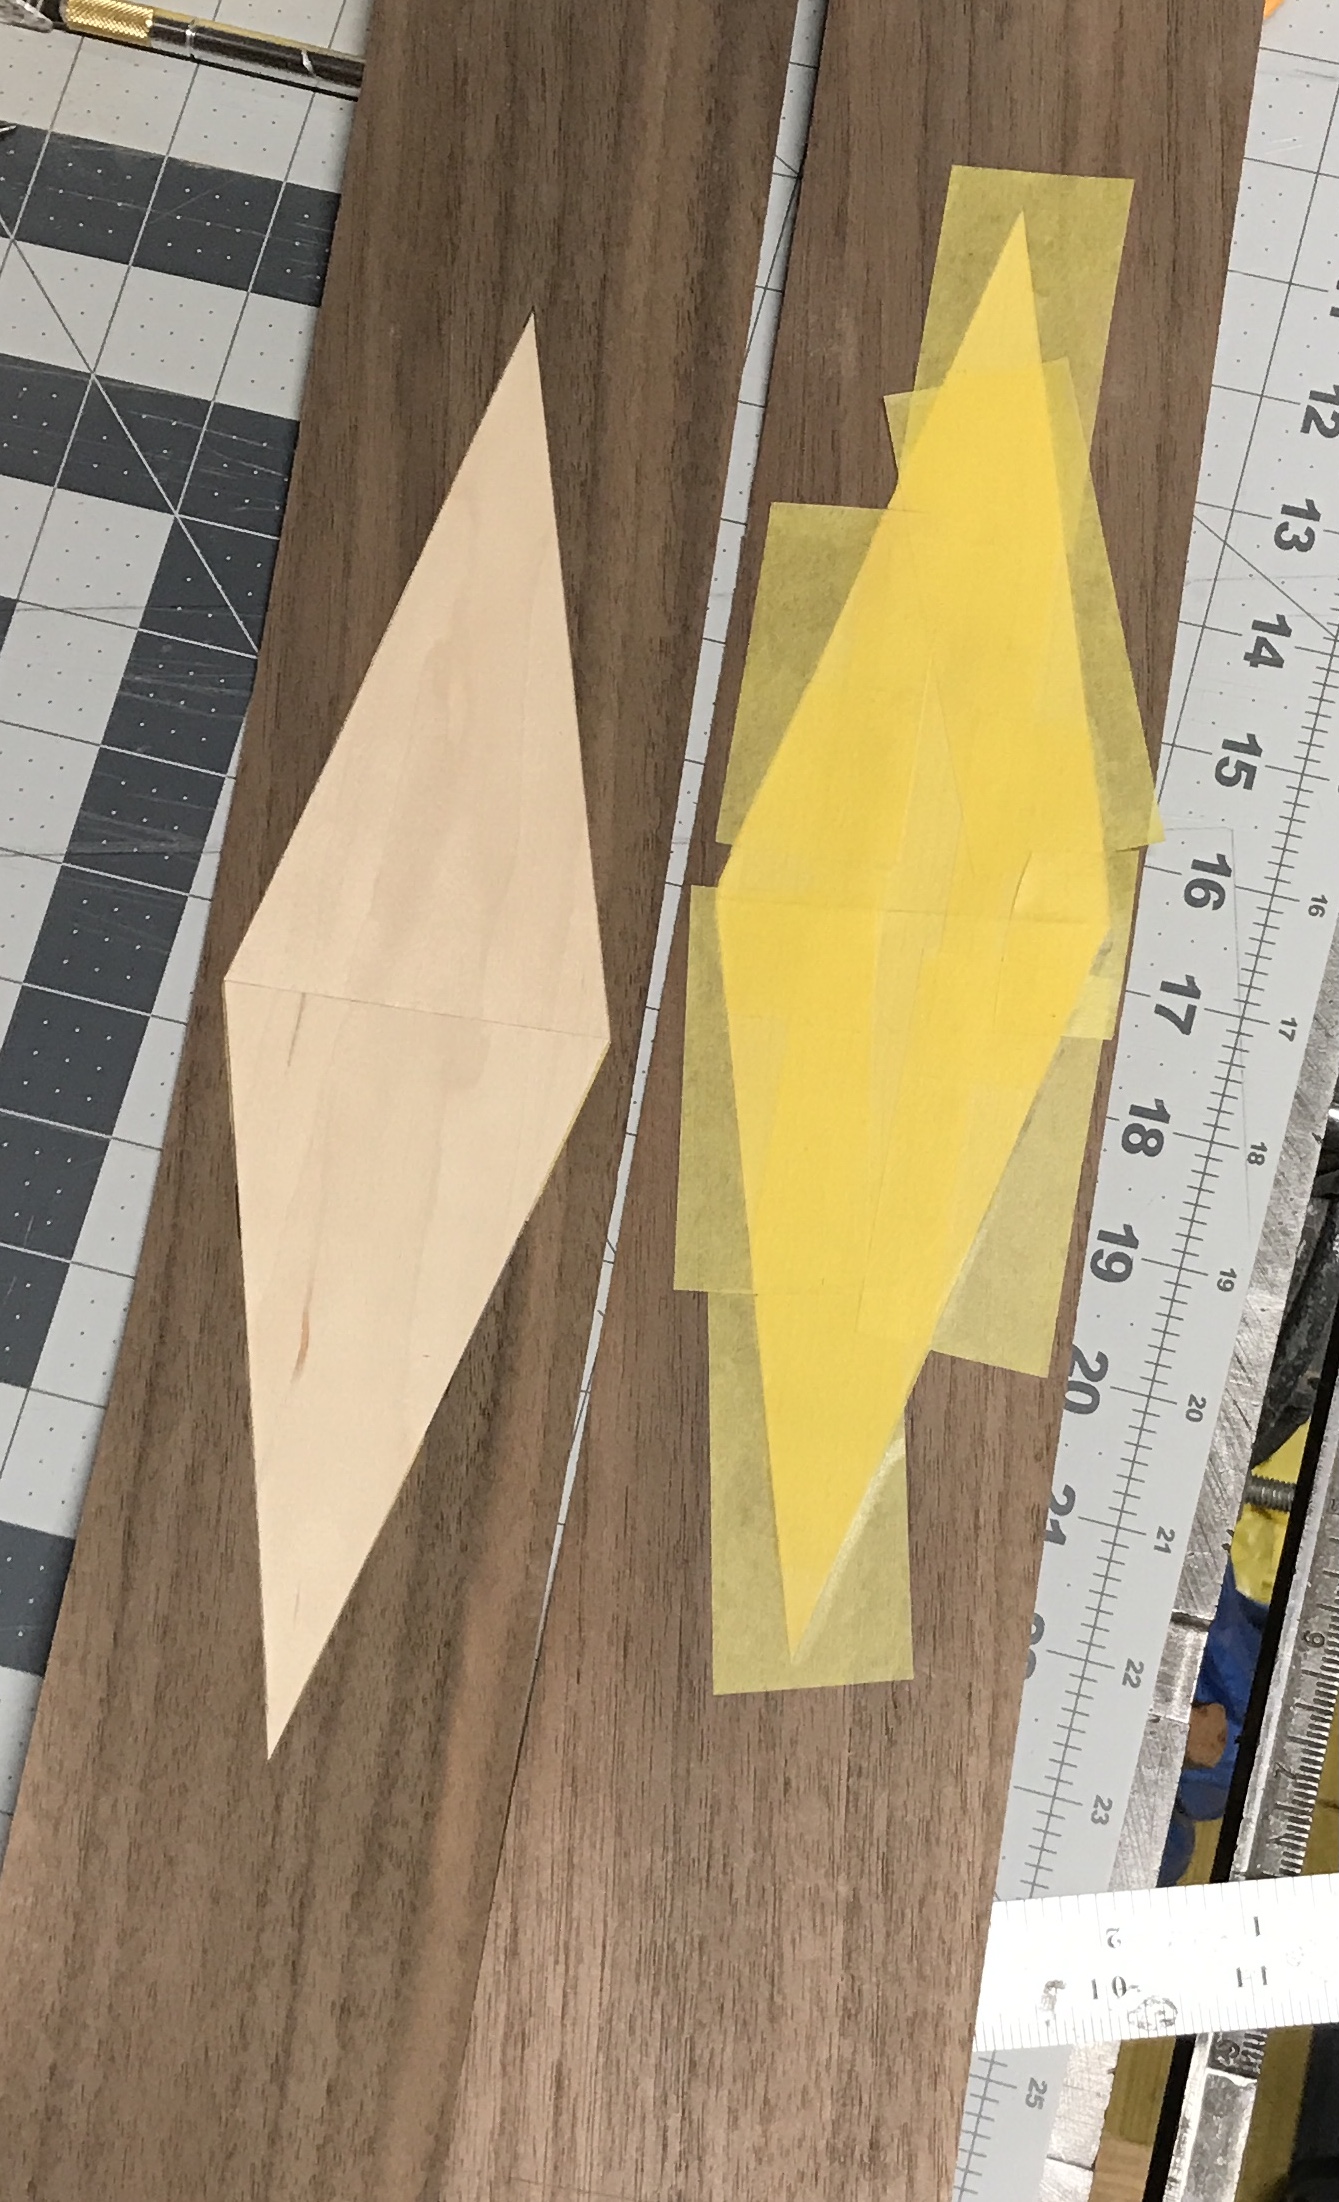
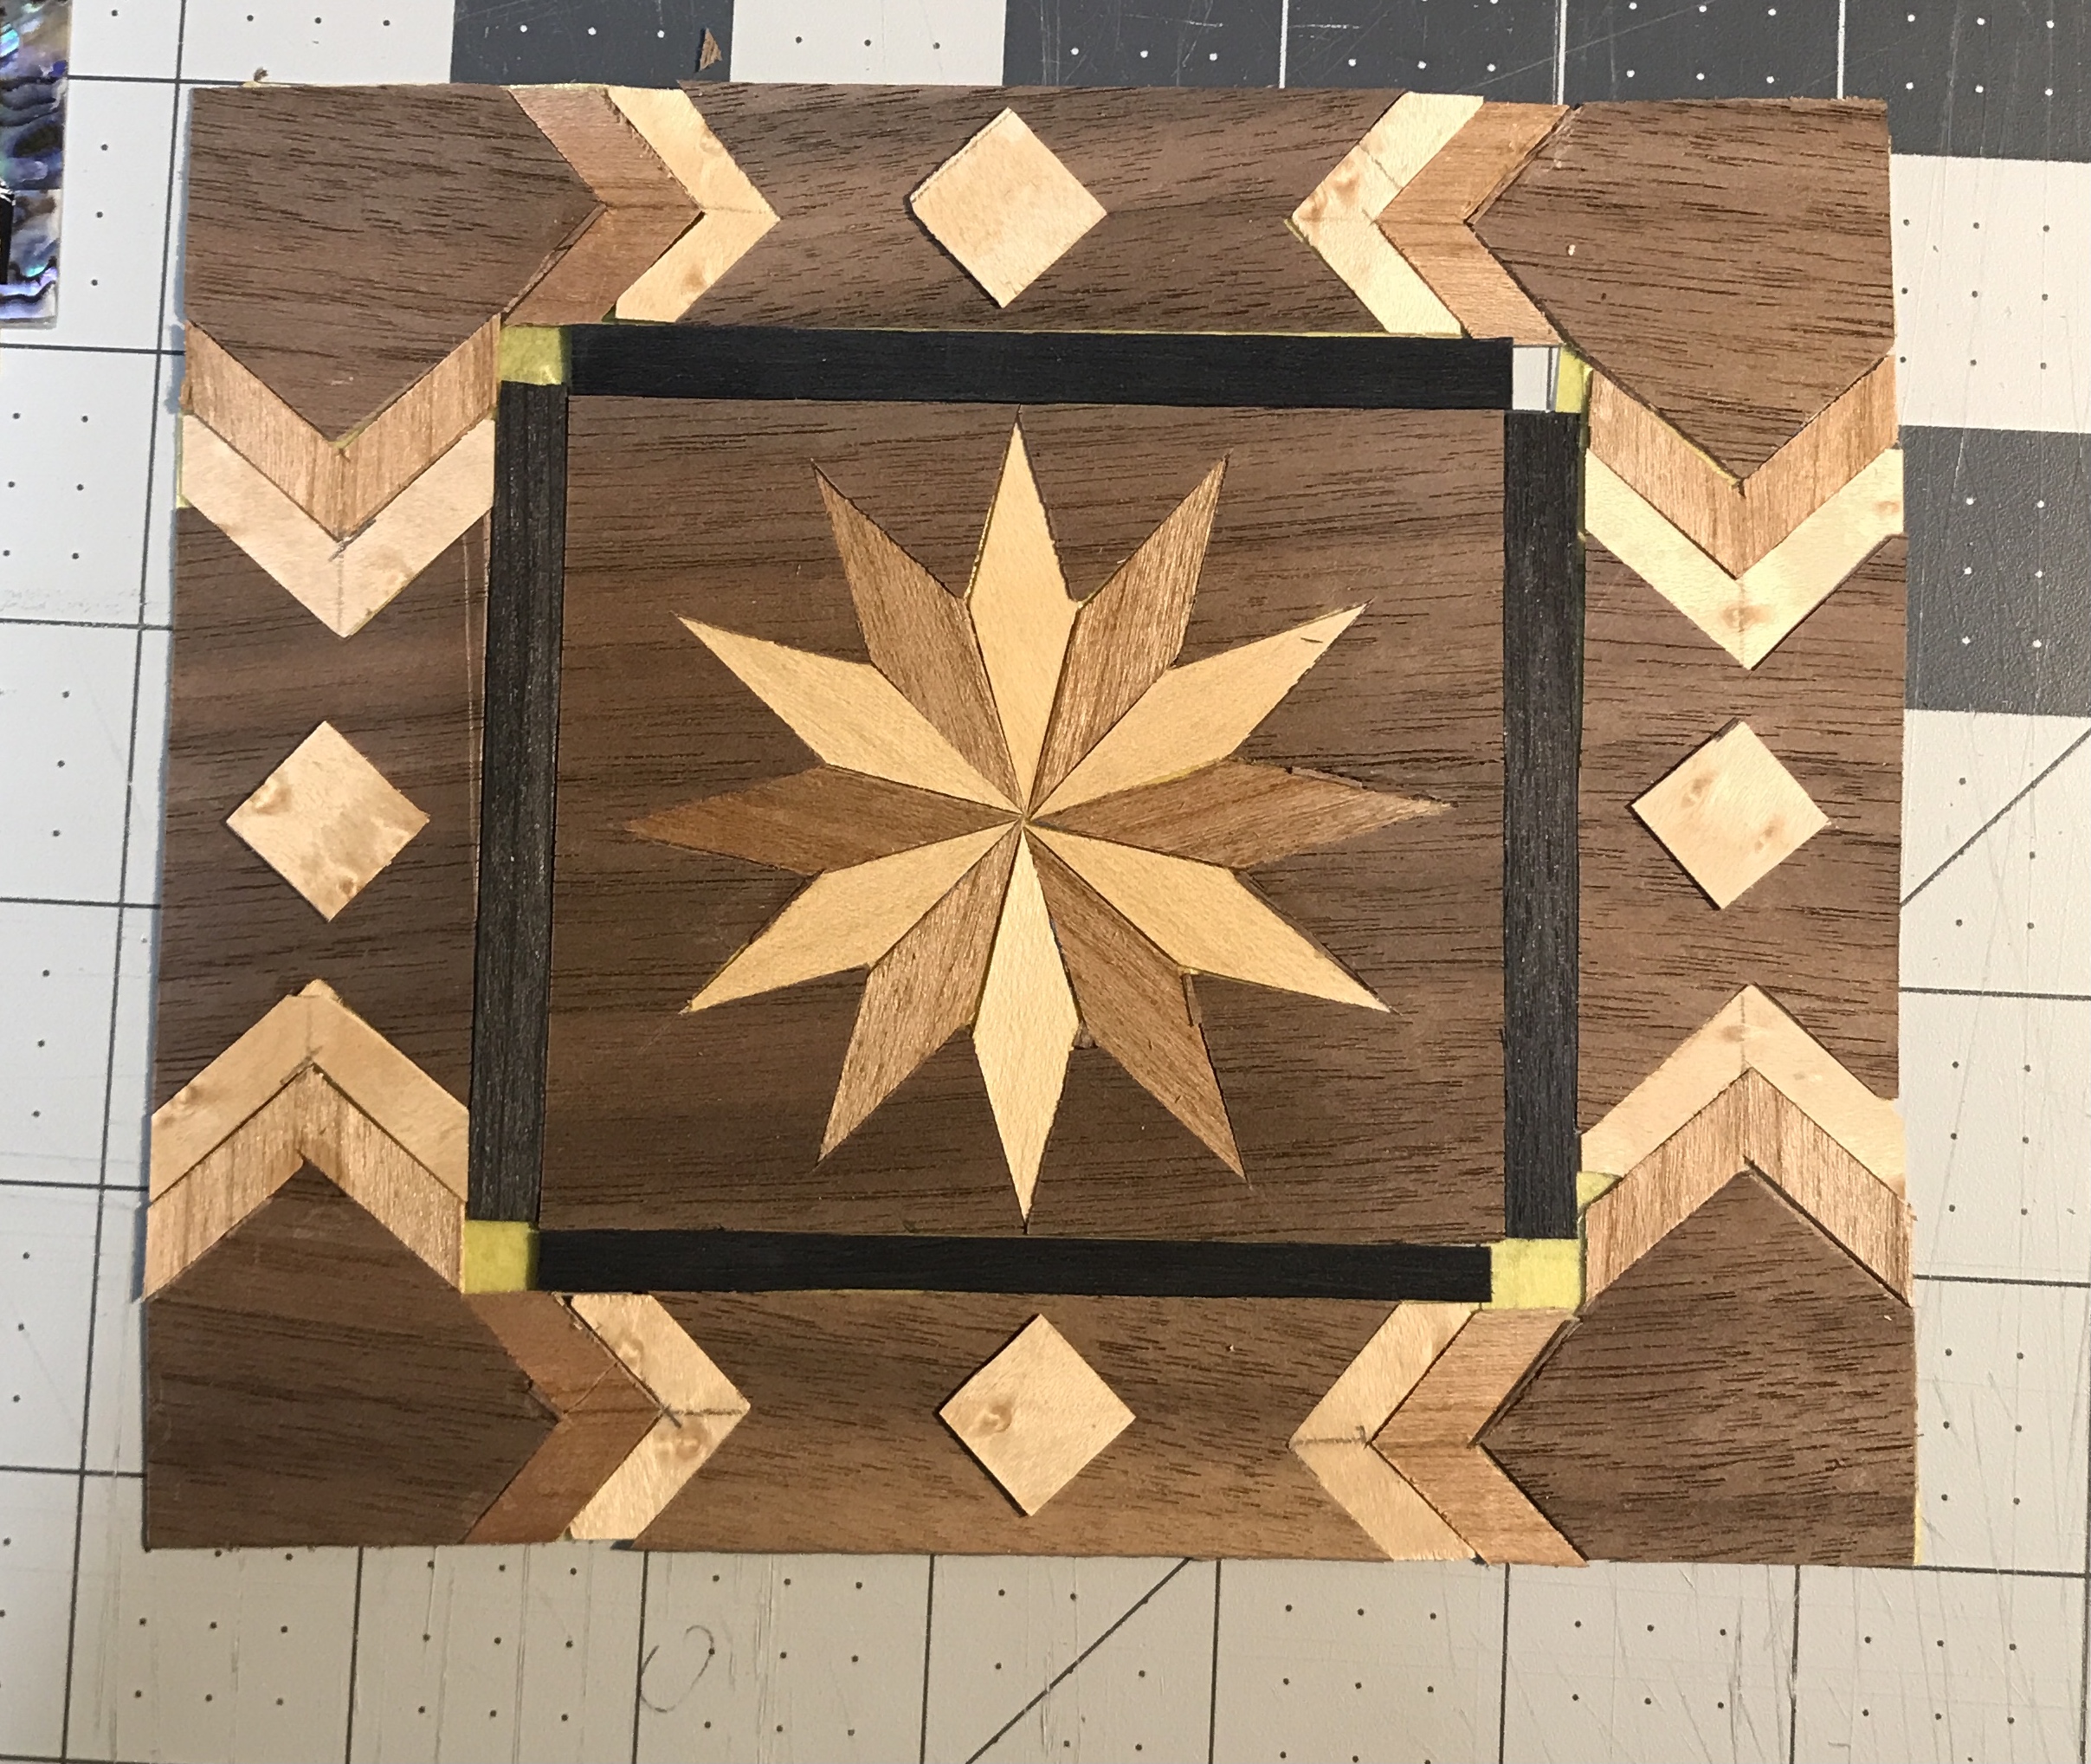
I struggled trying to come up with designs to surround this central star. The first idea is a series of diamonds. The diamonds are 1/2" wide and 1" long. These and the triangles between (half of a diamond) should be easy to make consistently. The only problem is the corners. The long side of the rectangle does not fit the number of diamonds. It is 1/4" too long. One possibility is half of a diamond and a square box in this corner. A second possibility is a rectangular box in the corner. The third possibility is a "falling" diamond in the corner. The second and third possibilities are shown in the picture below.
A fourth possibility is making the bounding rectangle 6" wide by using wider bounding box strips on the sides. Then all four corners would have the same long diamond.
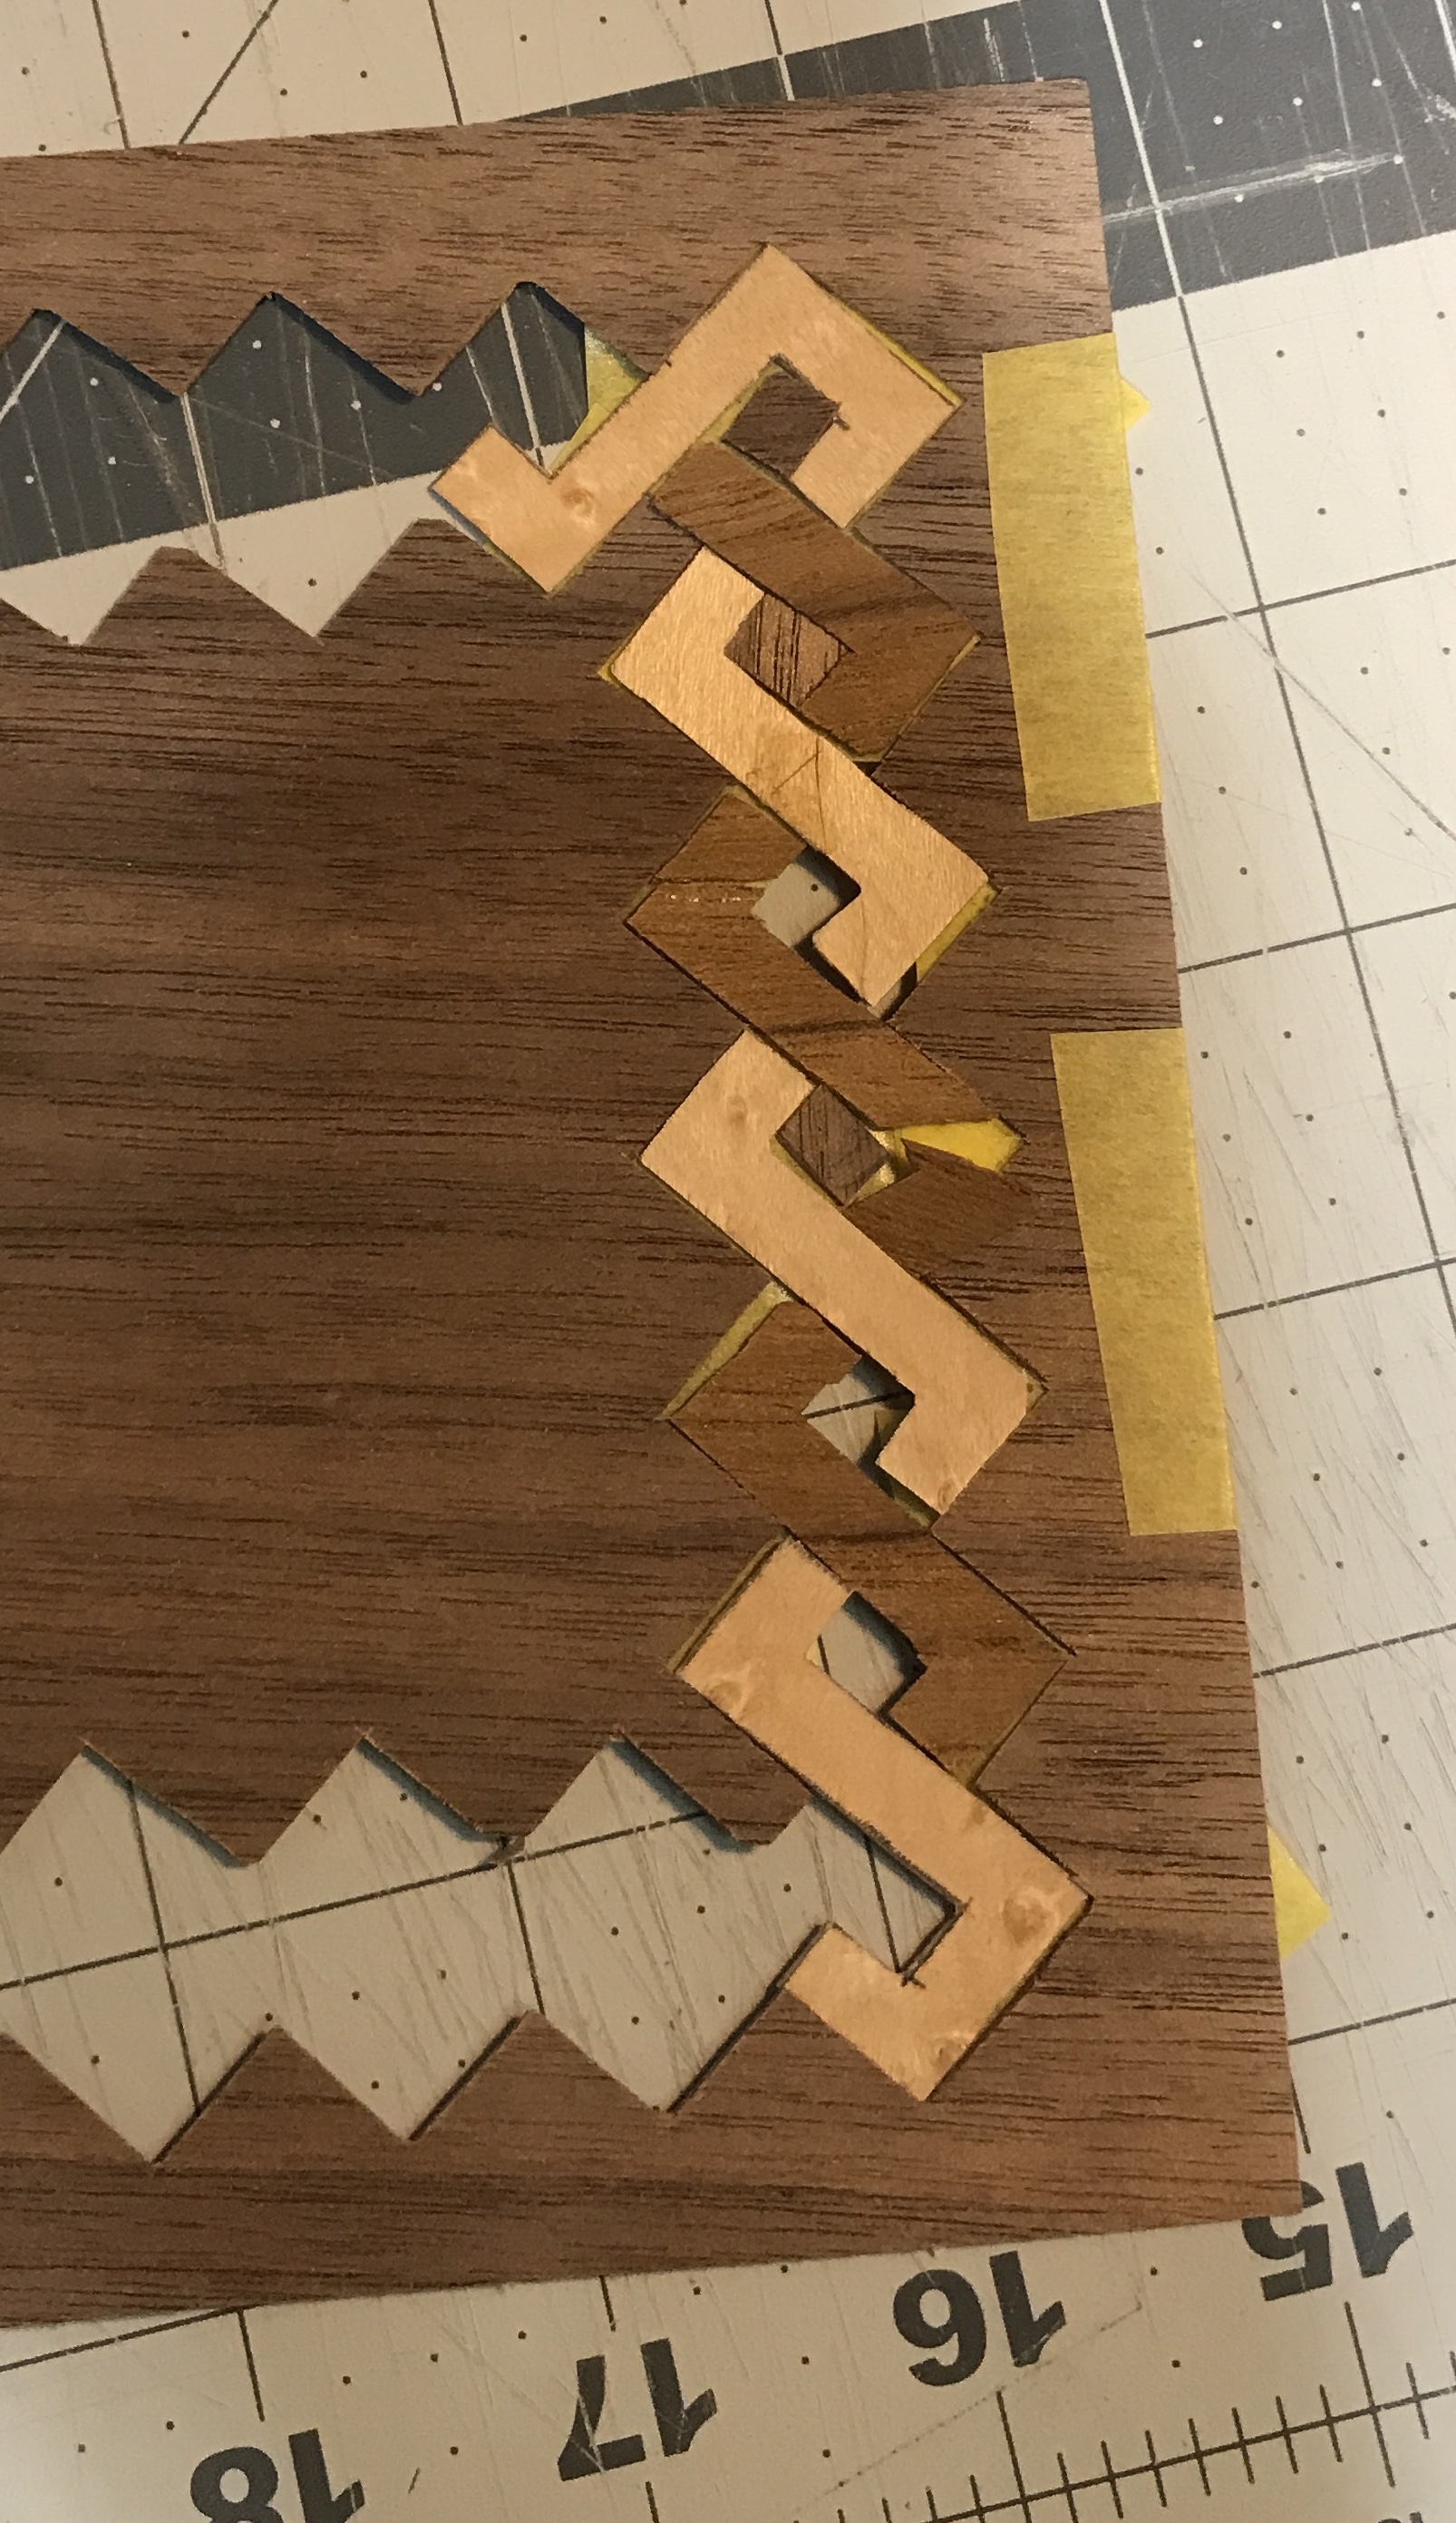
The other idea under consideration is inspired by Celtic knots. It is essentially two identical braided rings. Not shown in the photo below is my calculation of the parts needed to make it. Most of it can be made from 20 Z-shaped pieces and 44 triangles. The corners require 4 larger triangles, 4 L's and 4 Z's with an extension. 26 little squares are also needed to fill the "eyes". The Z's, L's and squares can be made from 1/4" strips of veneer. The same with the triangles, but using wider strips. The grain direction will need to be monitored carefully for the Z and L parts. This design does pose one problem. It does not completely fill the frame. Its outside dimensions are 5 5/16" X 6". The width of the outer frames would need to be adjusted to fit. I am leaning toward this proposal as there are already so many triangles on this board.
Whatever designs are selected, I better like them as they will be repeated on both sides. As I lay in bed last night I thought about the outside edges of the box. Veneer will be glued on to fit. This will leave an odd corner edge. A 1/16" strip of veneer will be used to fill this gap. It can be sanded to fit. The alternative is gluing the veneer on the sides of the box after cutting. This veneer can be left a bit long and sanded flush with the face veneer.
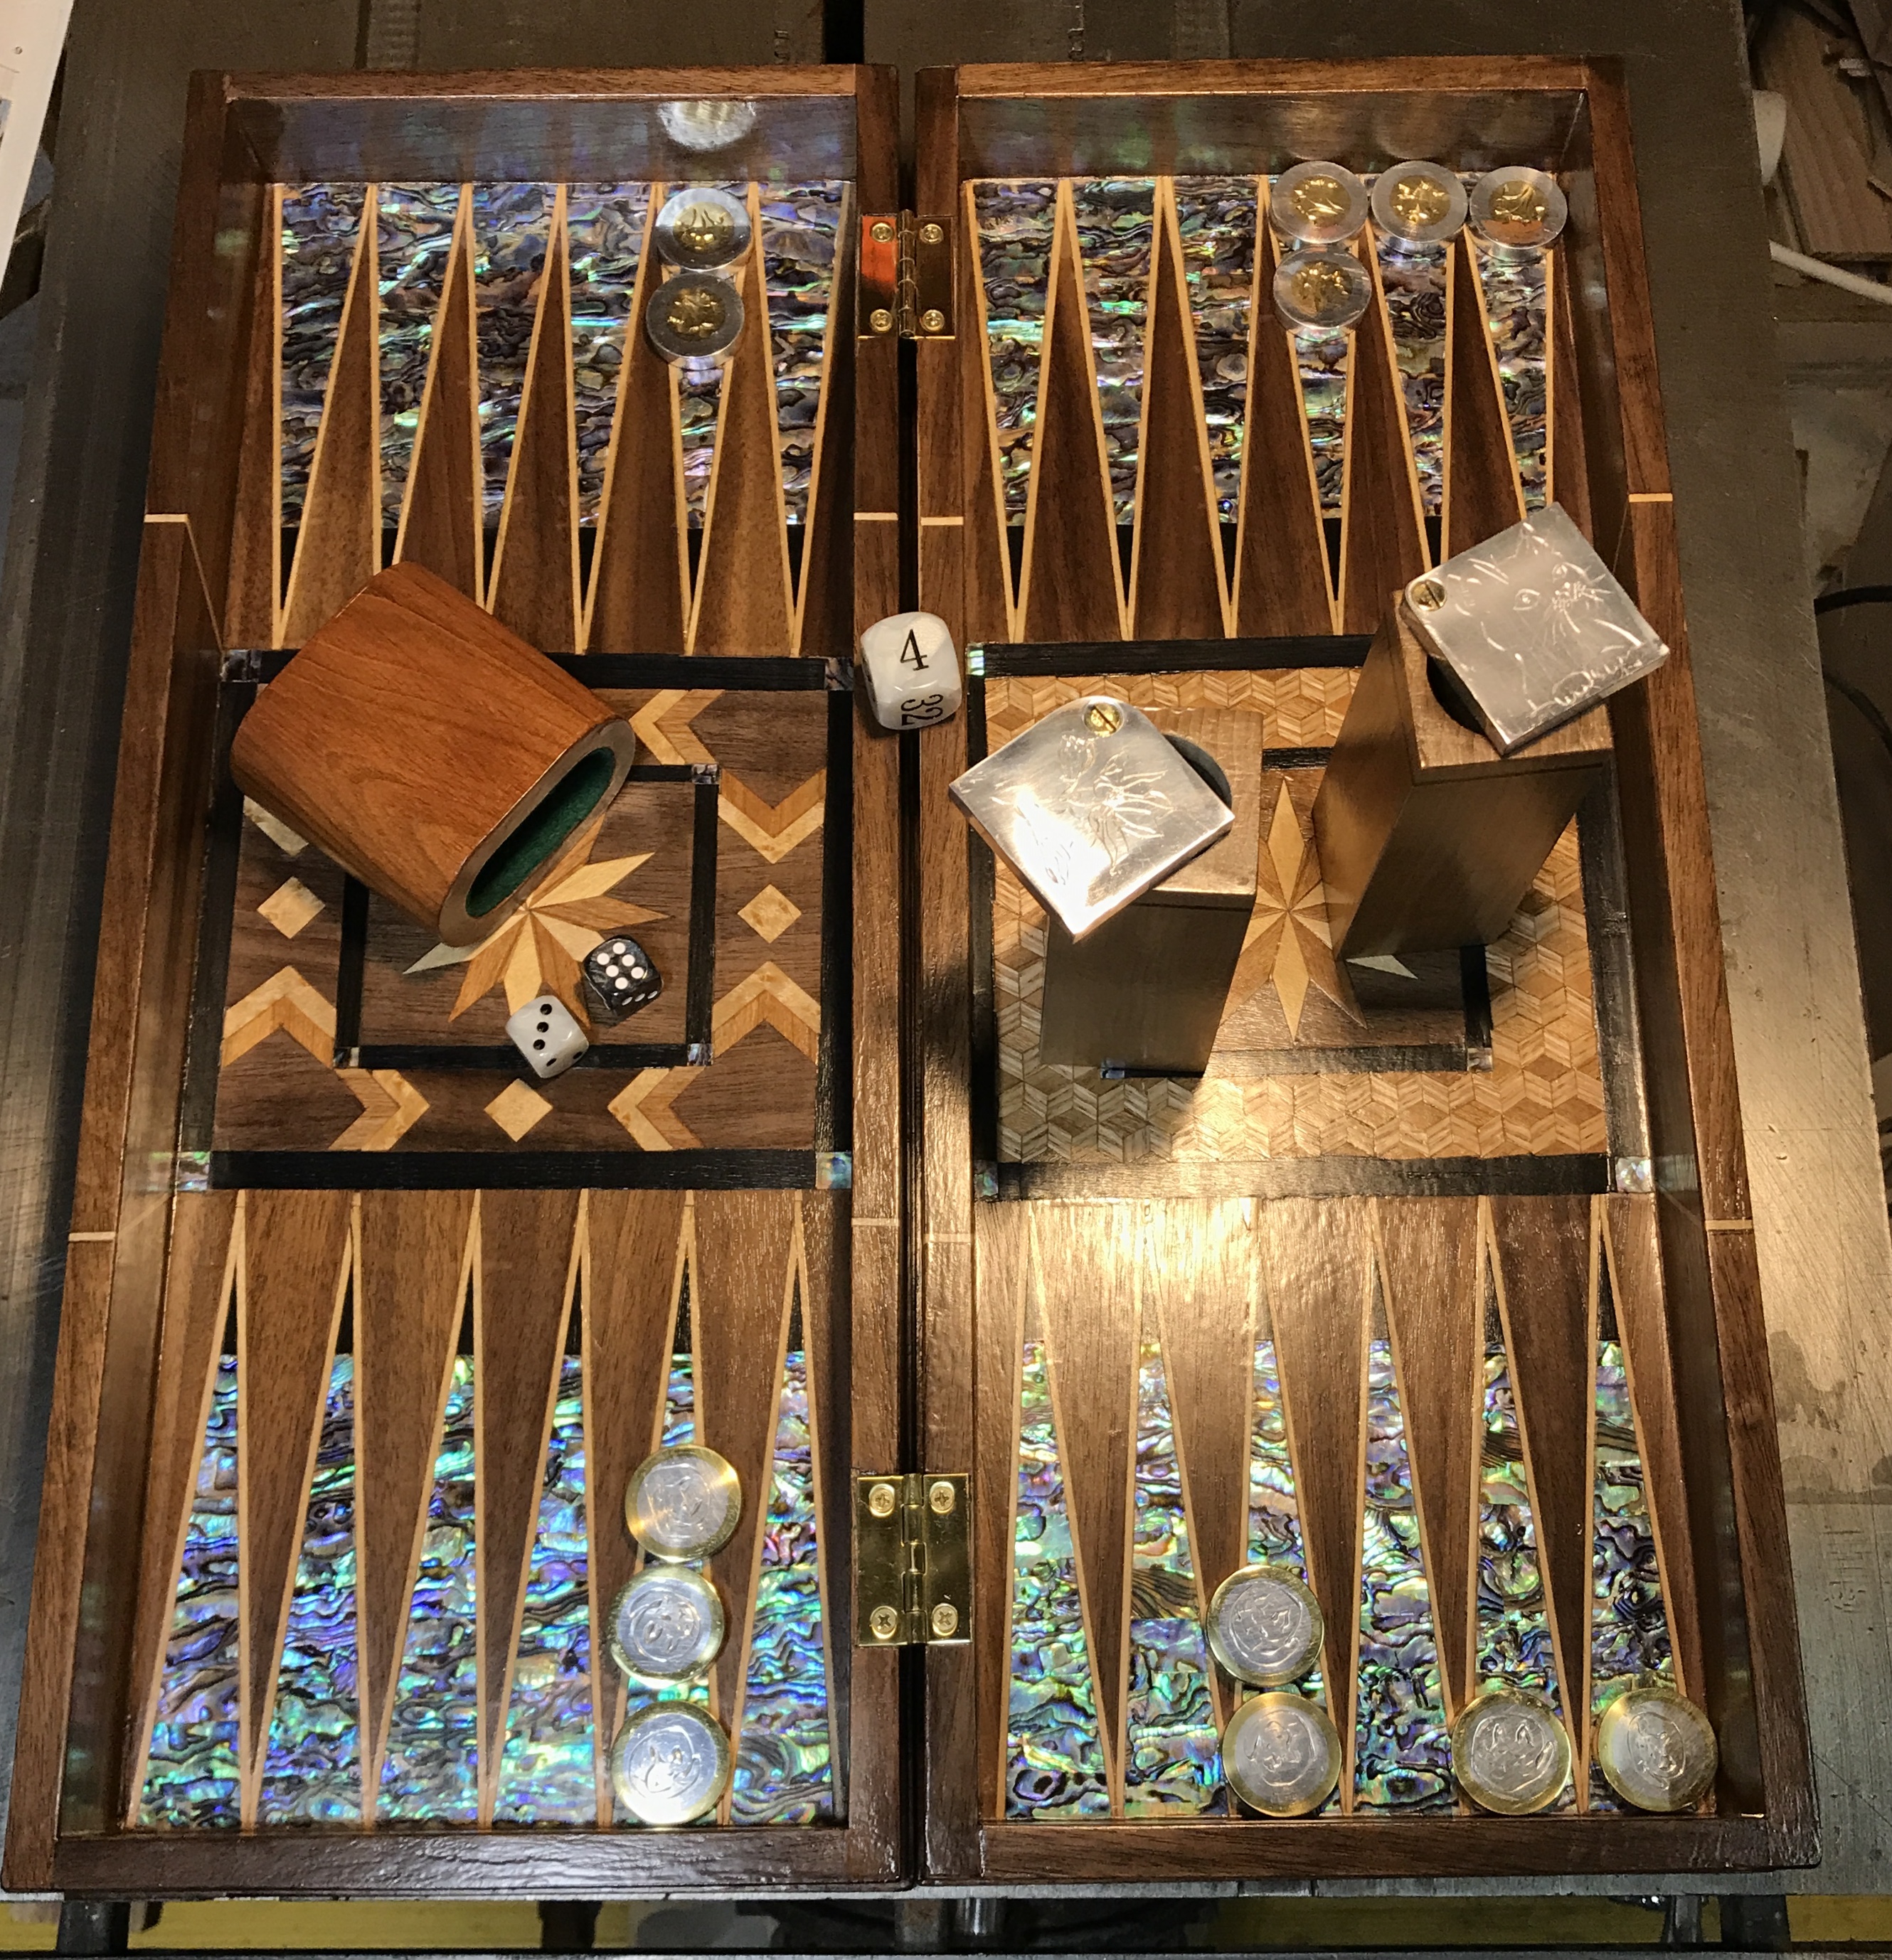
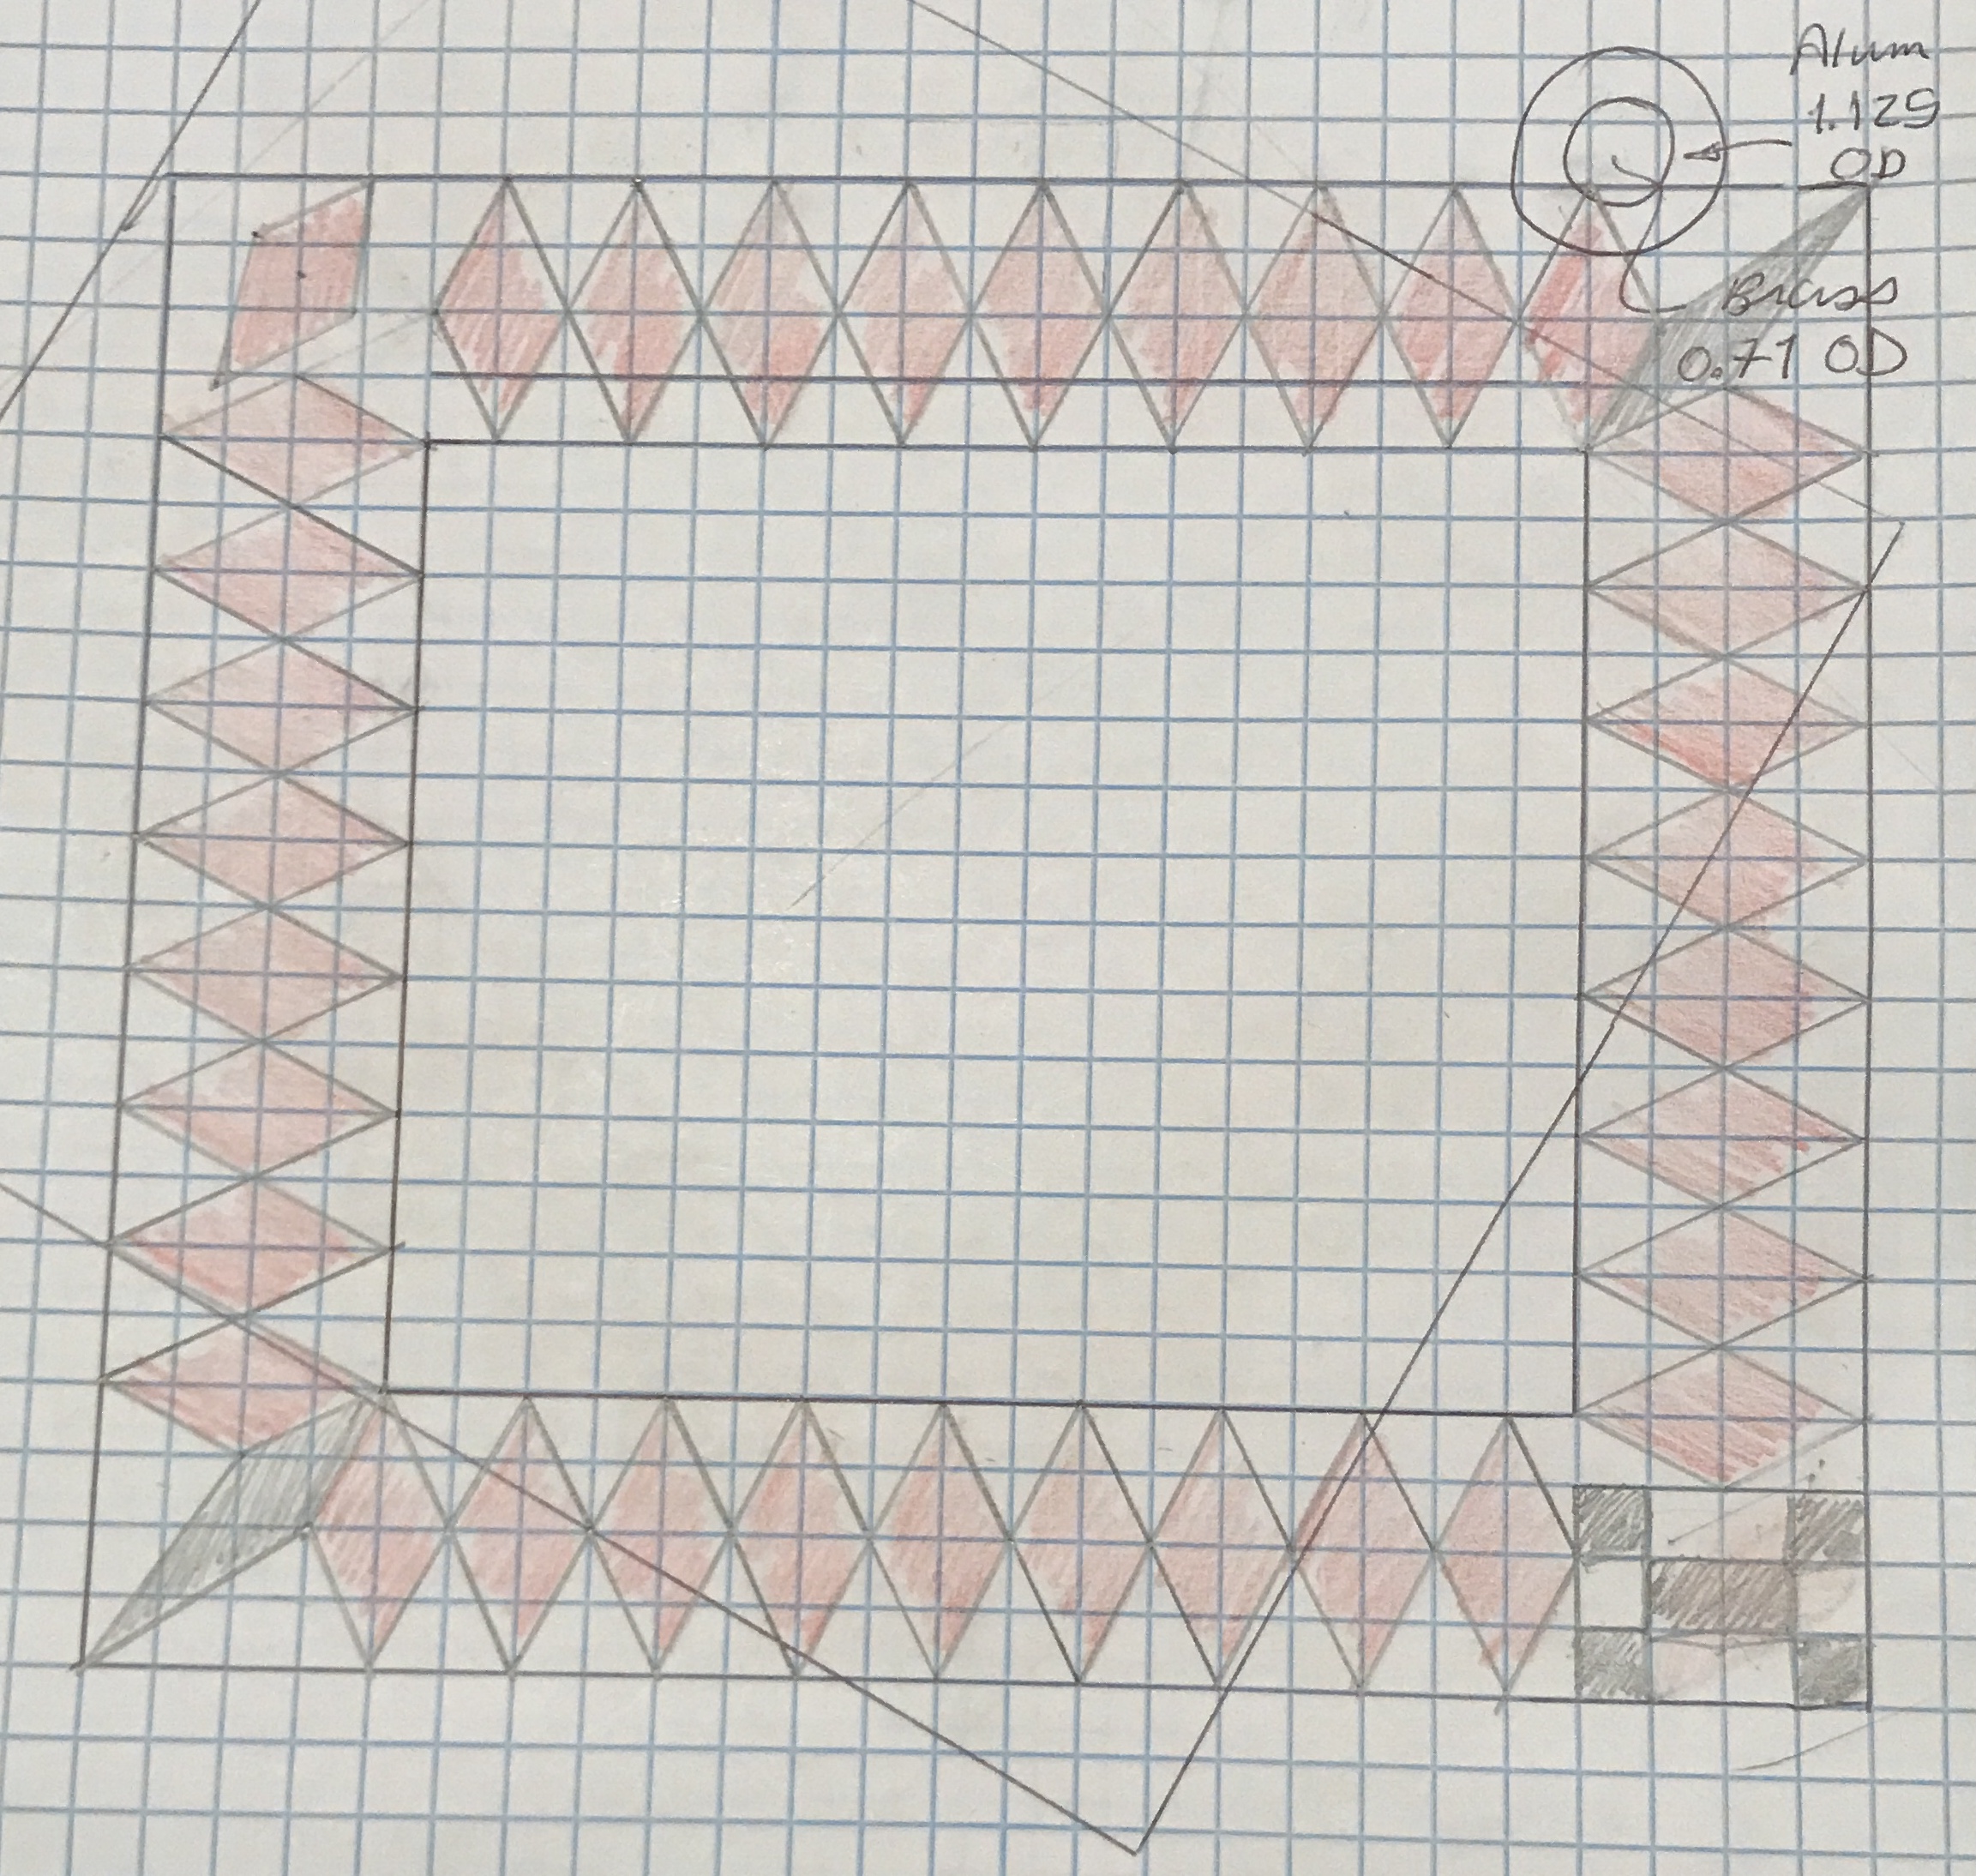
I also put some thought into the pieces. I considered purchasing pieces from Etsy. The nice pieces were $40 per set and up. It was hard to find pieces that are 1 1/8" in diameter. The sets included the four dice and one doubling die. I decided to make my own pieces. I will make them out of metal. I ordered brass tube and aluminum. One set of 15 pieces will be brass tubes filled with aluminum. The other set will be aluminum tubes filled with brass. The brass tube purchased is 1 1/8" O.D. with a 1/8" thick wall. The pieces should weigh approximately the same. A simple calculation indicates that a 0.71" diameter of brass for the center of the aluminum piece will weigh the same as the brass tube. A simple box to hold the pieces will also be made. It will have embedded magnets that match embedded magnets on the inside of the board. I may do the same with dice cups, which I plan to make out of wood.
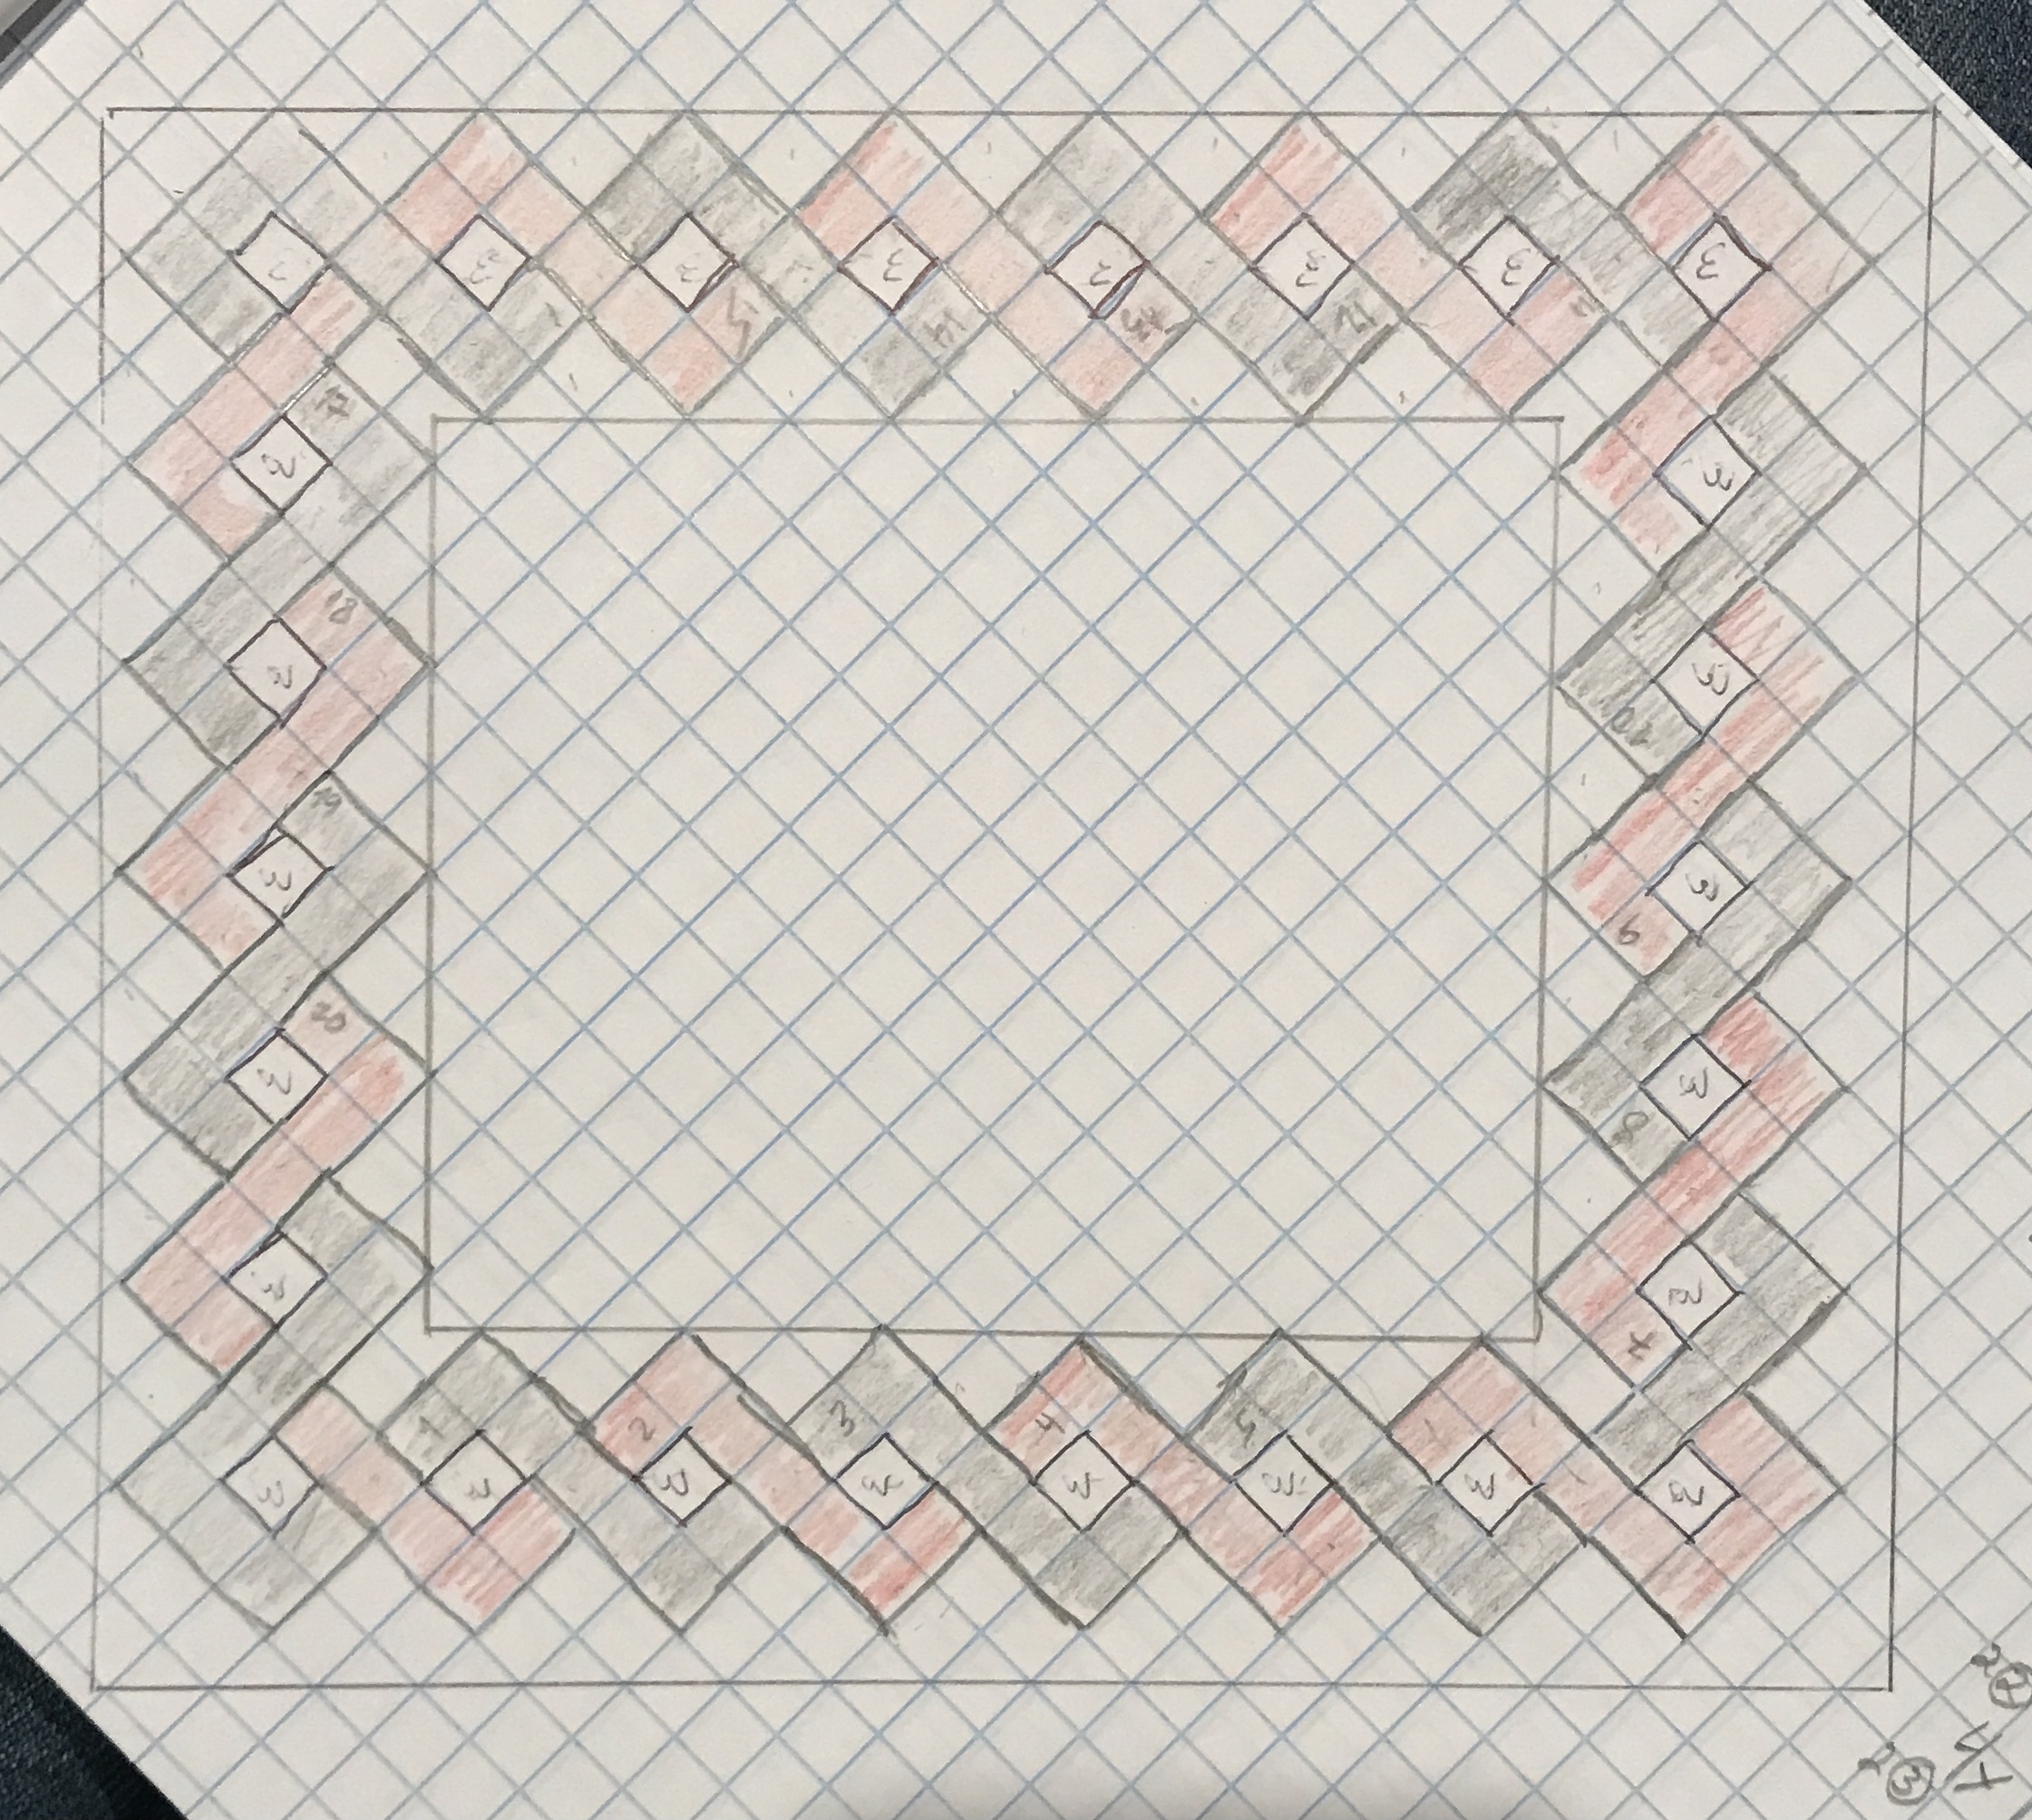
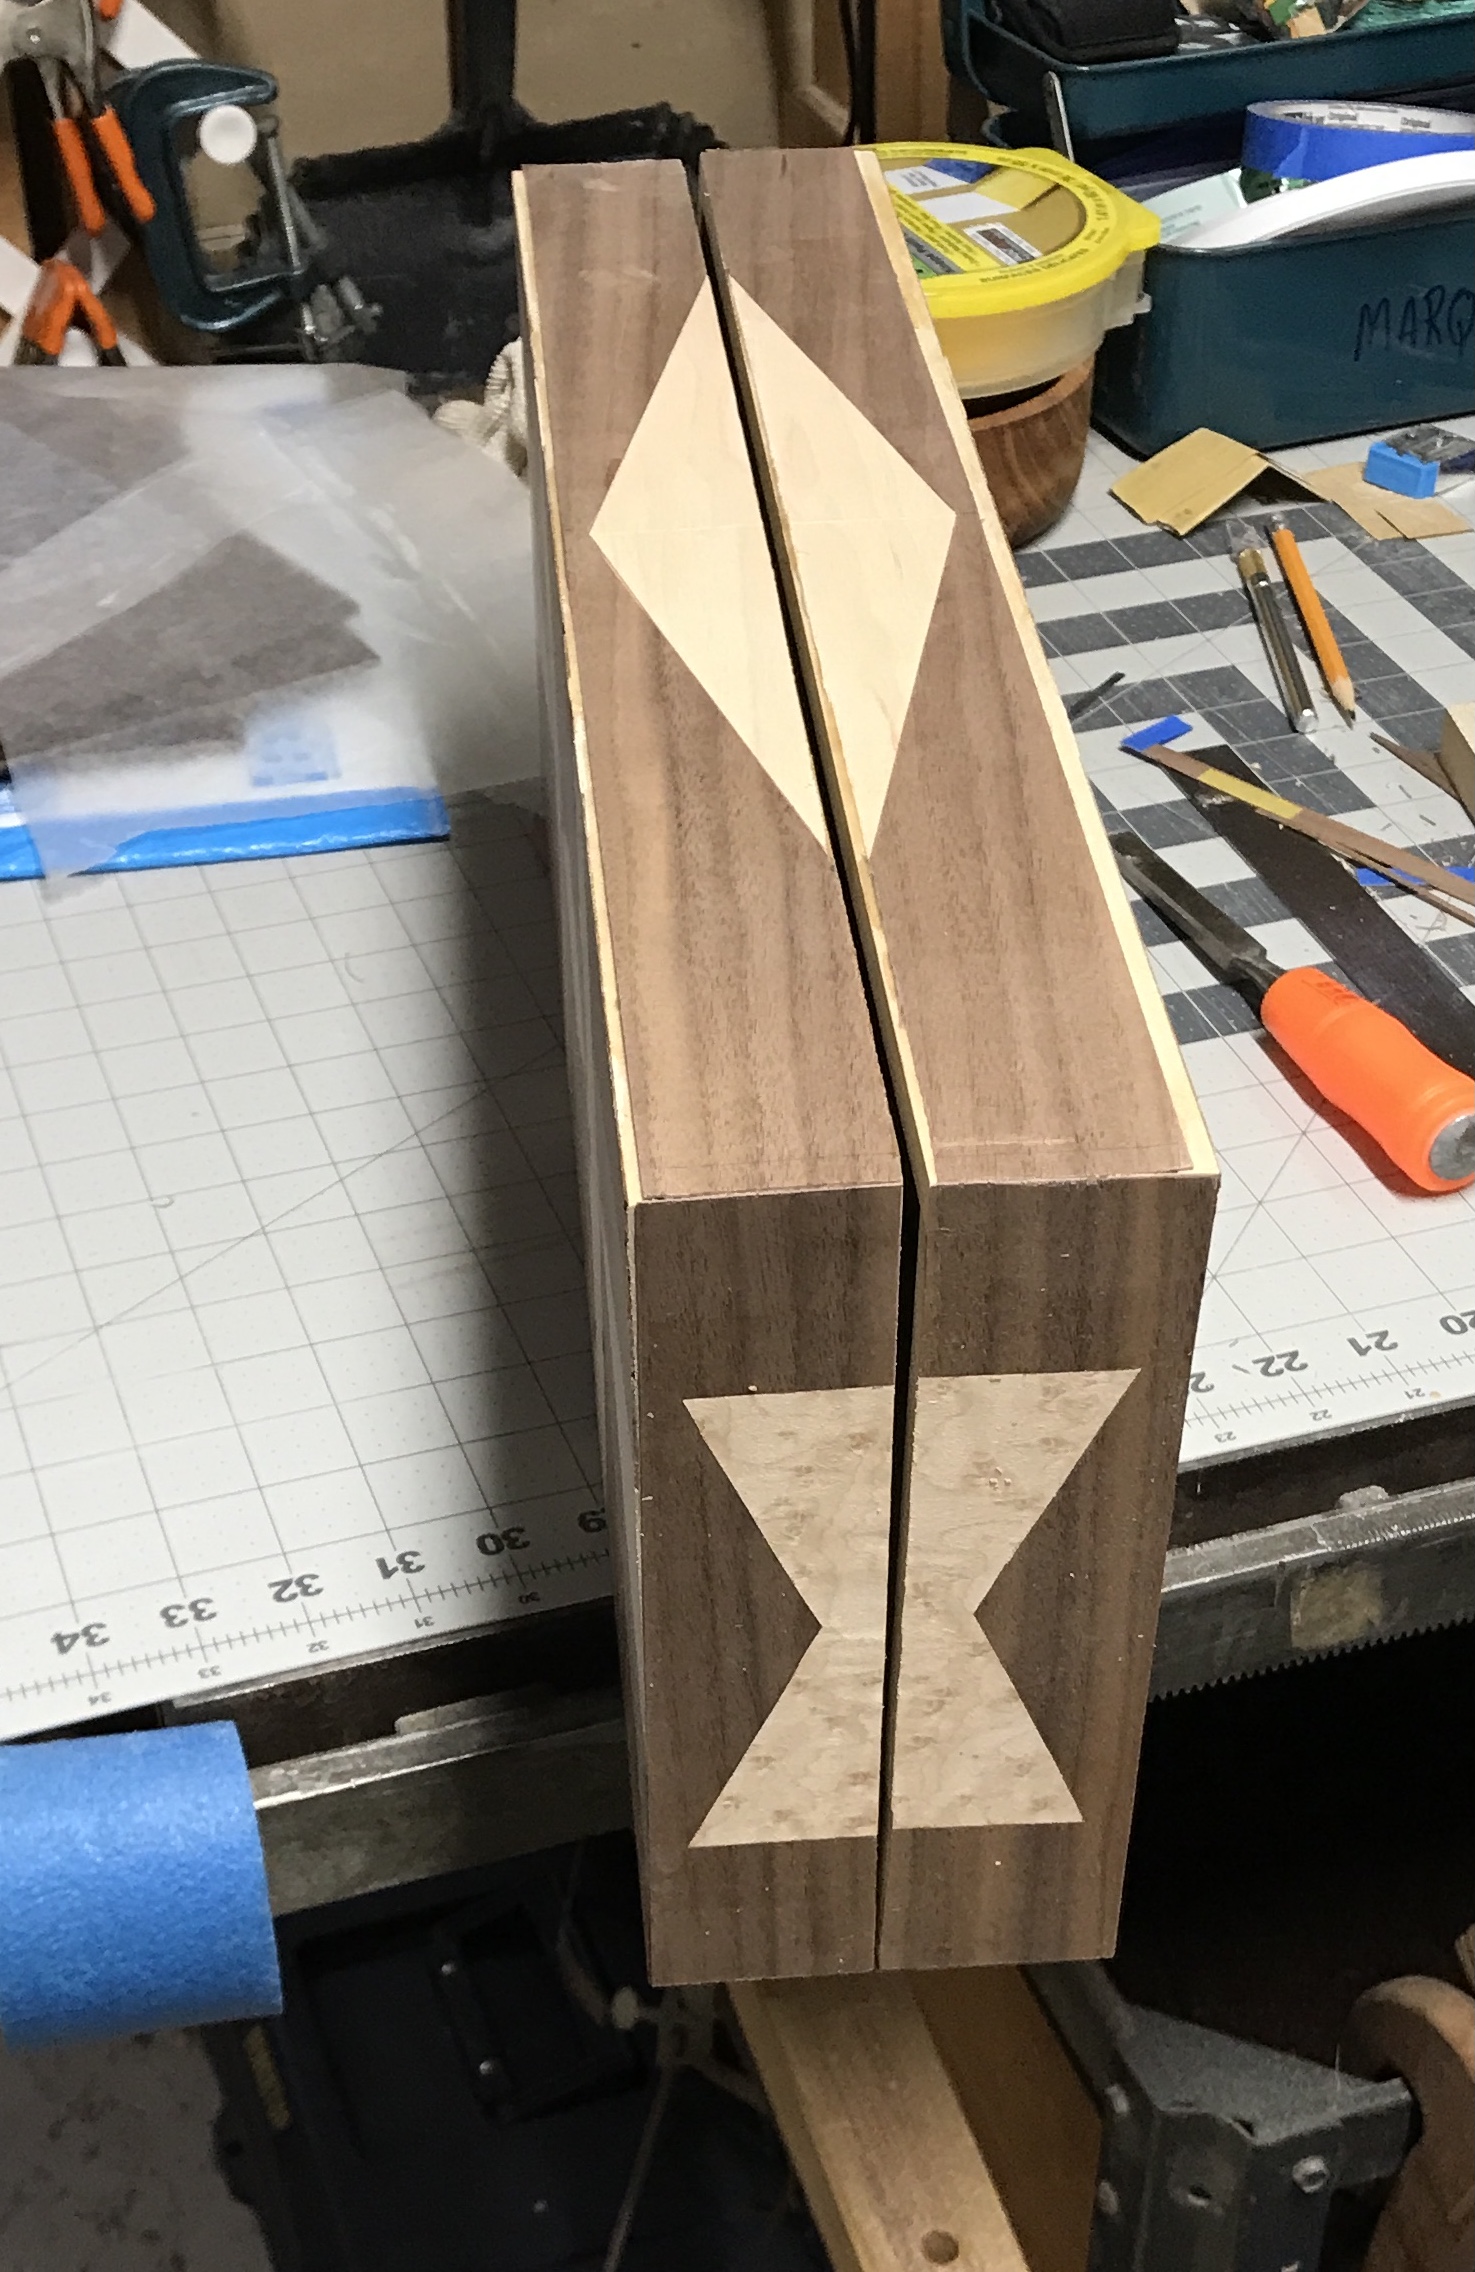
The outer parquetry faces also were planned. the photo below shows a rough sketch of the plan. The simple design will wrap around the sides. Only one side is shown below. This is actually the sides of the bottom and top halves of the box. The circle indicates the hinge point. The designs wrapping from the front and back will come back together in a triangle. At this point three colors of veneer are planned. The two bands could be broken up into diamonds for a little more impact. The inside of the sides and the edges of the two halves need to be planned as well as the outside ends of the box.
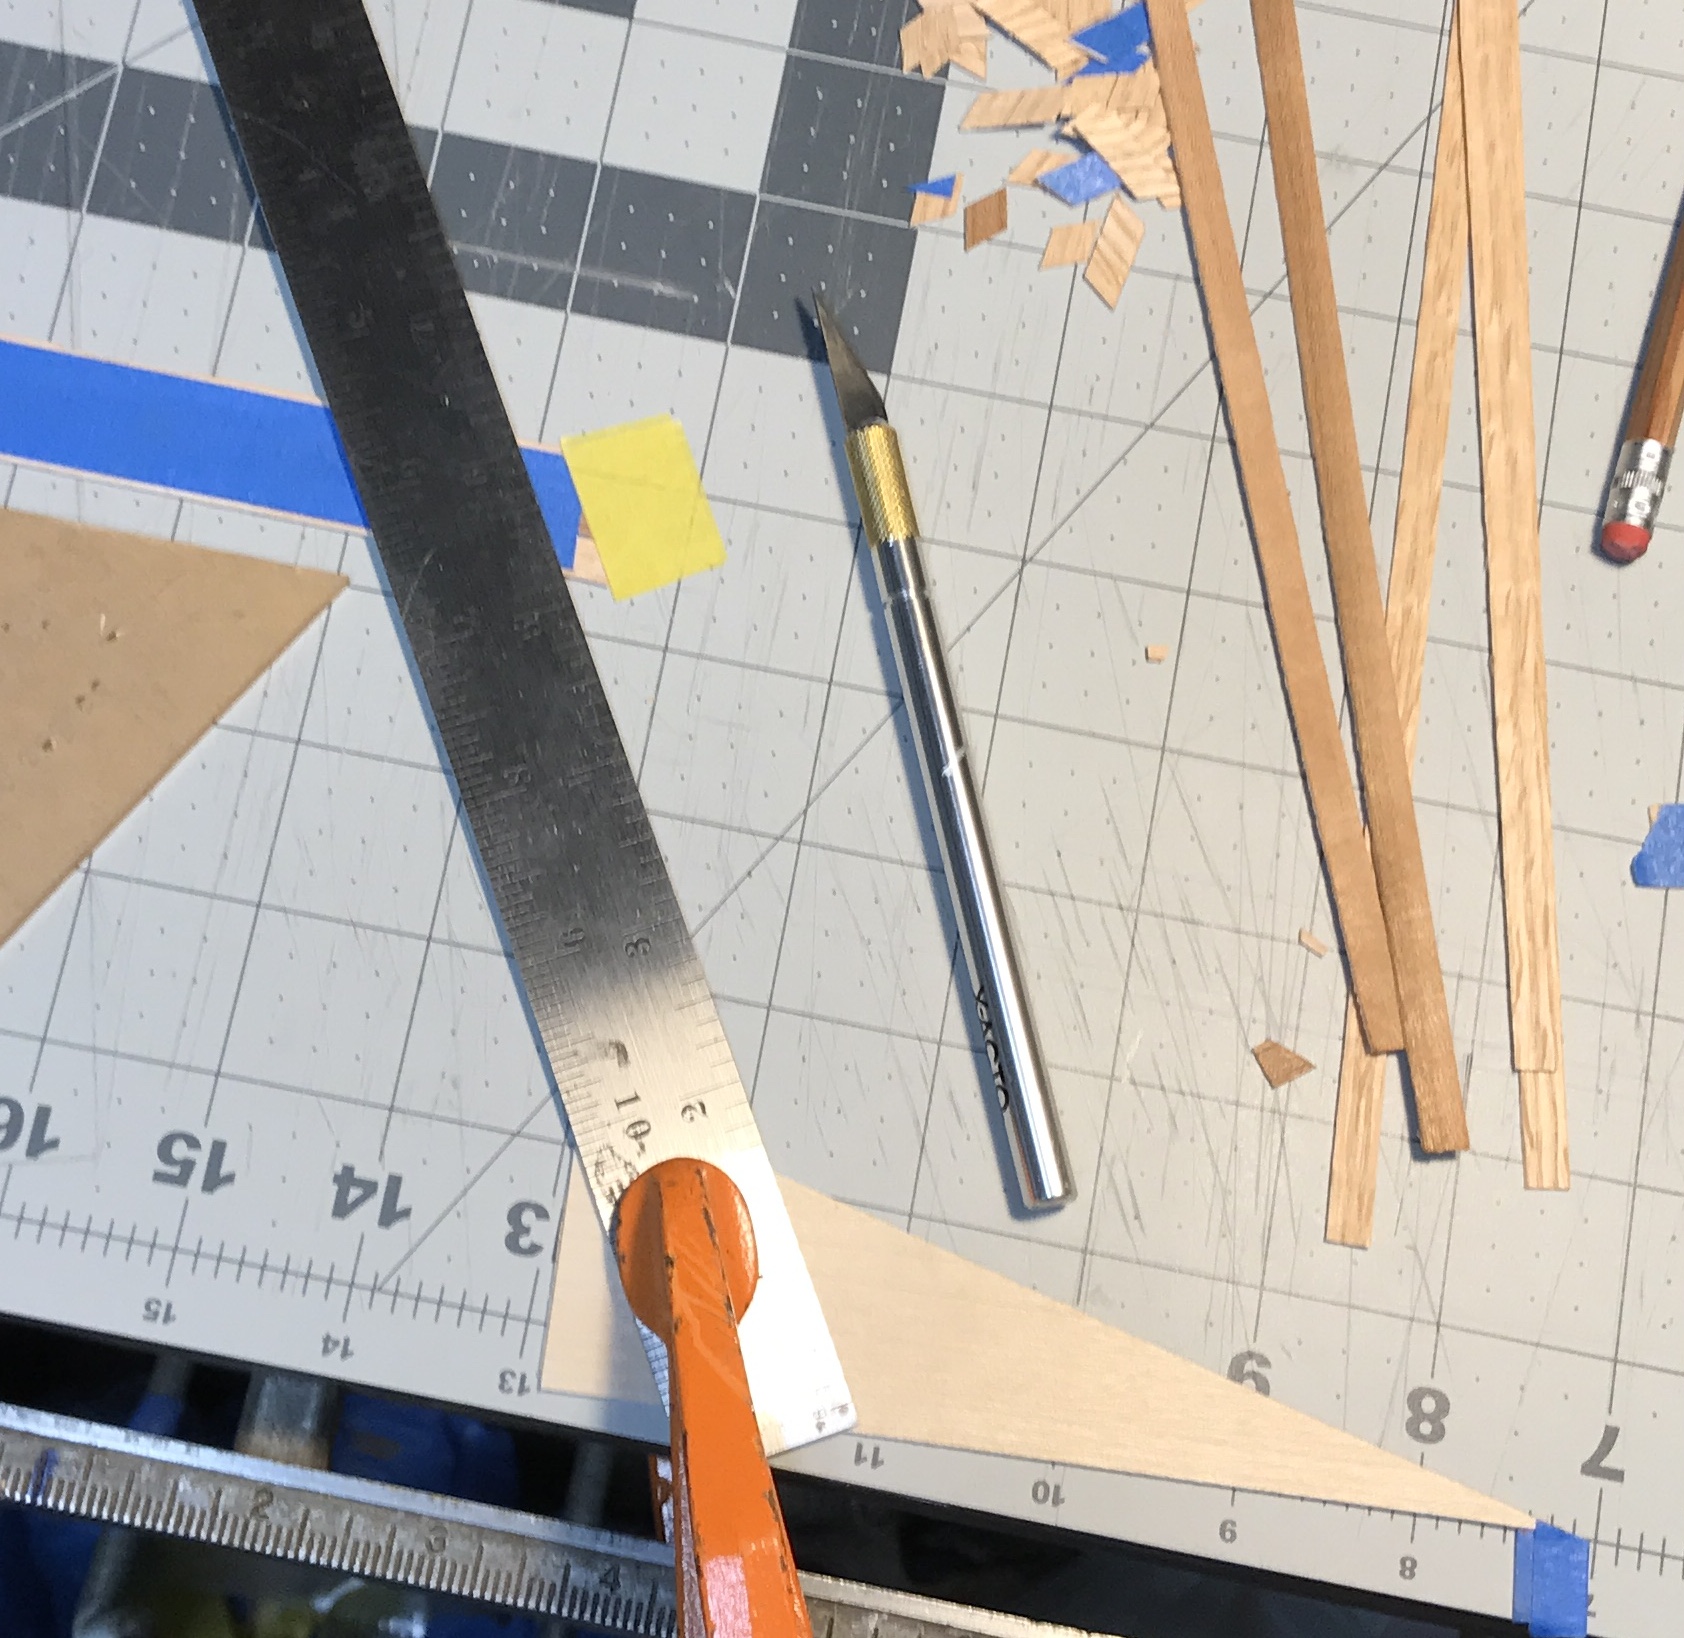
Upon further consideration I will replace the asymmetrical four pointed star in the center of the boards with a symmetrical twelve pointed star. After much wasted effort seeking an alternative, the star will be made from twelve diamonds (could be two different colors). The diamonds have 30° points. A little math indicates the diamonds should be cut from strips of veneer that are 0.388" wide. This dimension needs to be accurate. Any error accumulates times twelve. Similarly, the 30° measurement needs the same level of accuracy.
The box was put together this morning. I could not get to the belt sander so sanded by hand with an 80 grit block. The ends of the box frame were not perfectly aligned. The offending areas were sanded flat as needed. A dado blade was put in the table saw, 7/16" wide and 3/16" high. The long sides of the faces were cut against a fence. The short sides were cut with the miter gauge. Some trimming and adjustments were needed to get the faces to mate well with the sides. The photo below shows the dry assembly. The faces are a tad long, but this can be fixed later.
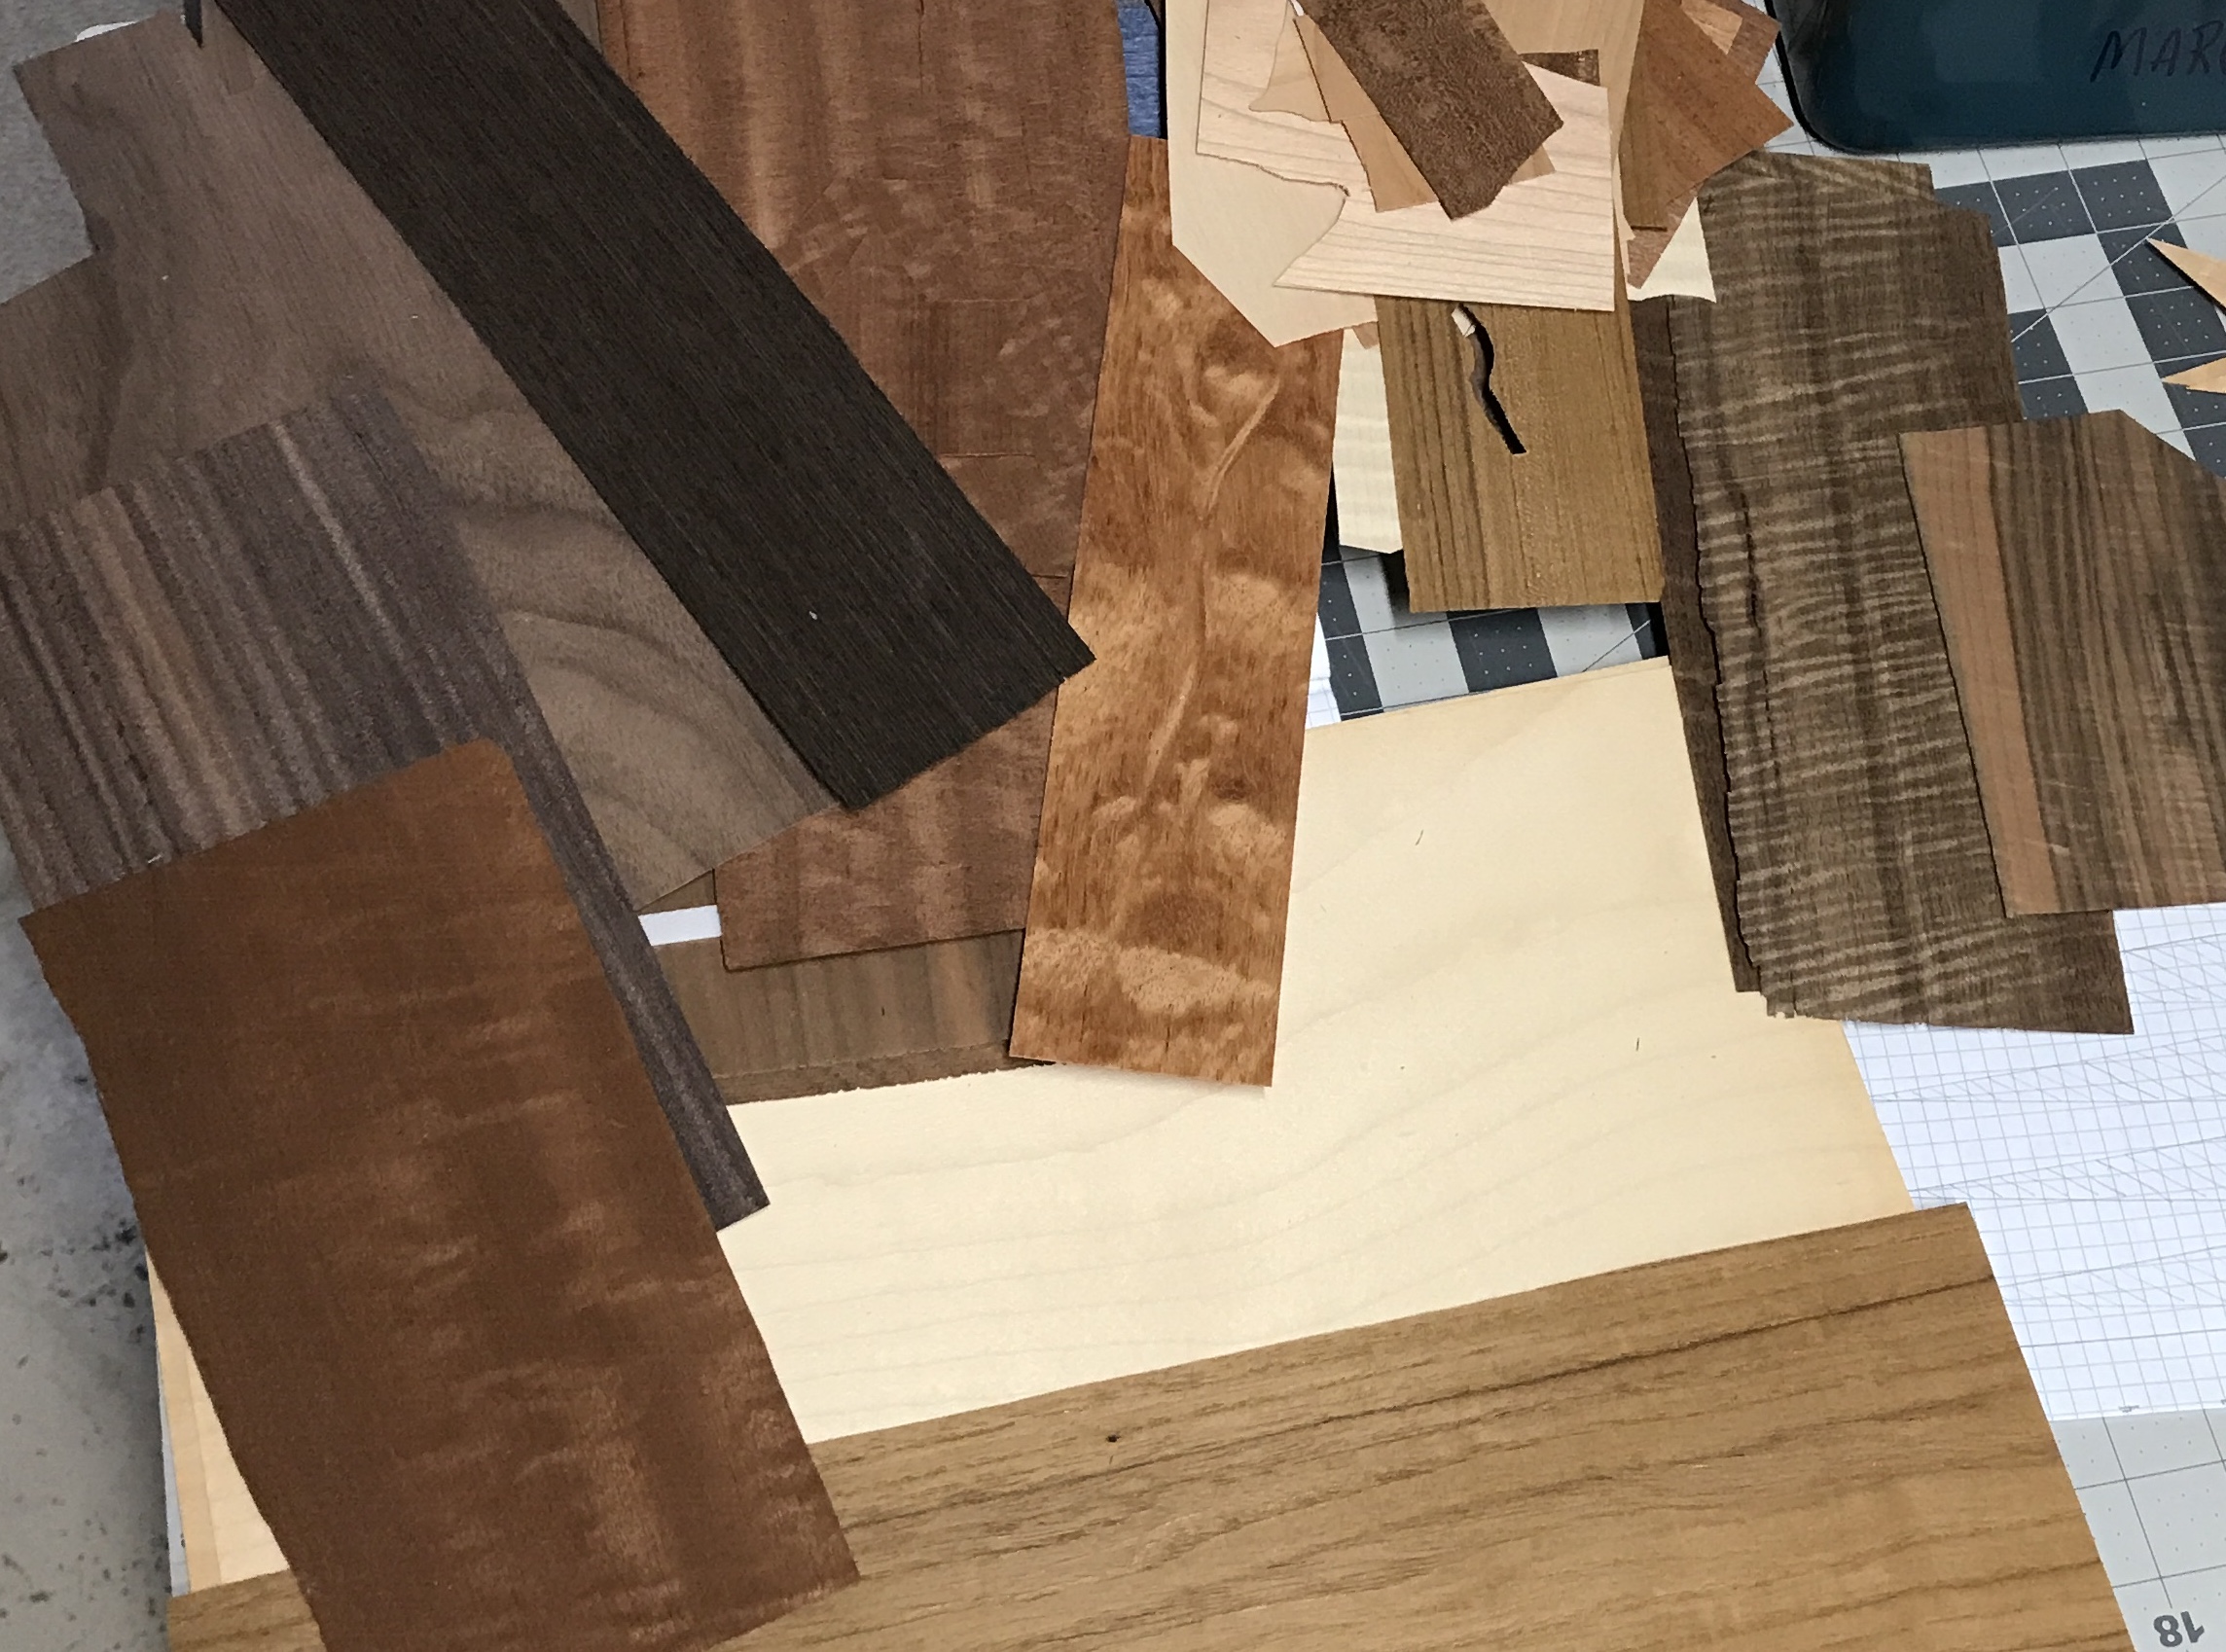
With the parquetry designs almost complete the outside designs were started. First, veneer was selected. I pulled out all of the veneer I have. In addition to veneer purchased at Marc Adams, some had been purchased many years ago for a tea box. This old veneer is curly maple and looks very nice. It will be used for the "on triangles" on the board. At MASW I purchased a large packet of dark wood veneer for $10. This is how it is marked and this will be the background for the inside and the outside. It will also be used for the "off triangles". Various other colors of veneer were selected for other aspects of the designs. The veneer was labeled and the veneer selected was marked on the designs.

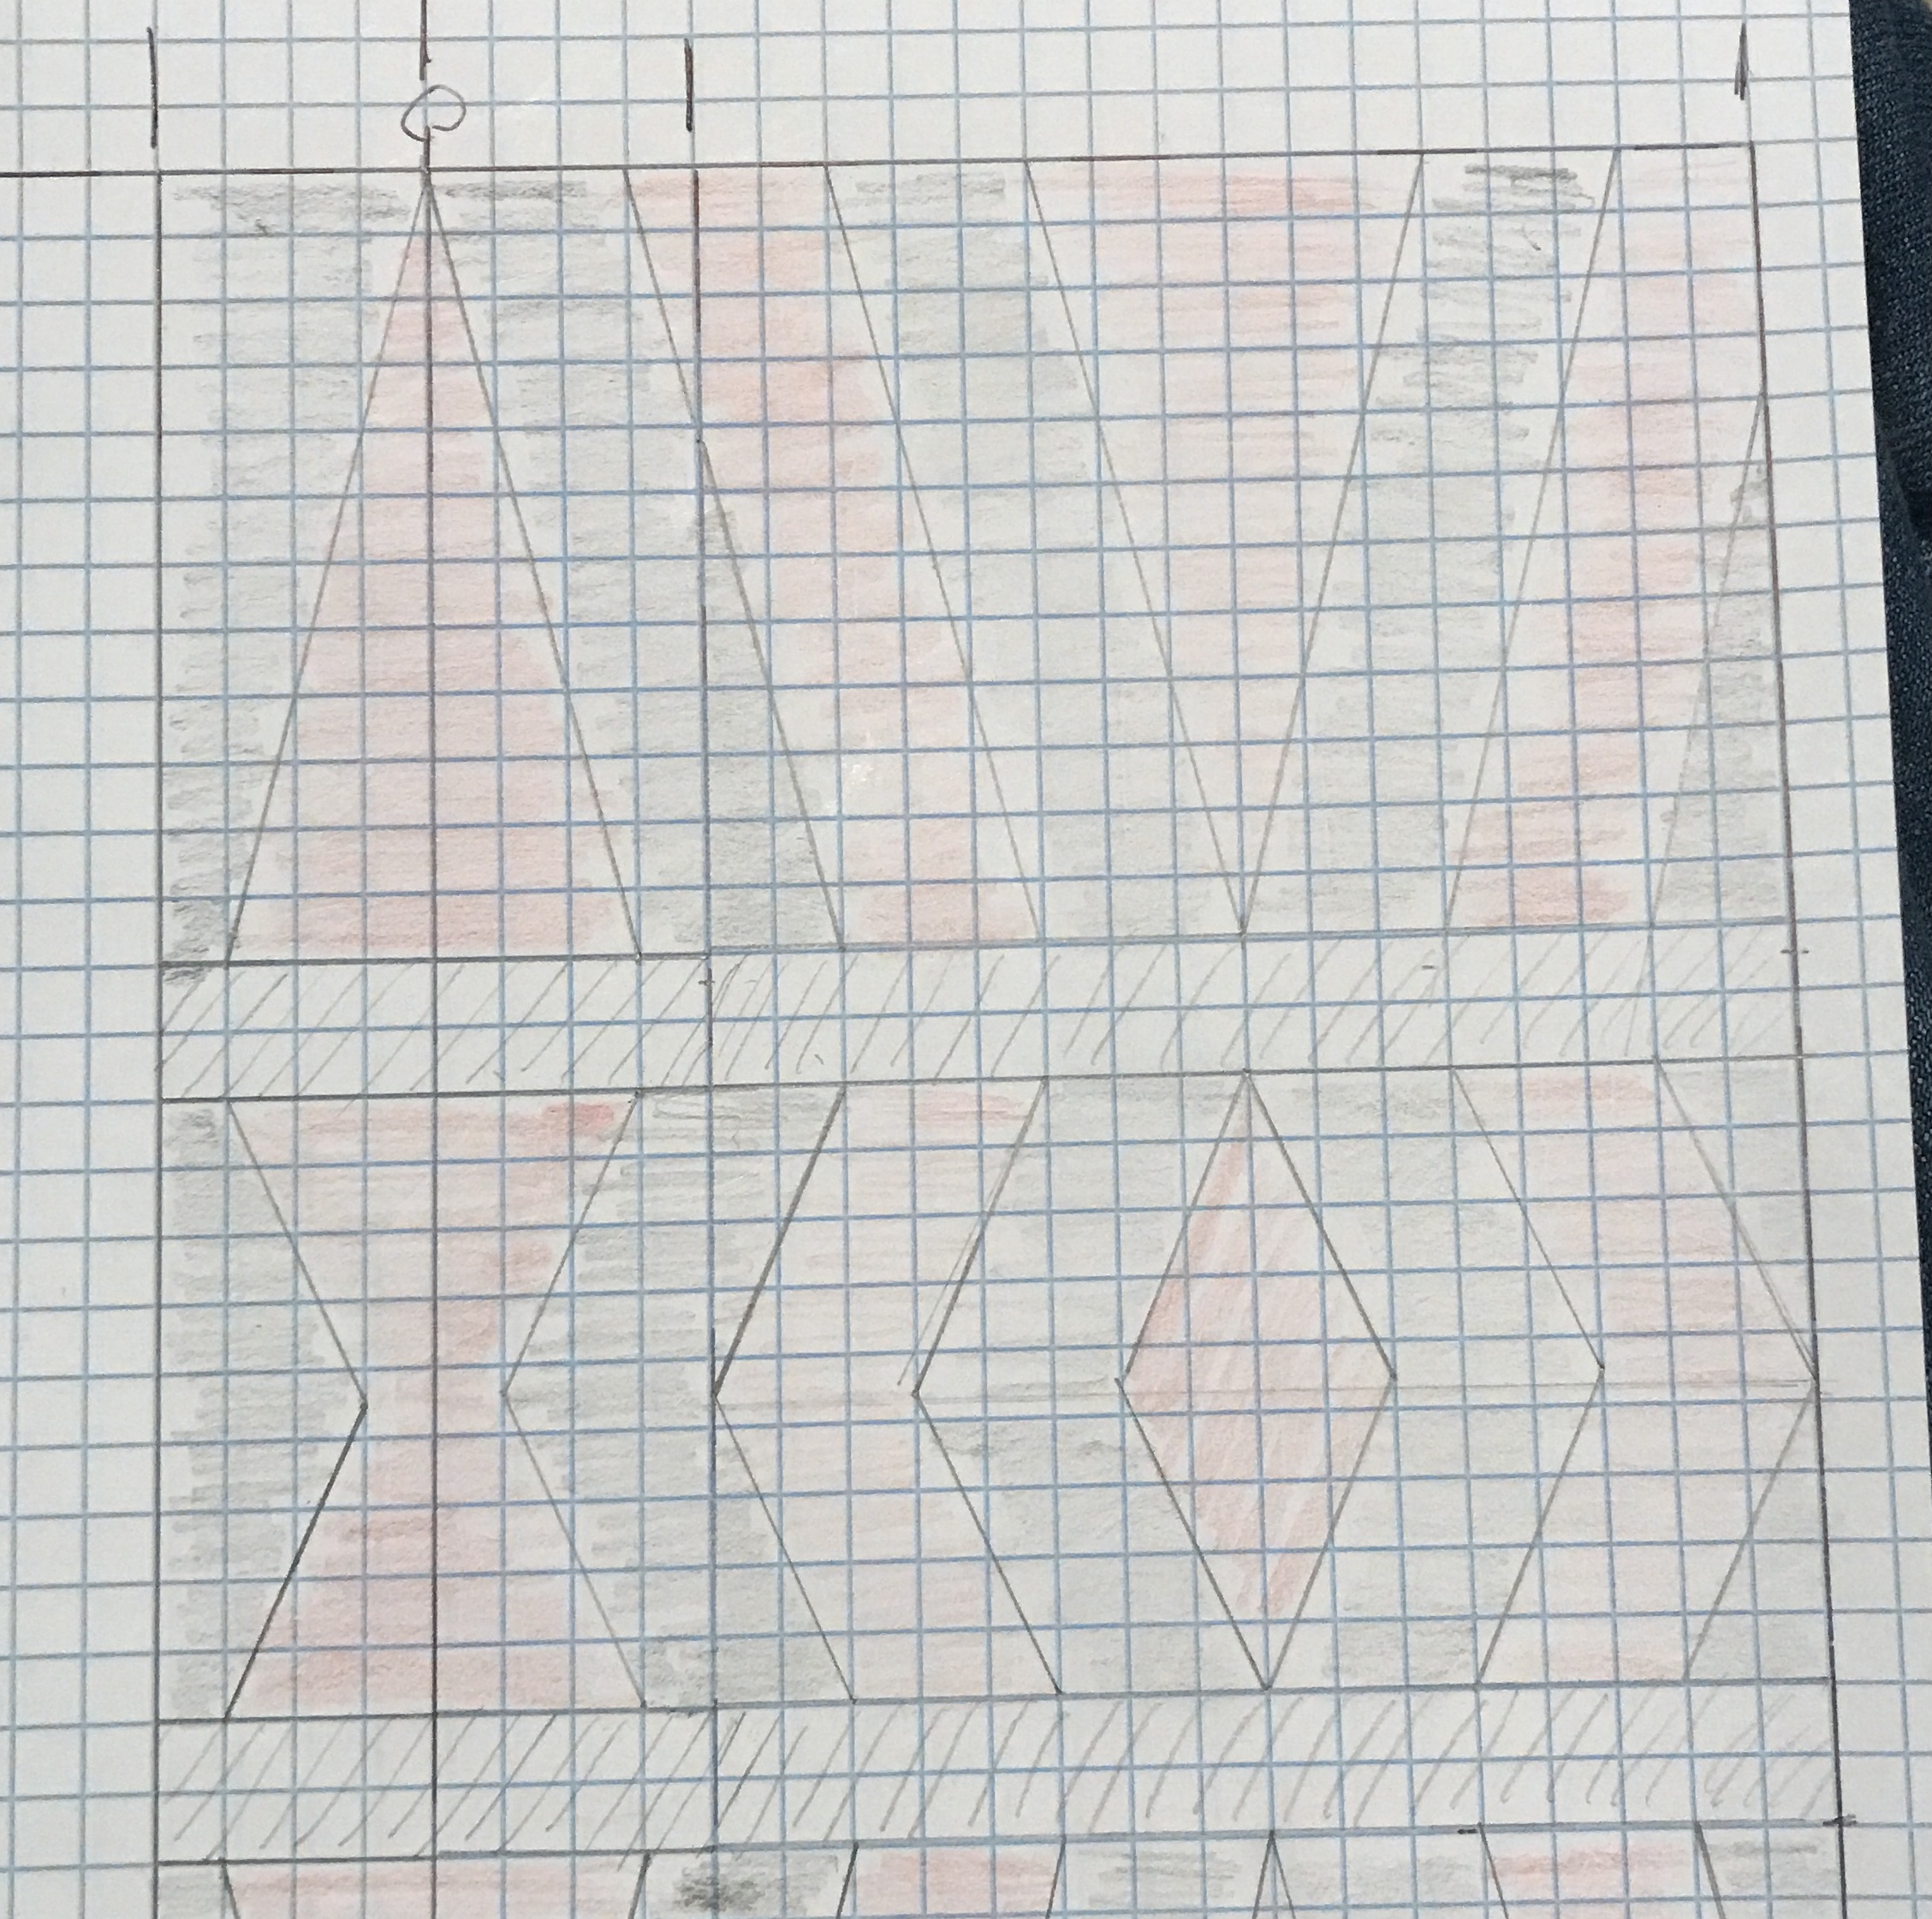
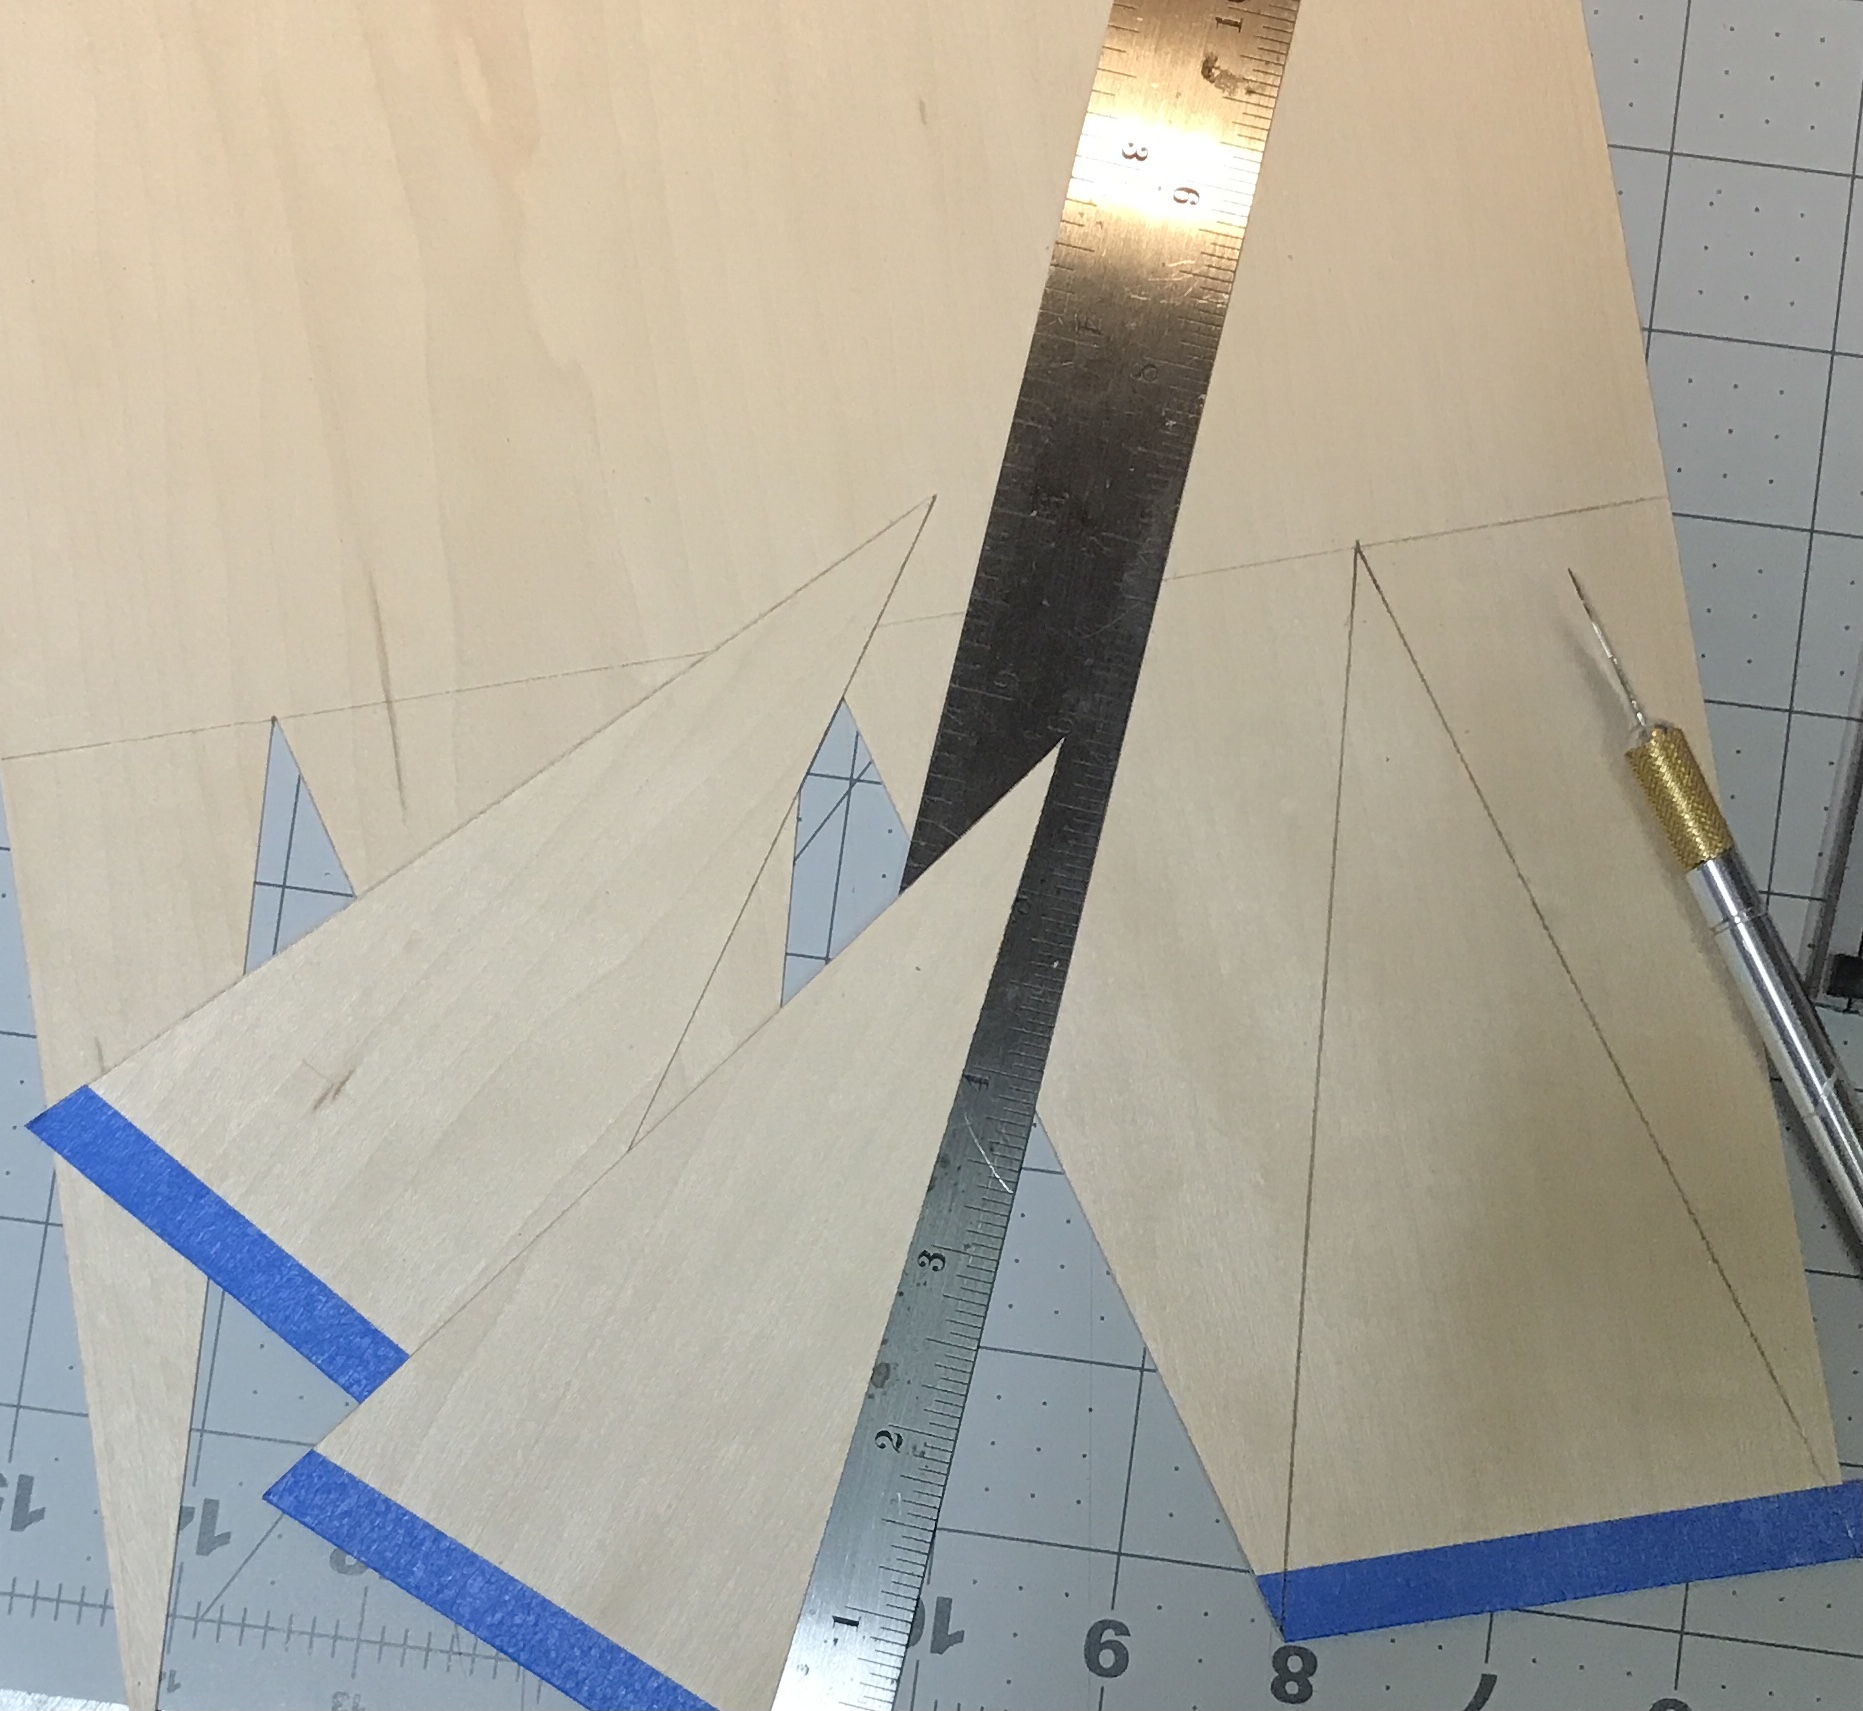
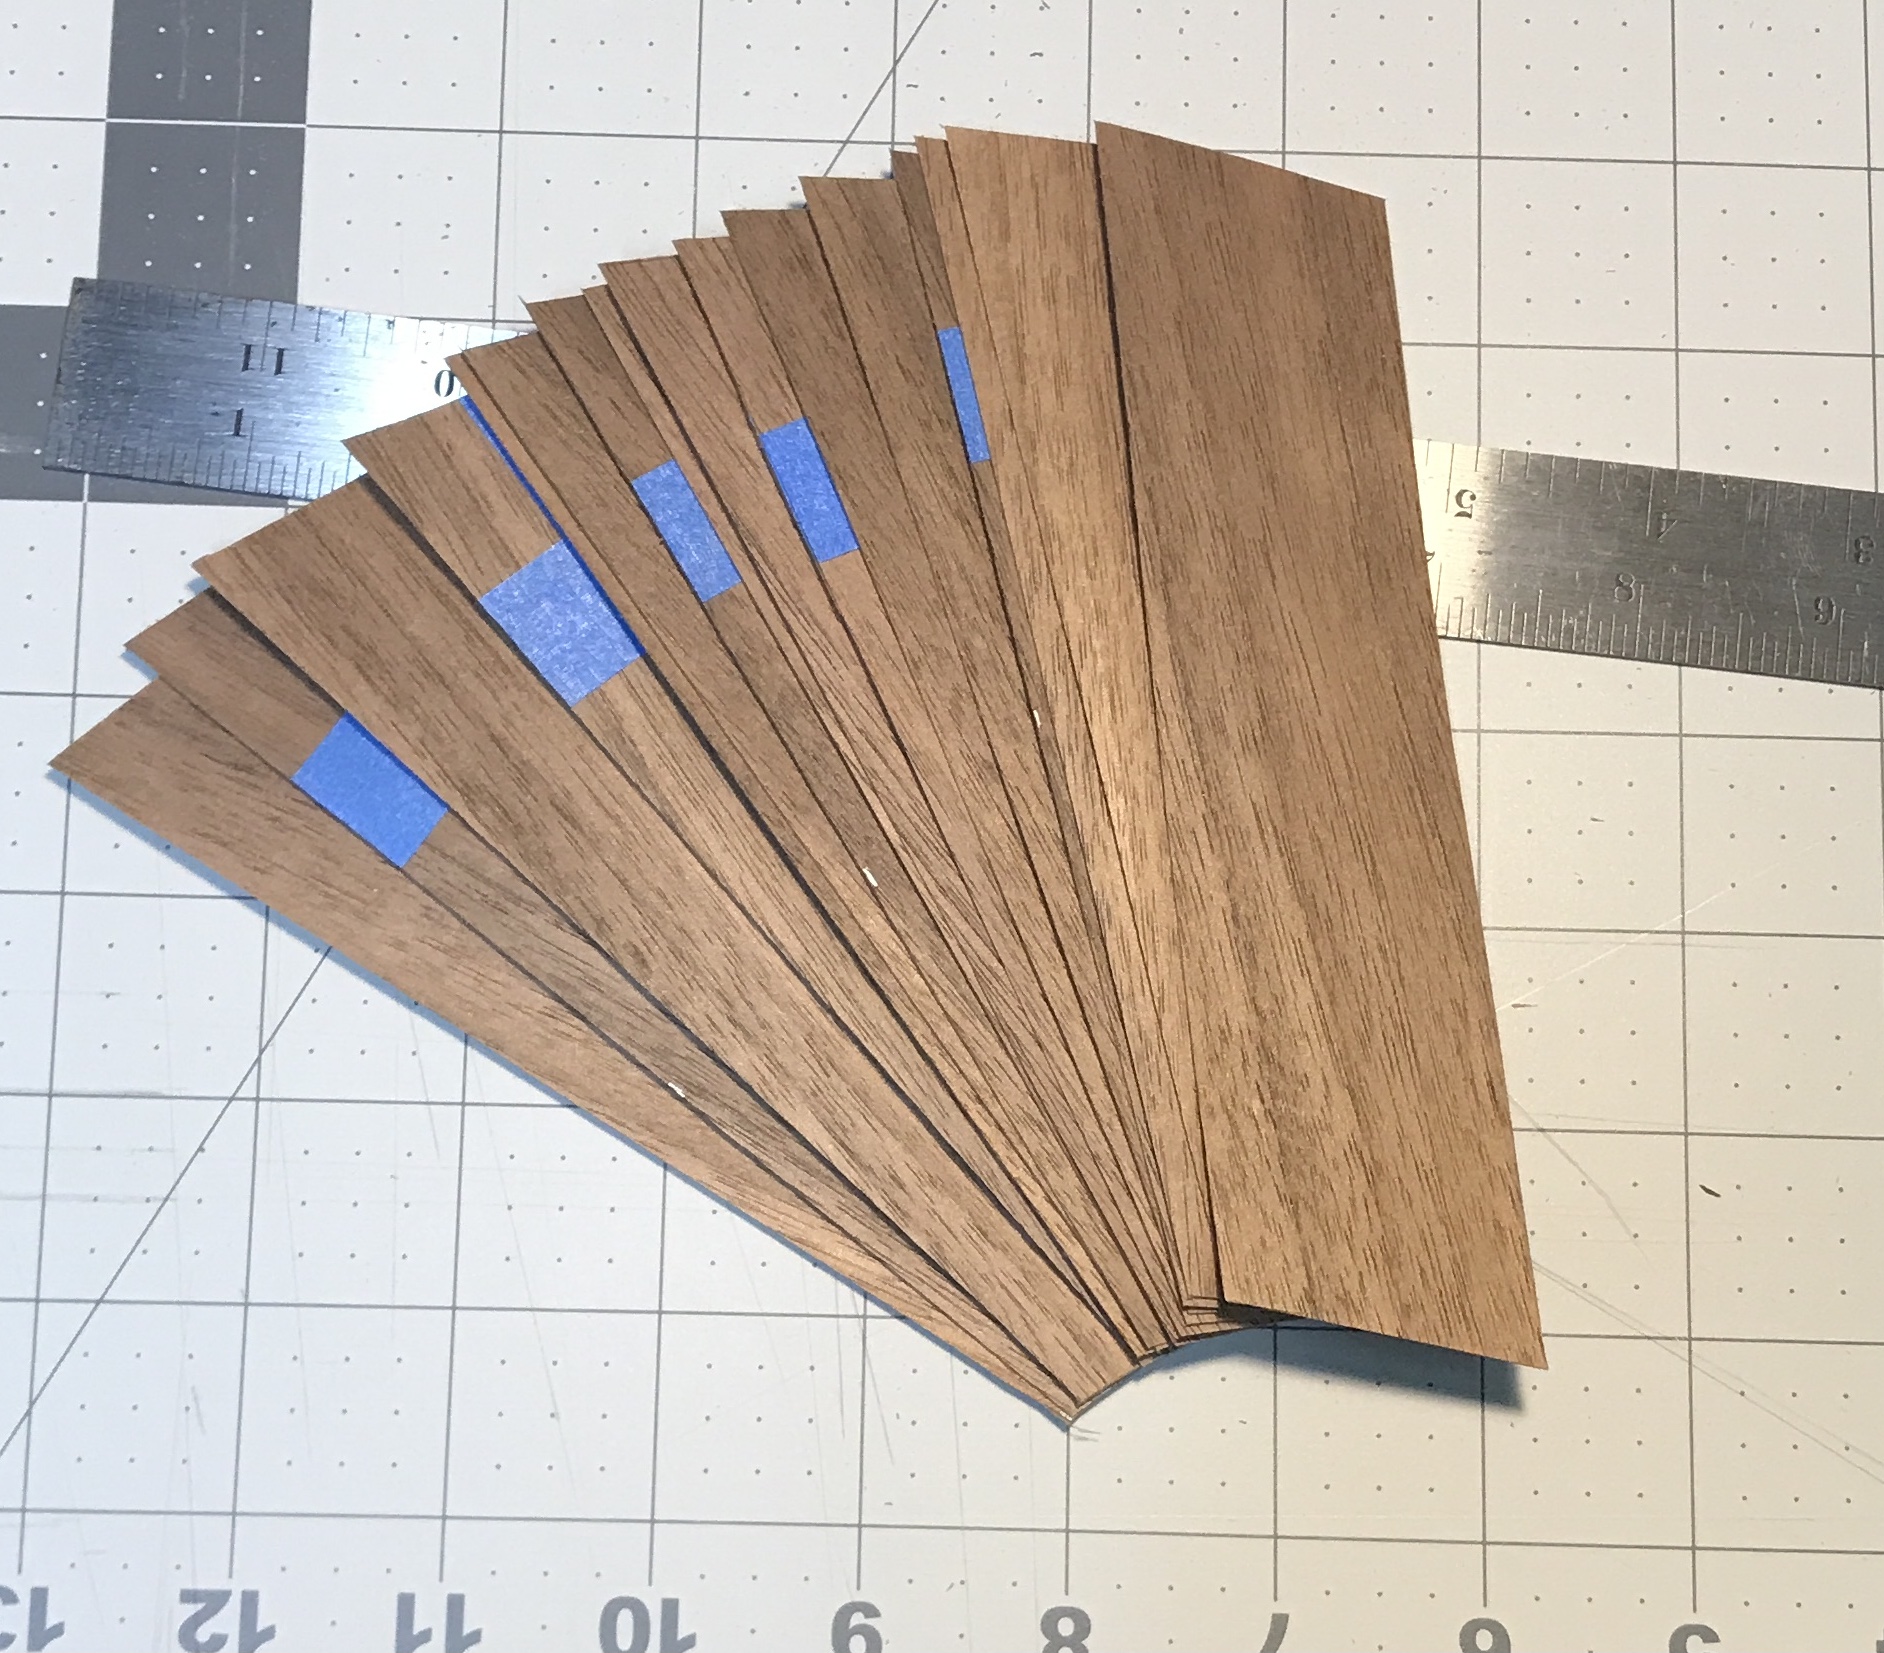
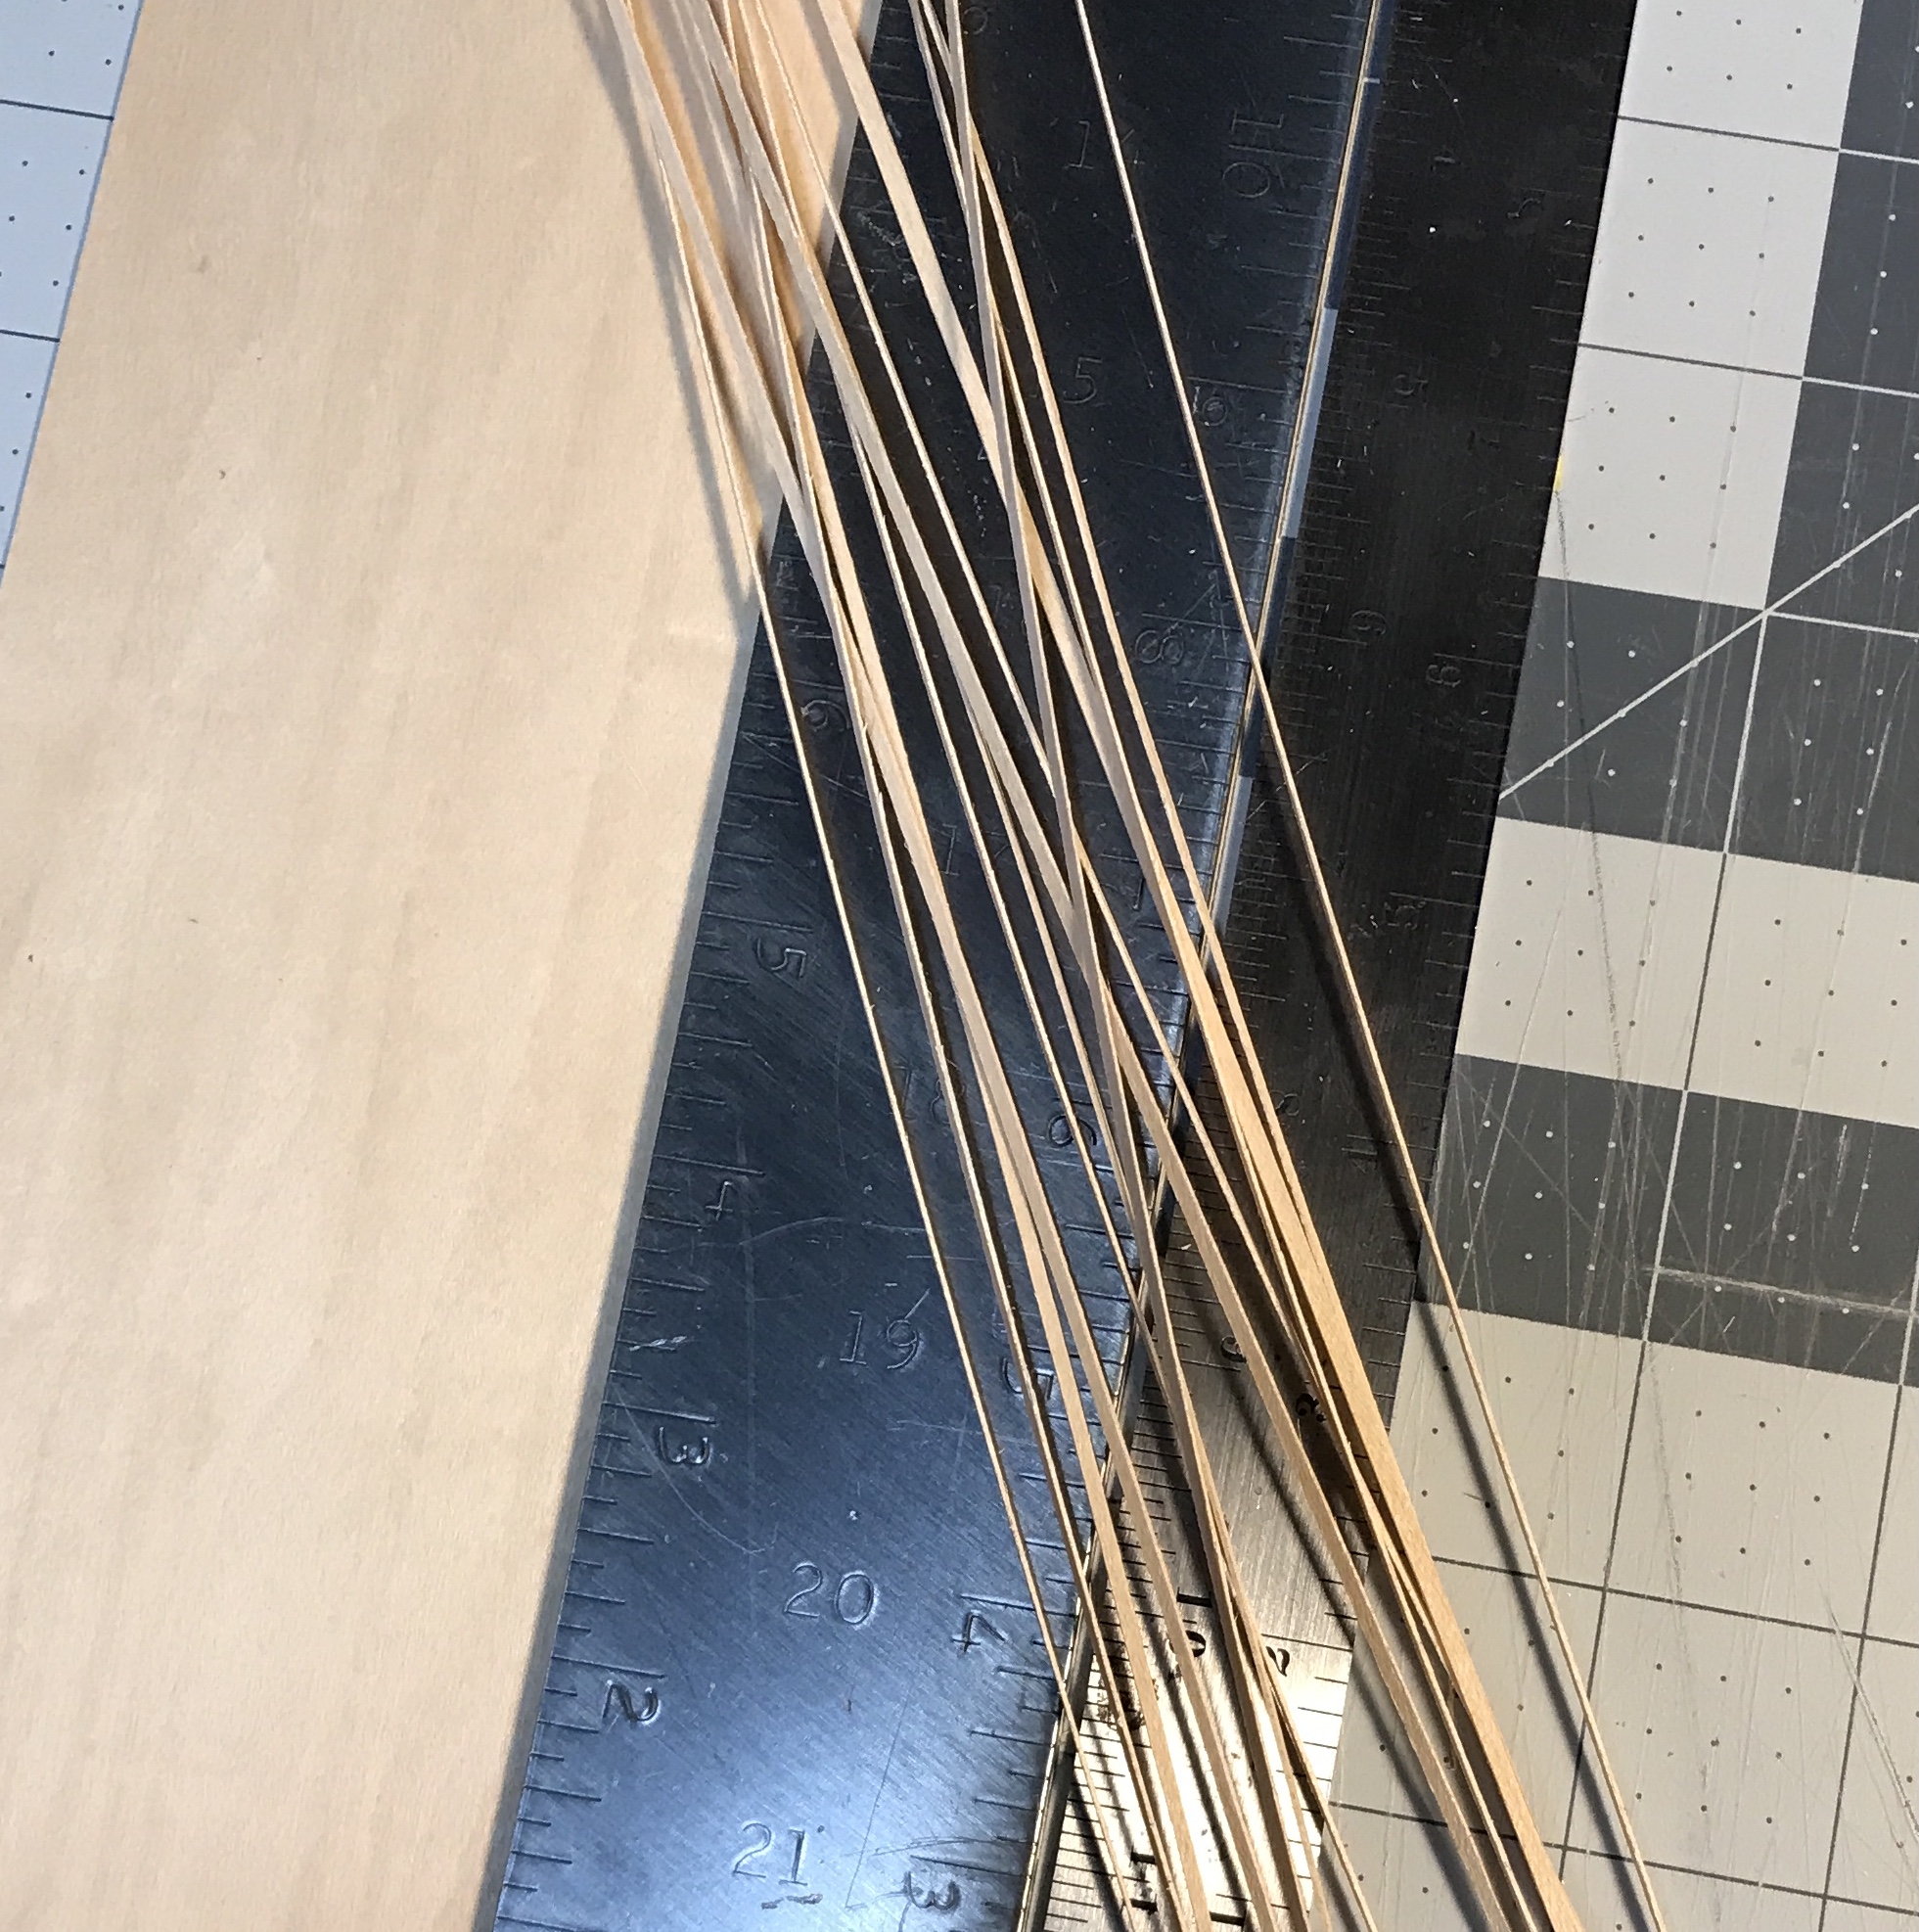
The triangles for the outside of the box were cut first. They are cut from a very light veneer. The design calls for triangles that are 3" wide at the base and 6" tall. This gives an awkward angle of 28.5°. The triangles will be a bit shorter, but will have a 30° angle at the top. This gives a height of 5.796". This distance was set on calipers and the calipers made a light scratch across the wood at this distance. The scratch was highlighted with a pencil. Intervals were marked at 3" on the base and centered between these marks on the scratched line. The triangles were drawn from mark to mark. Three triangles were cut out leaving two triangles attached at the scratched line. These were also cut loose. Two more triangles were laid out as before and along with the triangle between them, eight were produced. Two diamonds were made from the same material.
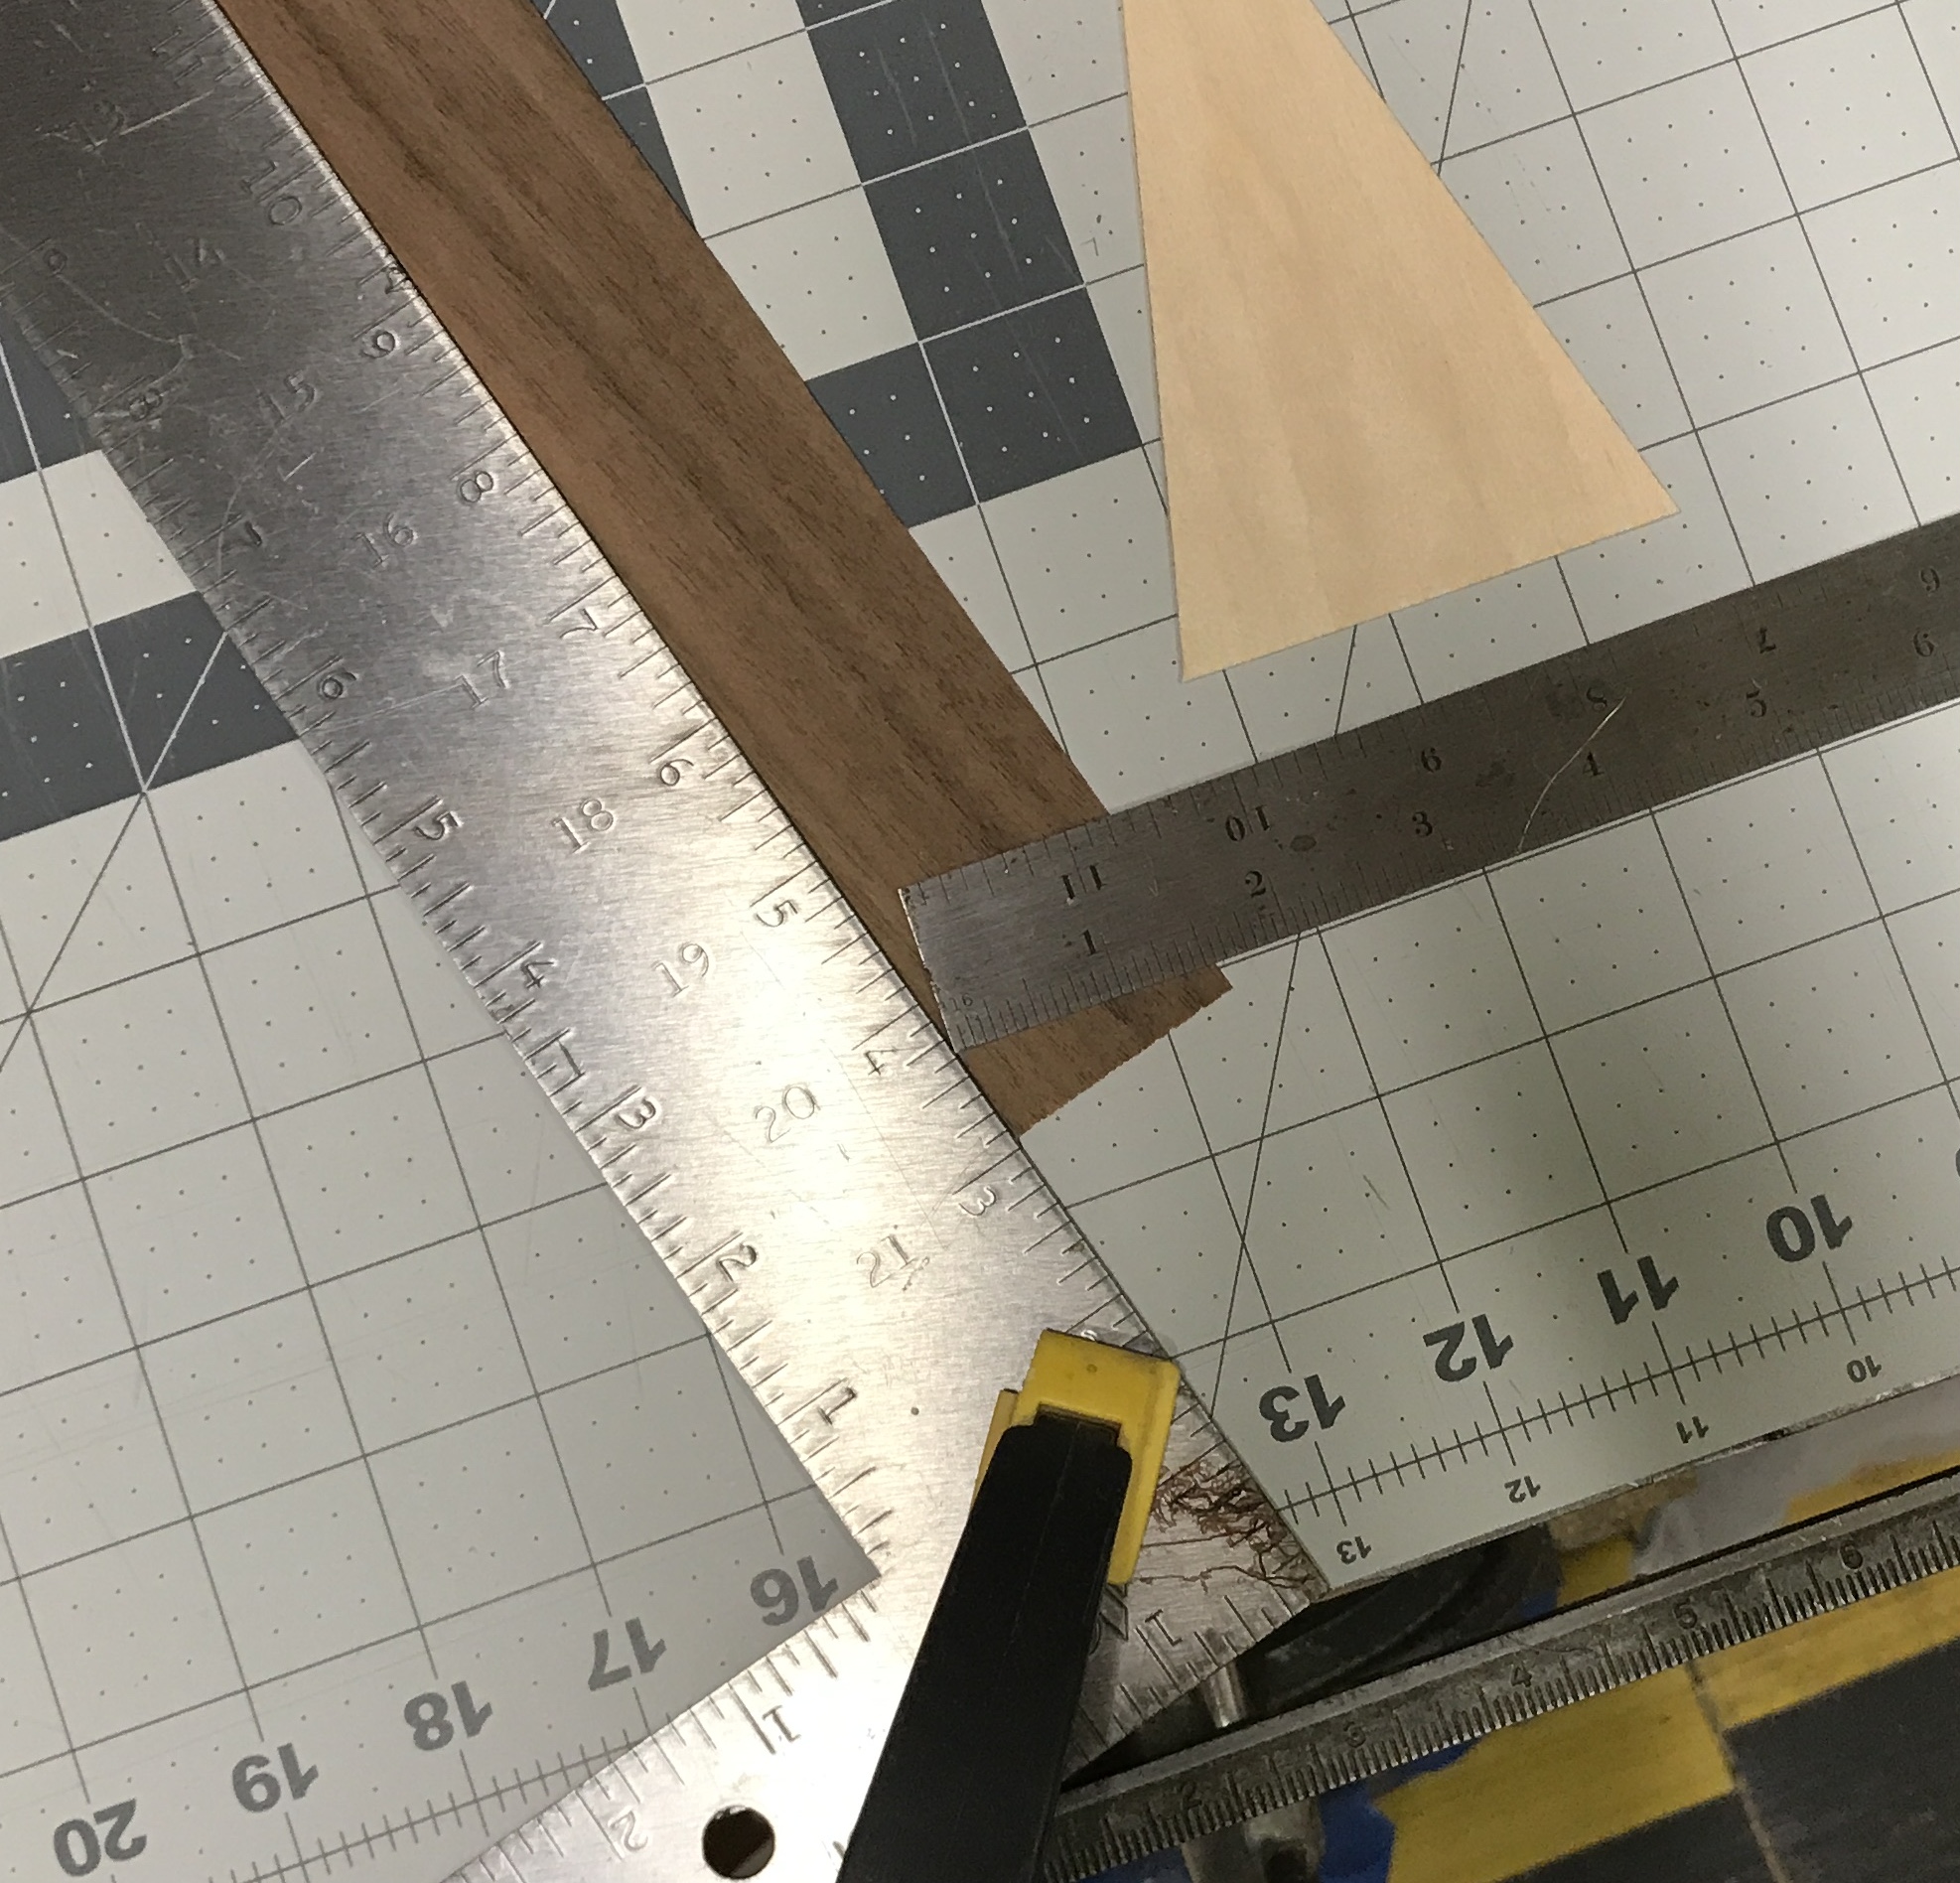
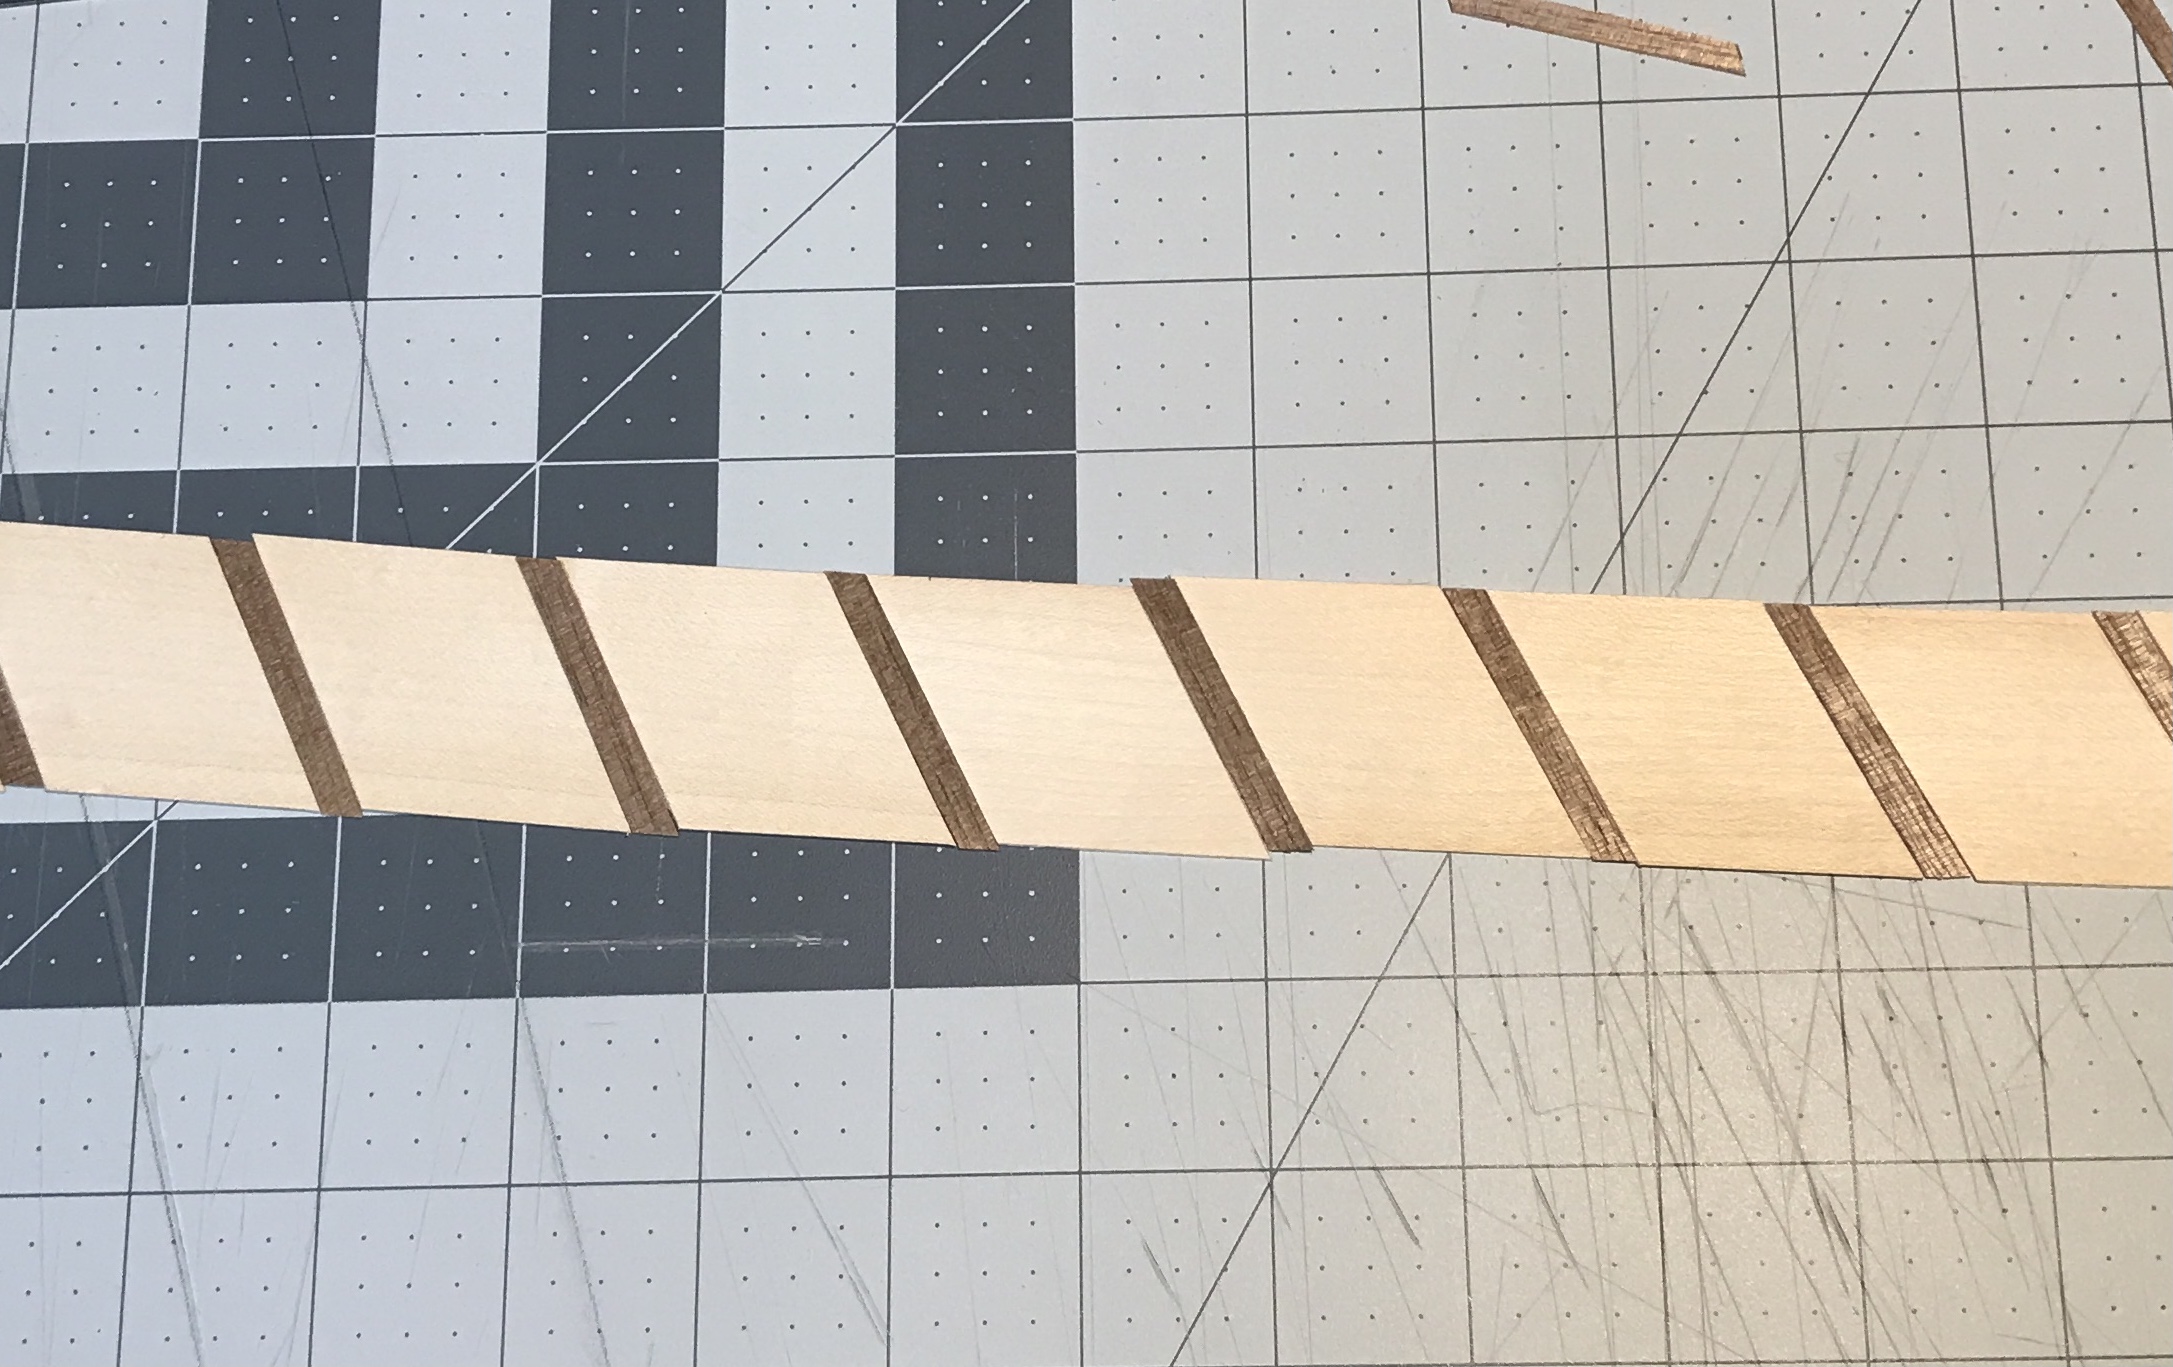
The strips that sit between the triangles were cut next from the $10 background veneer. The strips were marked at 1 1/2" and cut the length of the veneer. I am not yet sure how to consistently cut these strips at the appropriate angle. I set the square on the mat and set the angle with a triangle cut above. The bottom of the first strip was cut off by aligning it with the square and using a second straightedge for the cut. The second straightedge was aligned with marks on the cutting mat. This cut end was set at 1" on the square and the ruler was aligned at 7". A second cut was made to produce the angled bar. Each strip of veneer yielded three bars. An additional strip of material was made to get the needed 16 bars.
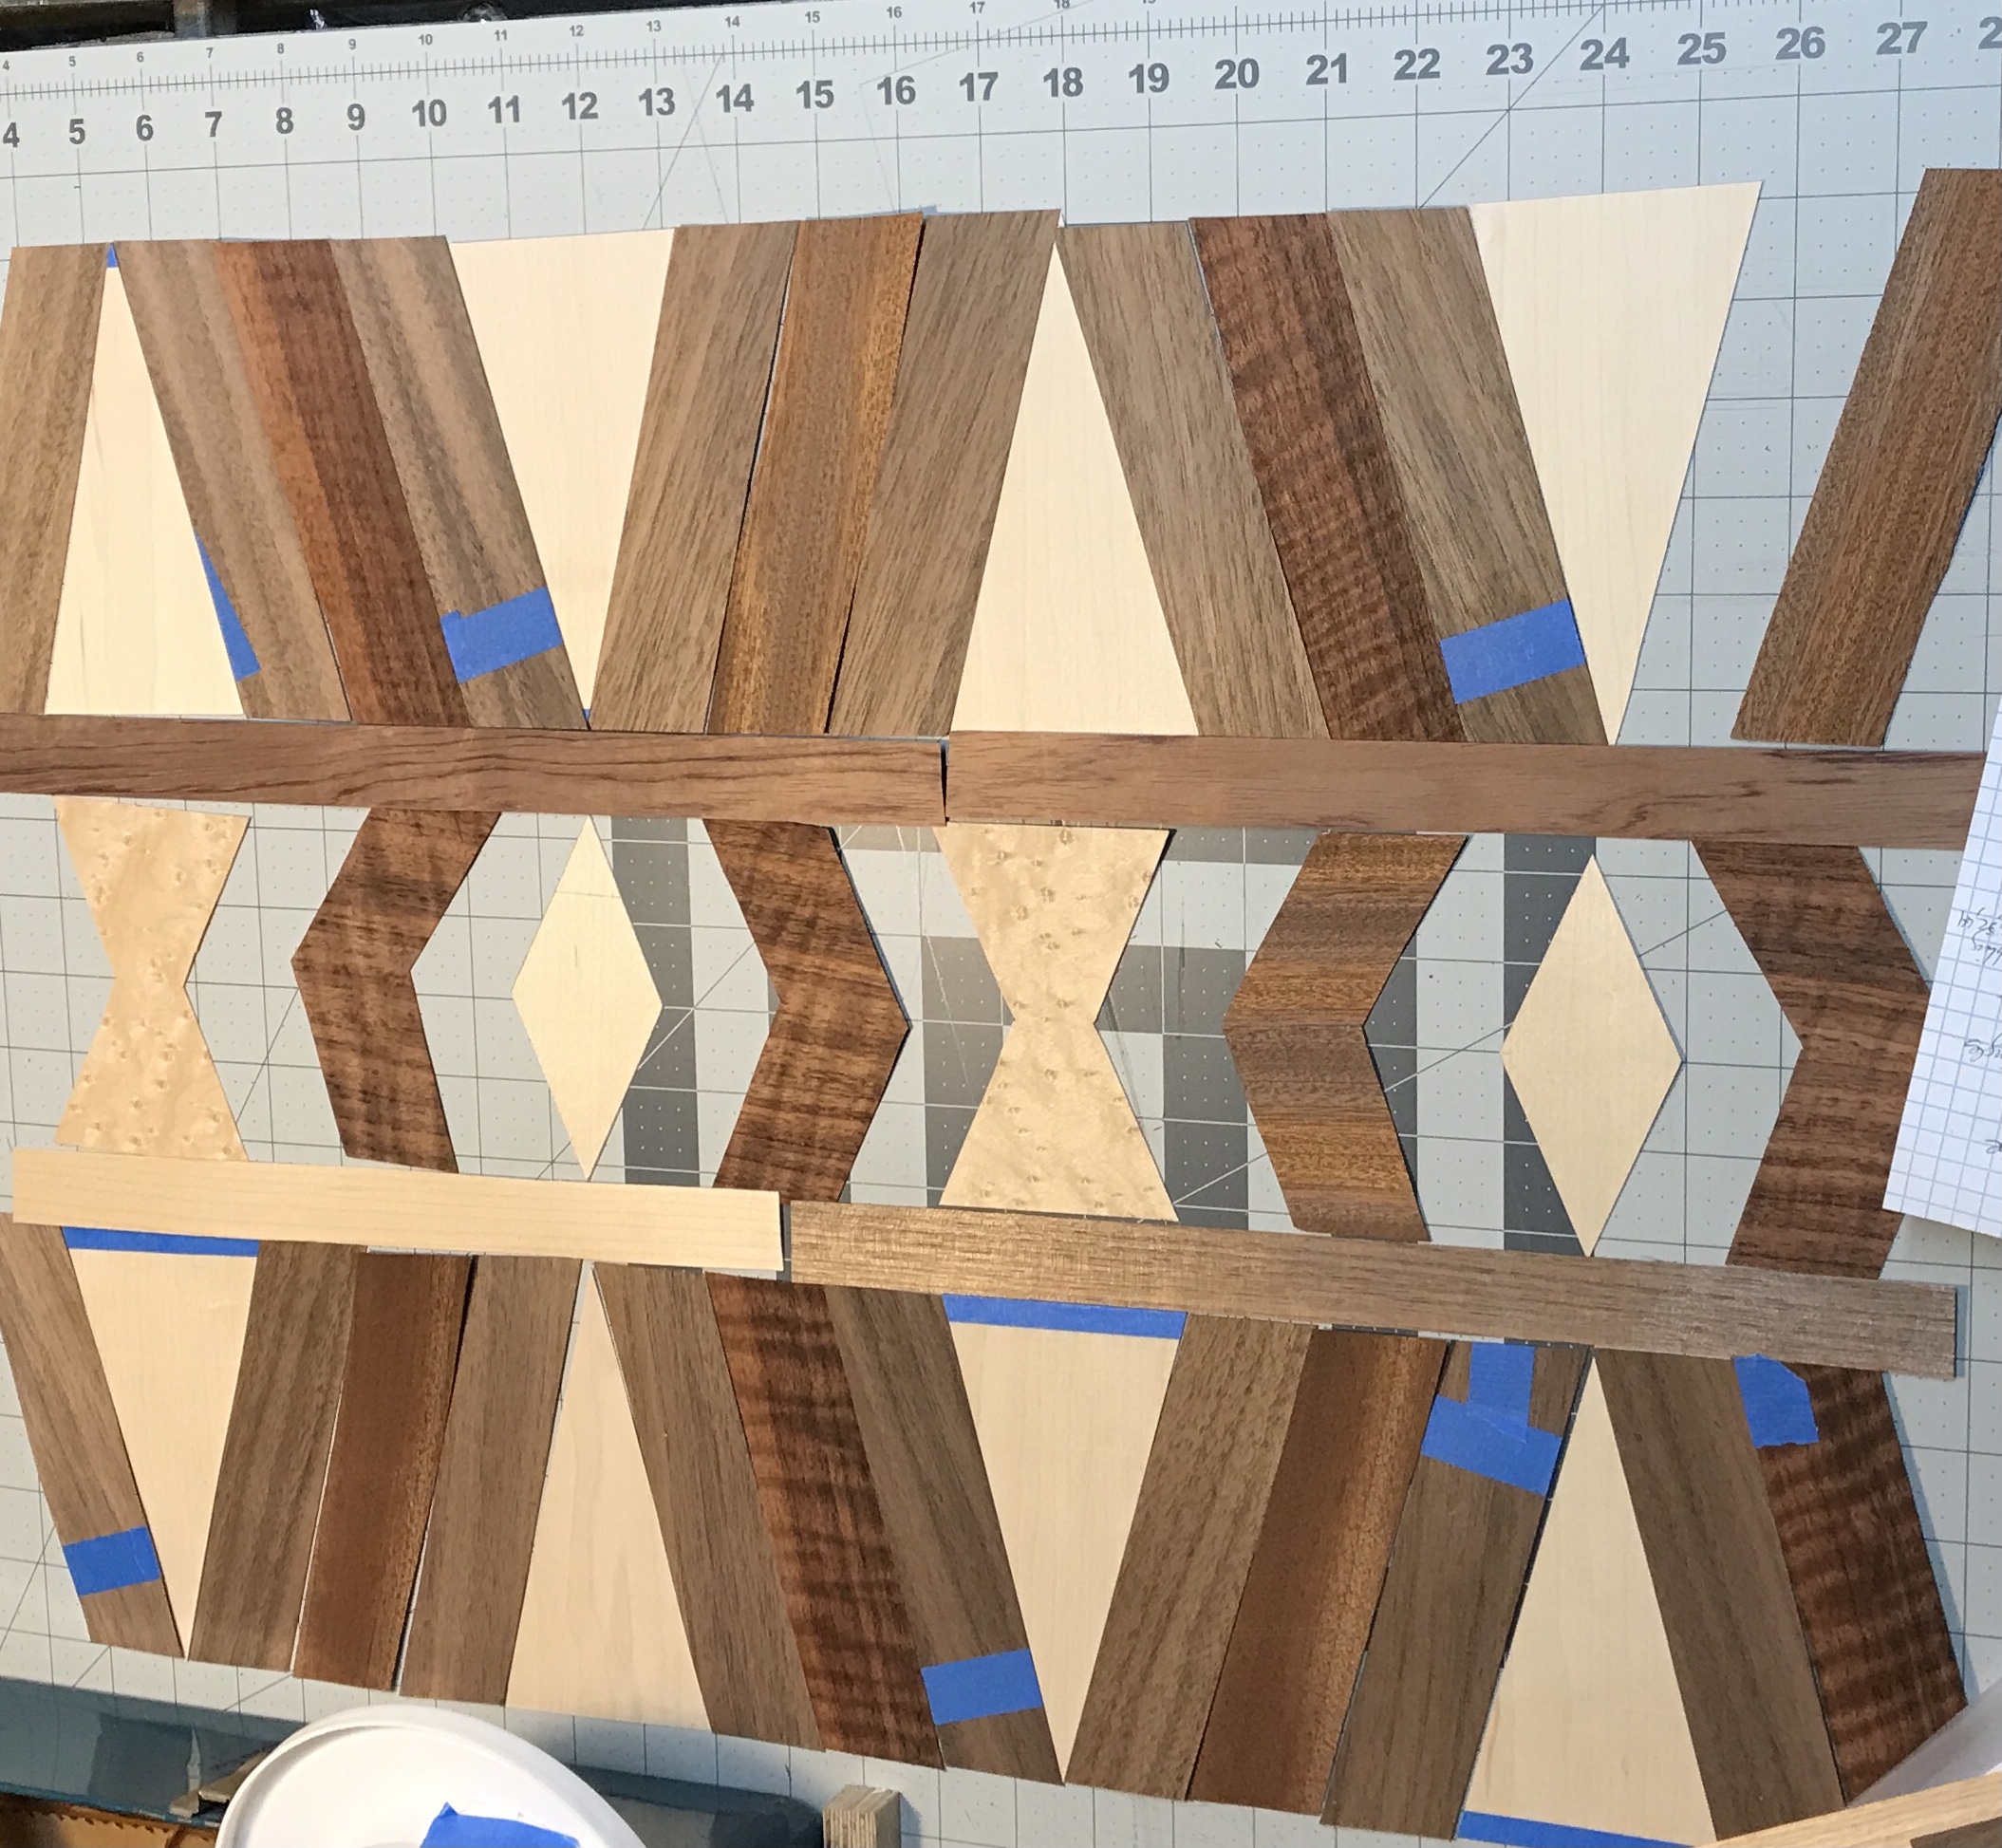
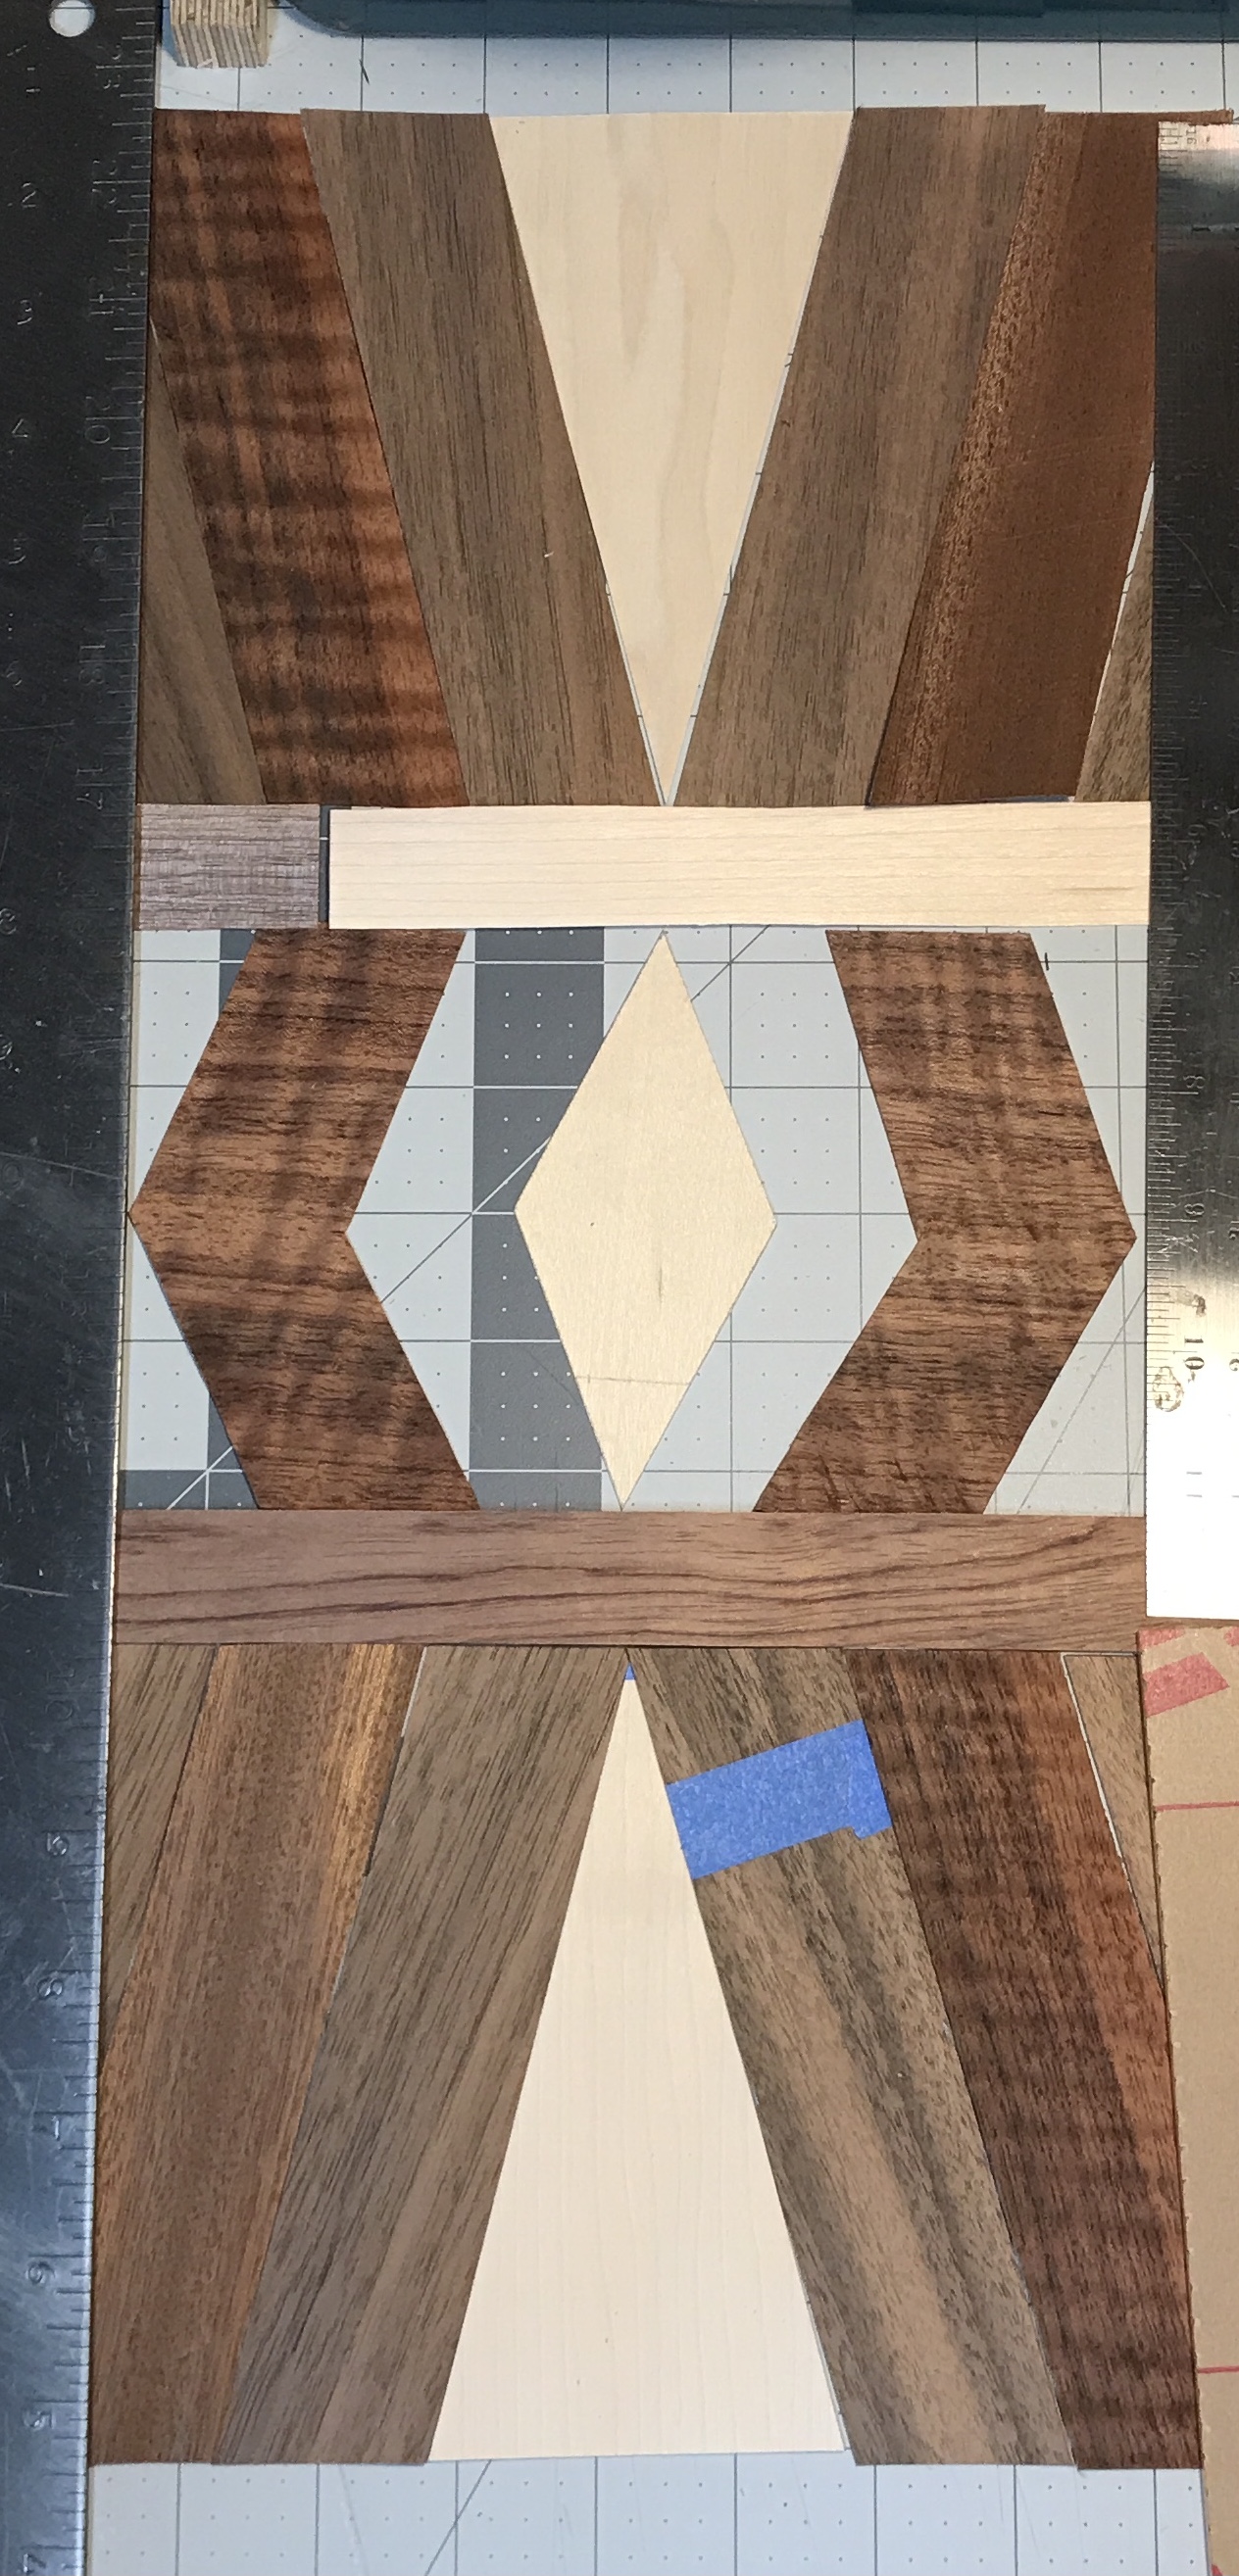
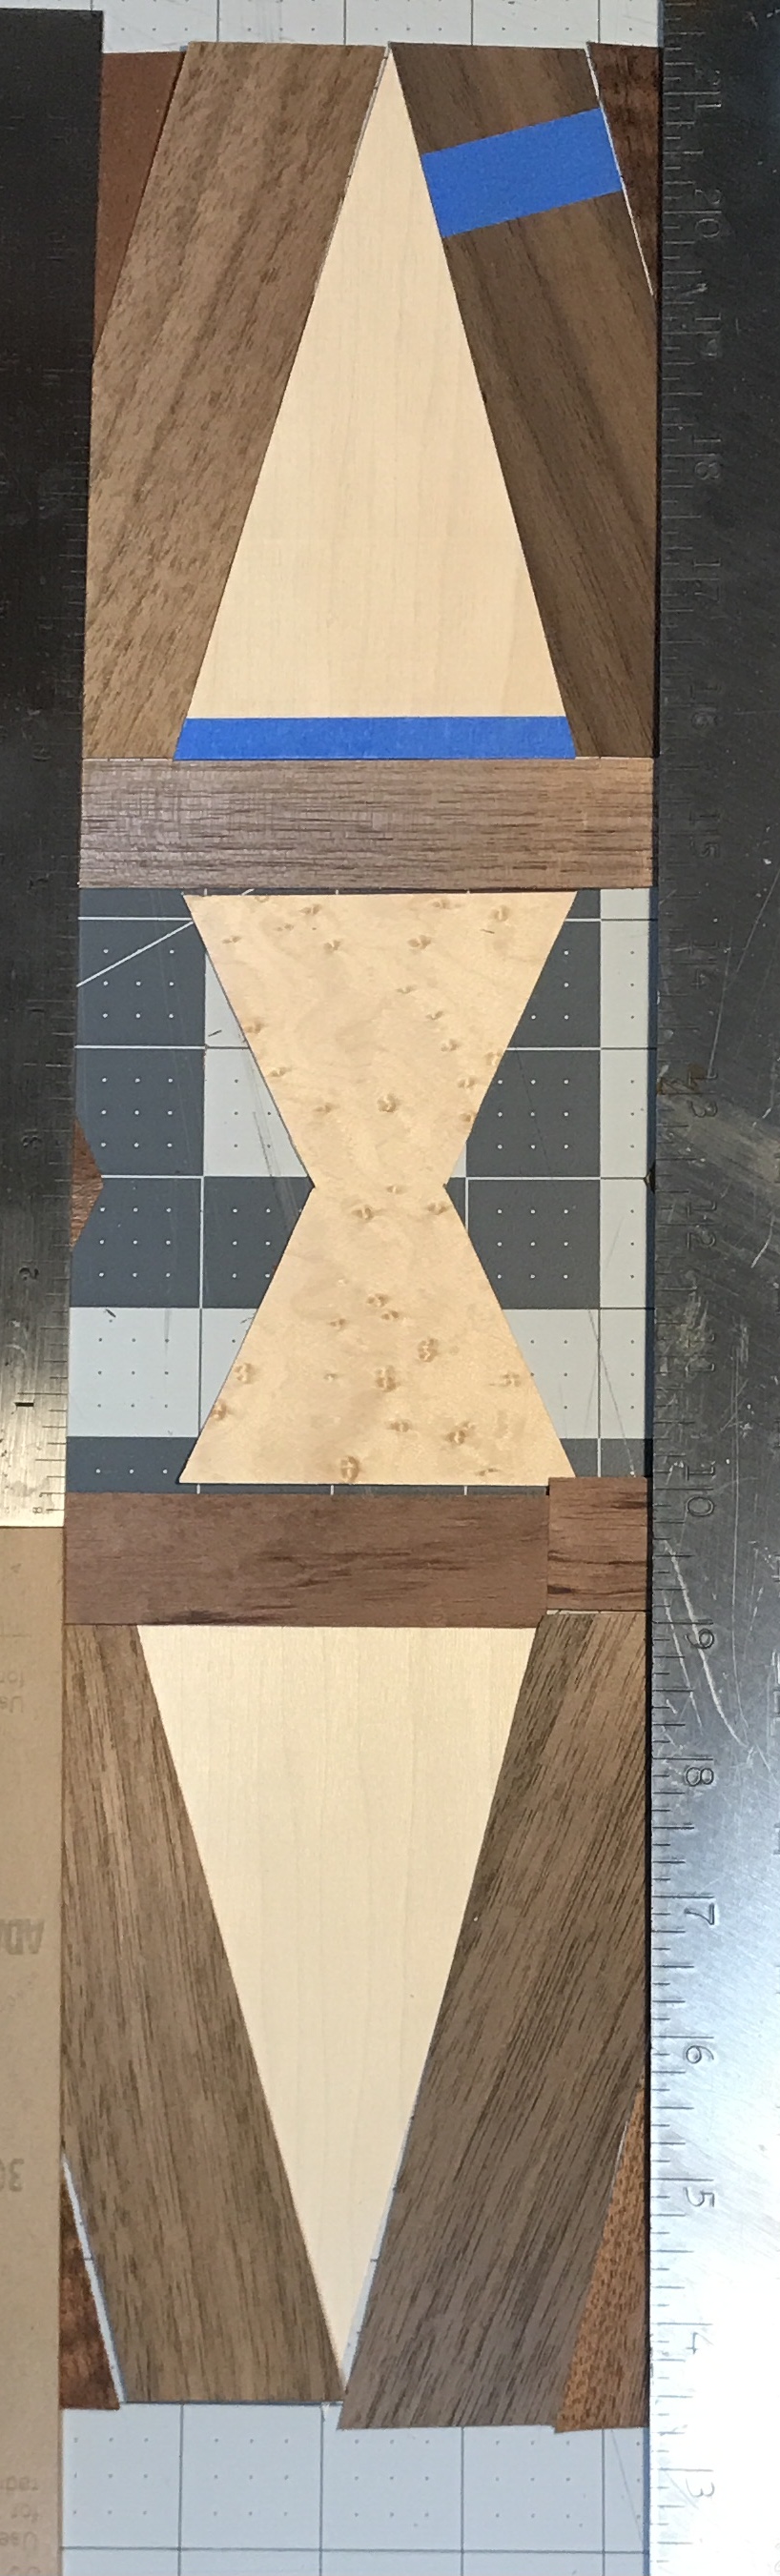
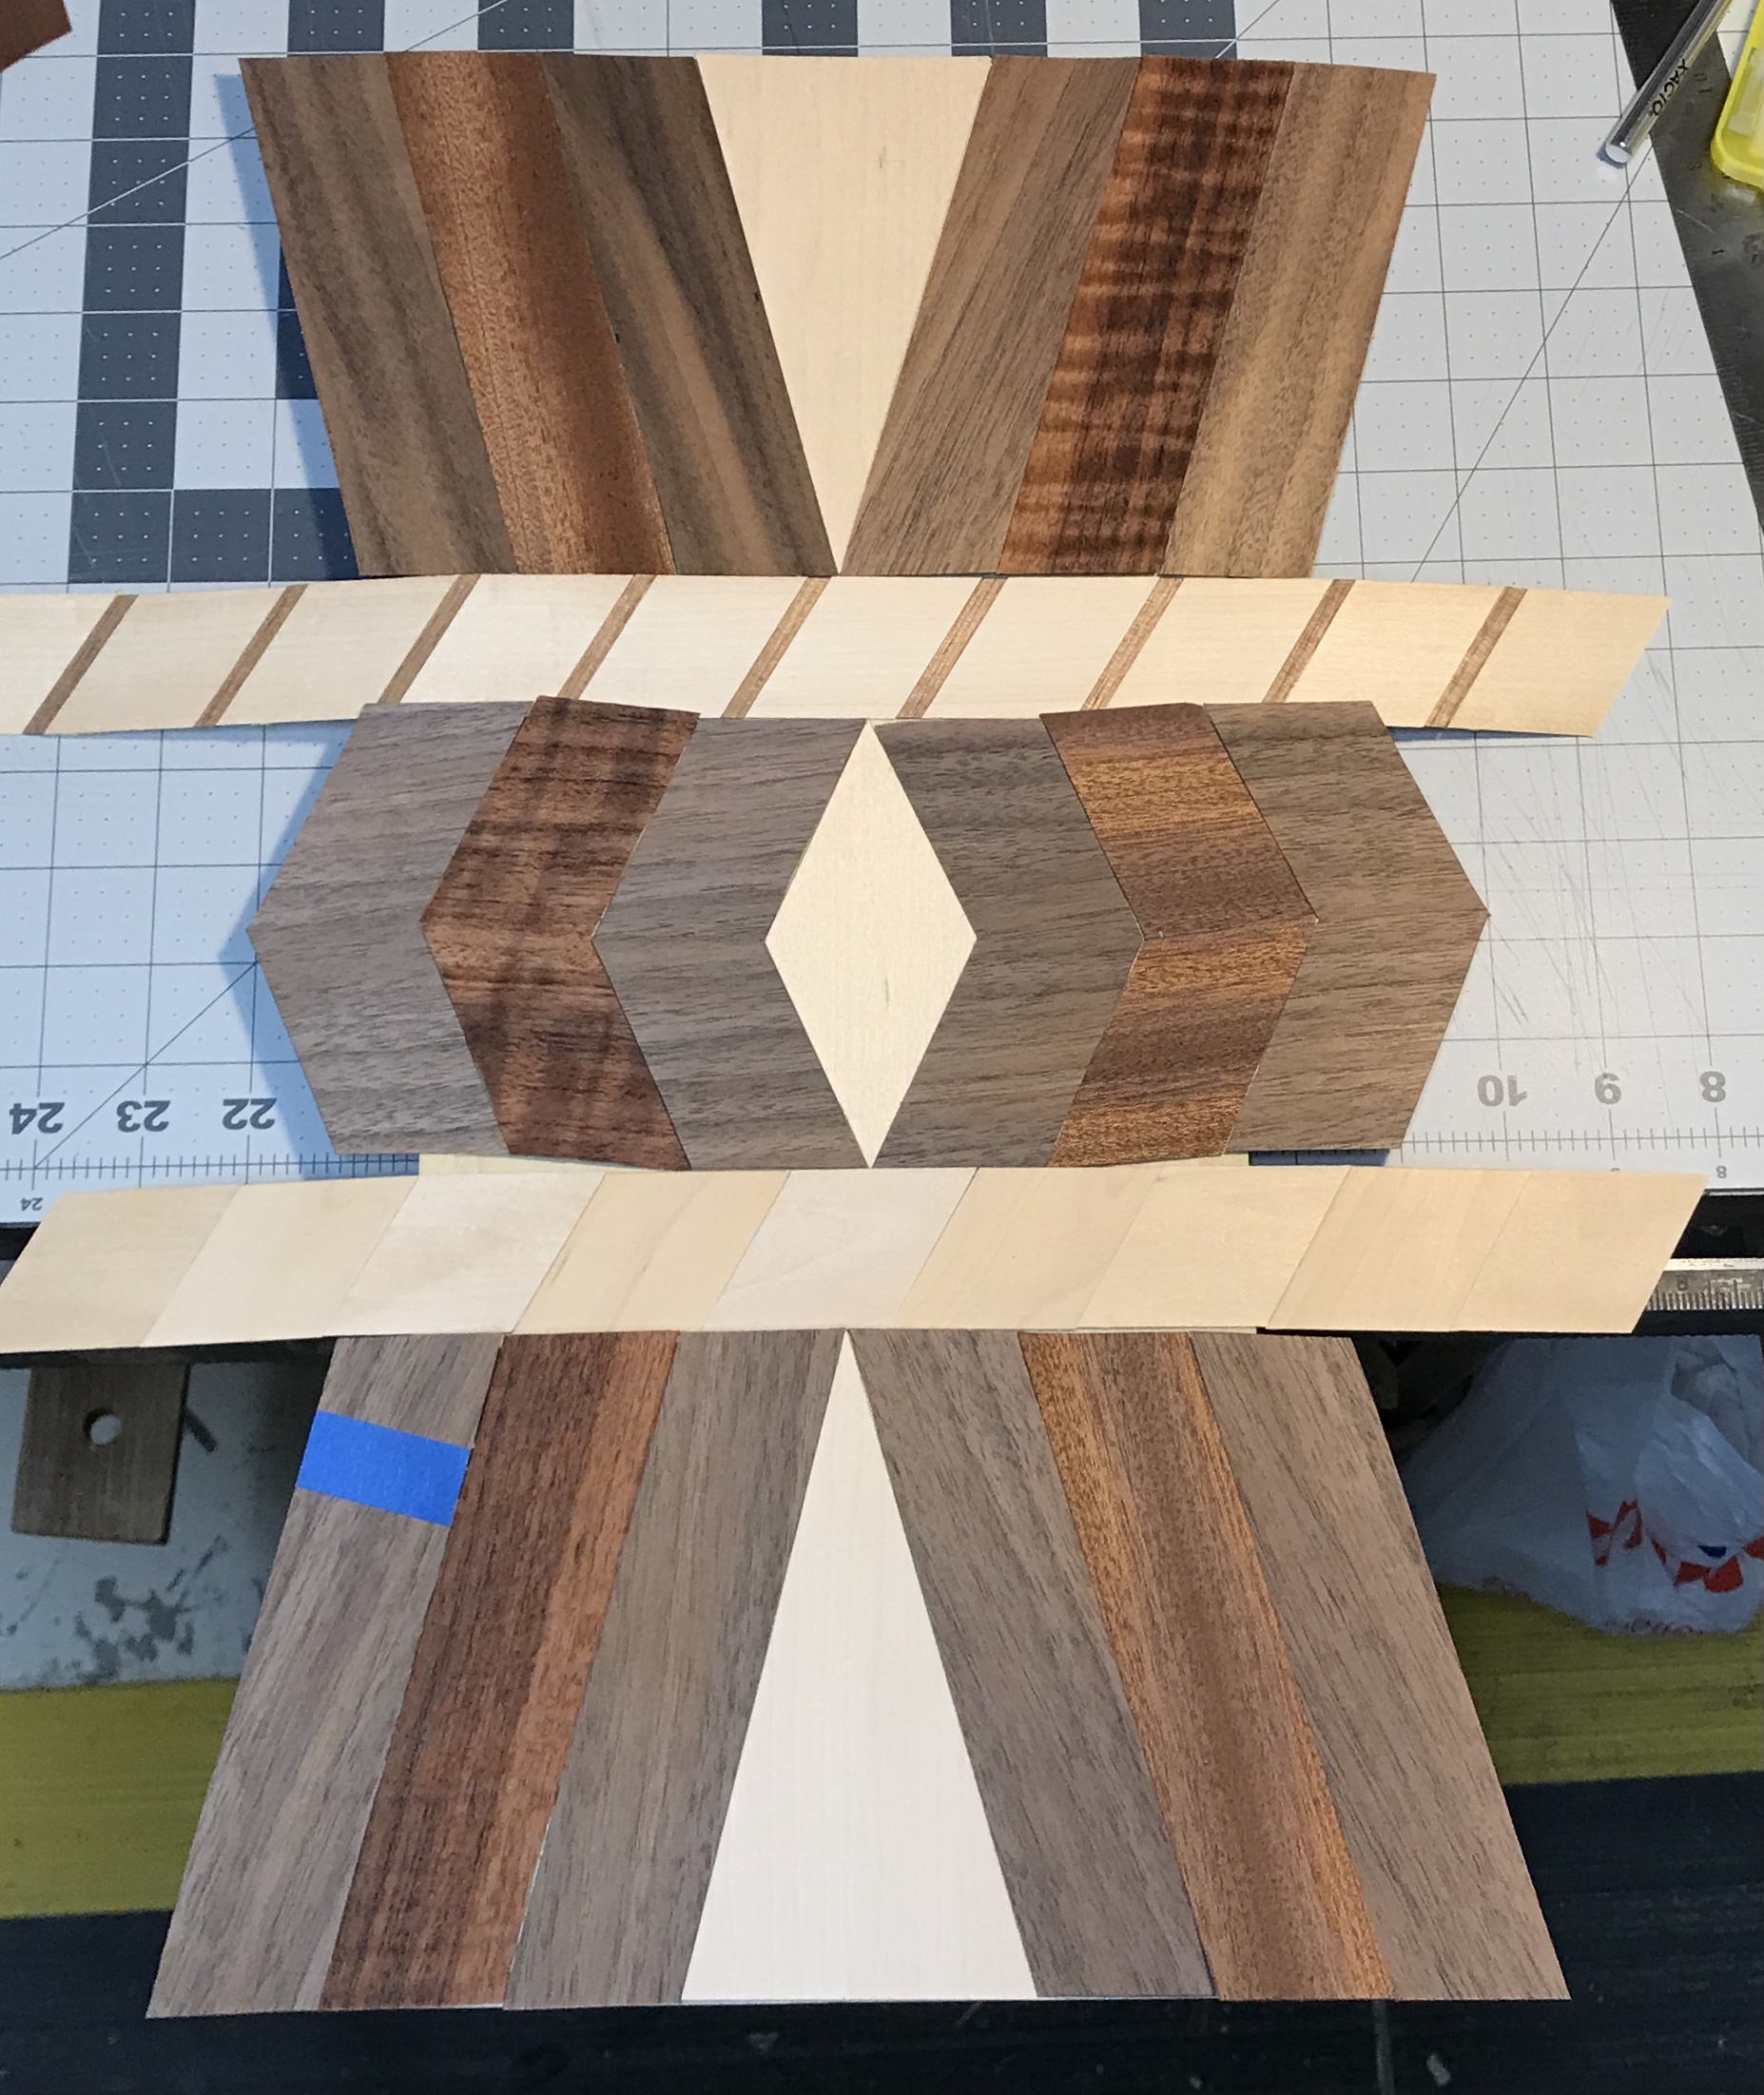
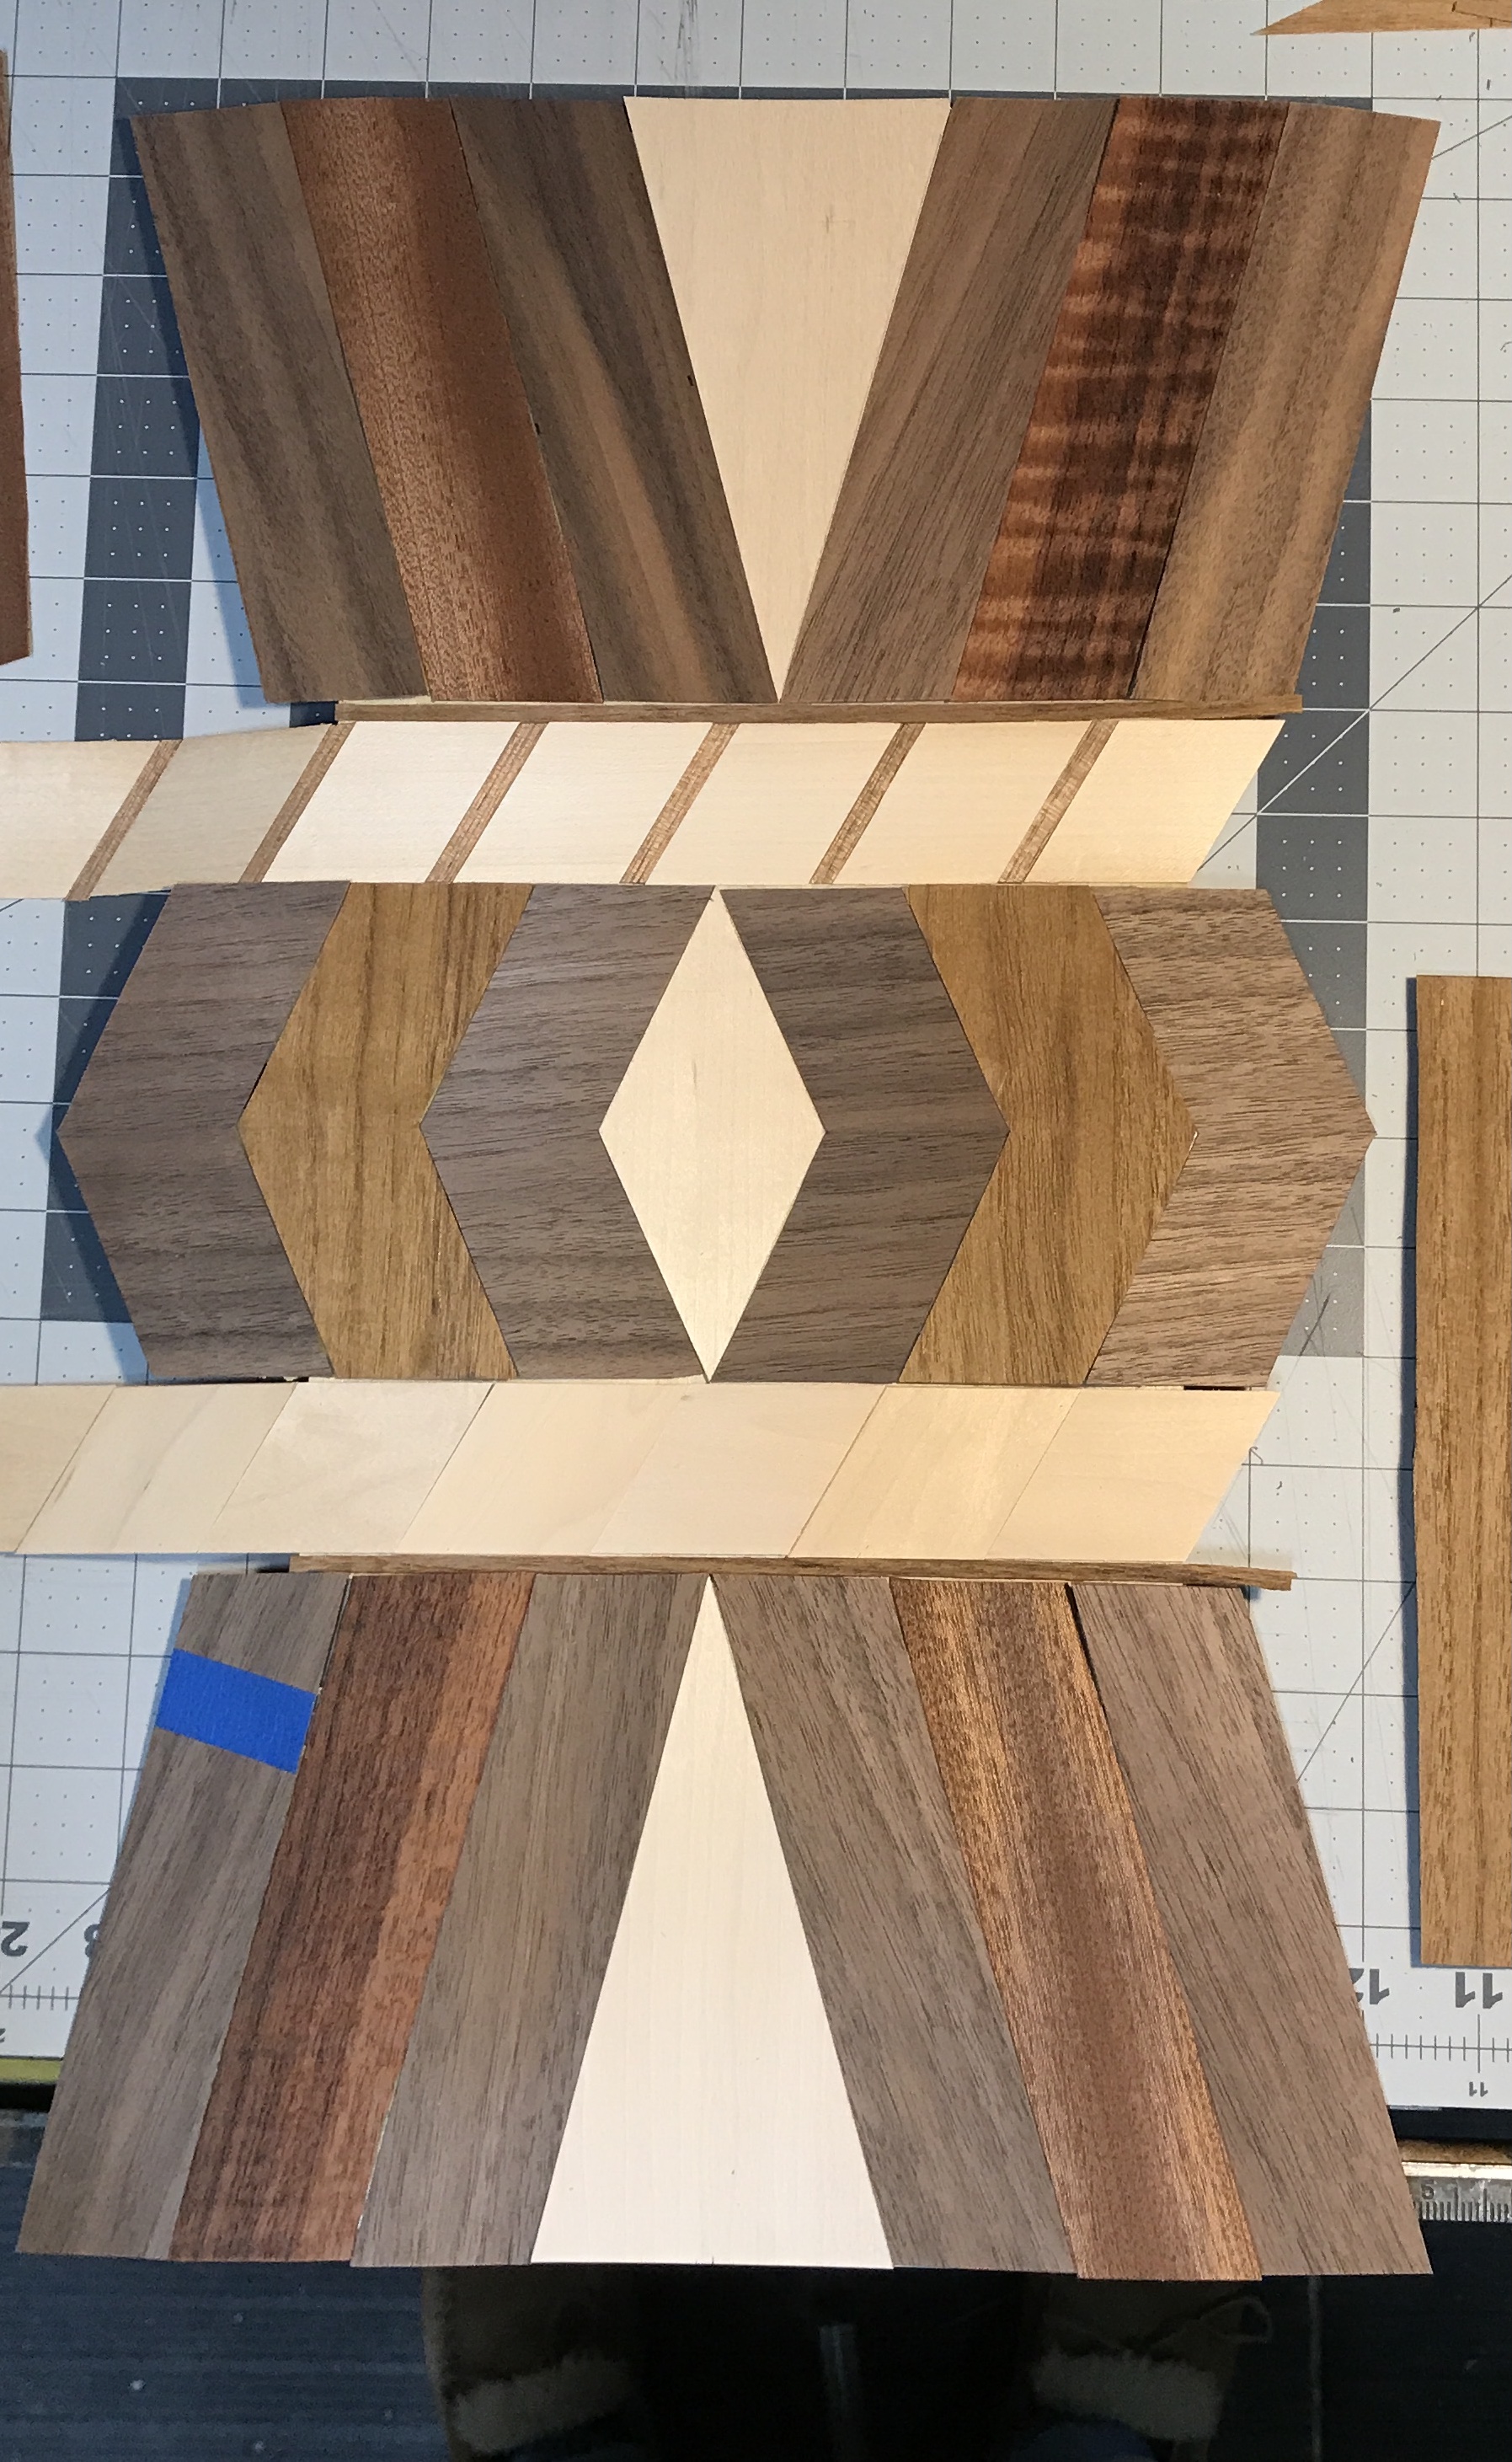
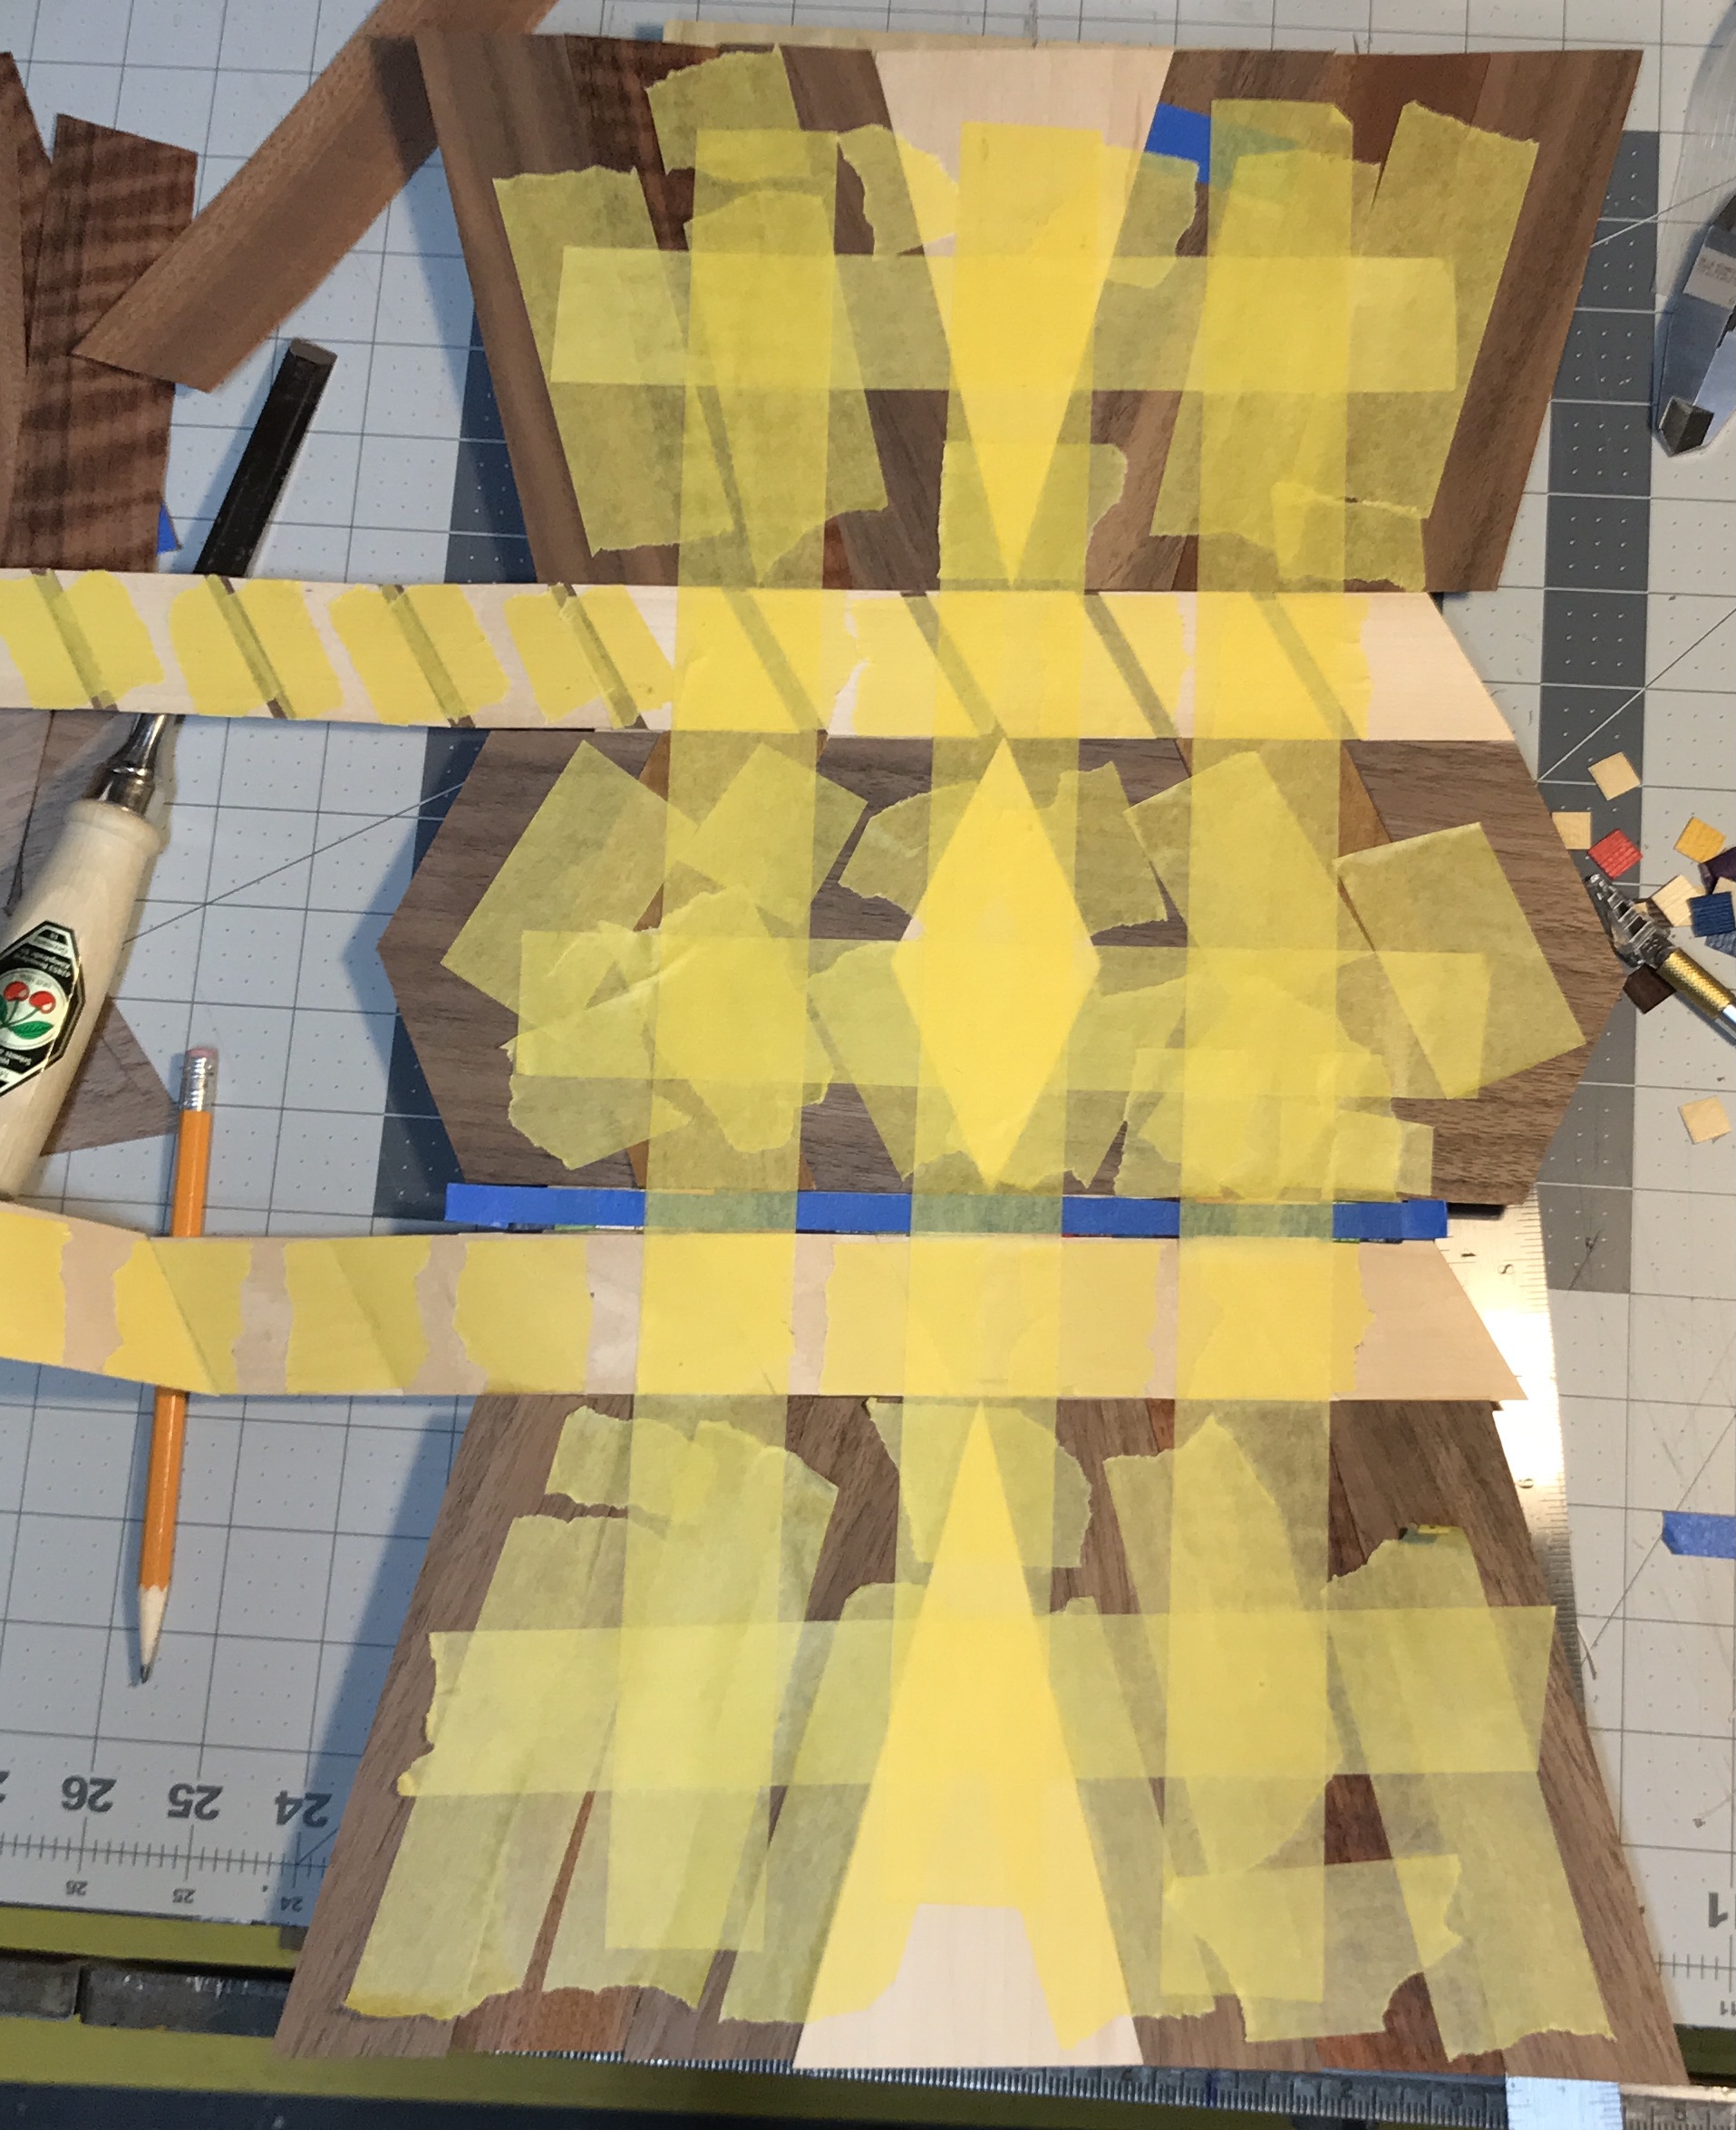
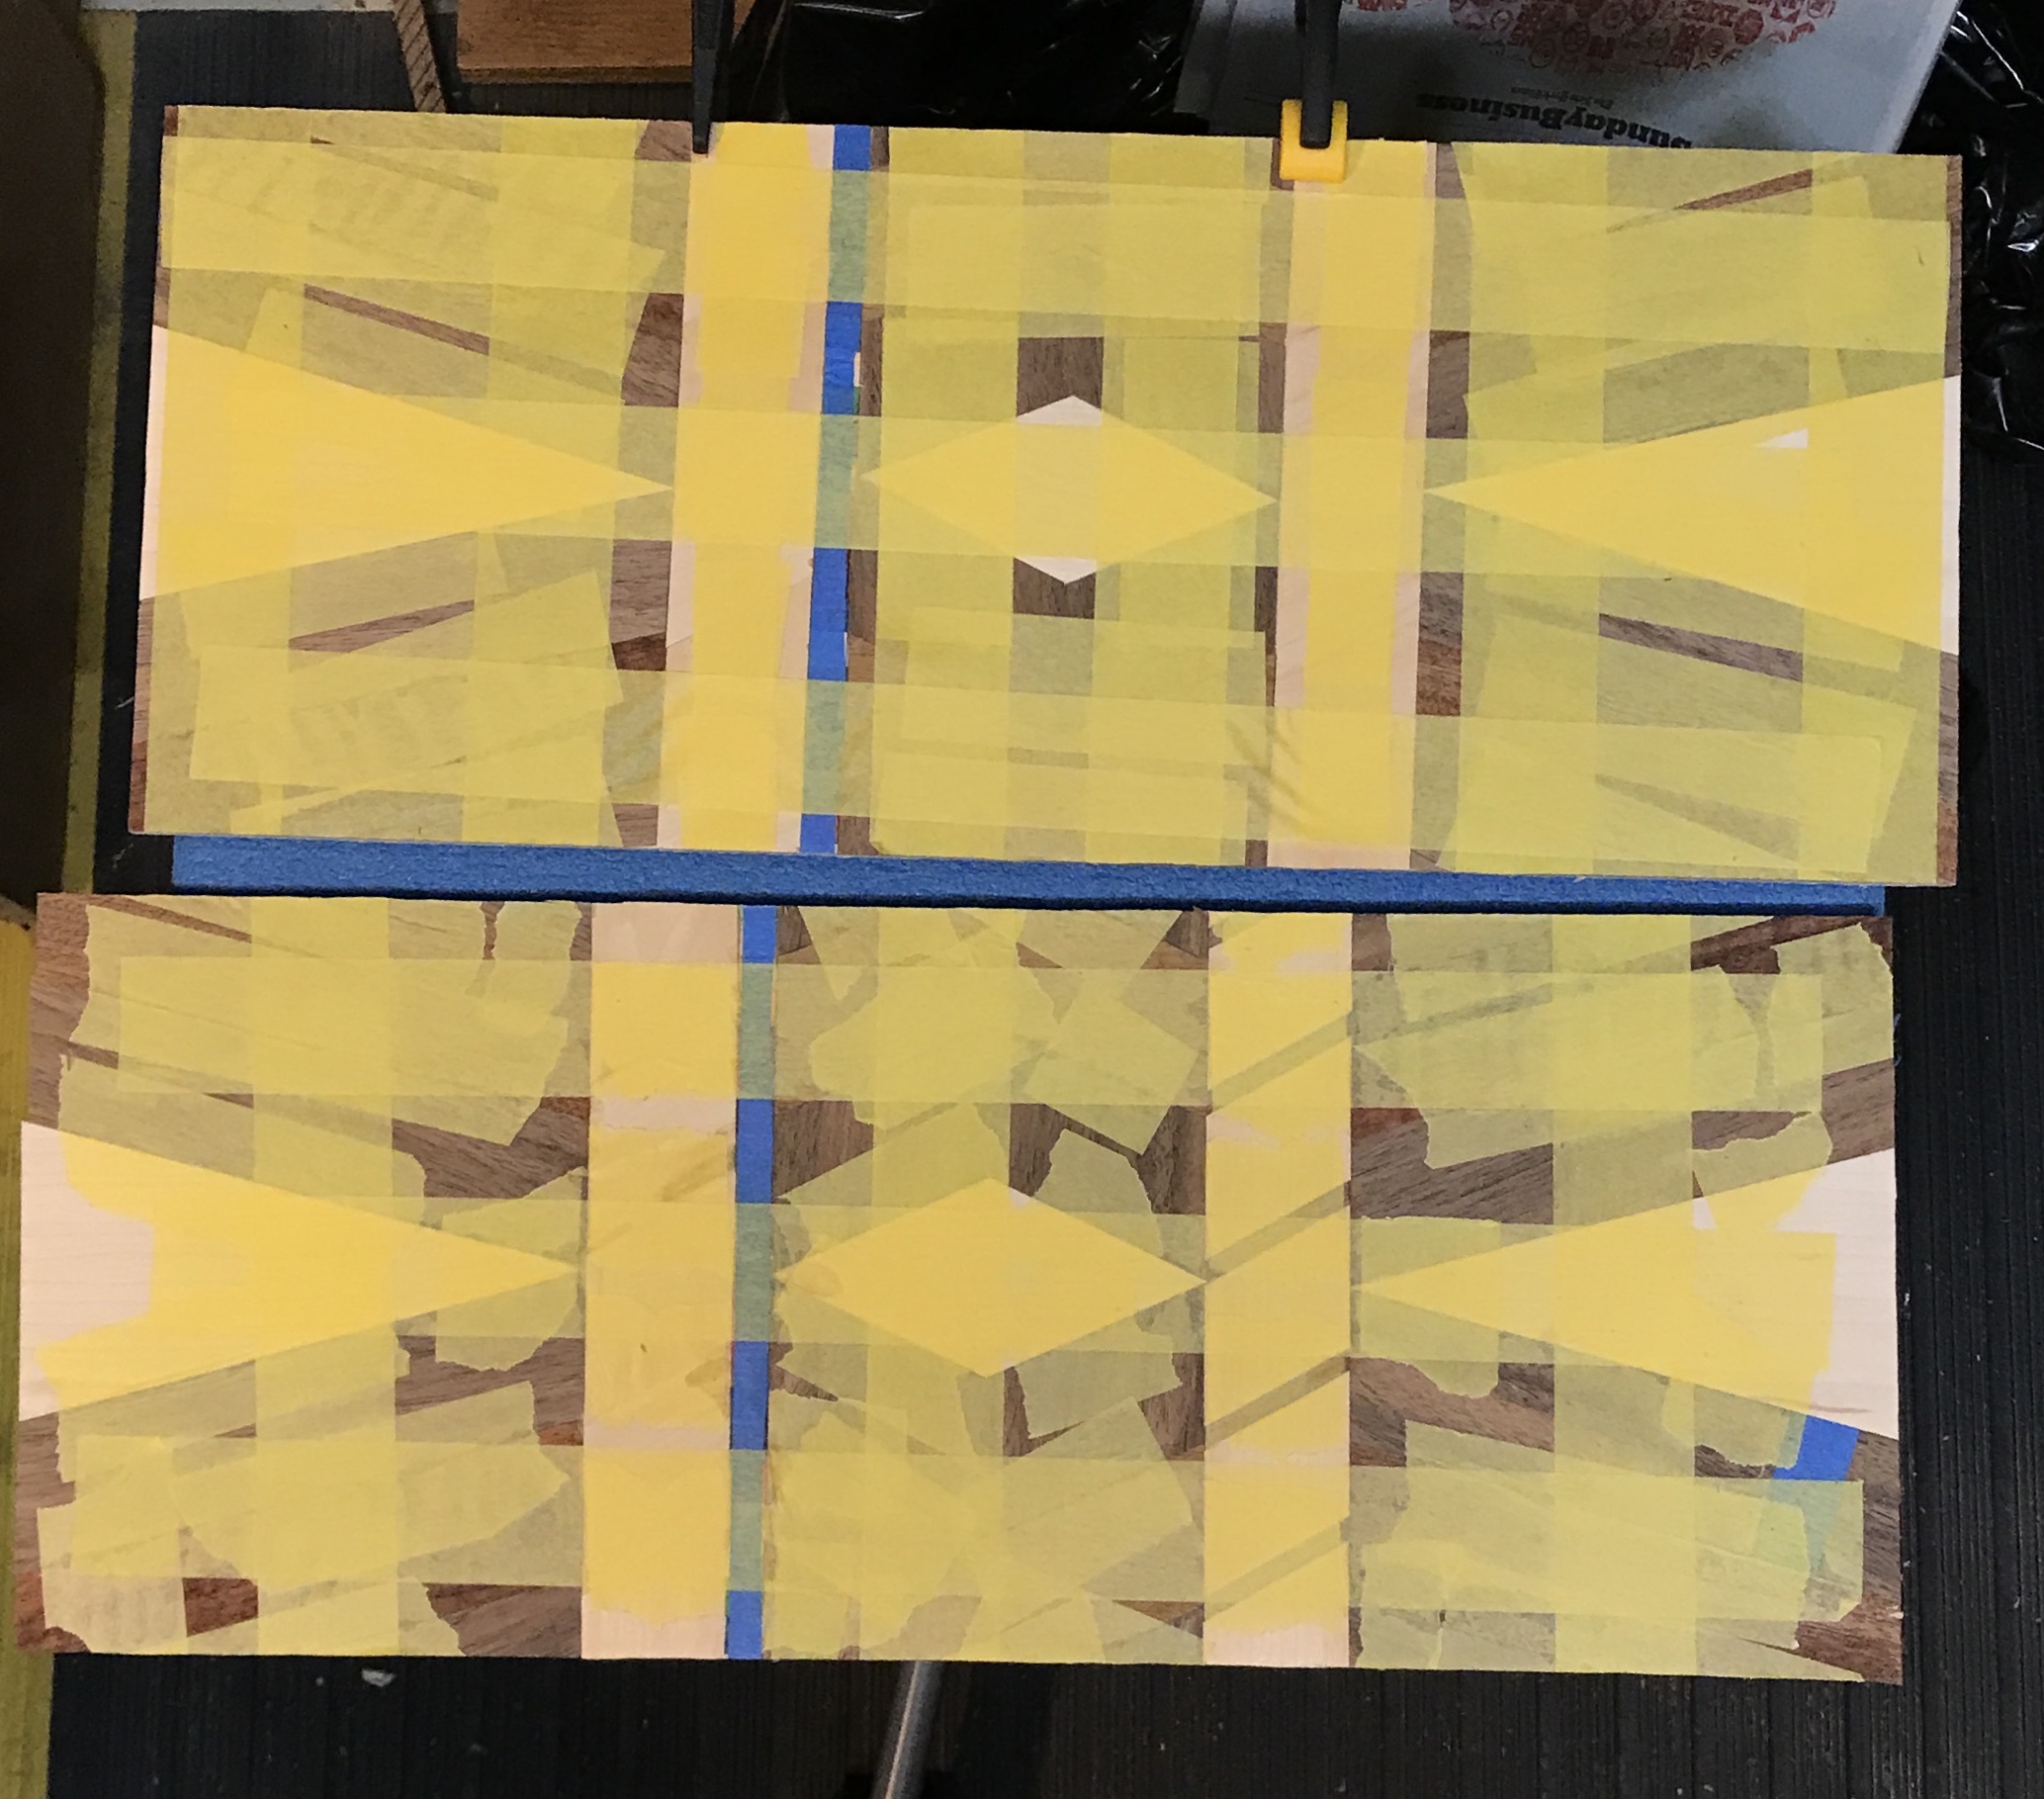
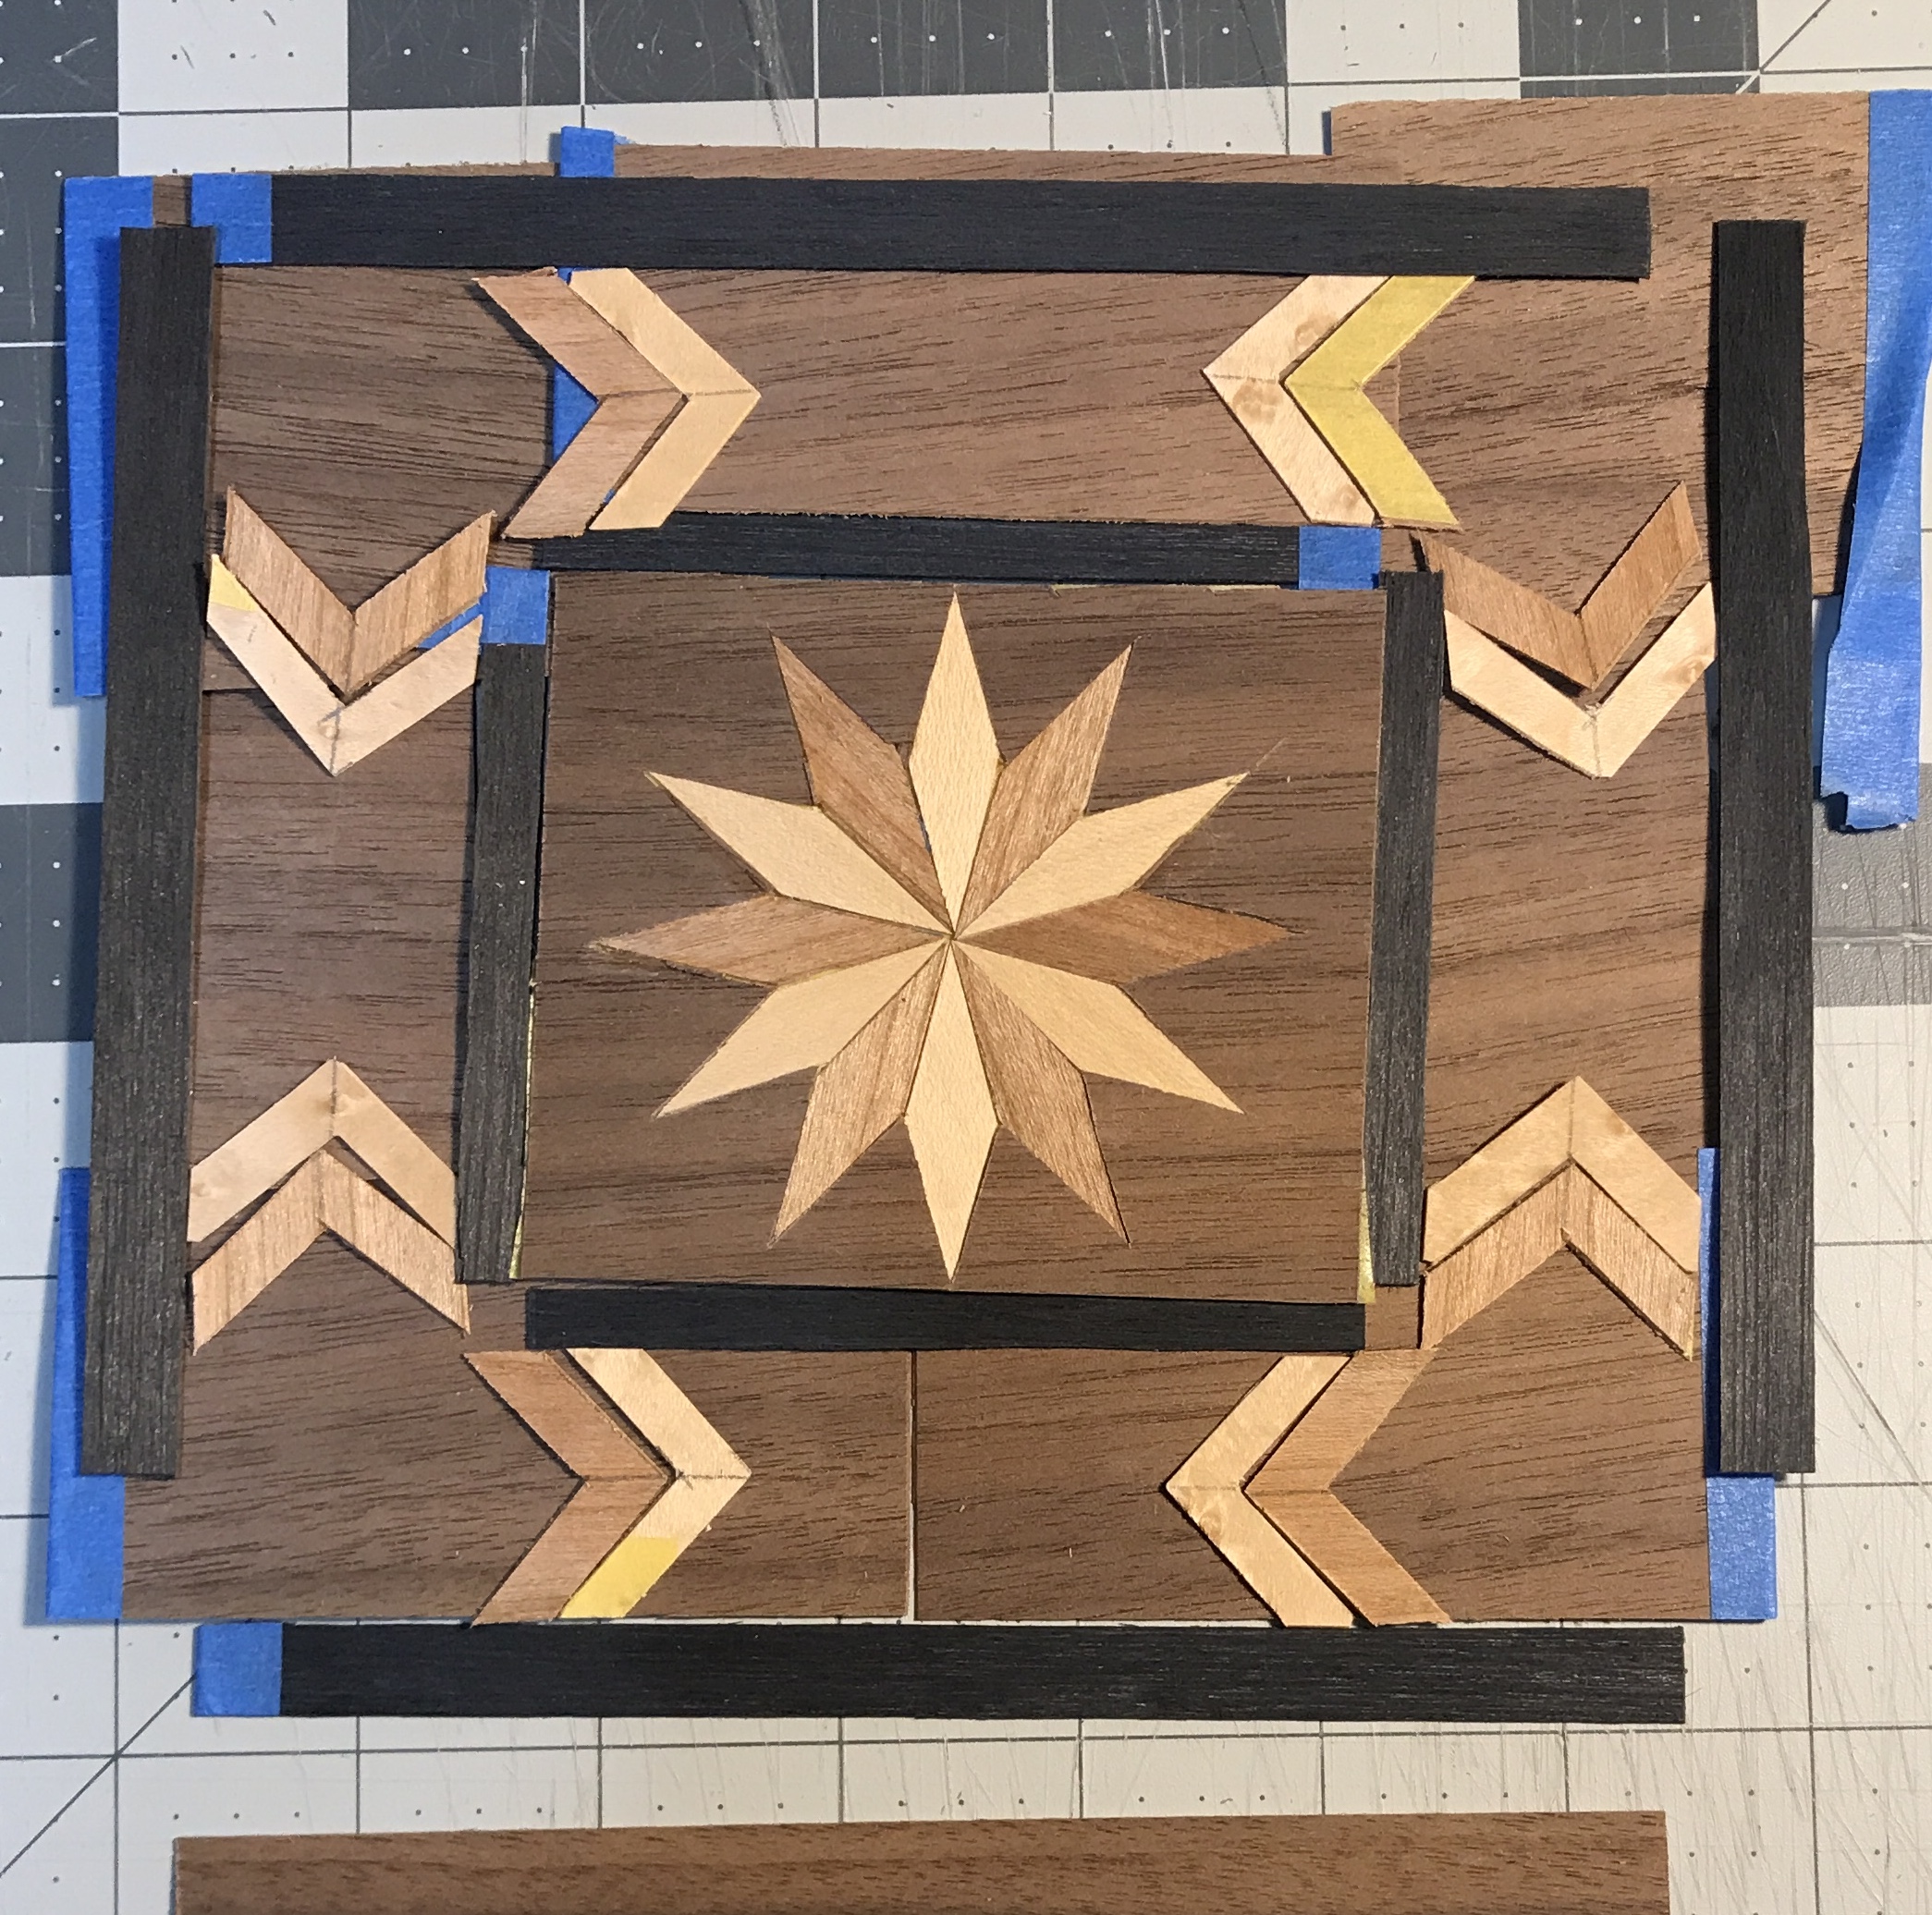
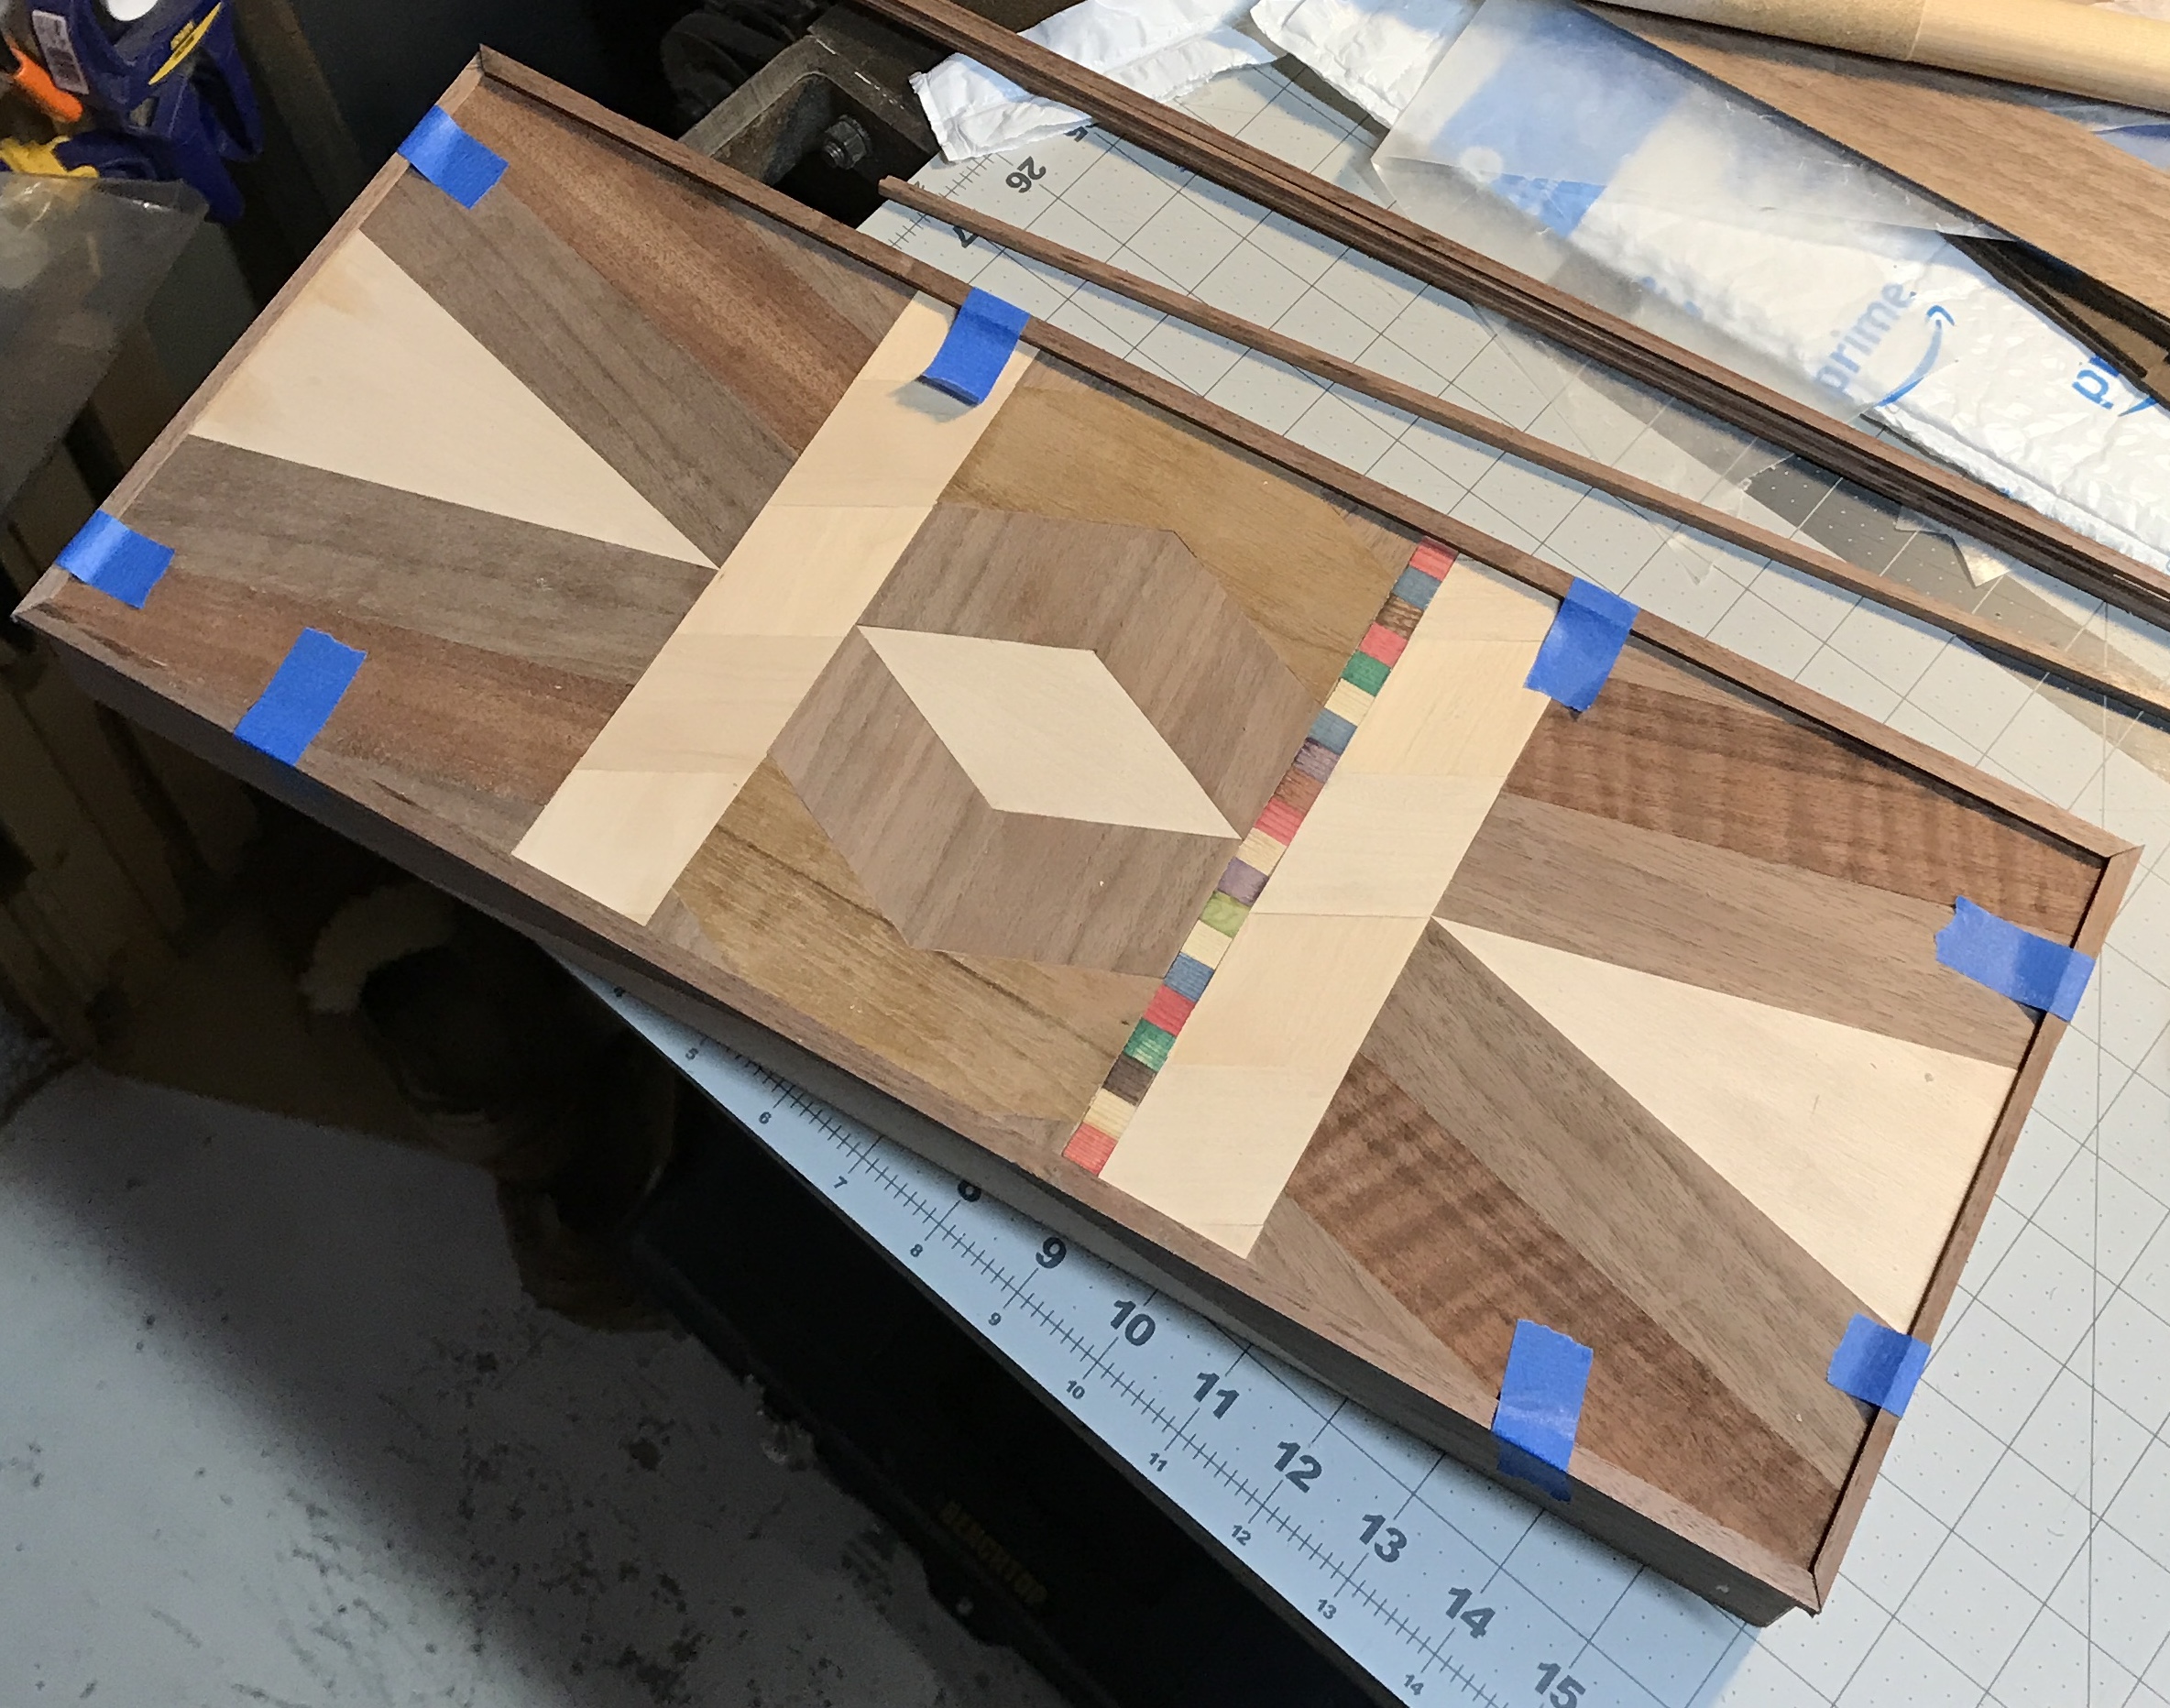
A template was made for cutting the chevrons. It is made from 3/16" hardboard. The angle was set based on the diamonds made previously. Four chevrons were cut from the two striped pieces of veneer. Eight more need to be made from the background veneer. The template was also used to make the hourglass shapes from curly maple. At this point a trial assembly was made with all of the pieces cut so far. The first photo shows the whole outside "unwrapped". The second photo outlines a box face. The third photo outlines a box side. Two 1" wide strips were used as temporary spacers between the top, middle and bottom parts of the parquetry. I am not sure why, but the parts as laid out do not add up to the 19" length of the box. The two spacers will both need to be 1 1/2" wide to fill the ~1" gap". The spacers need to contrast with the adjacent veneer. The faces will use white veneer, while the sides will use darker veneer.
The remaining chevrons were cut. First, the previously cut chevrons were used to determine how much material was needed. This piece was cut from the sheet of veneer. This piece of veneer was then cut to the height of the chevrons, 4 1/2". A center line was drawn to align the point of the template. The template was laid on the veneer and both sides were set at 1 1/2". The two cuts were made and the template shifted 1 1/2" for the next cut. In just a few minutes the eight chevrons were cut out.
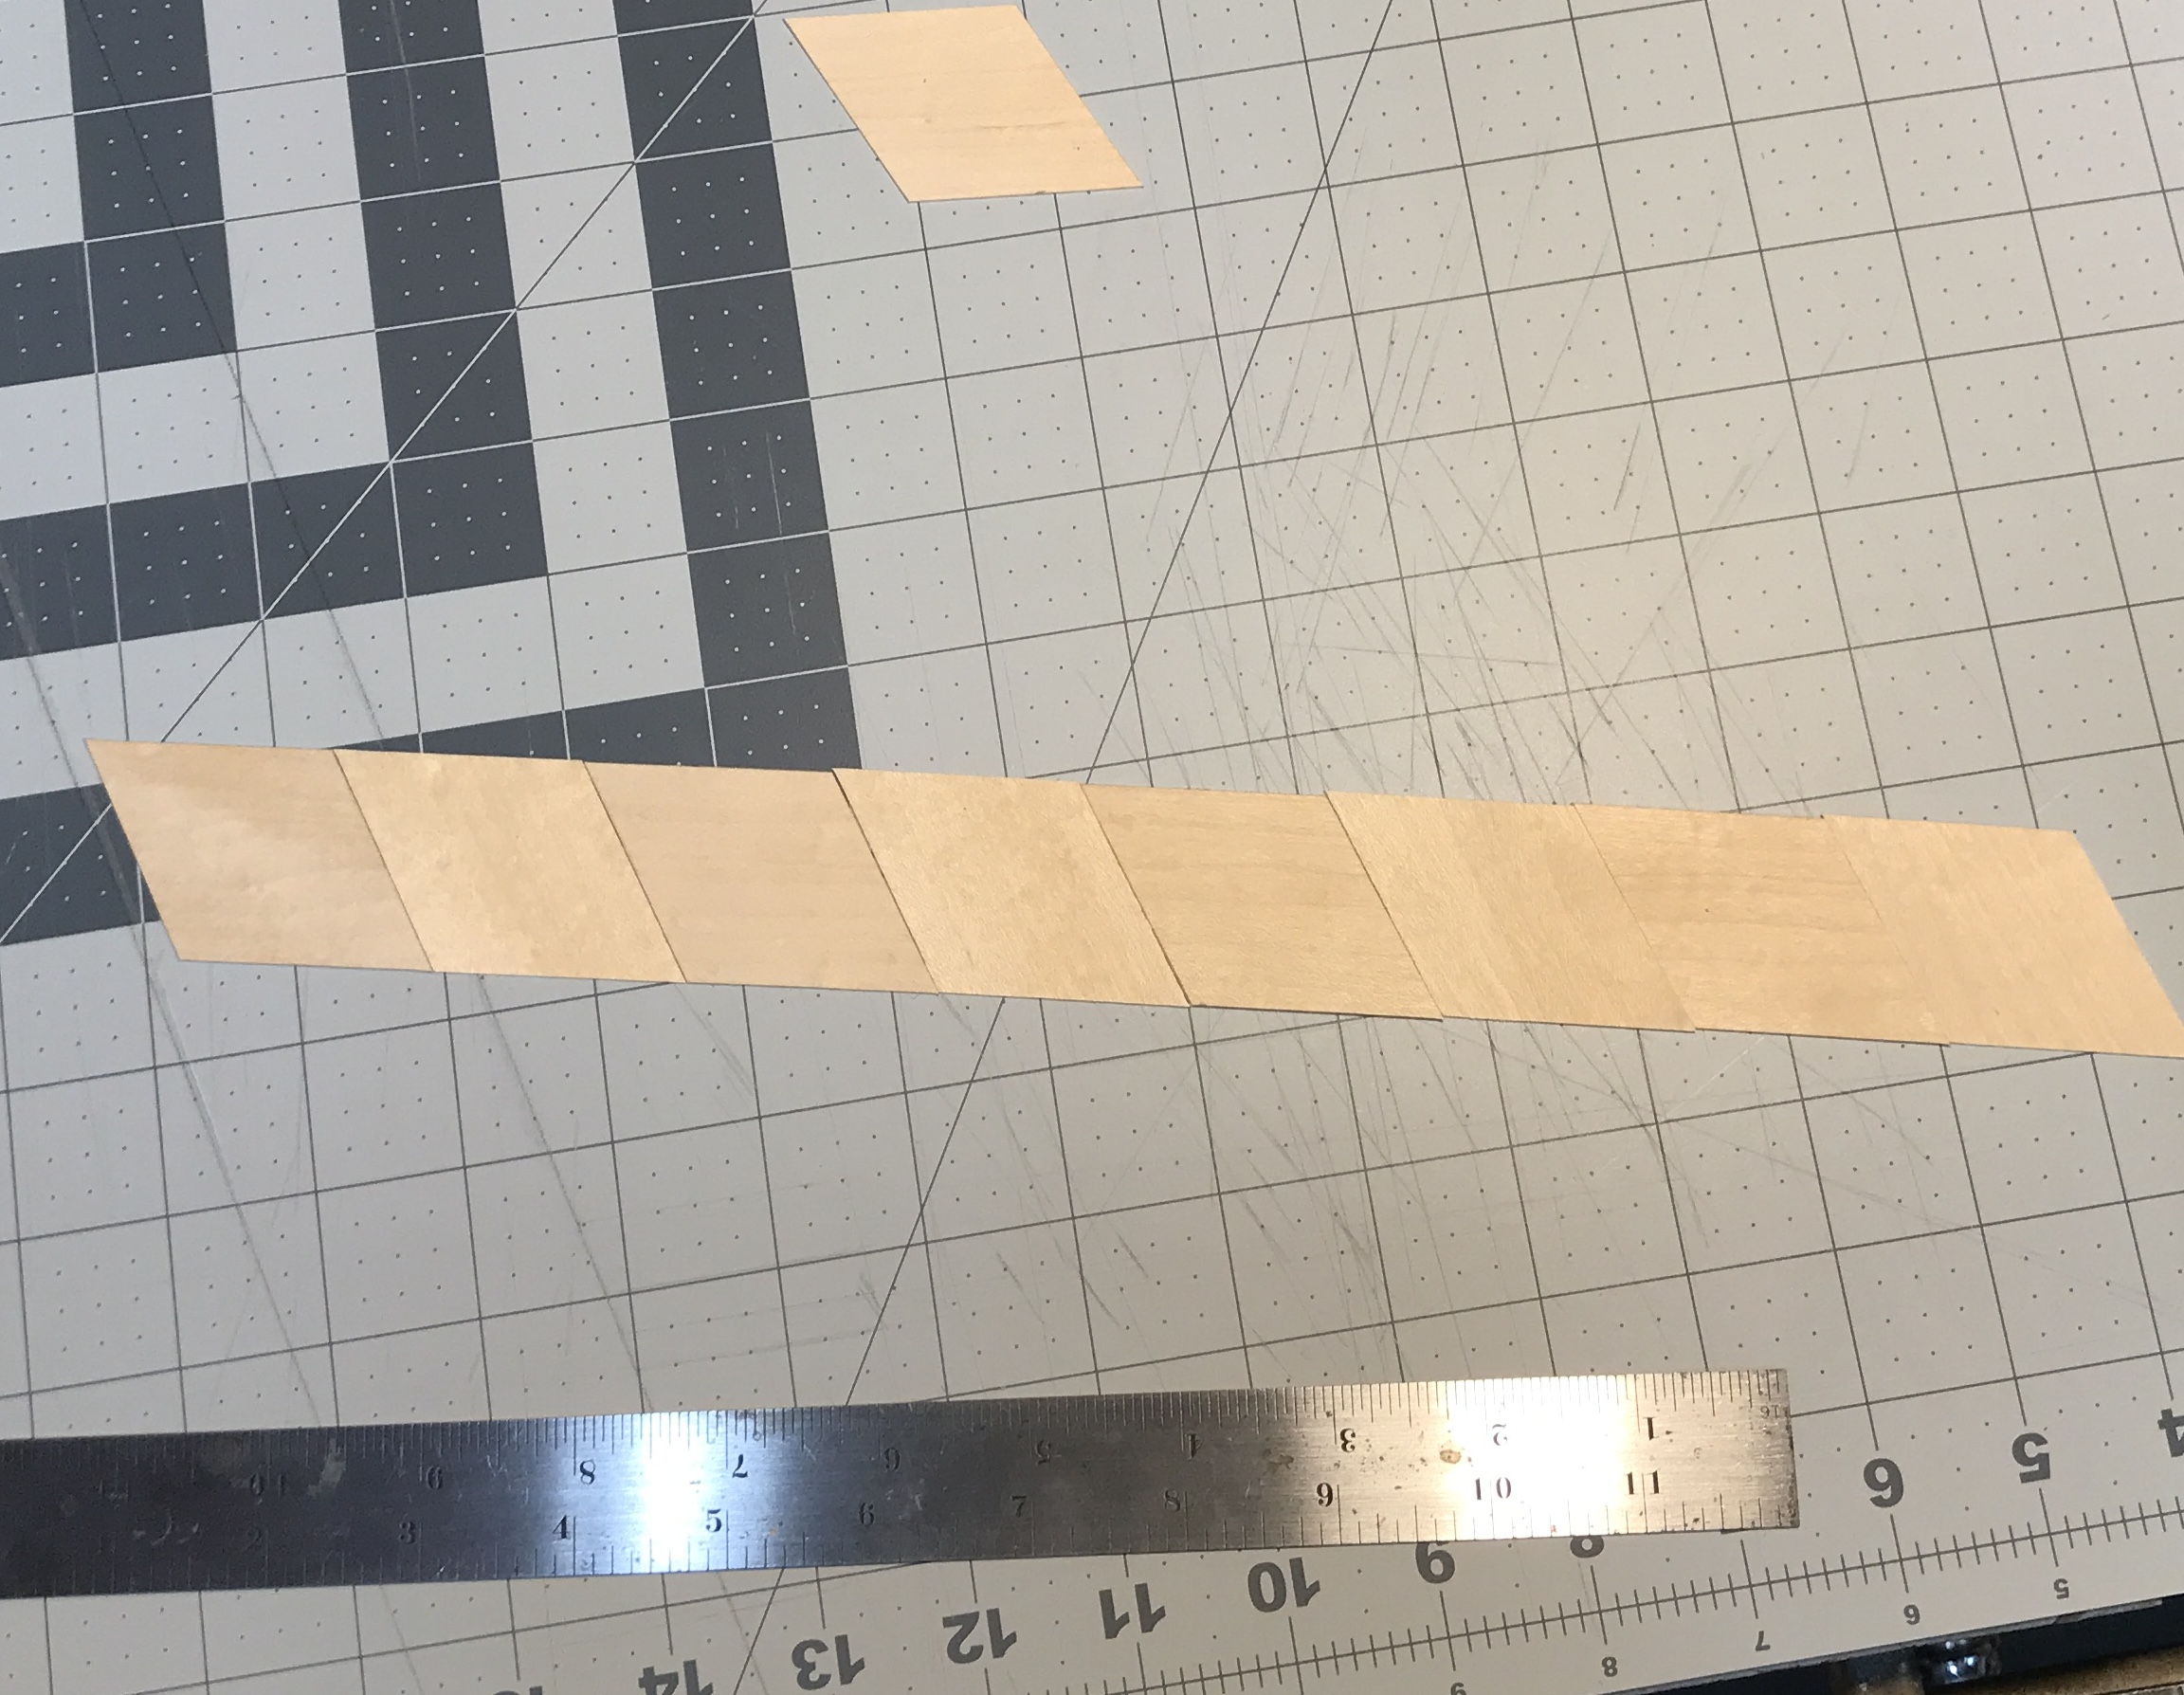
White strips will be used for the faces. The first white strip was made 1 1/2" wide. It was cut at a 60° angle at 1 1/2" lengths. After the fact it was discovered that this does not provide the correct width and the grain cannot be alternated. 3/16" wide dark strips were cut. These were then cut to length at the same 60° angle. The photo shows the result. This is enough for two strips. An additional two need to be made.
More white strips had to be made. This time a precut rhombus was used to set the length of the angled cuts. This length is approximately 1 11/16". This worked perfectly. Two strips were cut into diamonds. The picture shows them aligned with alternating grain patterns. It would be more spectacular with more pronounced figure.
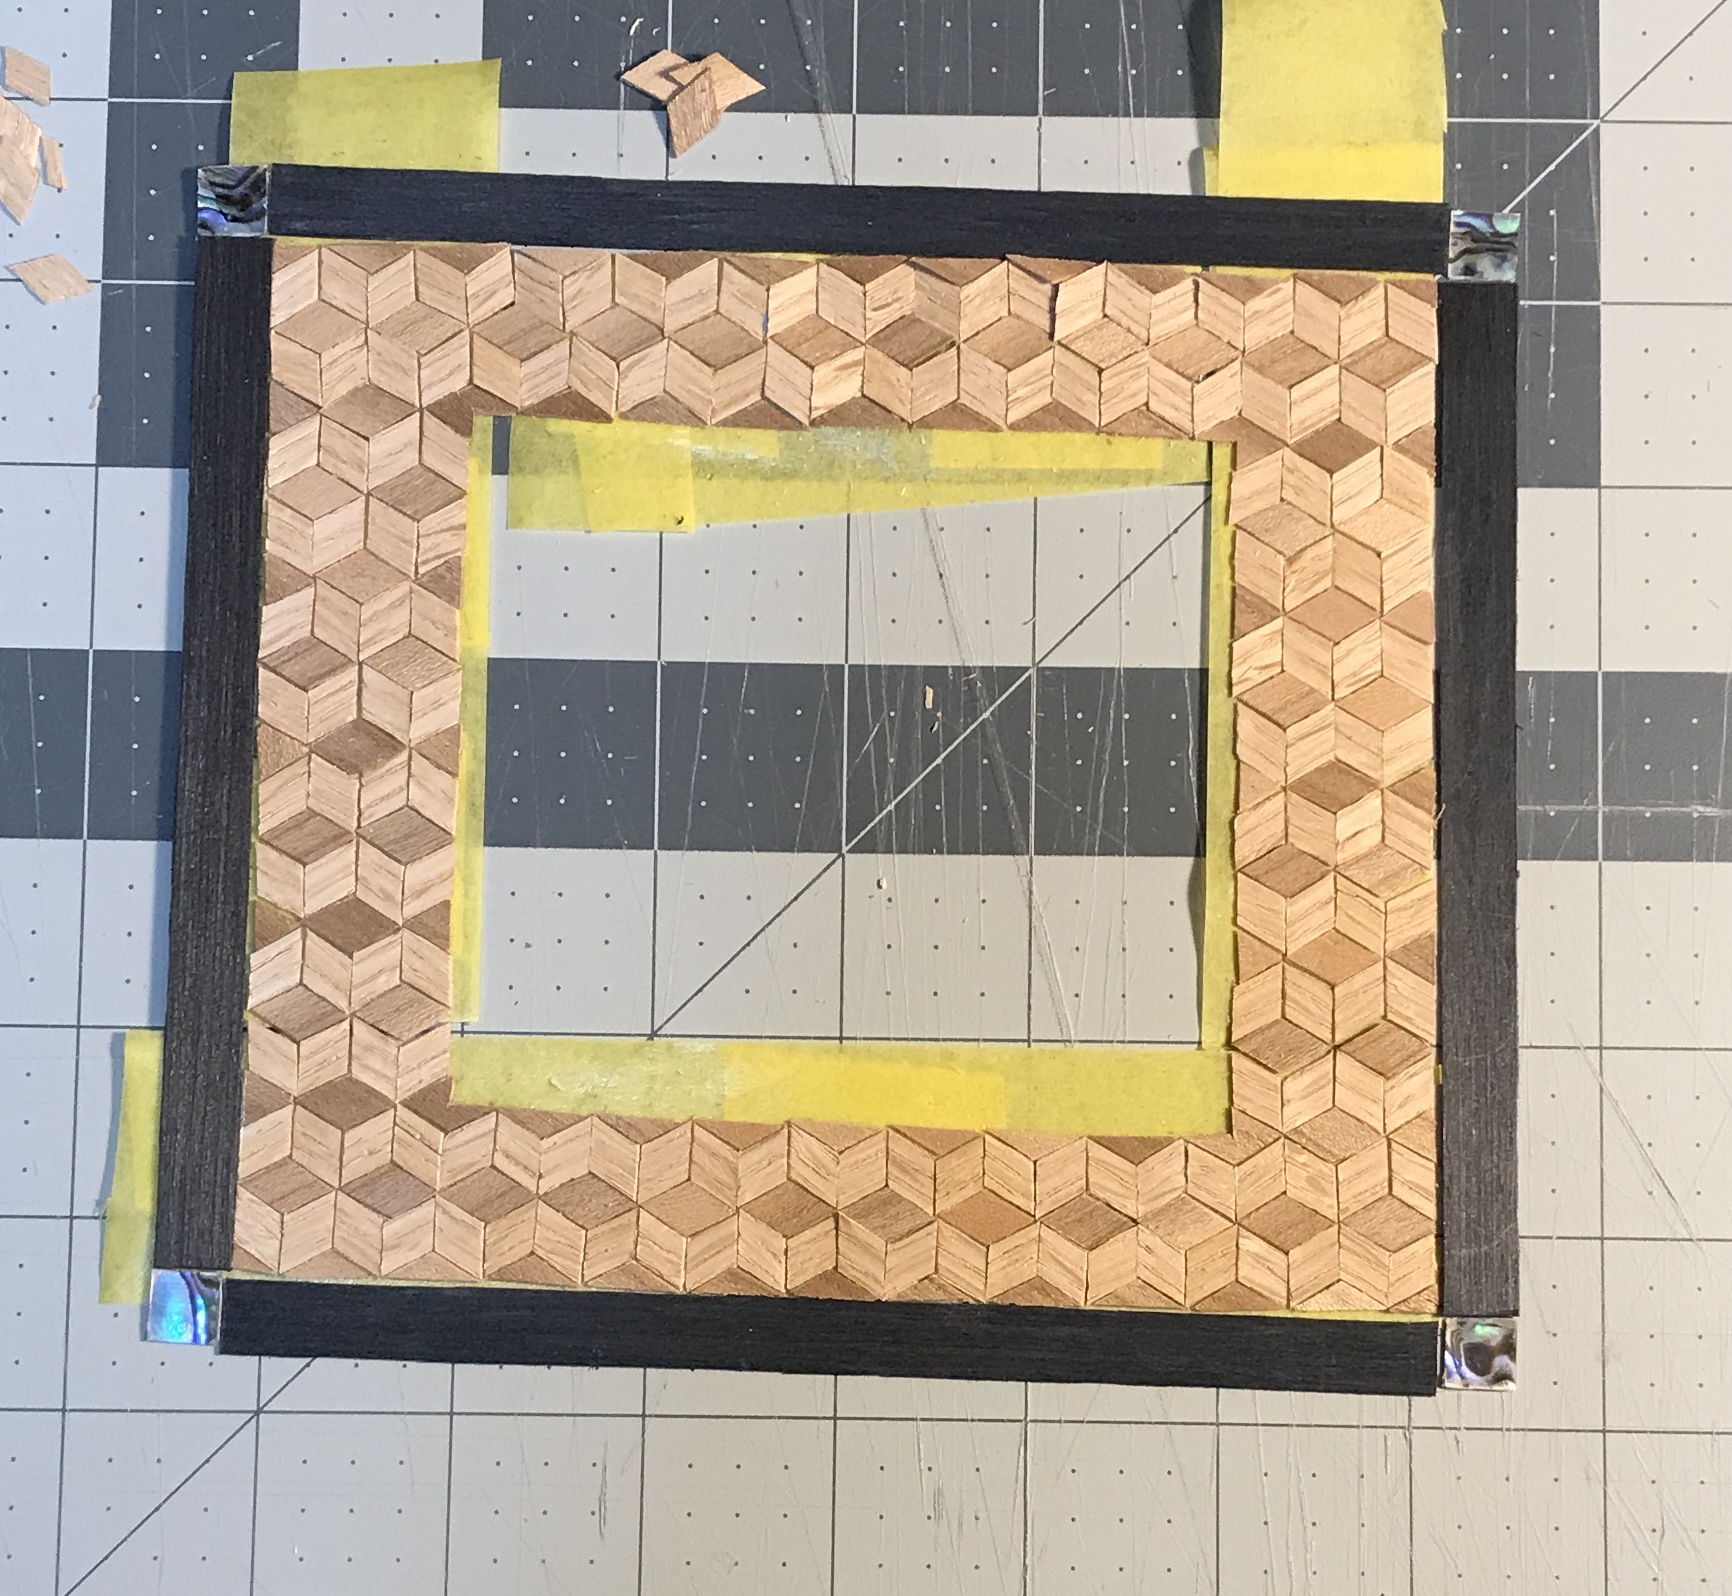
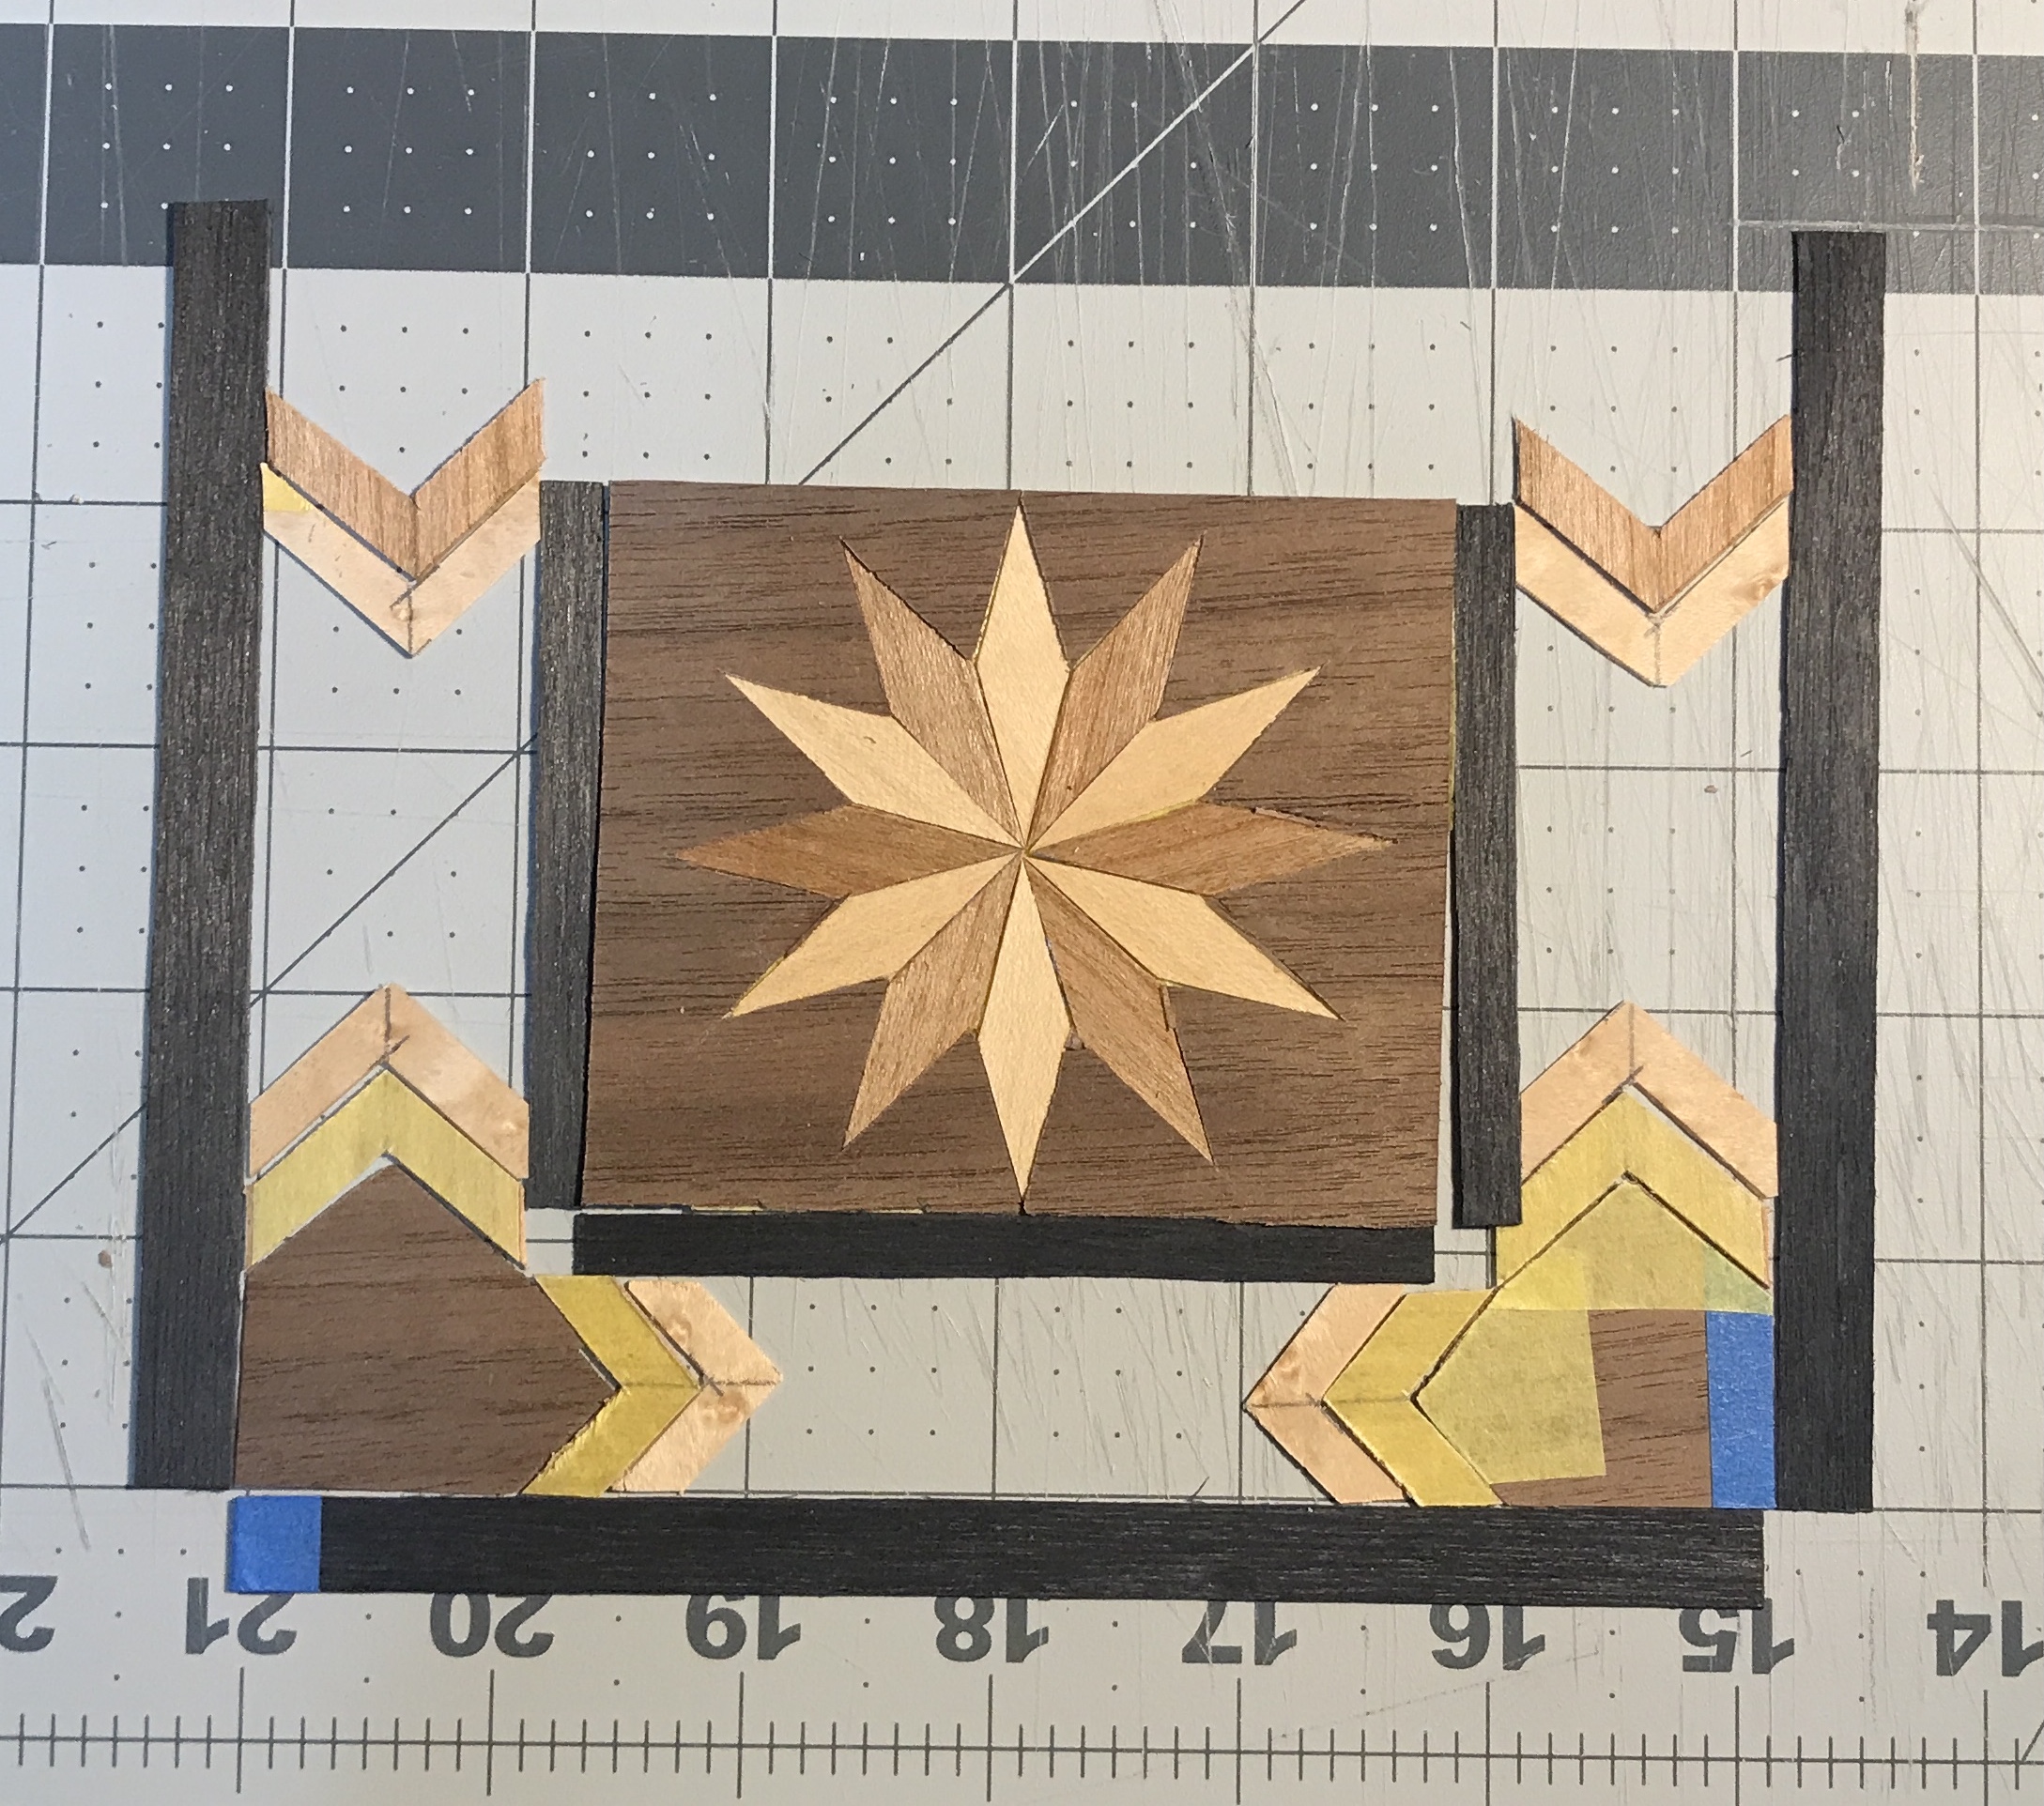
It was time to start the taping. The three sections of the box face were laid out individually and the pieces taped. The first photo below shows the first section taped. The middle section was problematic. The chevrons made from the stripy wood were not made well enough. The two different kinds of separator strips were also taped up. I am not sure where to stop the section taping, so checked the size against the box face. The three patterns along with the separator strips were laid out the way they should be glued to the box face. They were wide enough for sufficient coverage and to cut off the part of the veneer that will wrap around to the sides. The problem with the chevrons in the middle was now a glaring issue as seen in the second photo below. Some of the chevrons will need to be remade. There is no more of the stripy veneer.
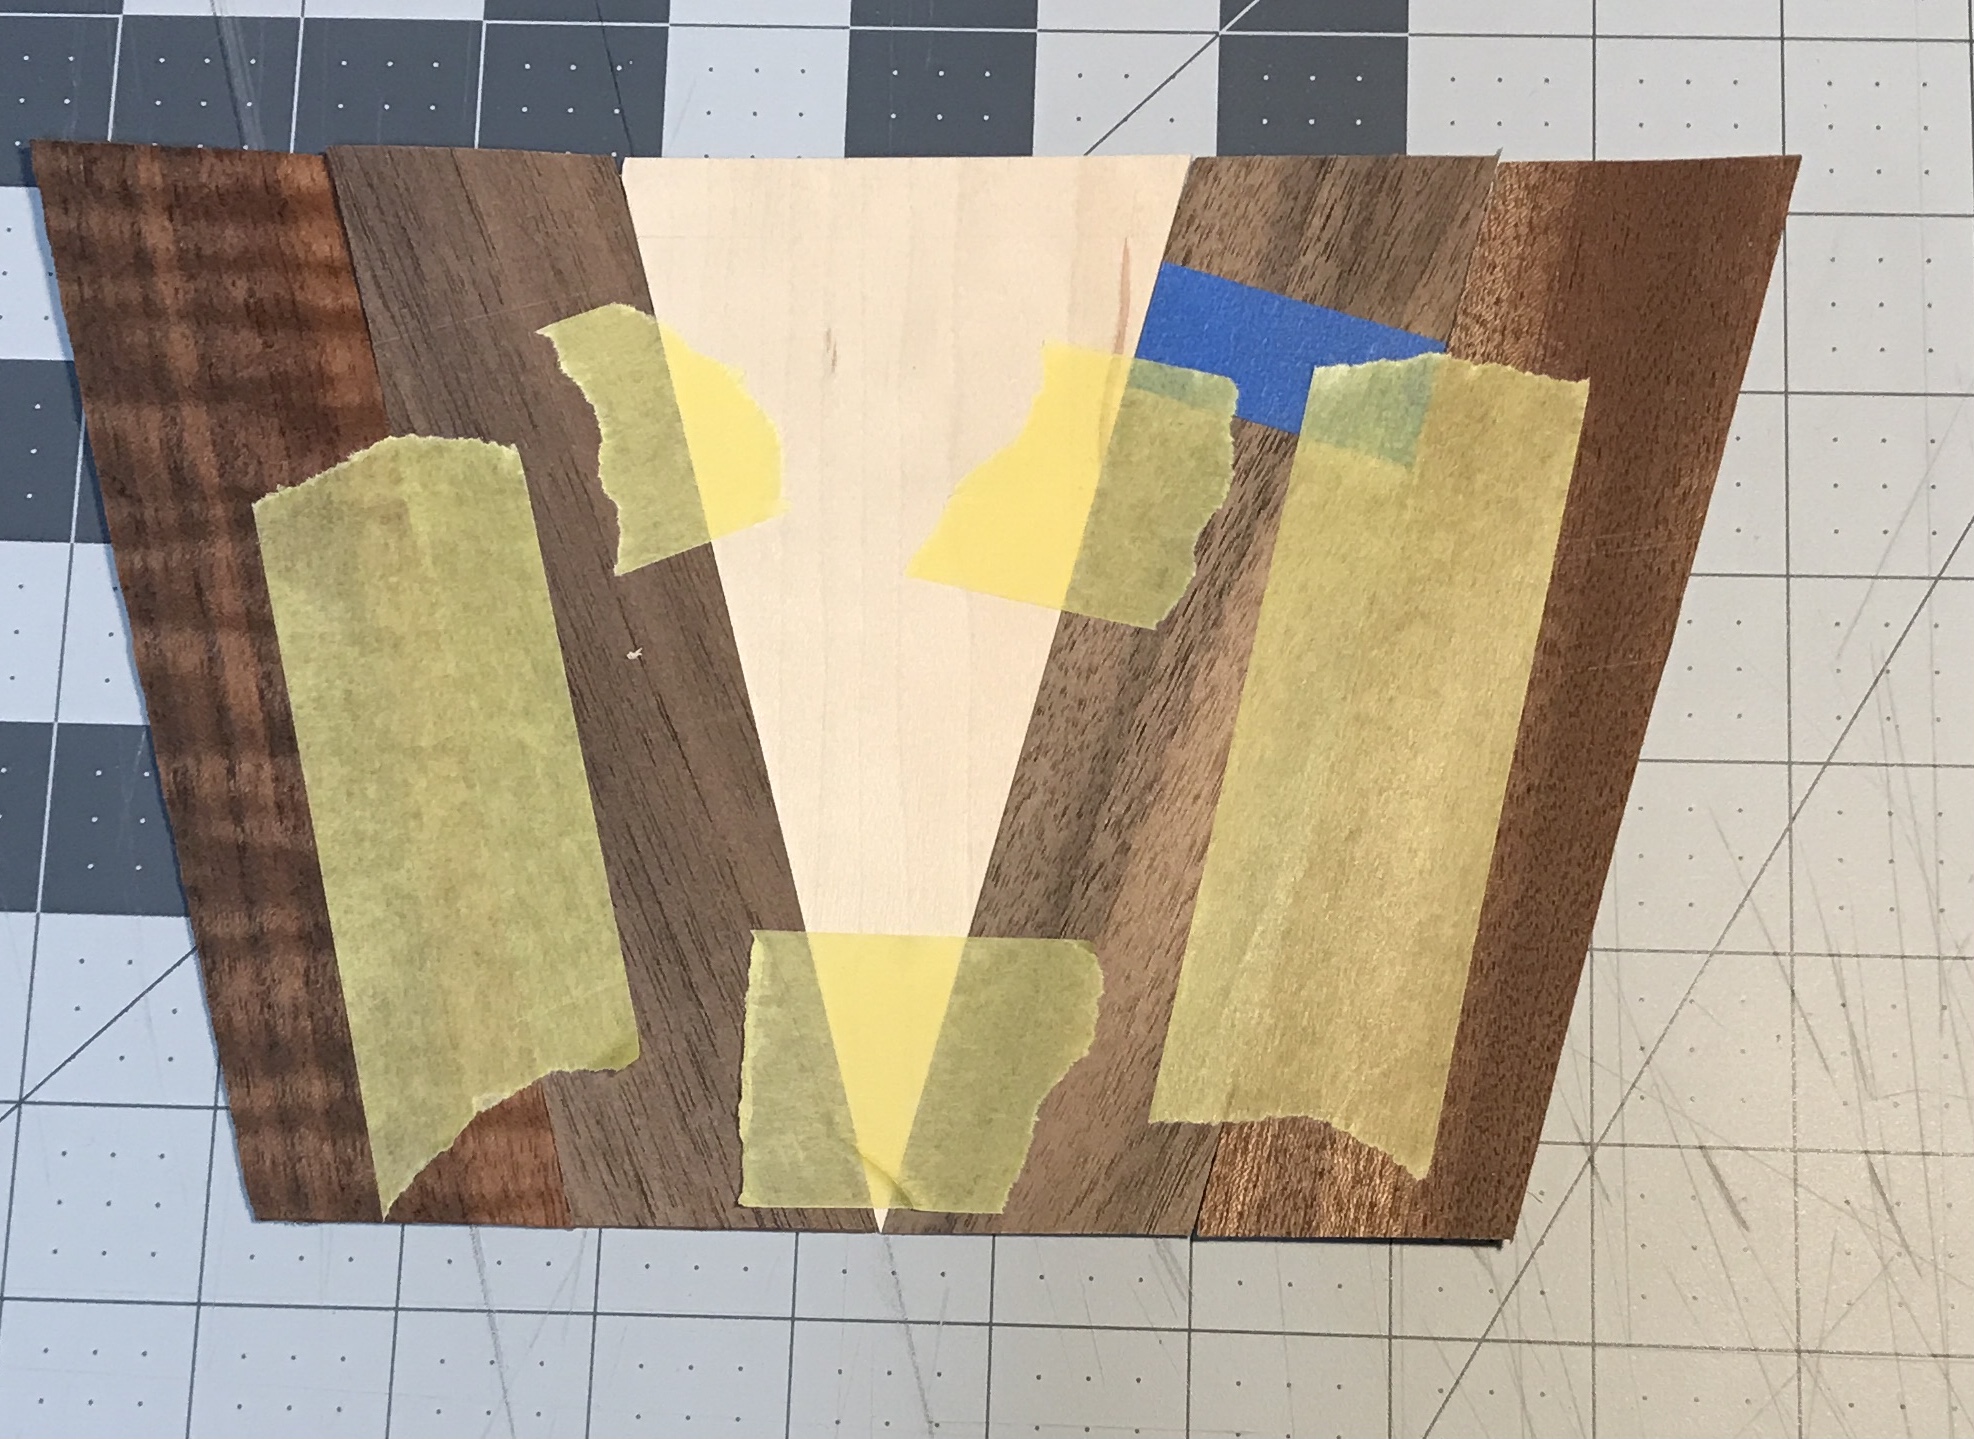
Two things were modified this morning. Four chevrons were remade. The four from the stripy wood were inaccurate. The key for using the jig is first, drawing a center line and second, careful measurement of the 1 1/2" width on both ends. This gave good chevrons from a more yellowish veneer. Two of these are in place in the photo below.
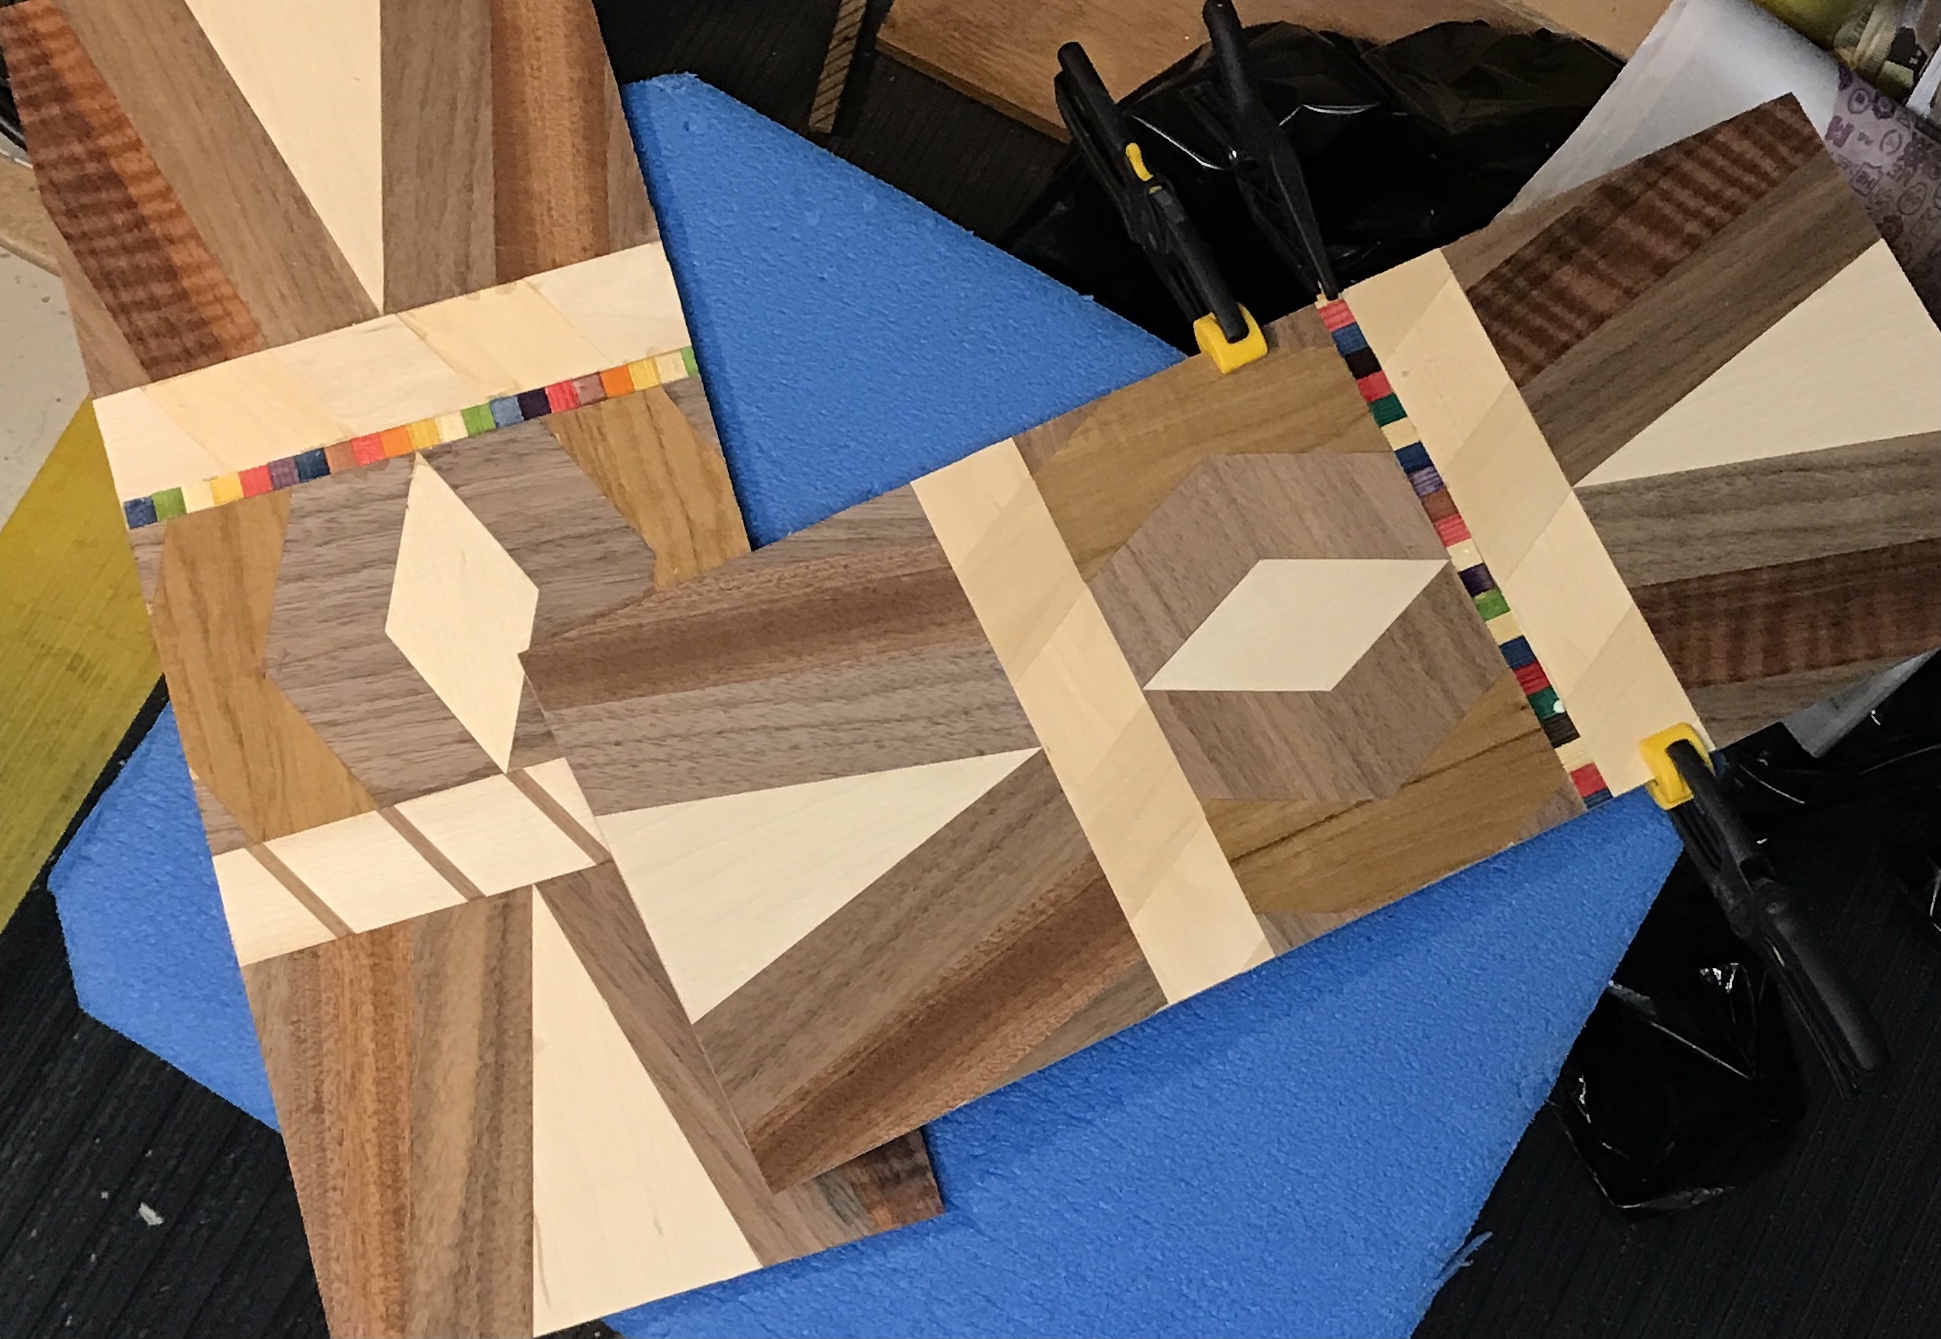
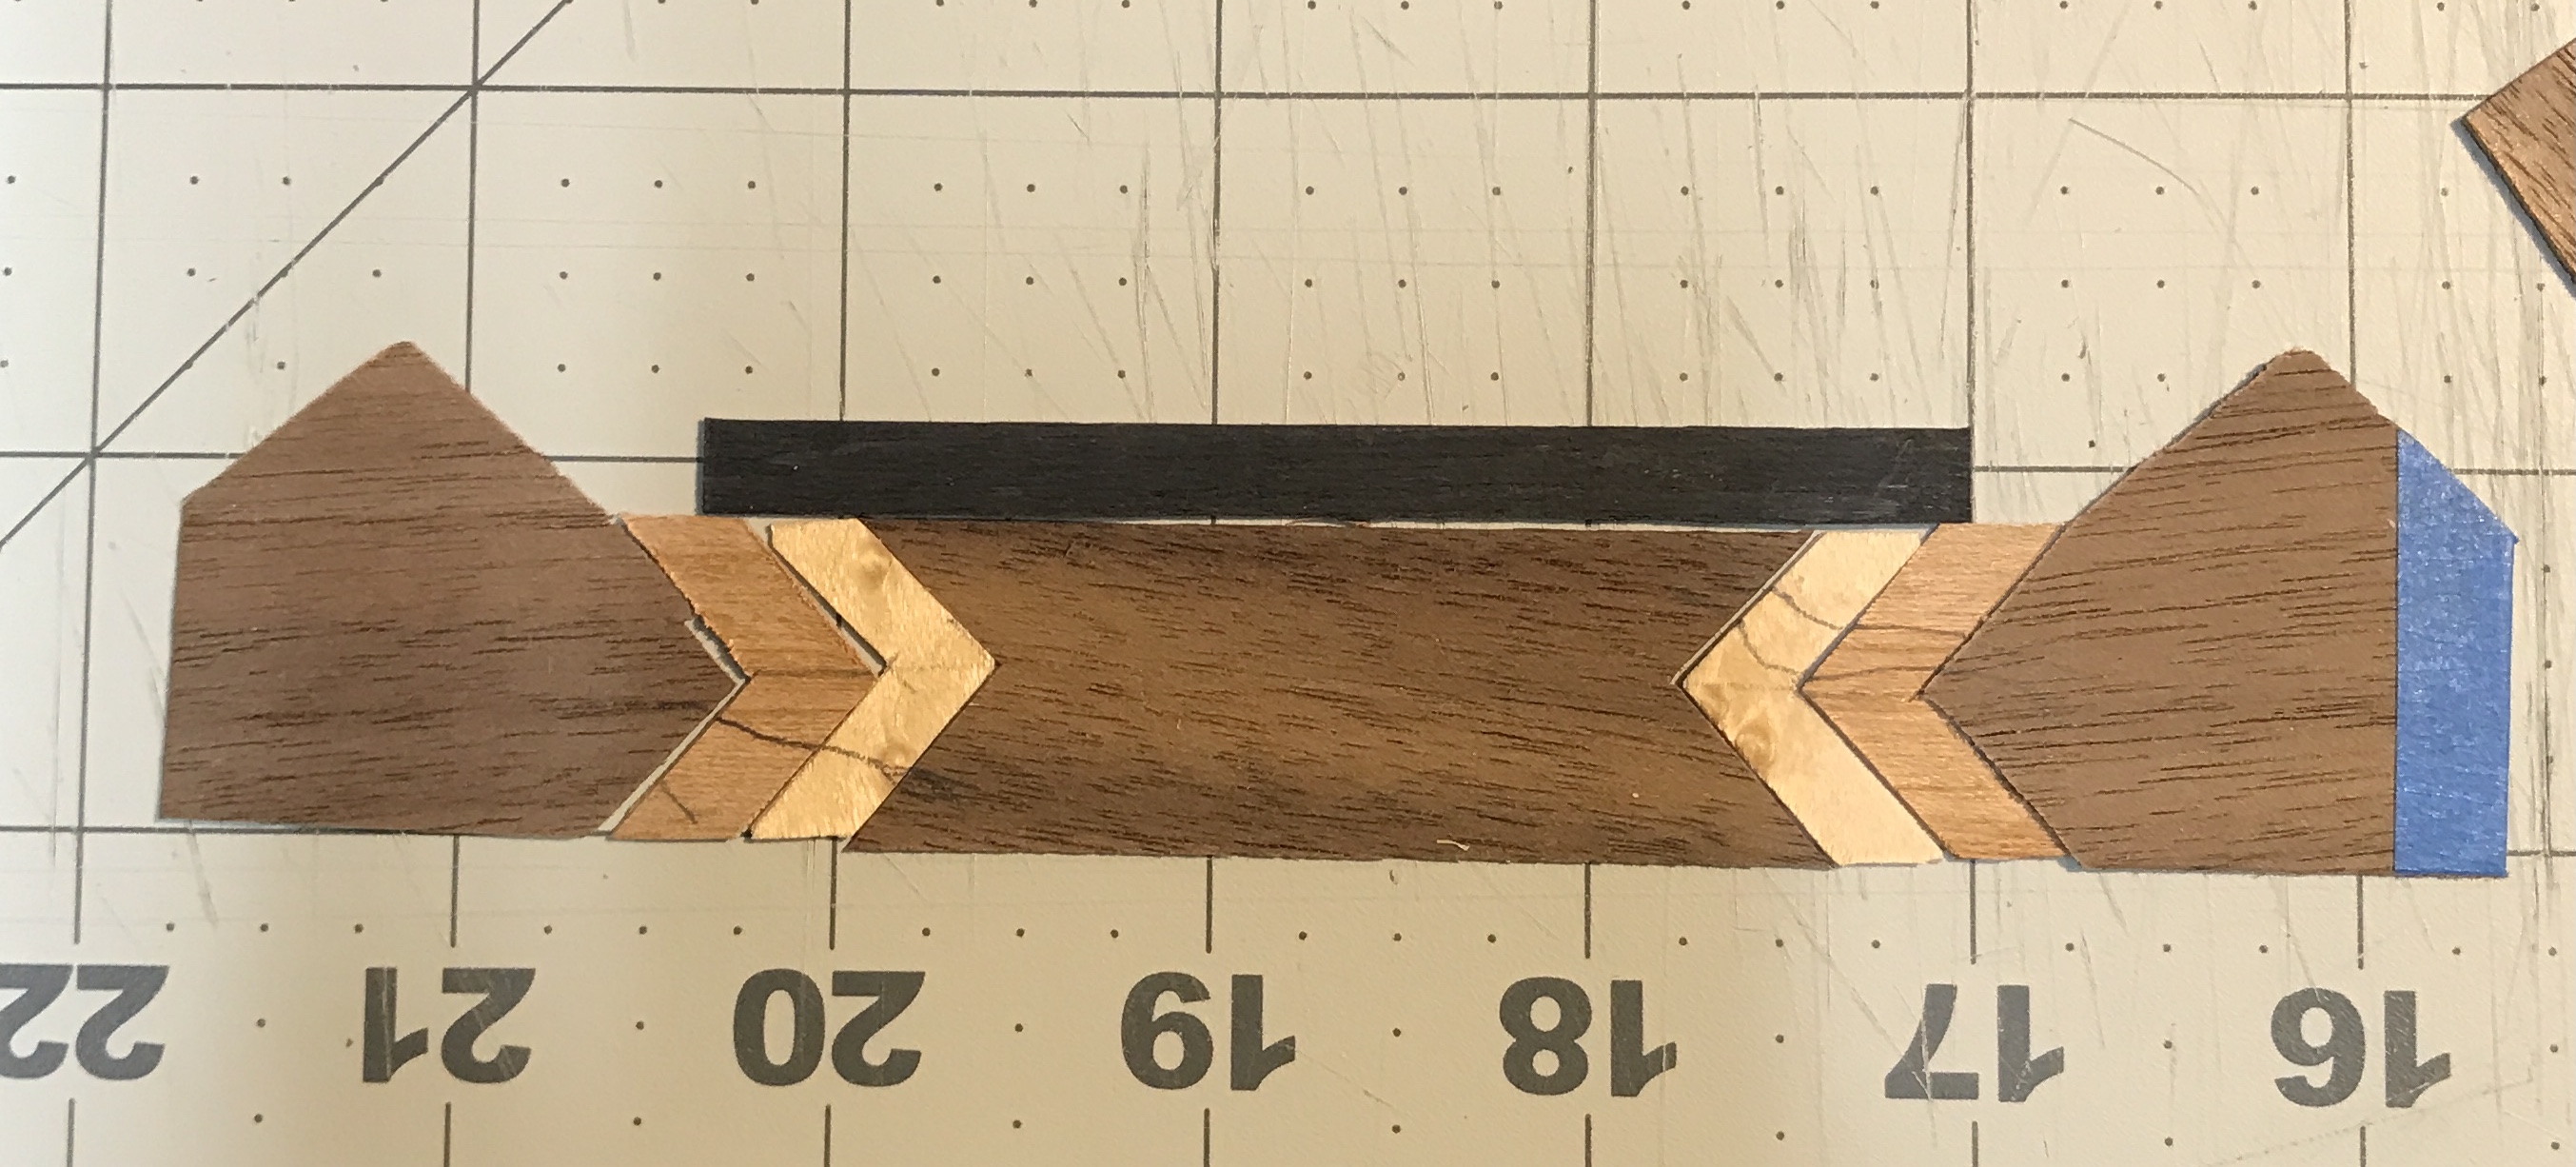
One further idea was explored. Currently the size of the veneer pieces is very close to the size of the box face, 19". I would prefer slightly longer veneer design, so the excess can be trimmed to fit the face hiding any misalignment between the ends of the pieces. One simple addition is a 1/8" strip of wood between the parts. Two strips were made and are shown in place in the photo below. Not thrilled with this as it doesn't really add anything design-wise.
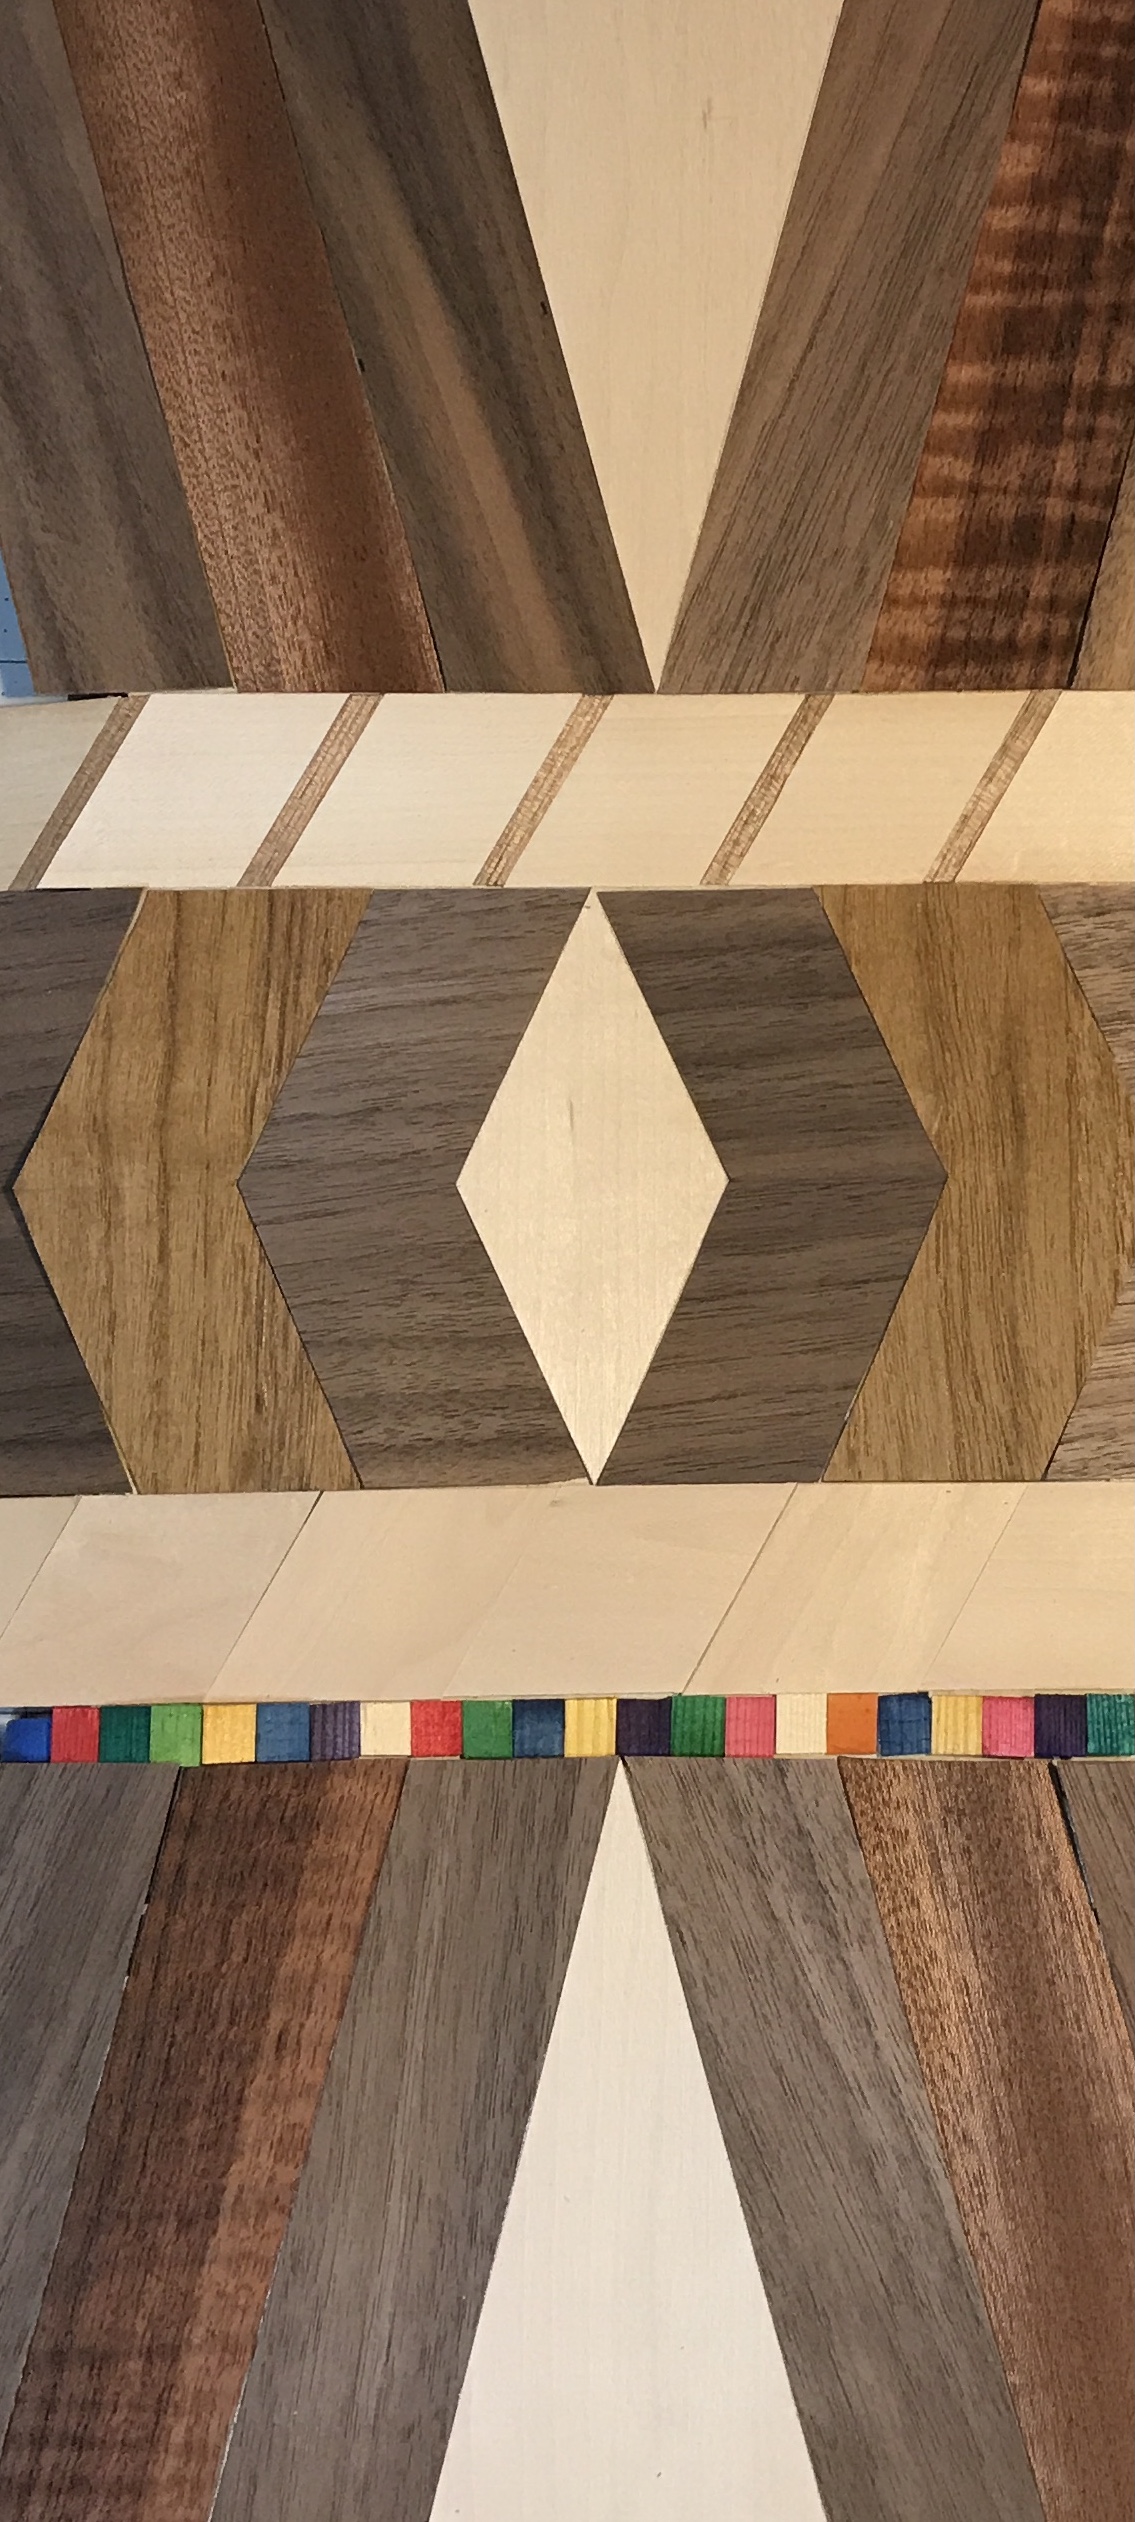
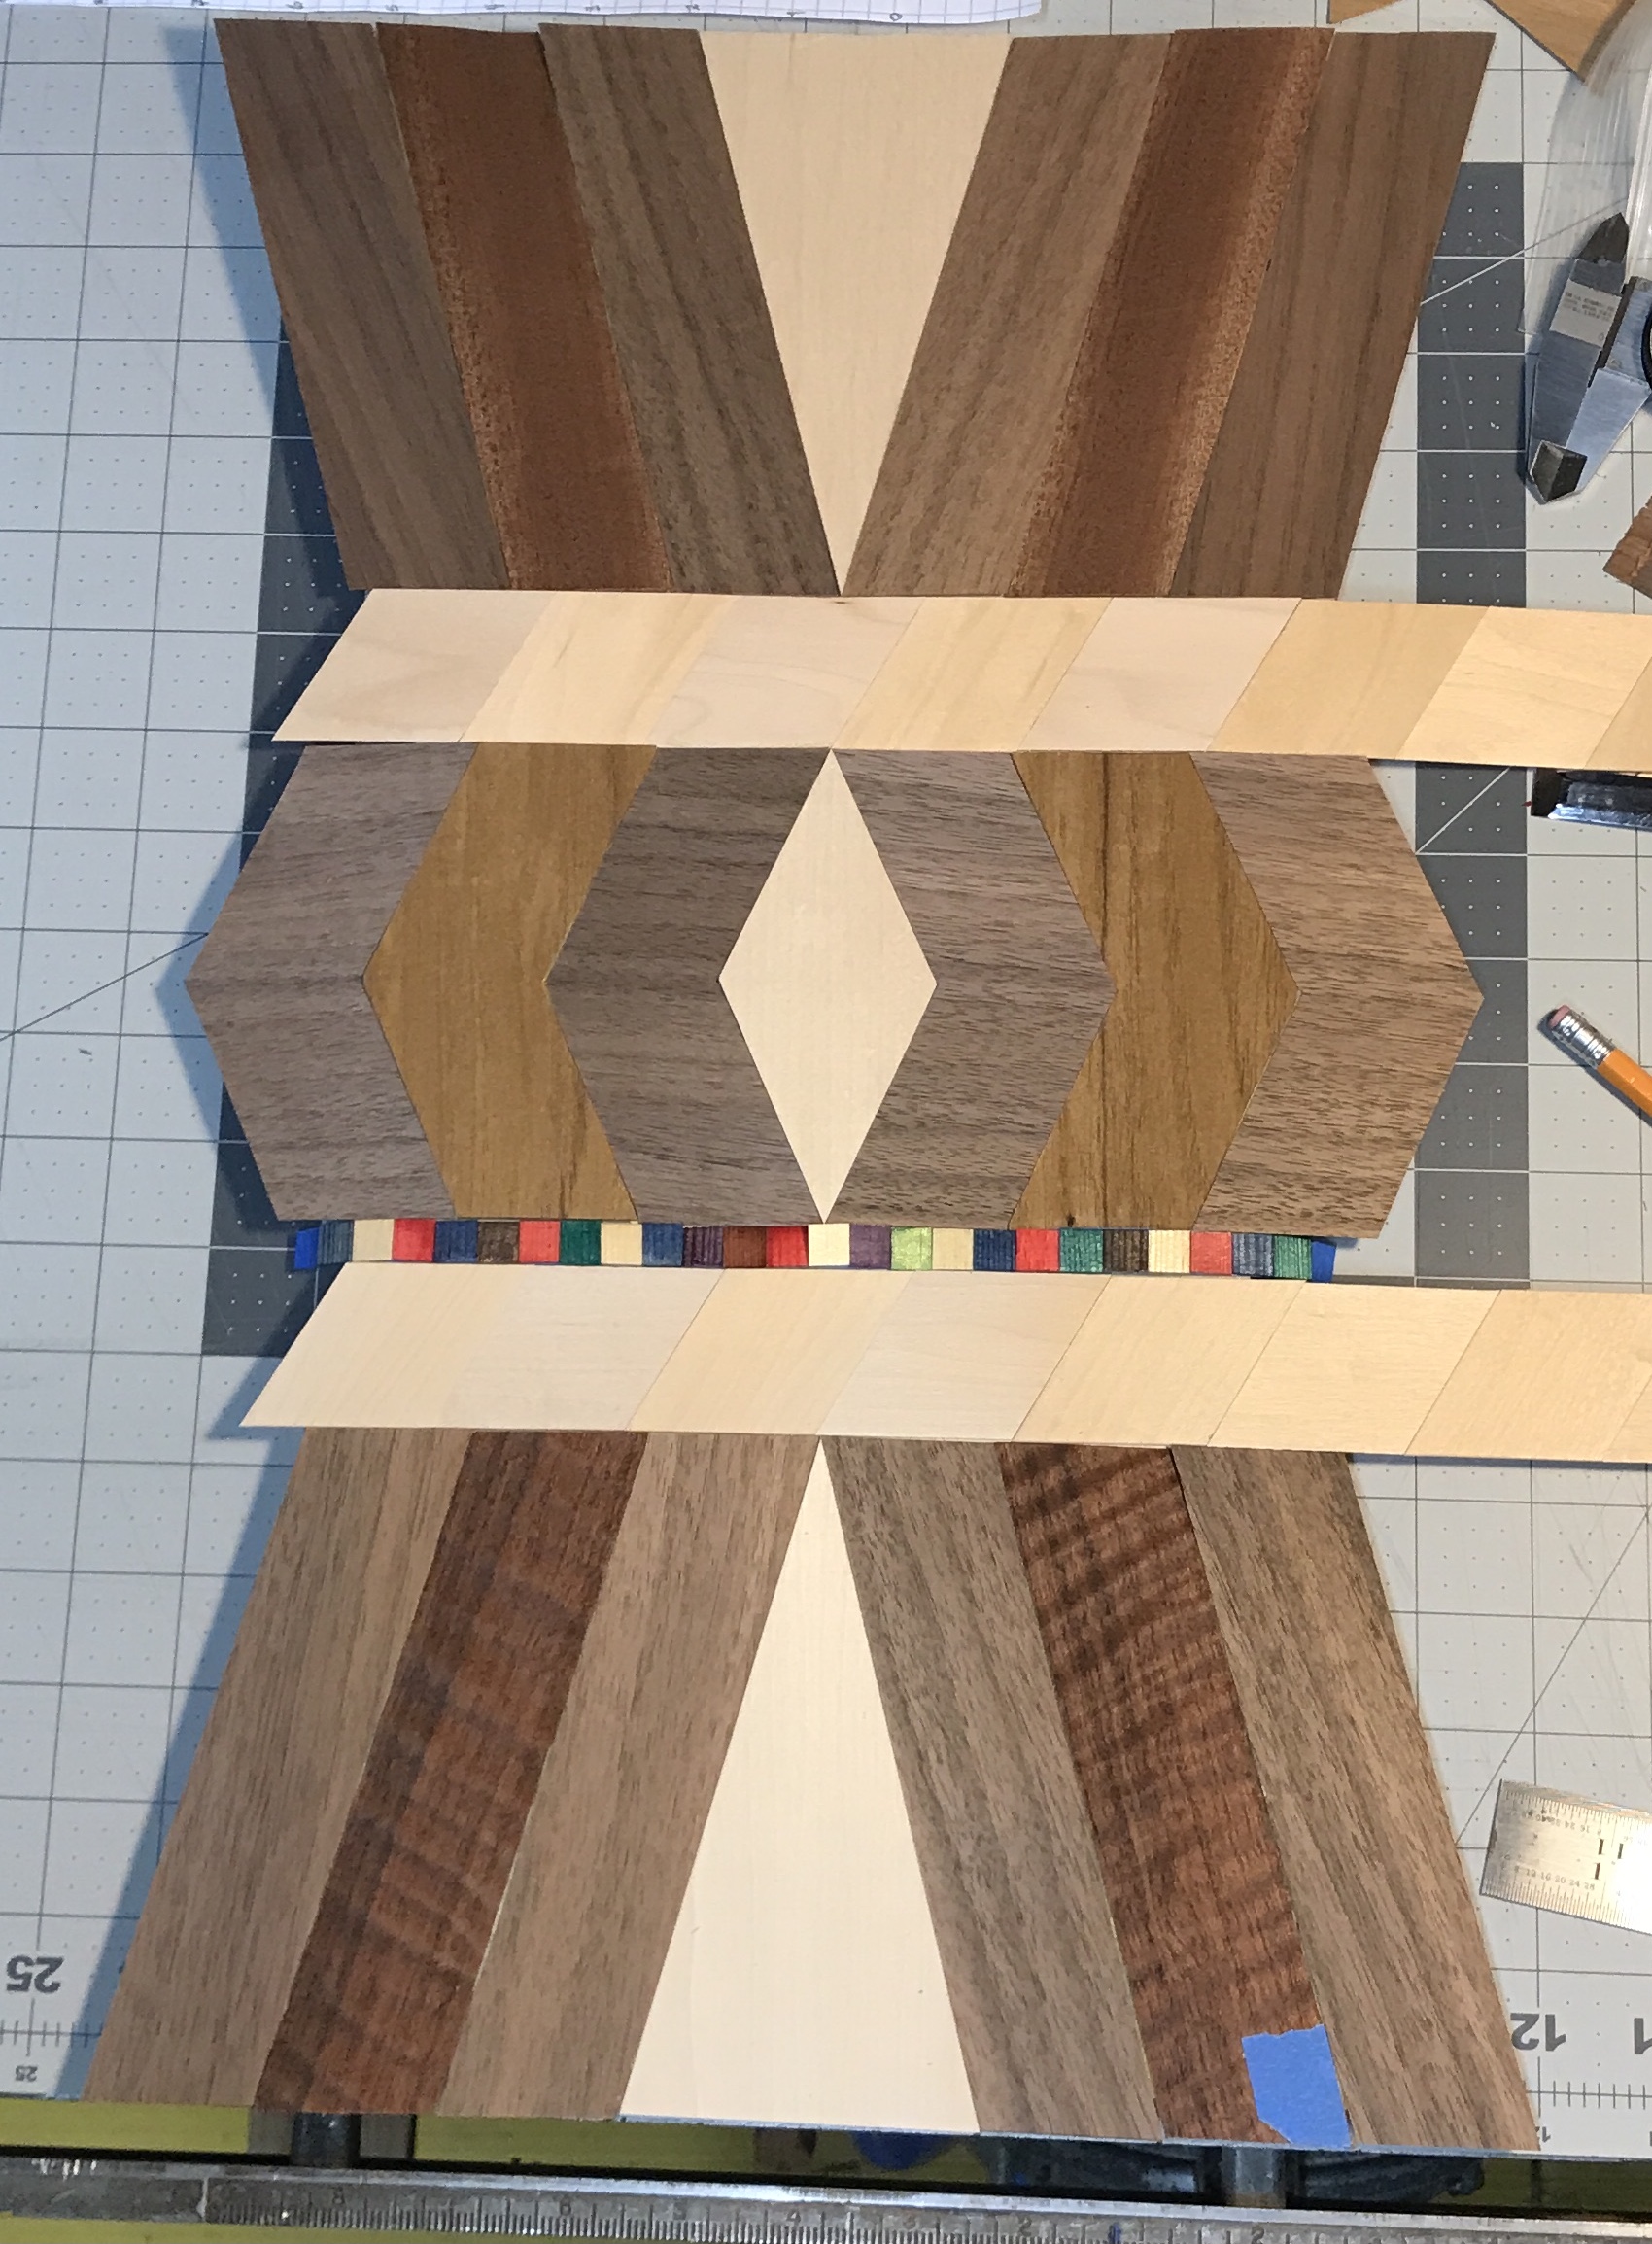
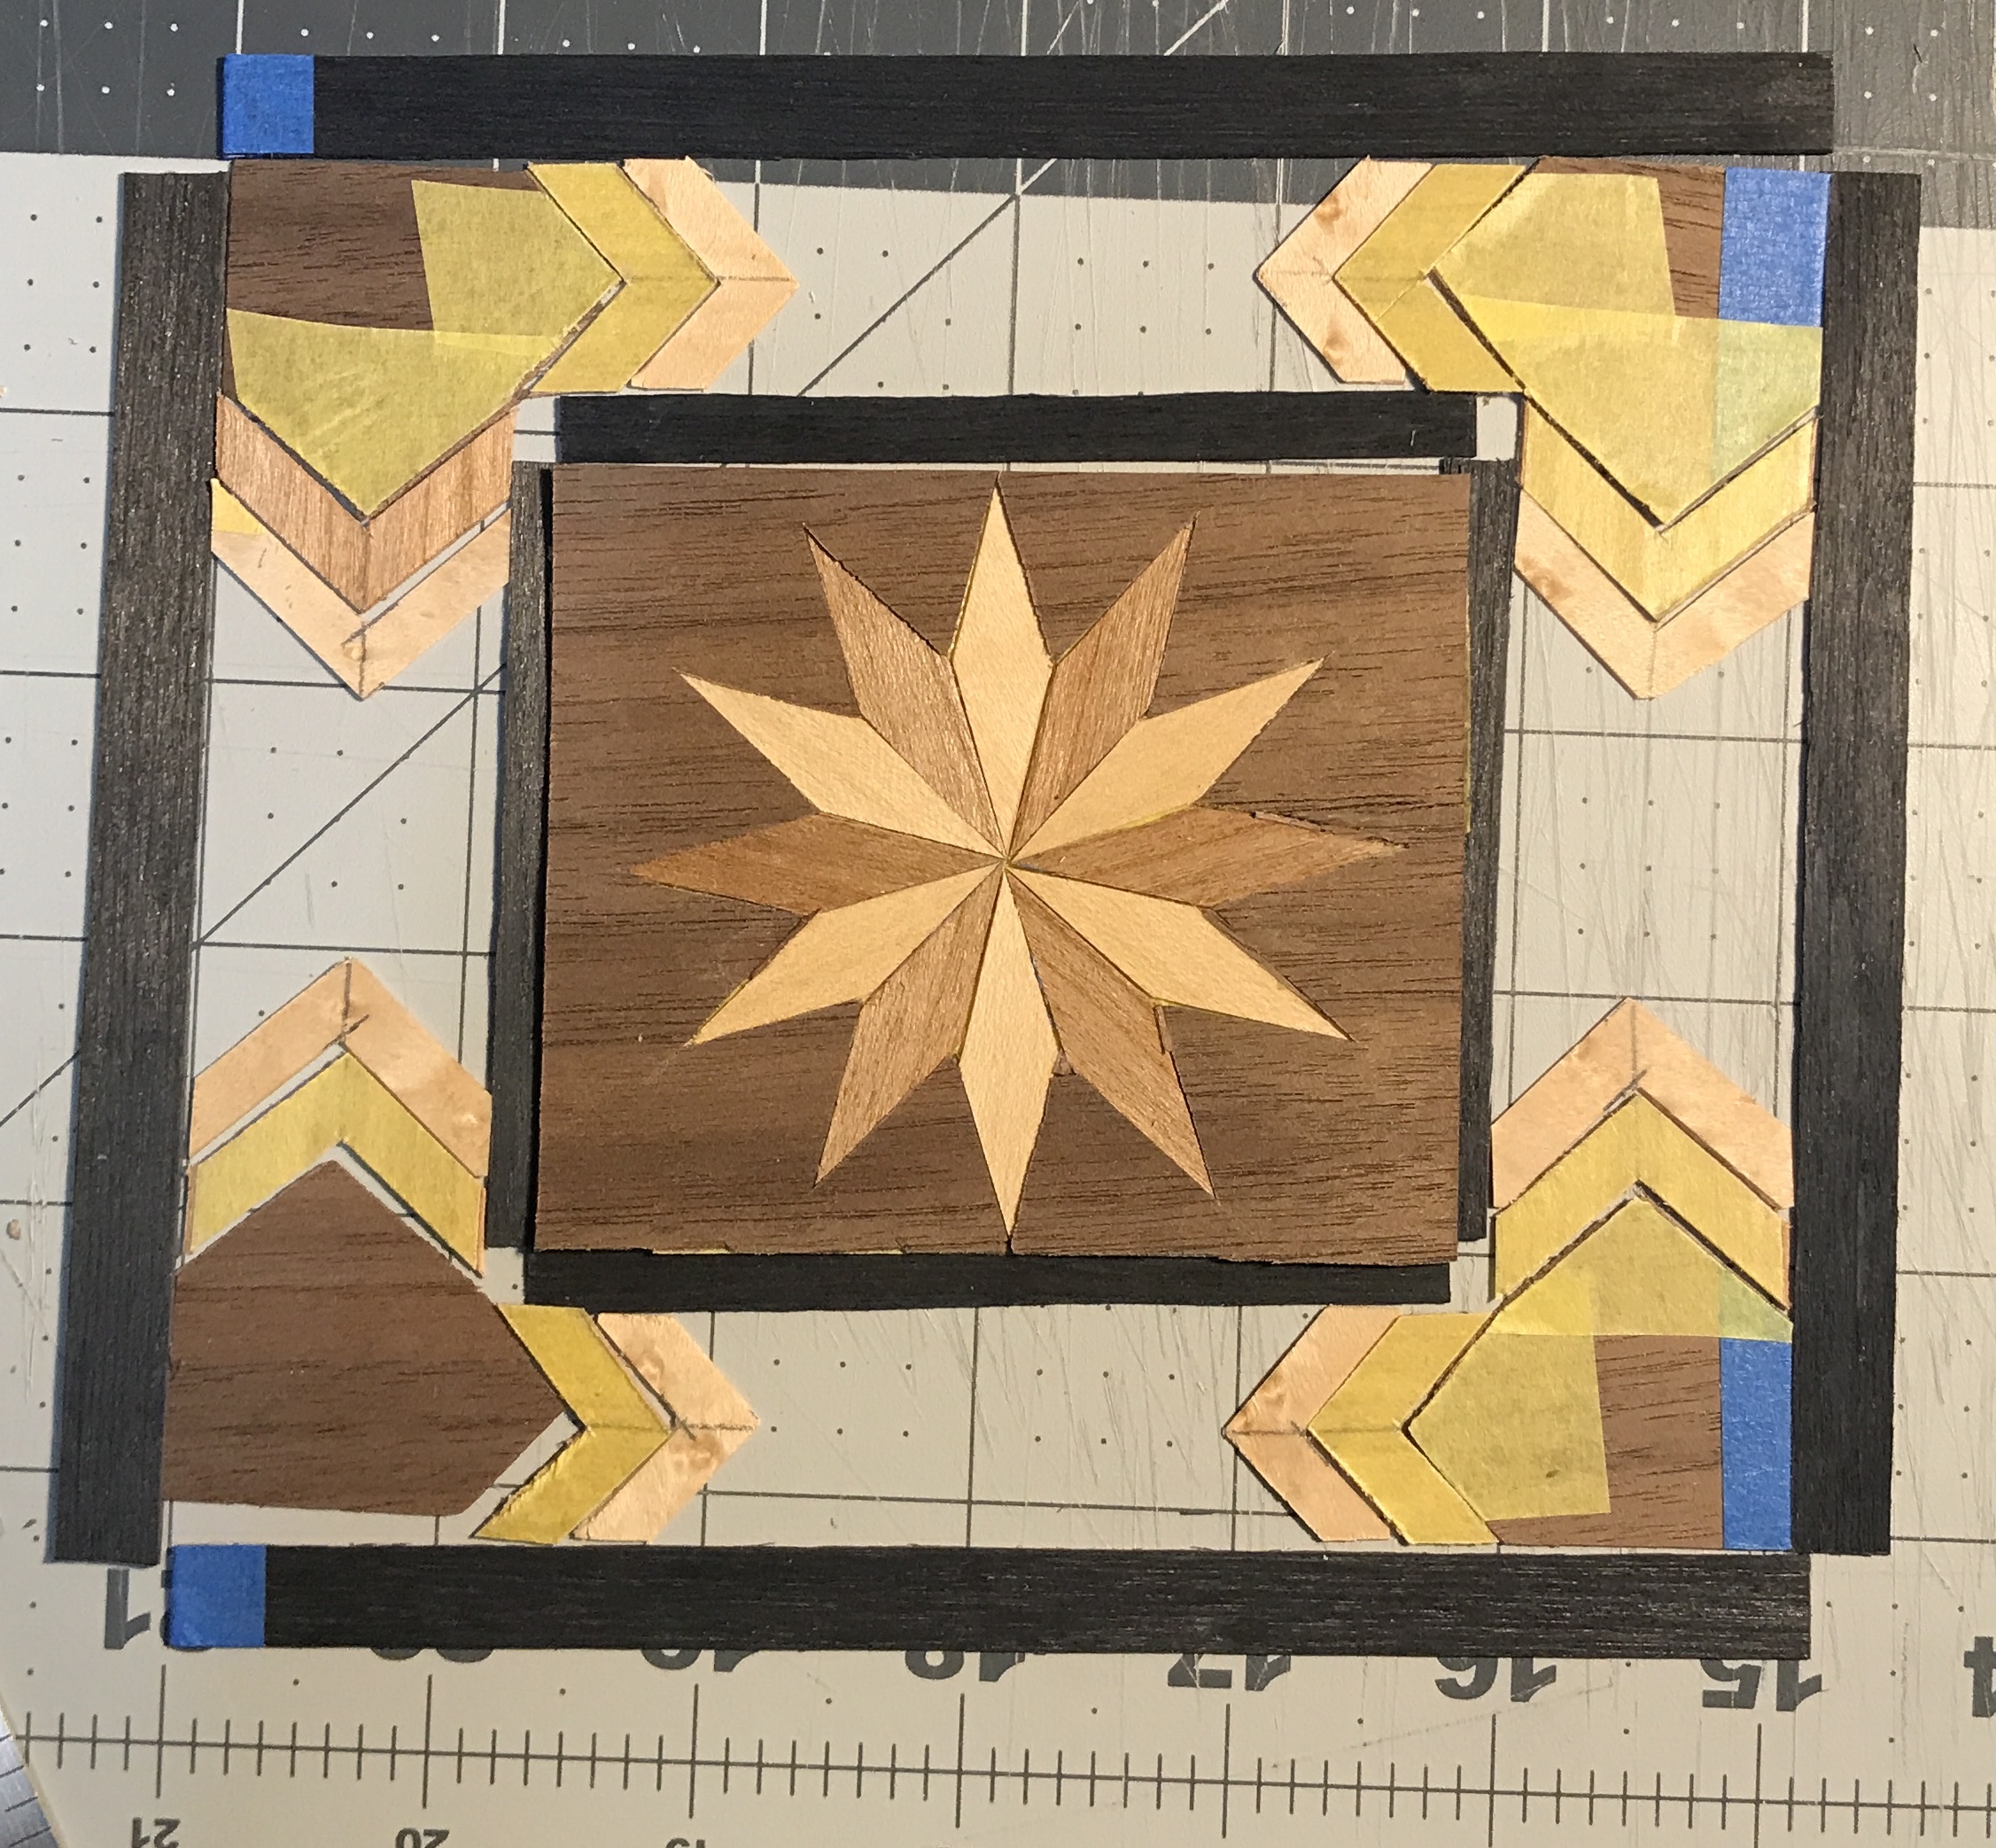
A different idea was explored. When looking for colored pencils in Rhea's boxes of craft supplies, I found two bags of colored veneer squares. The squares are not uniformly sized. A handful were laid out in a row 8" long. A narrow strip of blue tape was cut and laid across the line of colored squares. This was put between two sections of the design. It provides at least 1/8" of overlap on both ends. I like it! I like the asymmetry as well.
I need to check the dye on these squares of wood. Does it penetrate deeply enough that it can be sanded after glue-up? After checking all of the colors only the green dye did not penetrate all the way through the veneer. How do I cut these to the correct size?
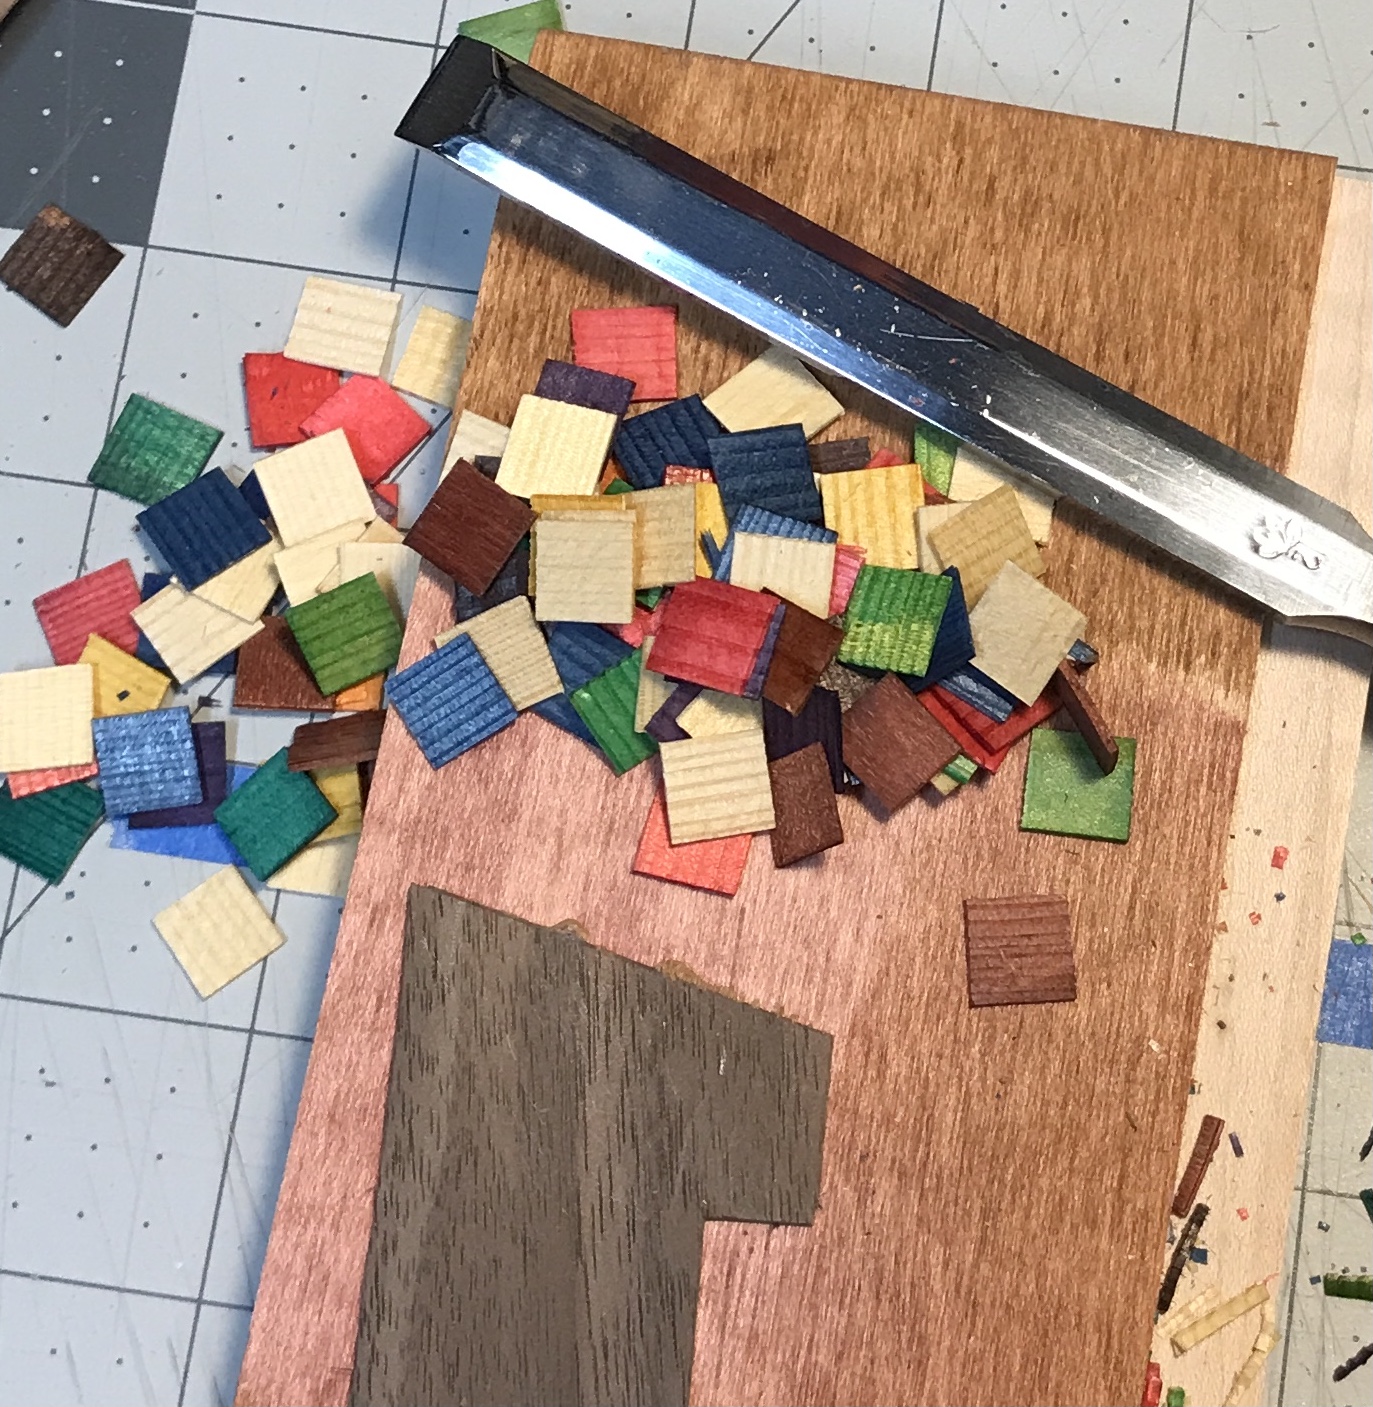
A jig was made. Two veneer scraps were glued face-to-face. After drying a 3/8" wide strip was cut from one side with a 90° angle at one end. The two sheets of veneer are 0.040" thick, while the squares are mostly 0.036" thick. A 3/8" wide strip of sandpaper was glued to the ruler. The jig parts are shown in the first photo below. The ruler with sandpaper did not work well. For many pieces I could not apply enough pressure to keep the veneer from moving under the ruler. I switched from the knife to a chisel. This was much more effective and rapid and did not require a ruler. The second photo shows the conclusion of the process.

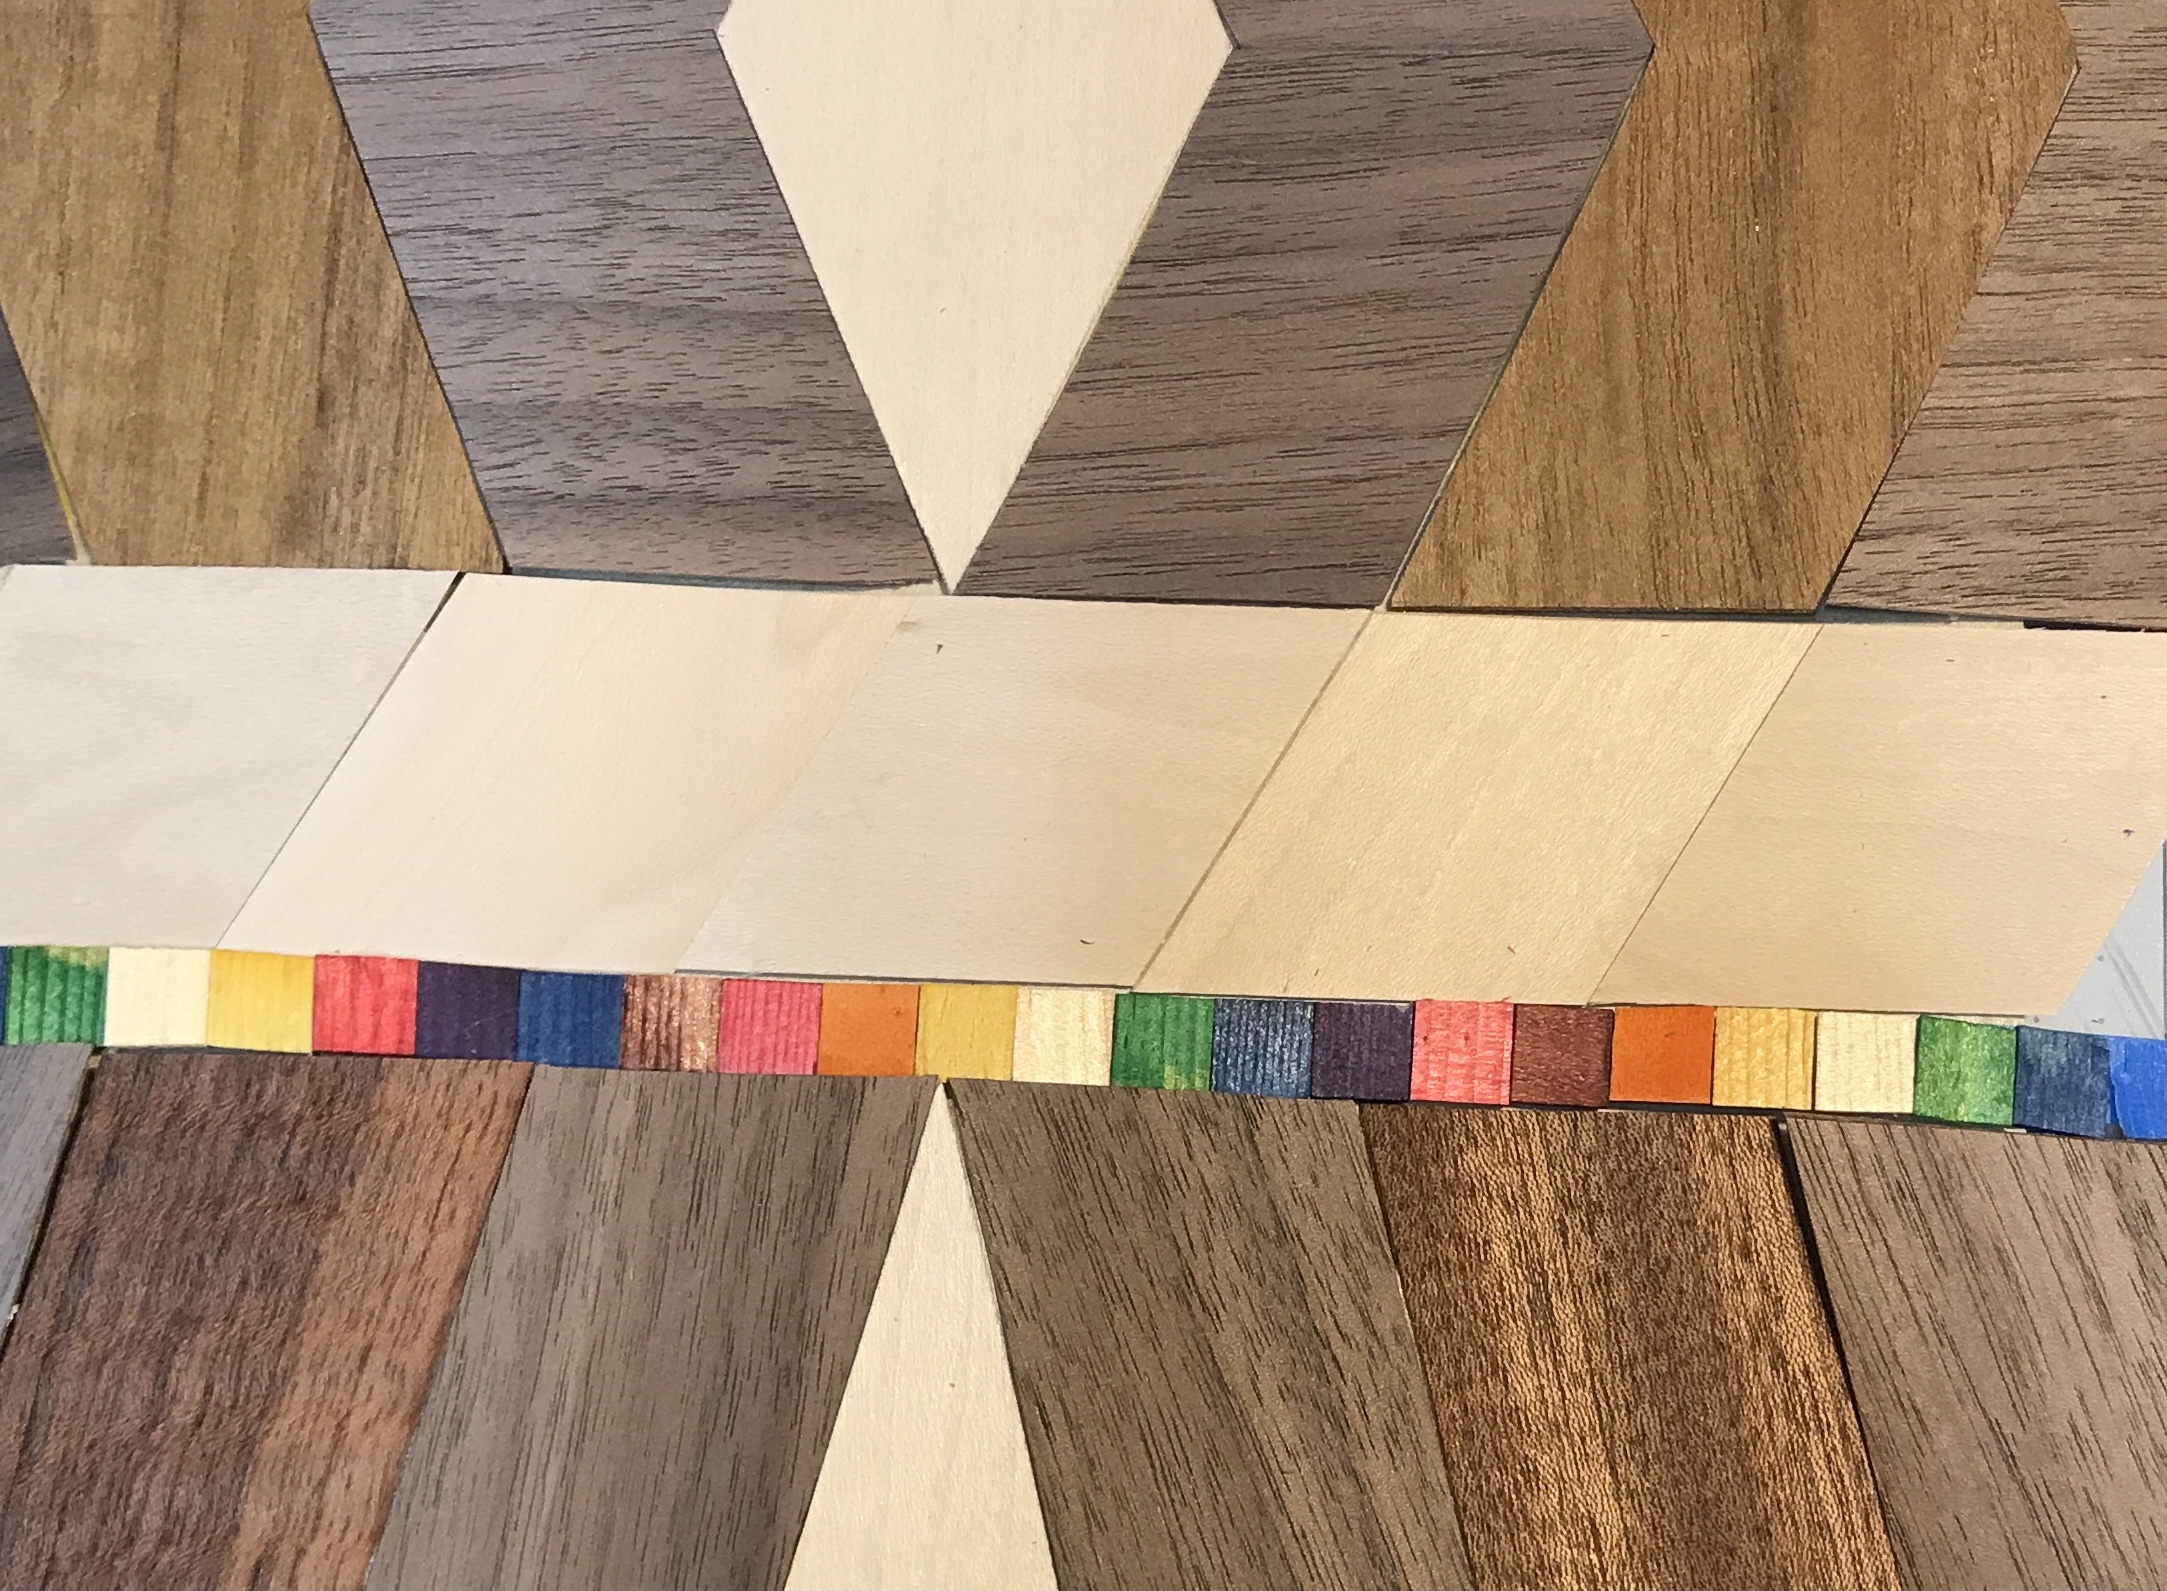
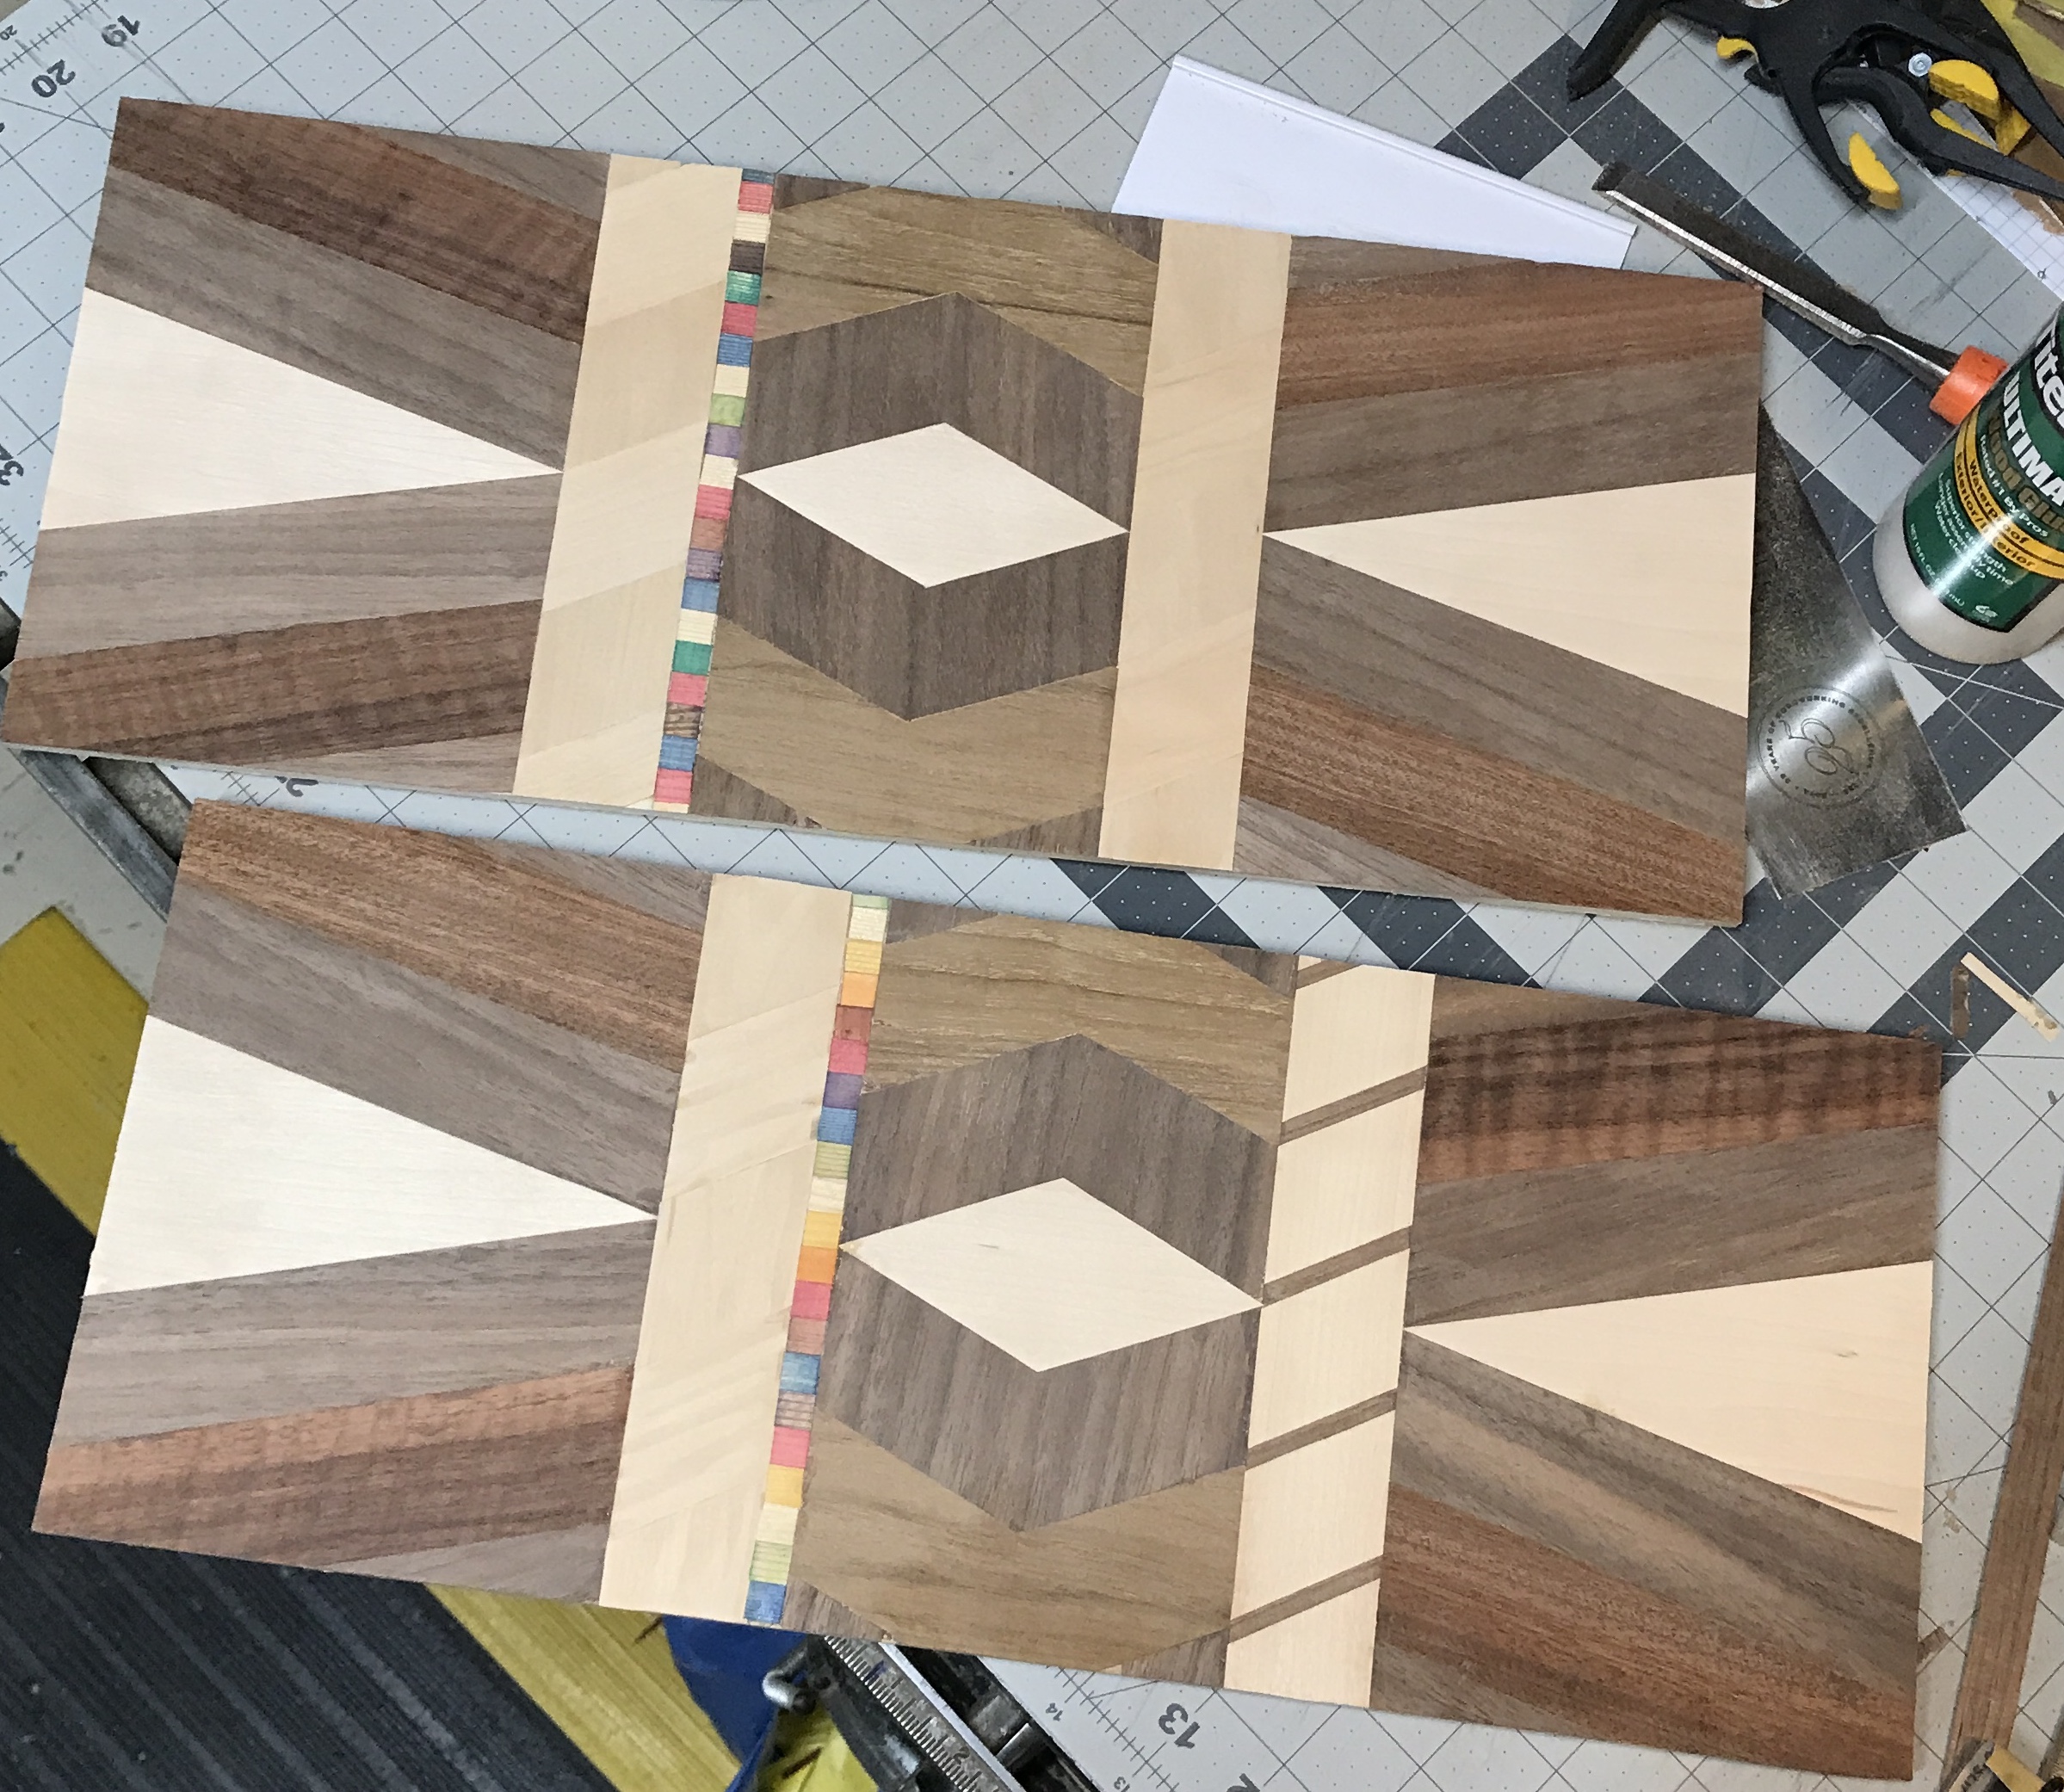
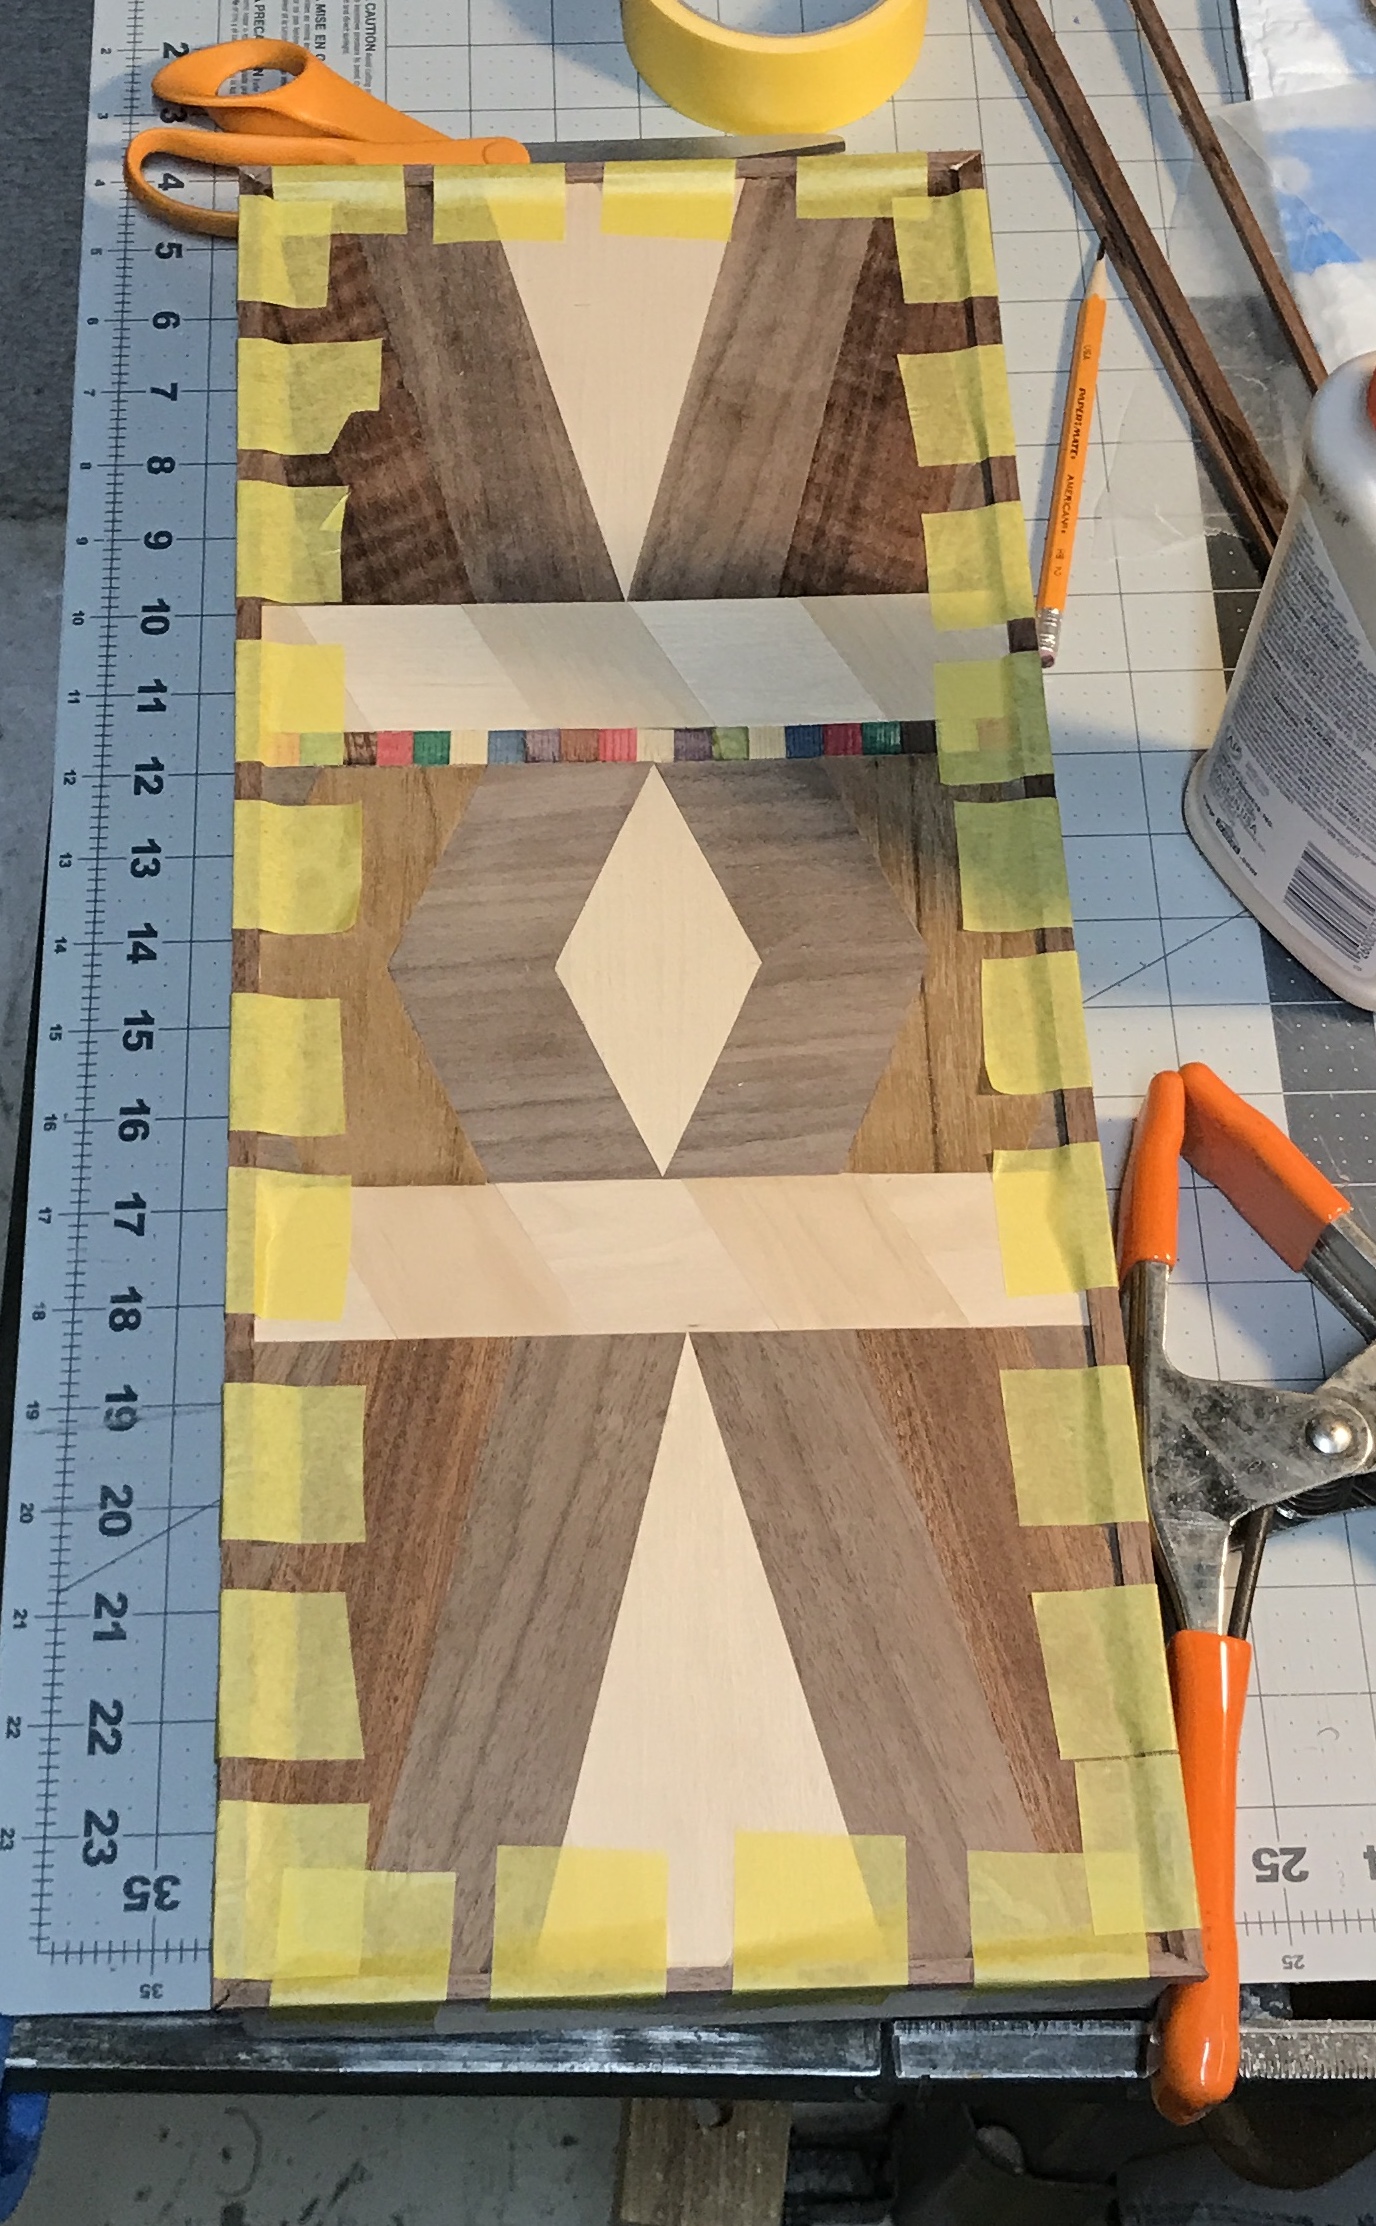
The squares were aligned in a rainbow pattern of color. This was taped and is shown in the first photo below. Each section was then better aligned and re-taped. In each case one edge was chosen and aligned with a ruler. Two rhomboids in the uninterrupted strip of maple were slightly trimmed. The chevrons still posed the most problems. Two chevrons were trimmed slightly. There is at least one place that will require some filling after the glue-up. The sections were taped together prior to gluing as seen in the second photo.
The second set of outside face parts were arranged and taped this morning. There were enough rhombi for one strip of alternating grain maple. A second 1 1/2" strip of the white maple was cut. This was cut into rhombi and these were taped together. After taping a strip of colored squares the entire set of pieces were taped together like the other face. The blue tape covering a crack as seen in the photo below was removed.
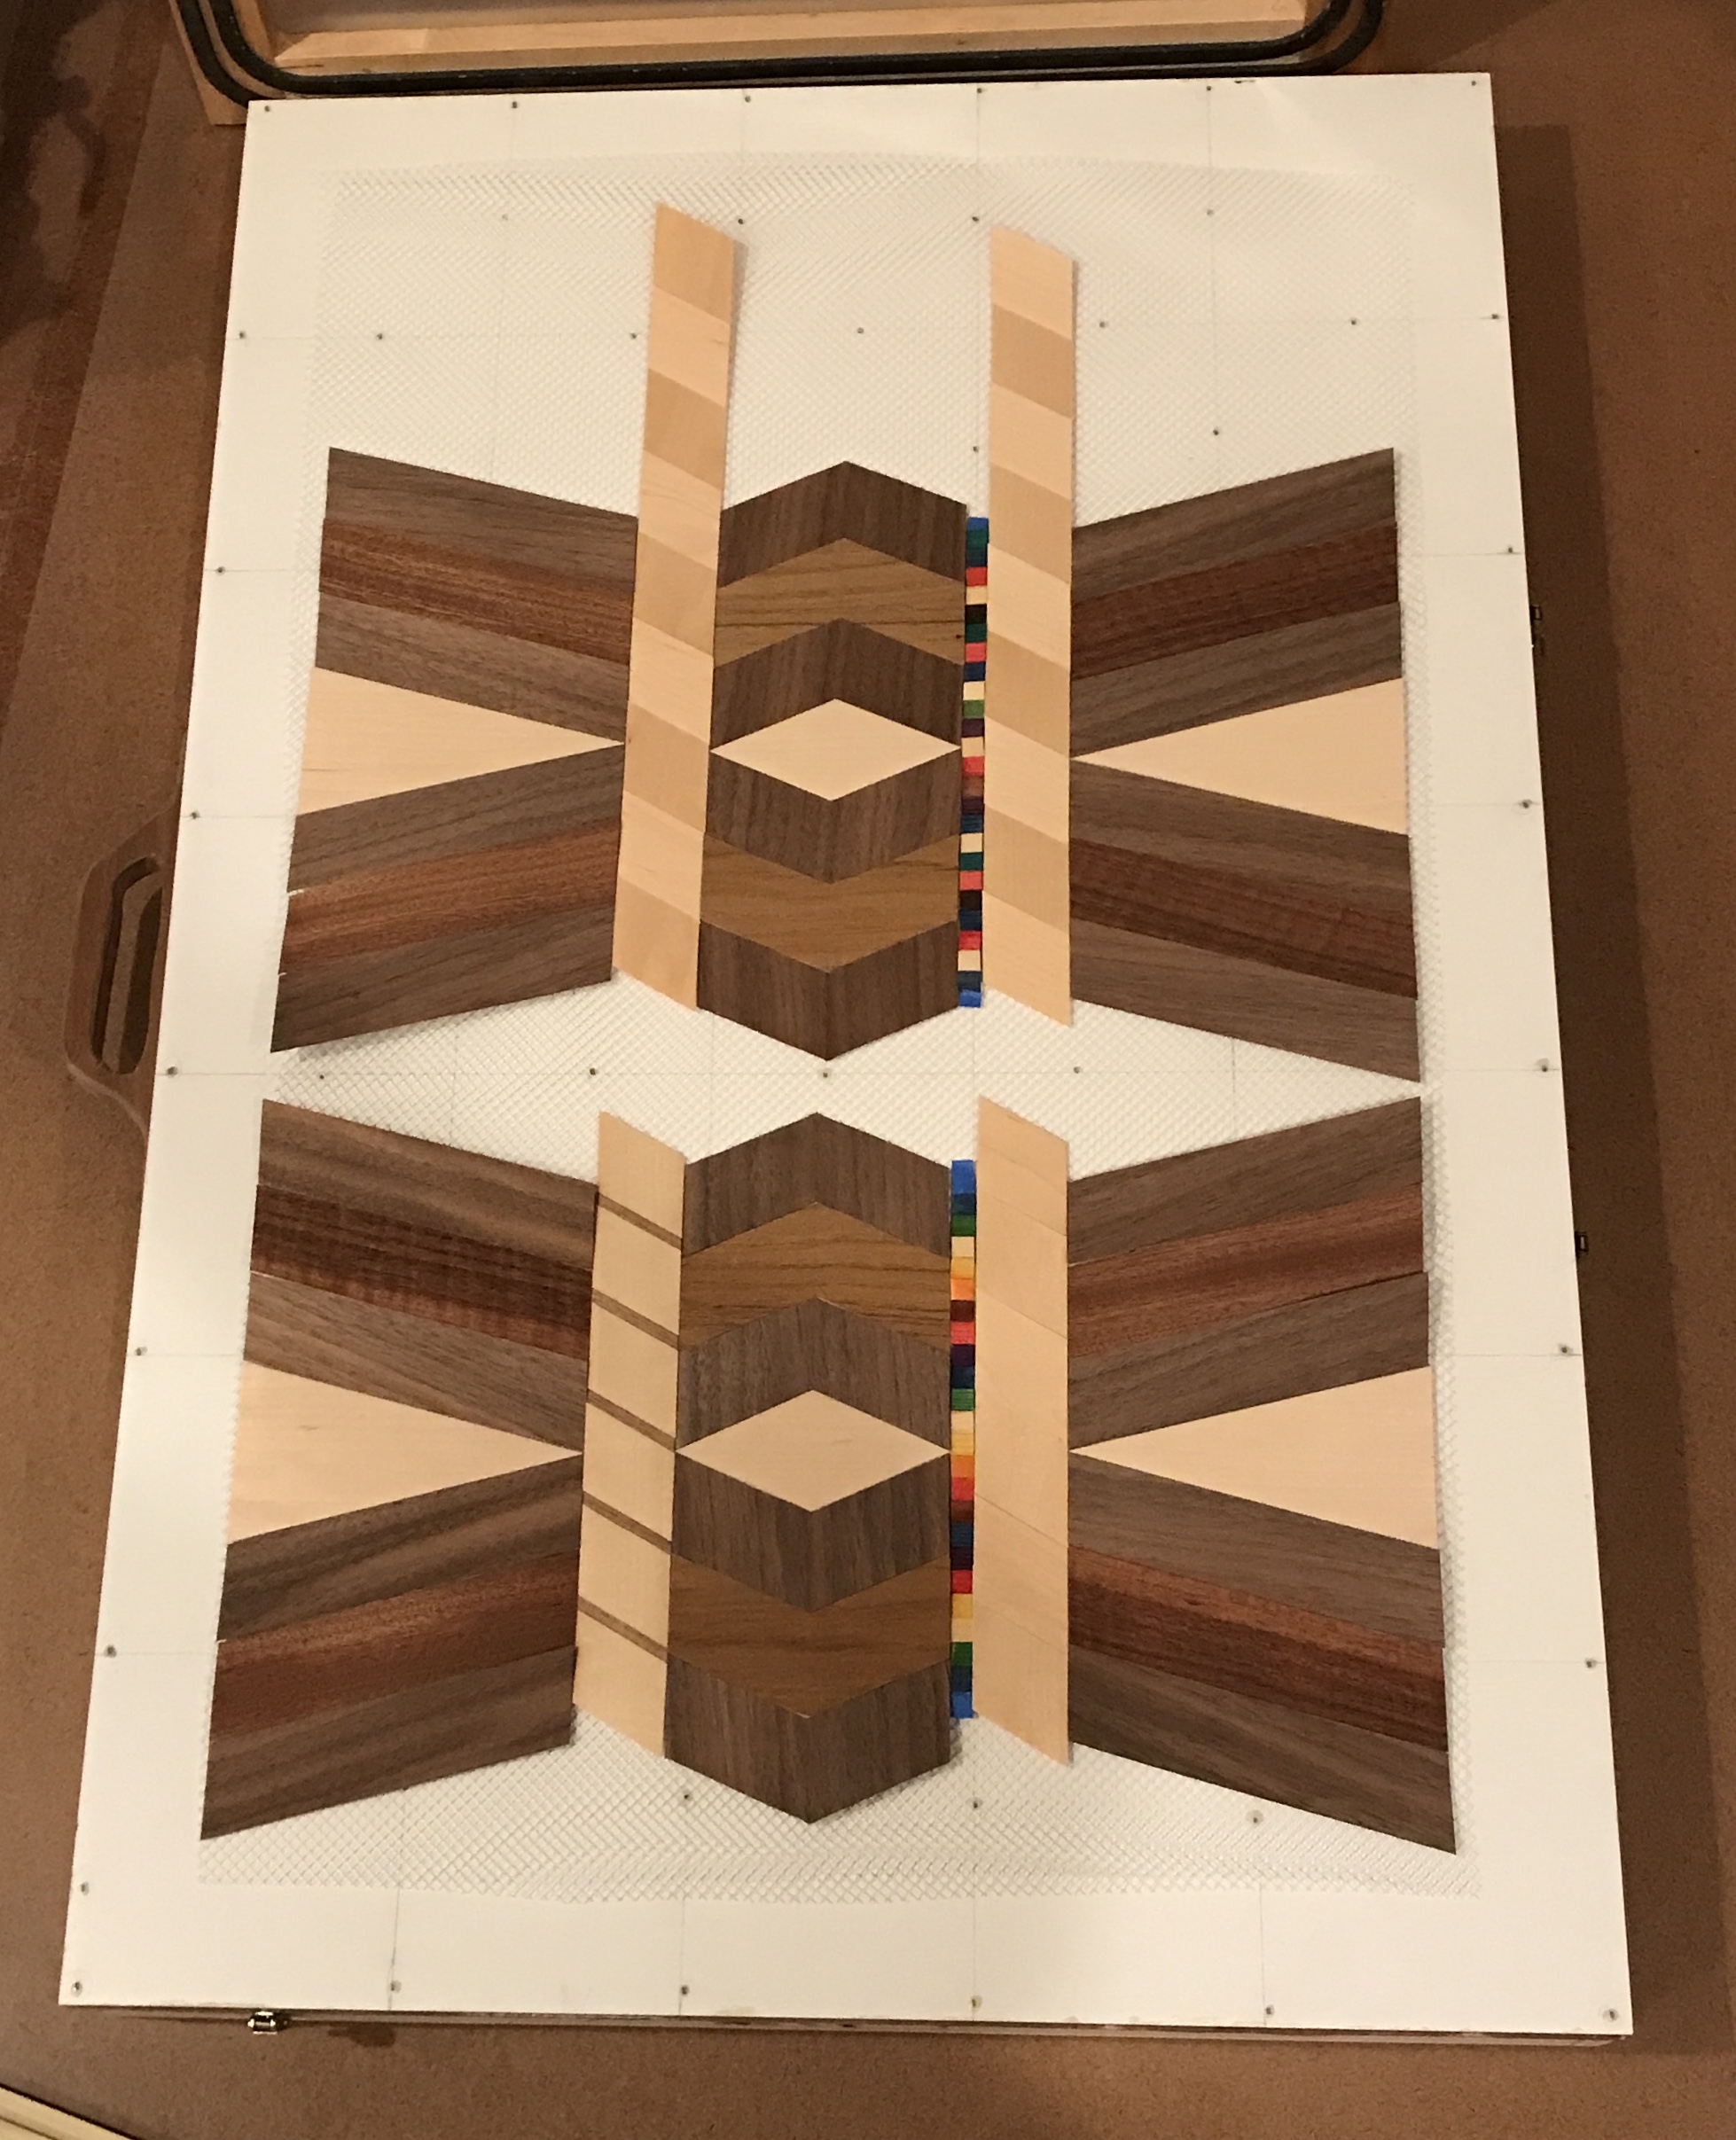
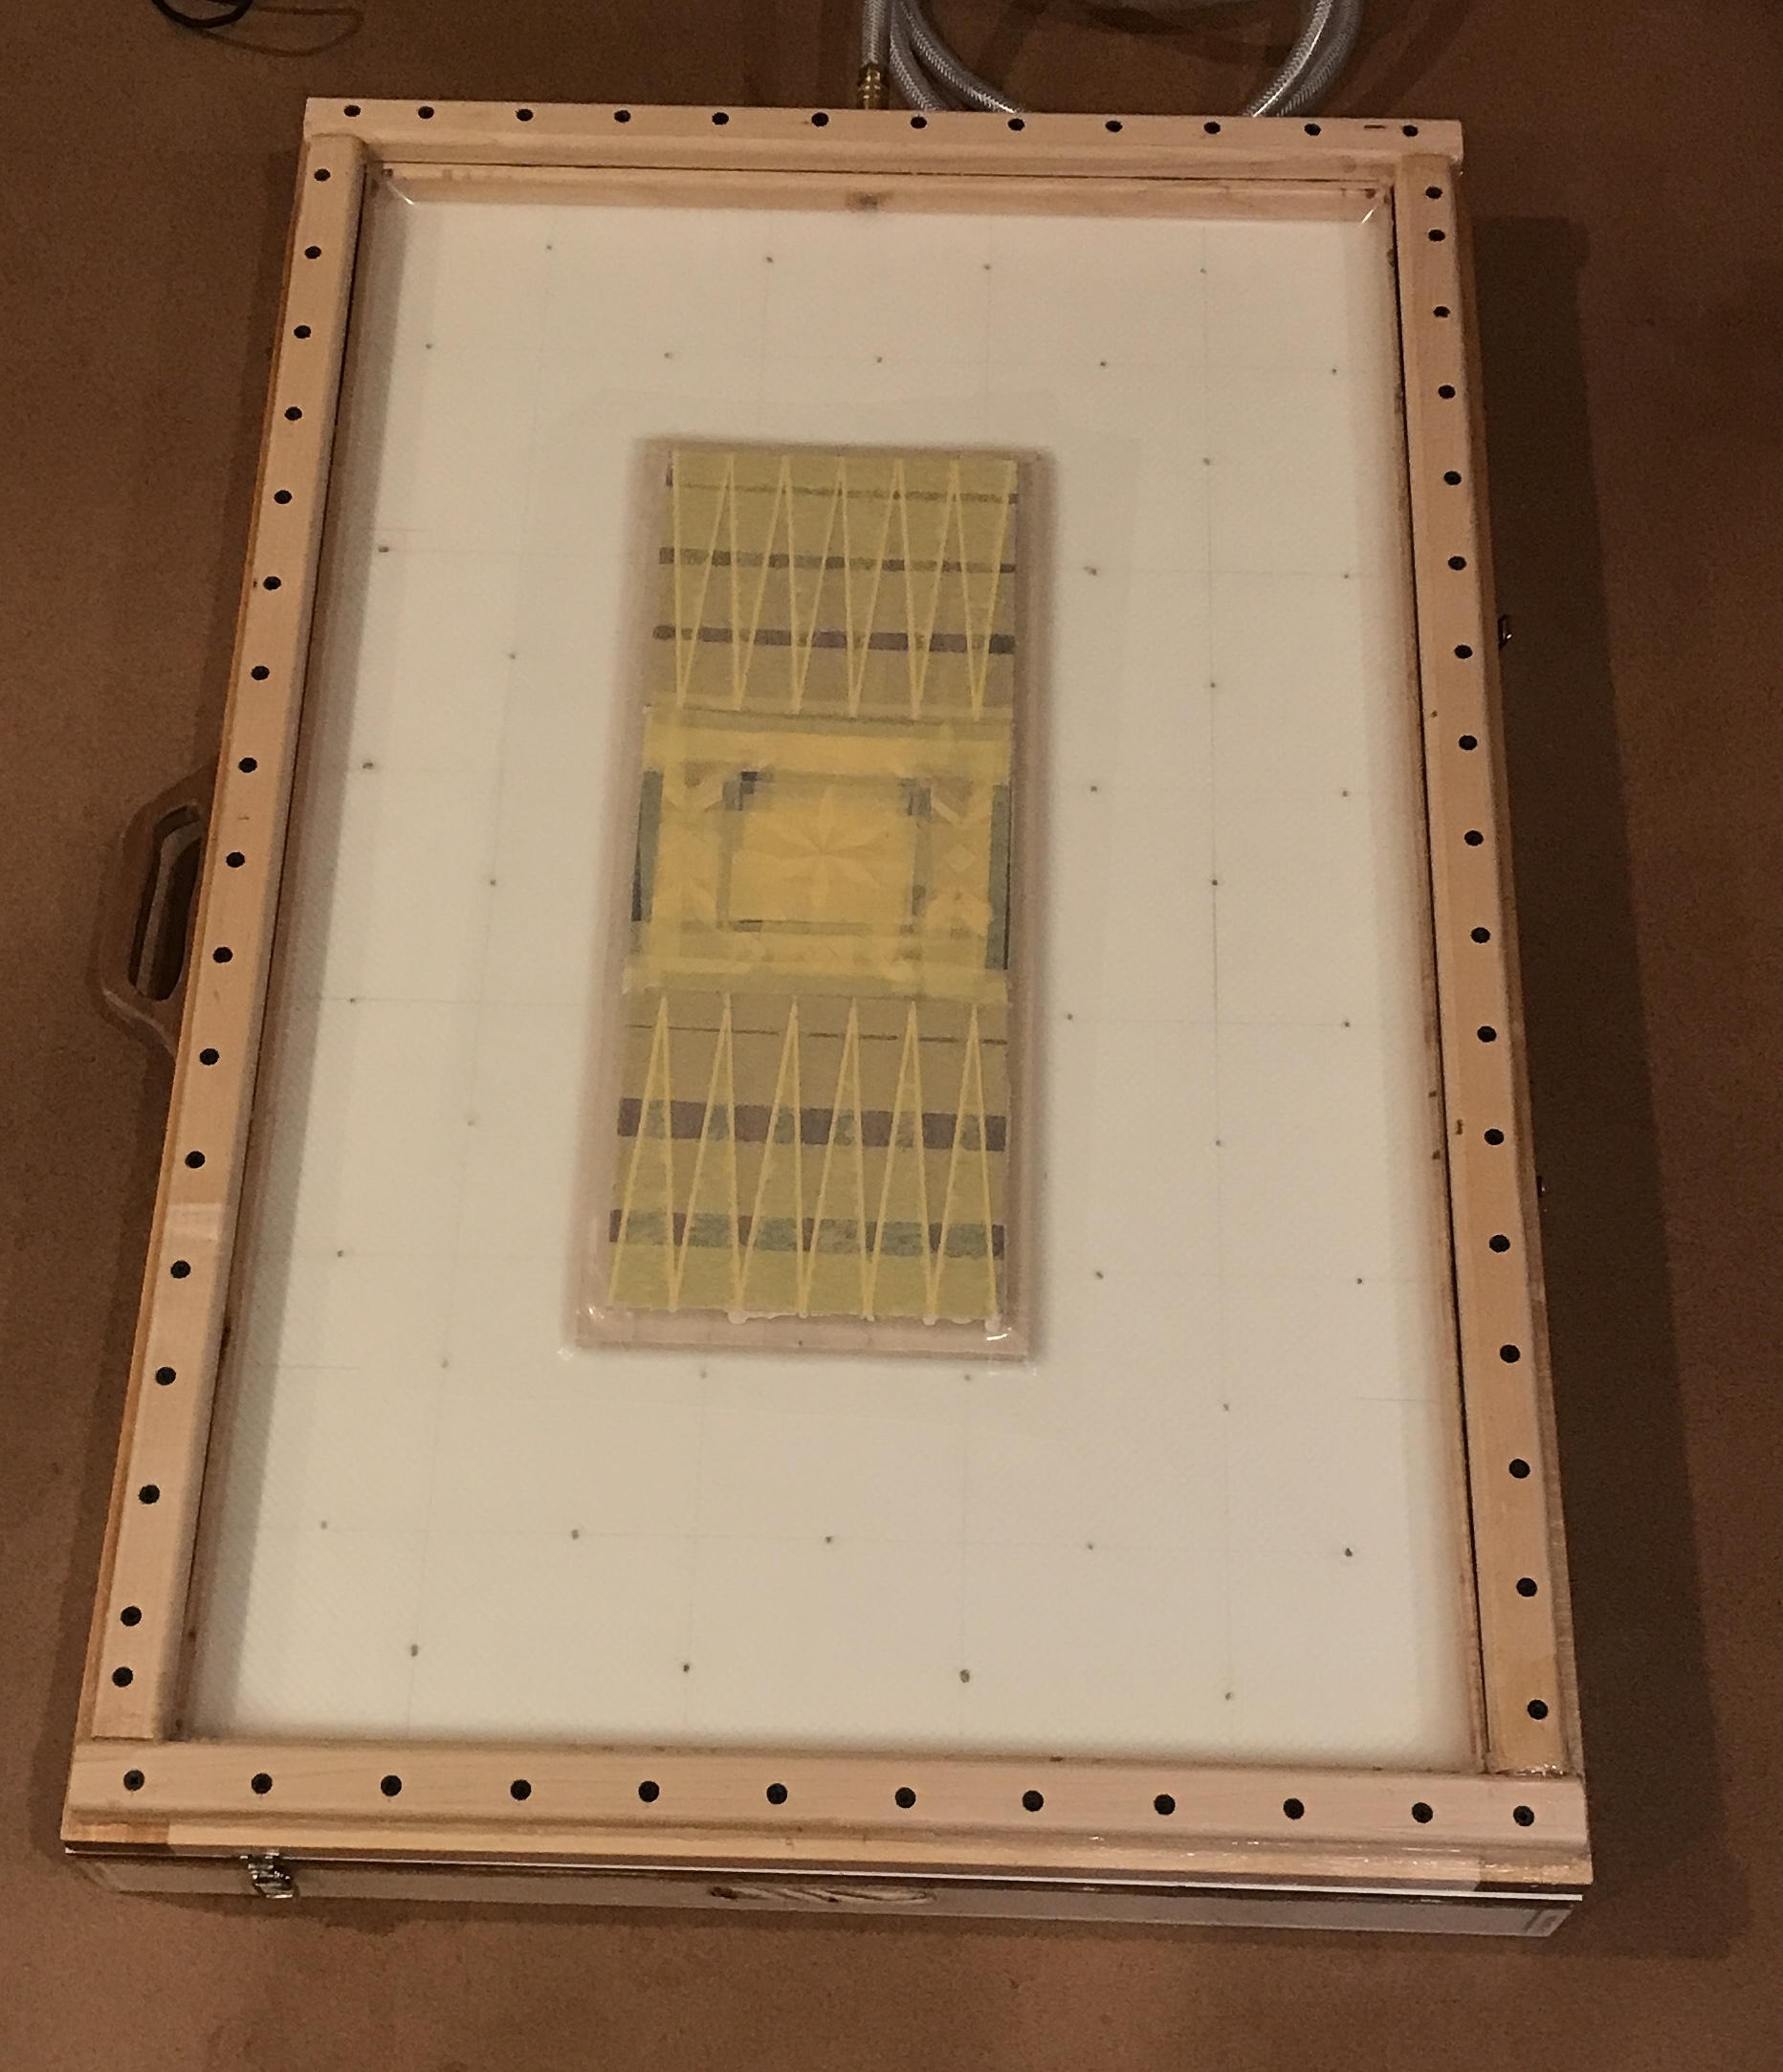
The pump and vacuum box were brought to the basement from the 20° garage this morning. After lunch I laid out the taped veneers for the two faces. I was just getting ready to mark centers on the veneers and the box faces when I had second thoughts. Under the veneer is a plastic mesh. I assume this is to provide good vacuum beneath the parts and to keep any glue off of the box. If this is used as seen in the photo below, the veneer will not be pressed flat onto the face. There are two choices for dealing with this. First, the plastic mesh can be replaced with waxed paper. Second, the box face is placed on the mesh and the veneer centered on it. The problem with the second choice, and probably the standard way to do this, is that the veneer going off the sides of the face will break off leaving a jagged edge. Making the second choice work requires cutting off the unsupported veneer prior to gluing in the press.
For future reference: psi value = inHg value / 2.03602. The -20 or so inHg produced by the pump converts to almost 10 psi of pressure on the items in the box. A one square foot panel will feel 1440 total pounds of pressure. (How the mind wanders when a tough decision needs to be made.)
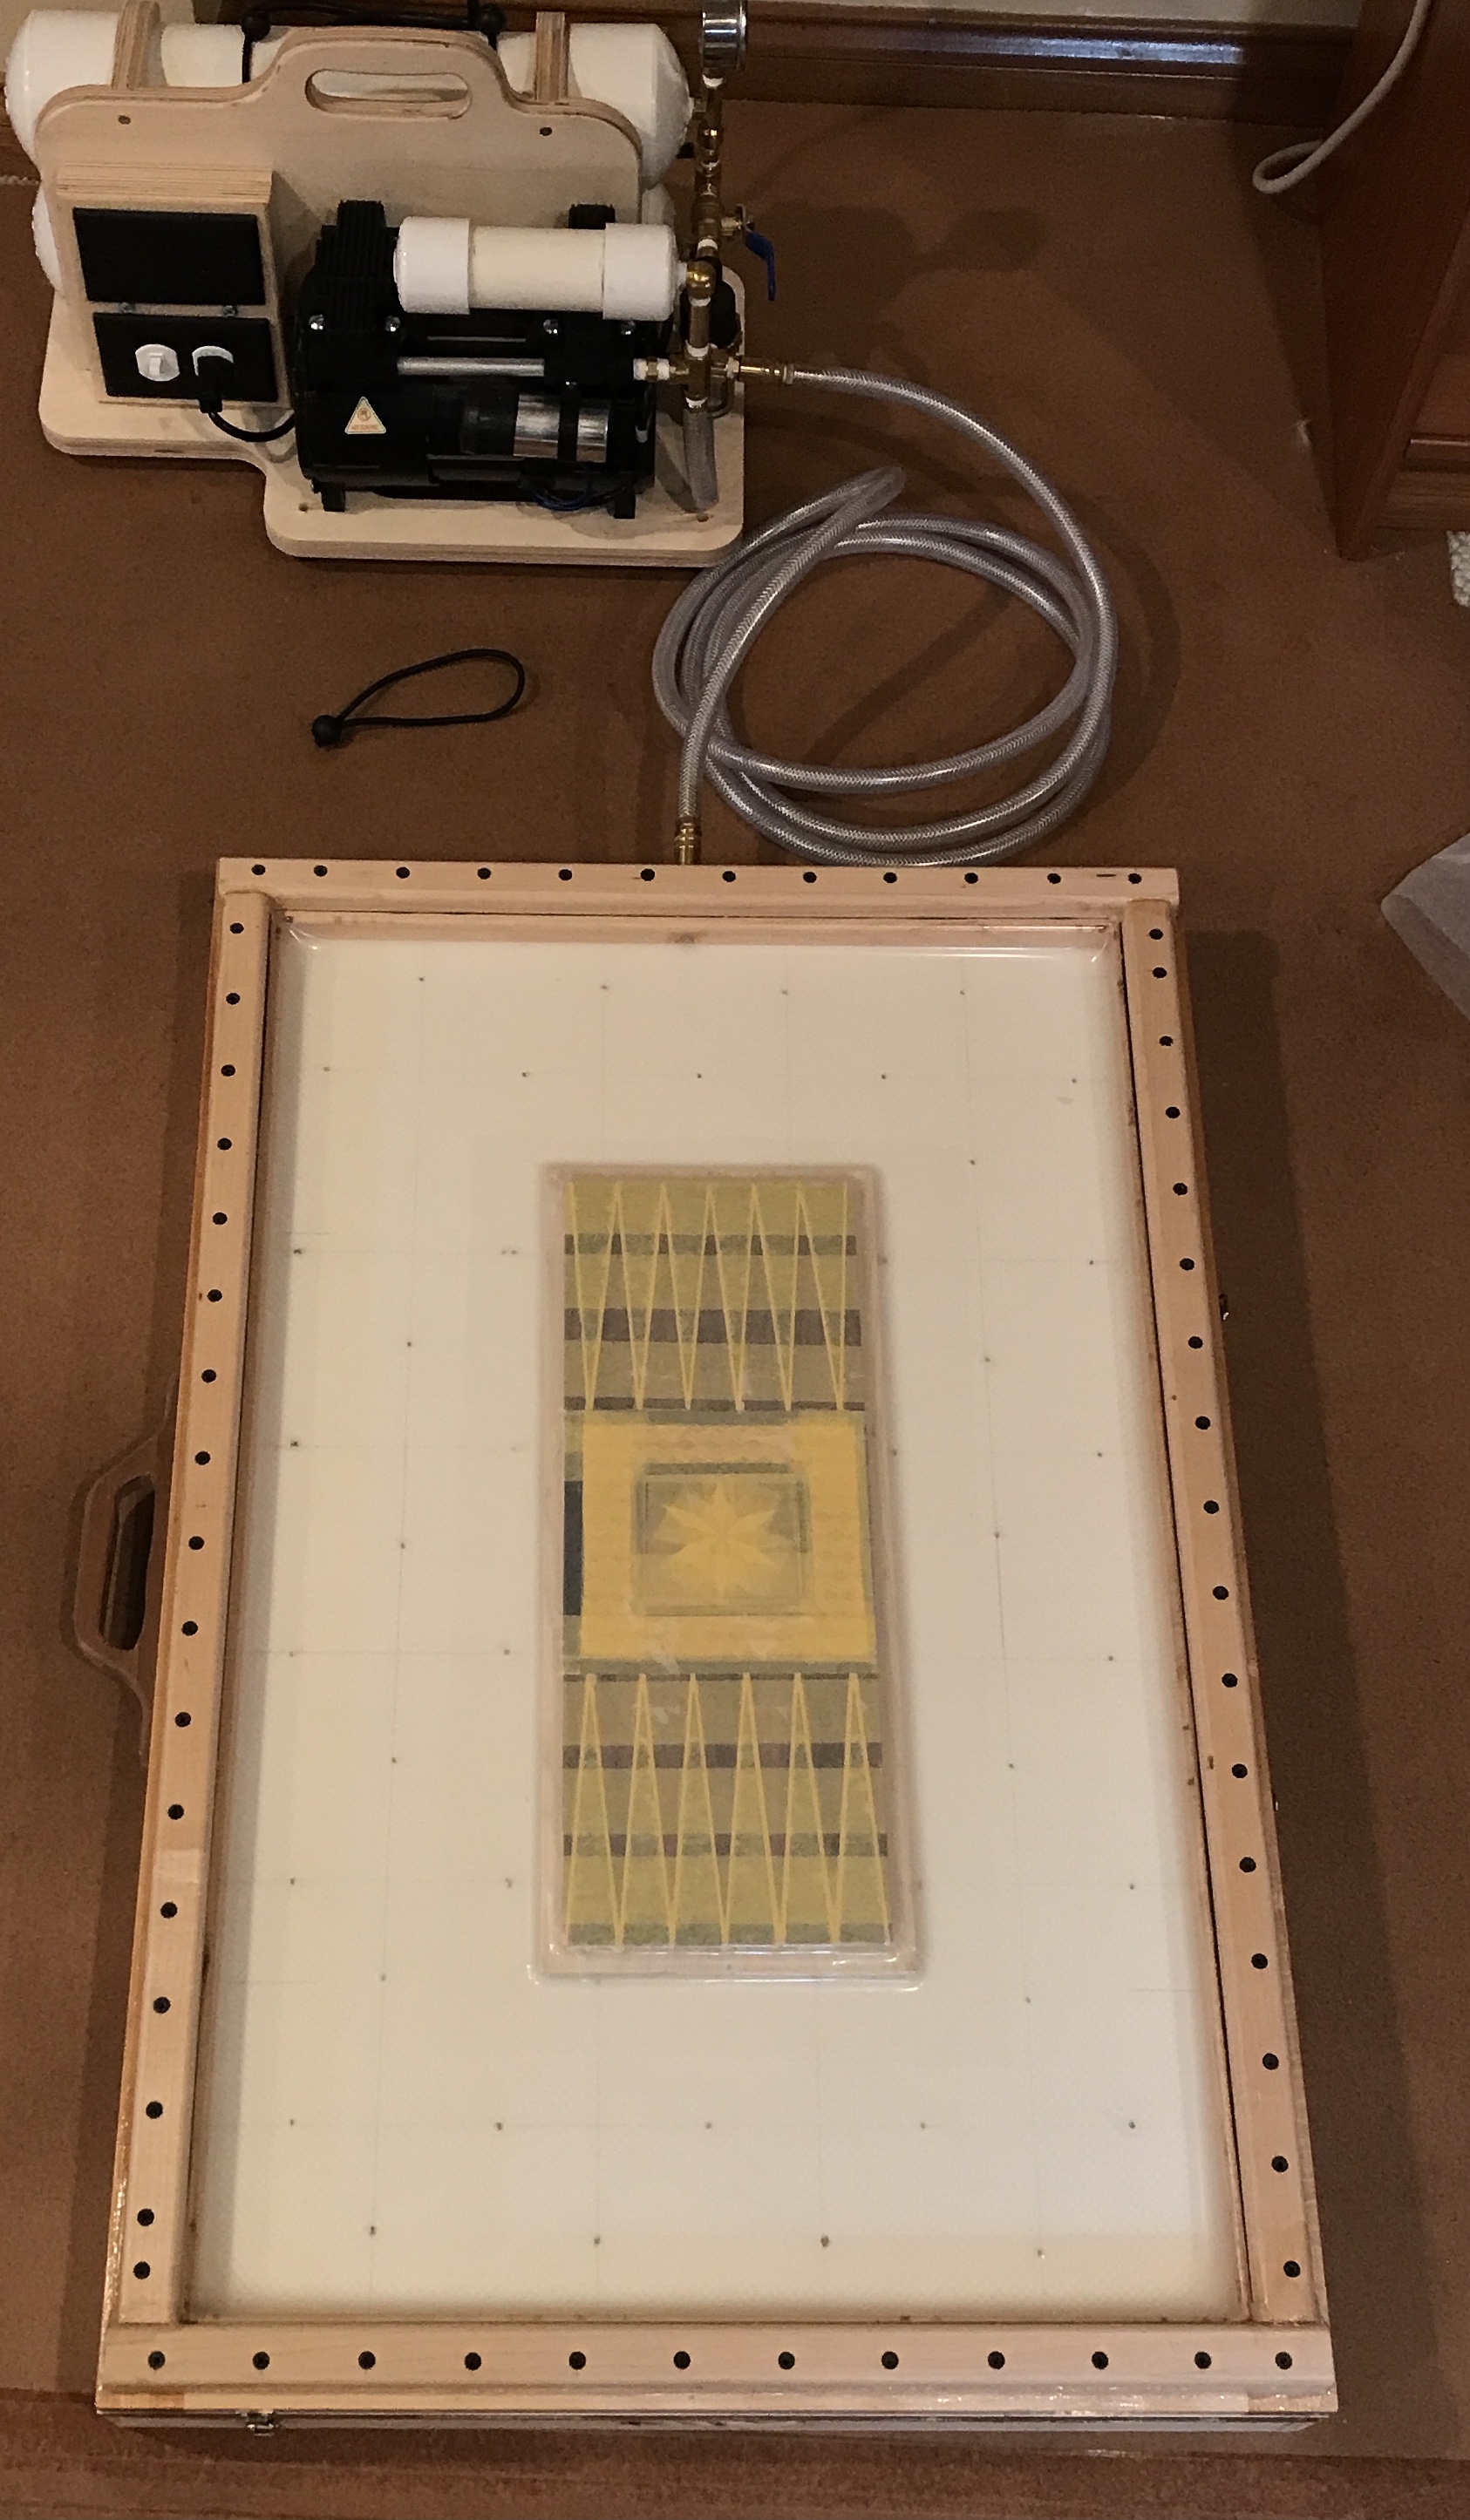
Tried option one this morning. The center of the veneer's glue face was marked at both ends. The center of the box faces were also marked on the inside. The torsion box was covered with little glue bumps where the nail holes were sealed. They are the reason for using the mesh. These were removed with a small plane. Two sheets of wax paper were laid on the torsion box. The veneer was placed taped side down, aligning the center marks with lines on the box. The first photo below shows the box faces aligned on the veneer.
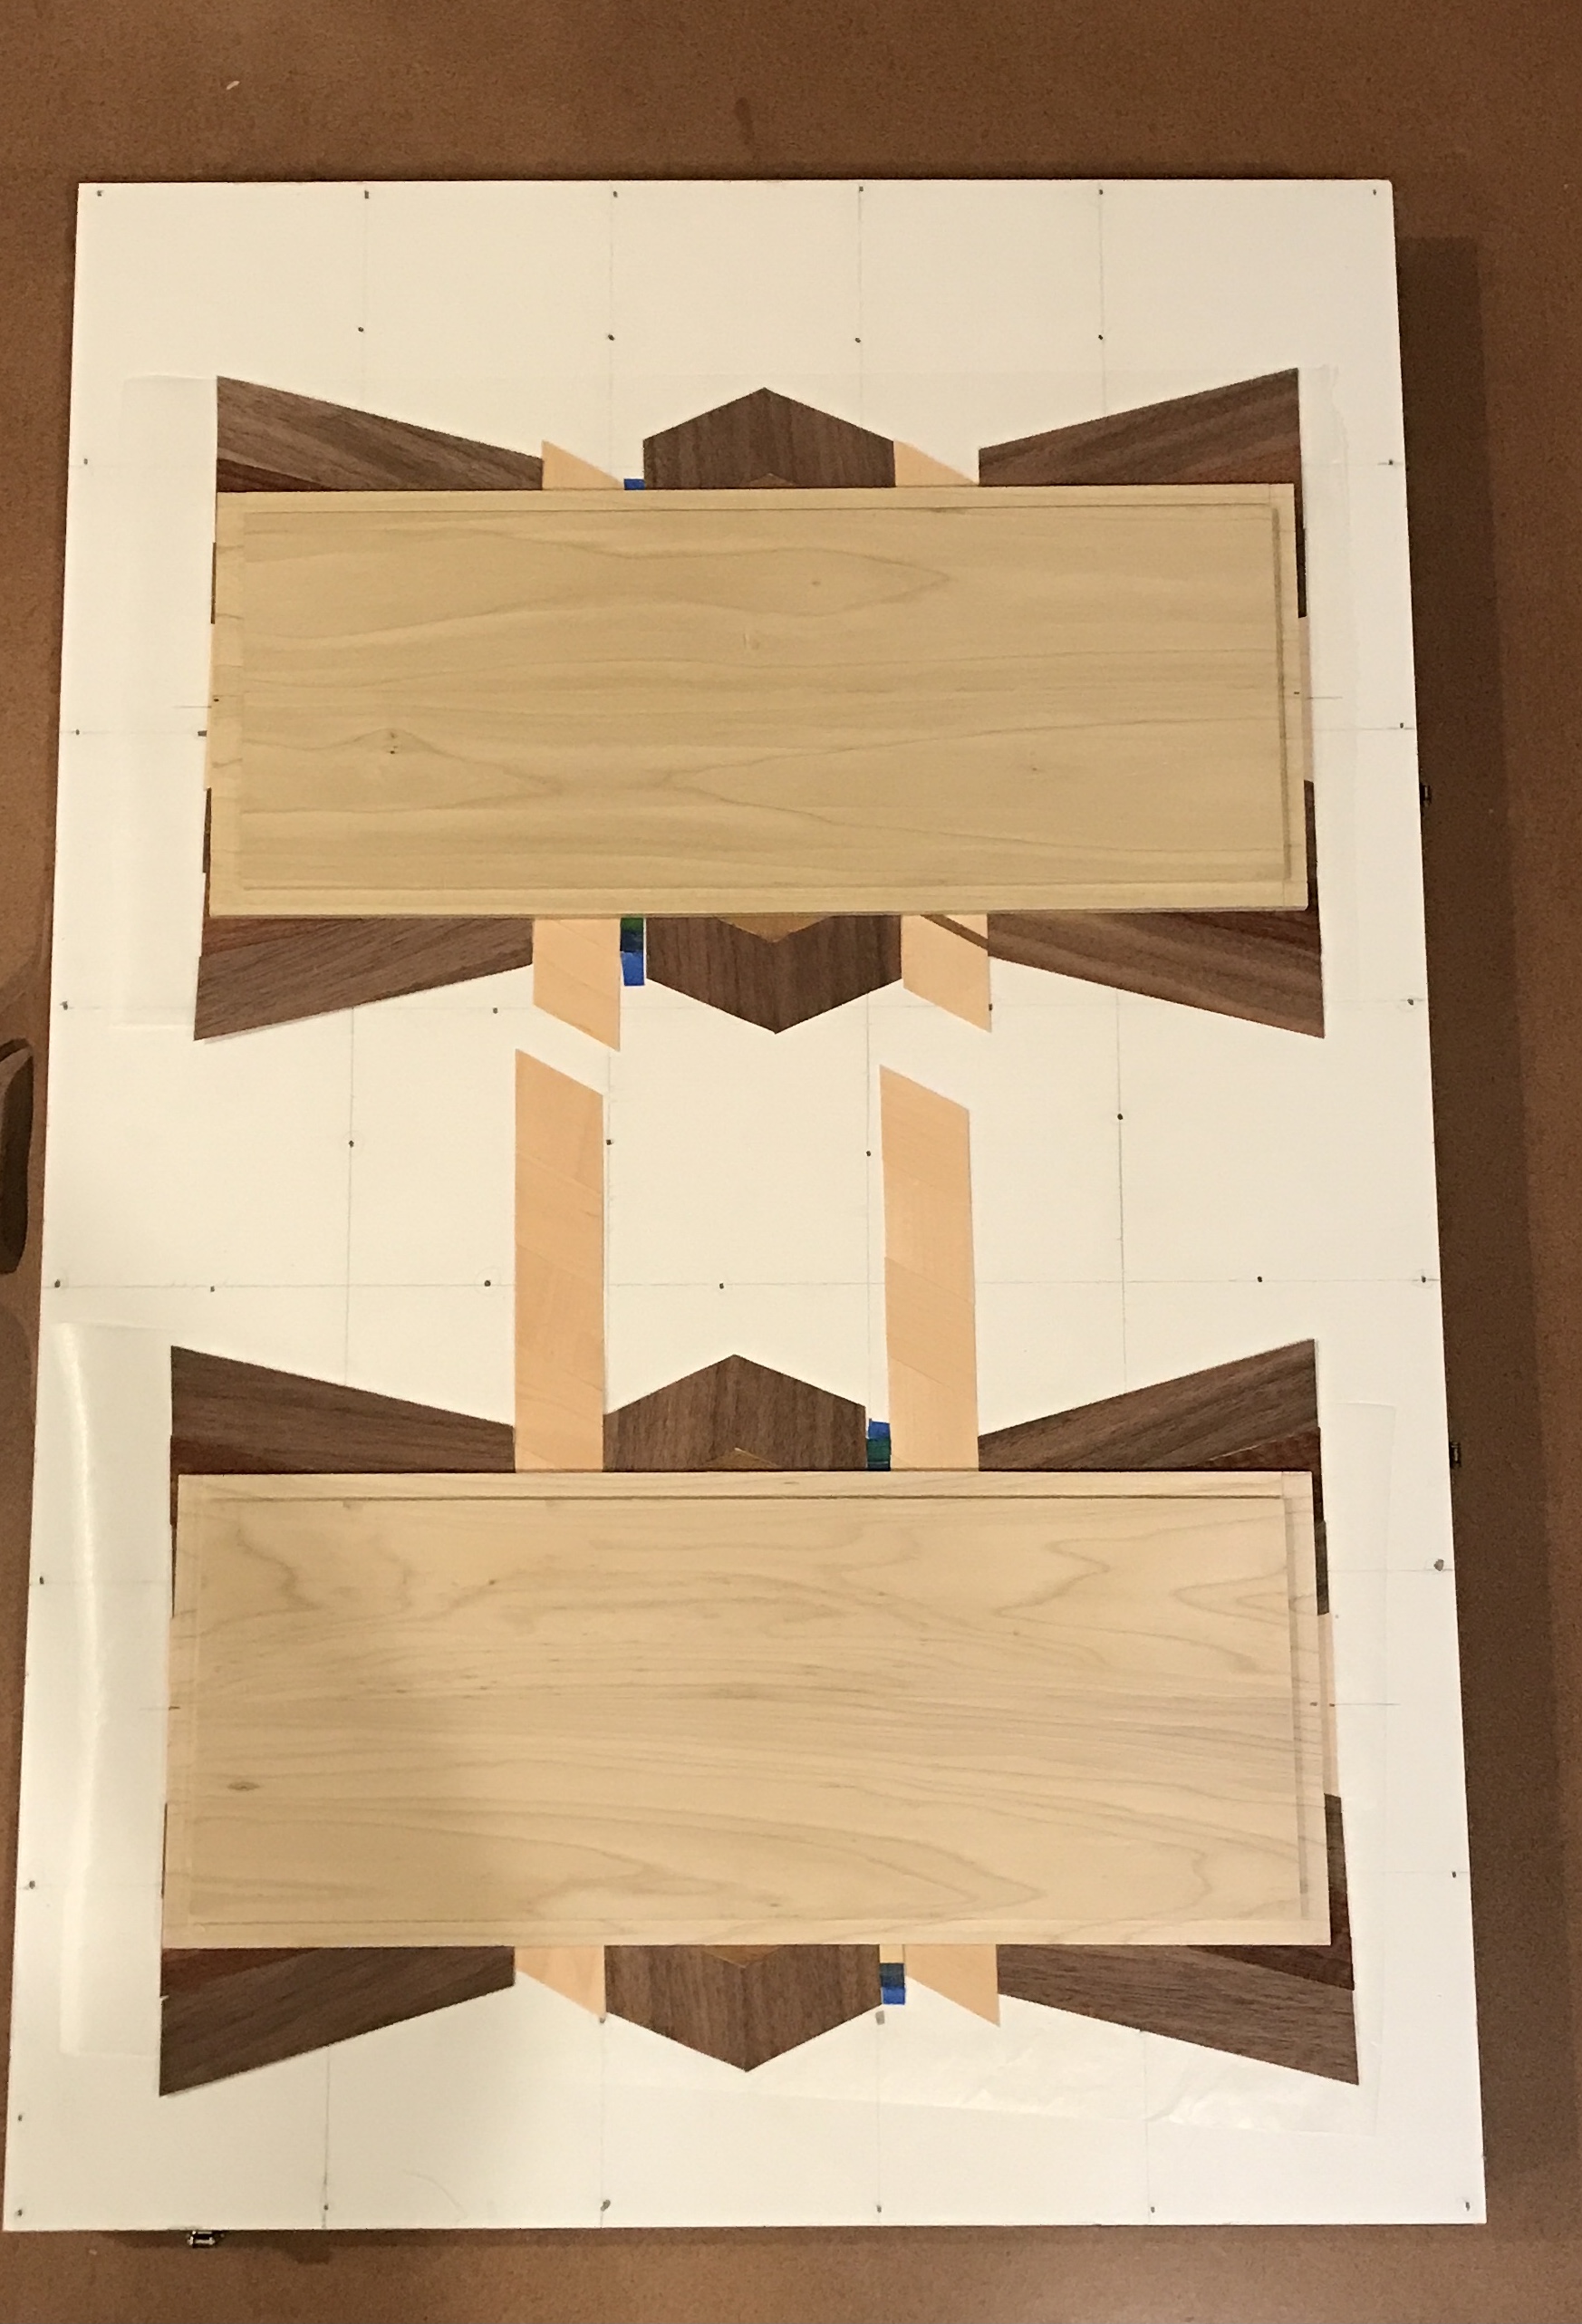

Glue was spread on the outside faces of the box parts. The glue was spread evenly with the new glue spreader. There was no part left without a layer of glue. After both box faces had glue the faces were aligned on the veneer. The vacuum press lid was put in place and the vacuum pump turned on. After applying some pressure on the sides of the lid the vacuum caught and clamped the box faces firmly to the veneer. The glue covering the nail holes was important. Without the glue in these holes, the best vacuum I could achieve was -13 inHg (versus the expected -21 inHg). This equates to about 6 psi. That equates to 900 lbs of pressure on each box face. Should be enough. Of course the pump will run continuously for the next hour.
The pump ran for an hour and then the pressure was released. Both veneered faces look good. The veneer is flat. The only worry was around the colored band. This veneer is thicker than the rest, but adjacent to the colored band the veneer is held flat. The picture below shows the veneer faces right after removal. They will dry at least overnight before cutting the veneer to size.

I plan on regluing the nail heads. The pump and the pressure sensor both got quite hot during the hour of pumping. I will have to stick with the mesh and put the backing boards down with the veneer on top. The wax paper worked well. Only one had a little bit of glue, but was easily removed from the taped veneer.
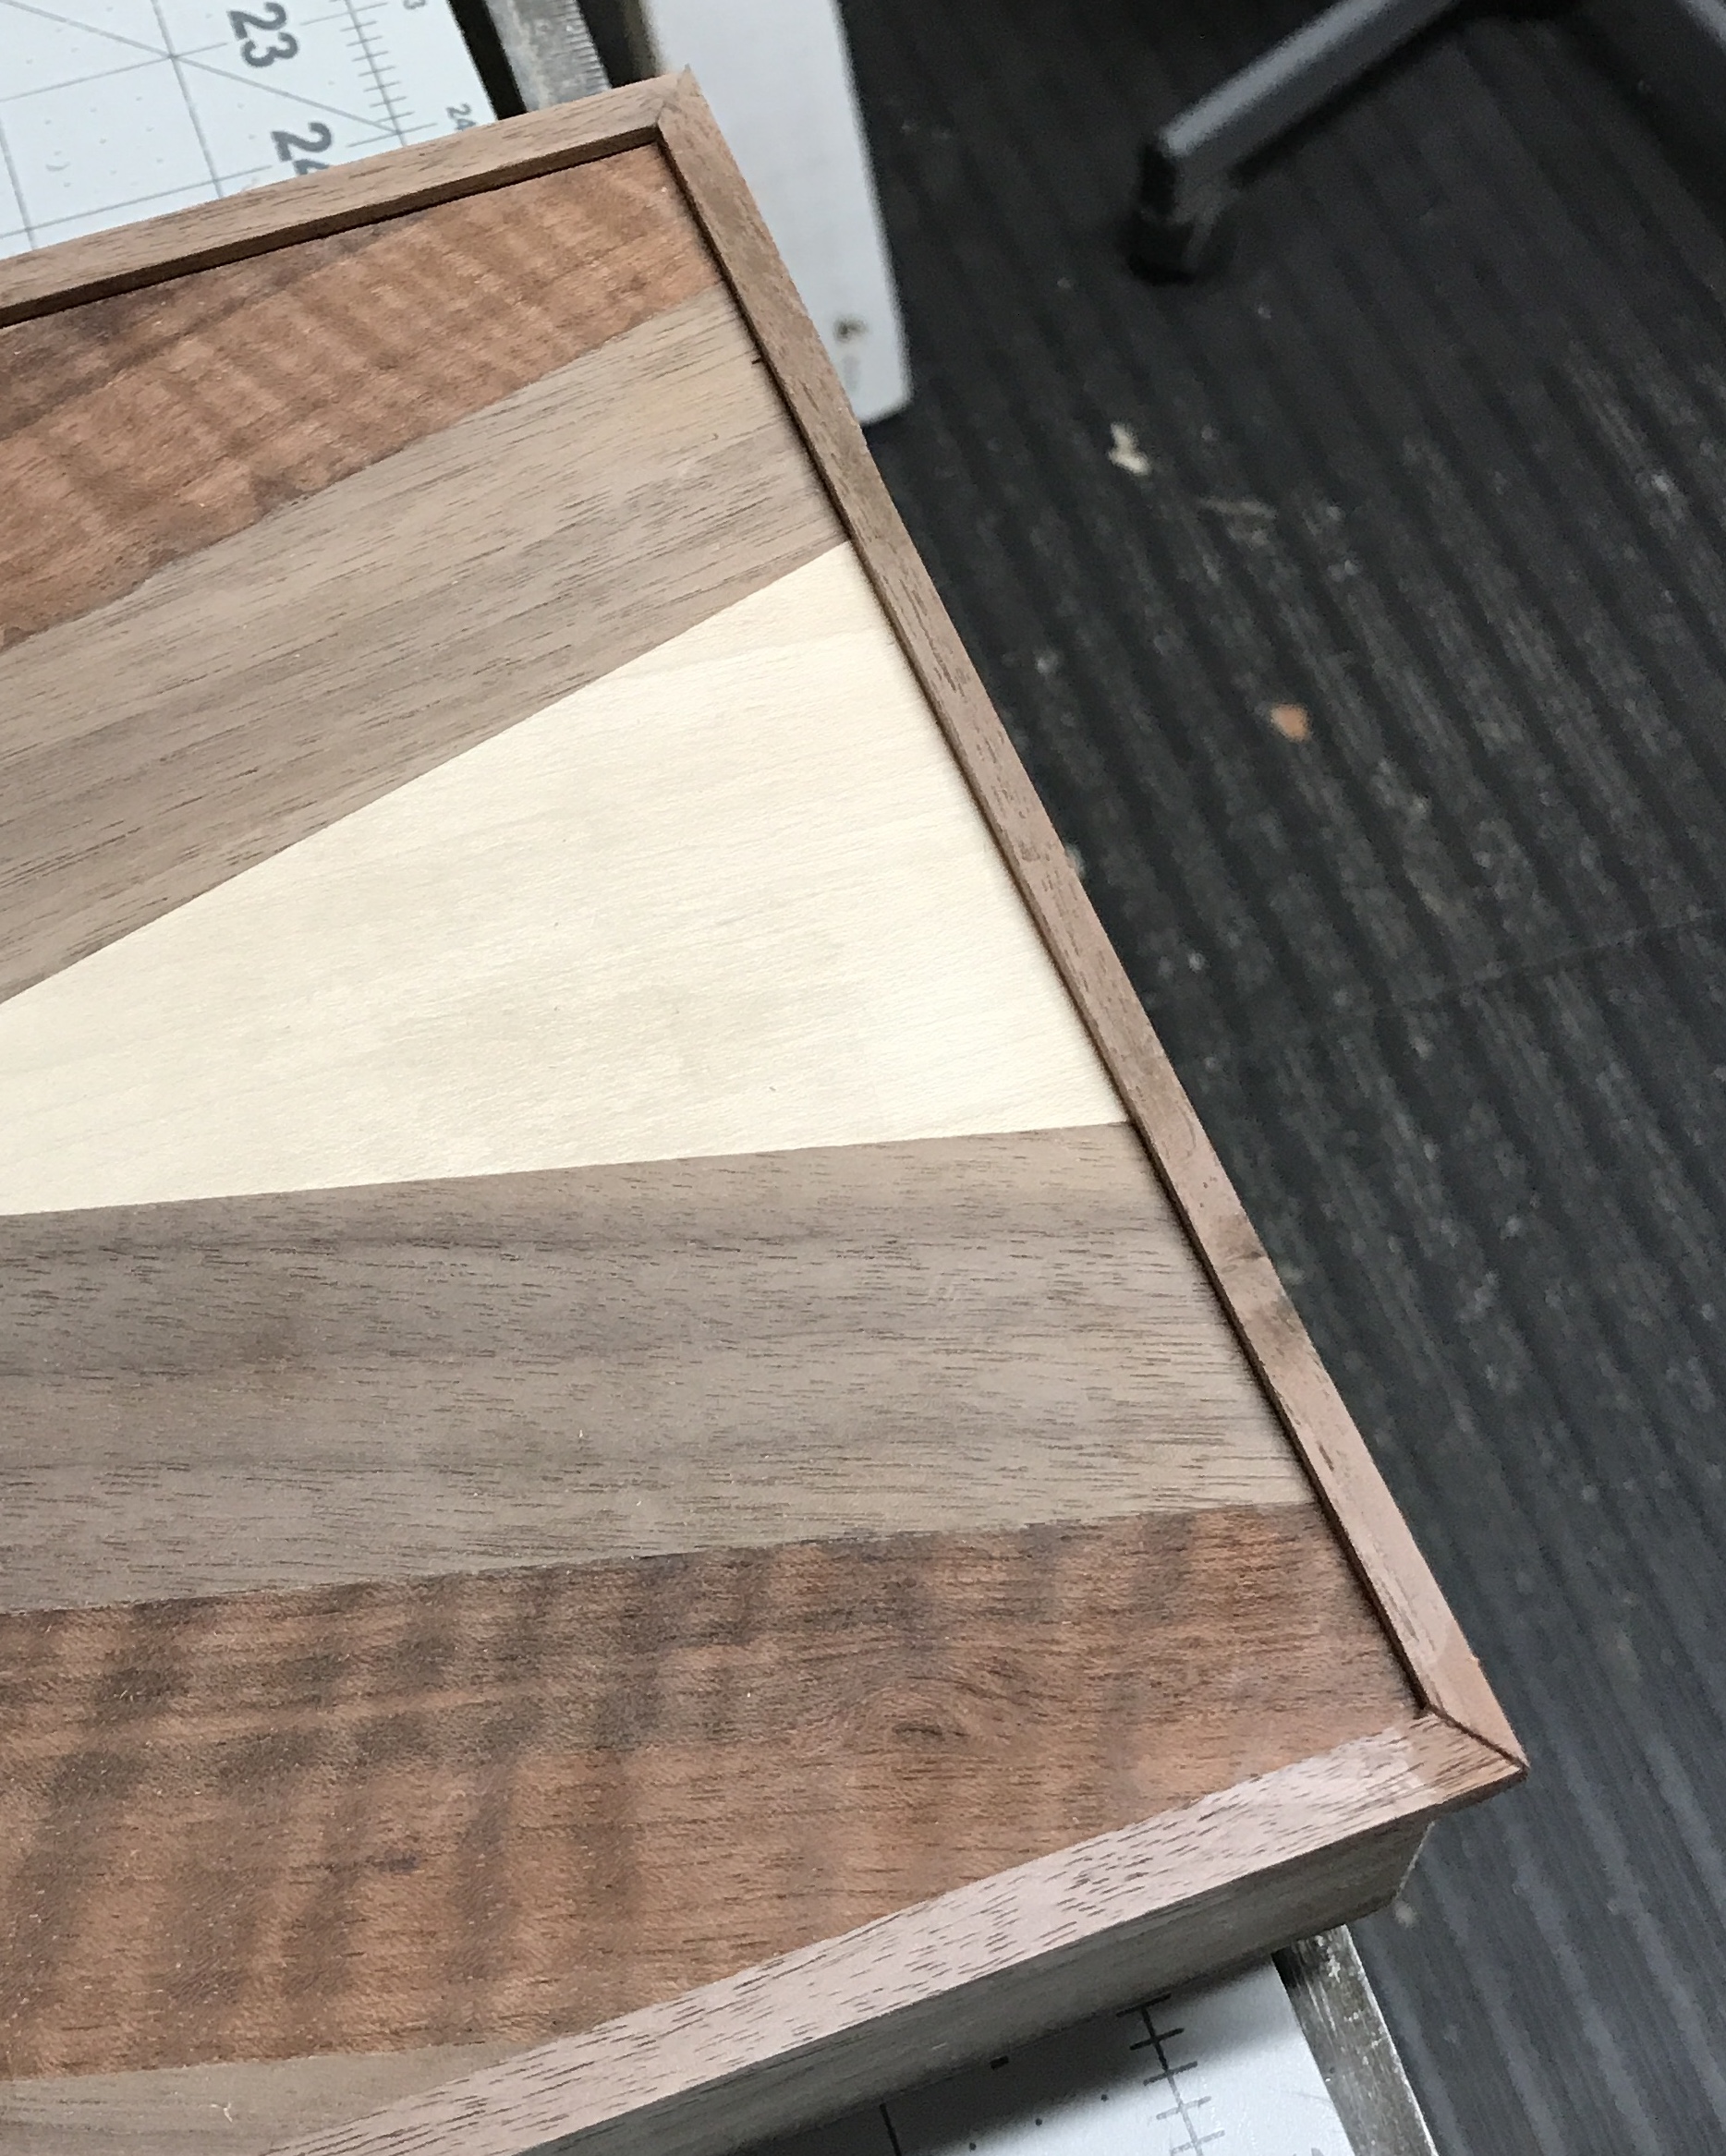
The veneered faces were trimmed this morning. Each face and edge was marked and tape was put over the pieces of veneer to be trimmed off on the long sides. The veneer was cut. Even with a new blade the cutting was difficult due to the glue squeeze out. I eventually switched to a chisel to cut through the glue blobs. This worked superbly. One face had two places where tiny bits of veneer came loose. Both were glued back in place and clamped. The photo below shows the two veneered faces after trimming.
Epoxy was reapplied to the nail holes on the torsion box. After drying overnight vacuum was applied. The pressure dropped to -21 inHg. The pump was back to cycling every 2 1/2 minutes or so. Eight 1" box corners were ordered from Etsy this morning.
The next step is removing the tape, almost as thrilling as removing the bandages after plastic surgery. The tape was removed carefully, but some veneer broke, mostly the tiny corners of the angled pieces. These were repaired. The issue noticed while removing tape was with the colored squares. The blue tape holds too tightly. Quite af few of these squares lost their top layer as the tape was peeled off. Use yellow tape in the future! As the photo below shows some sanding is needed to get rid of a few glue spots.
Did some quick sanding this morning. The orbital sander with 220 grit paper was used to sand the surfaces of both veneered box faces. The scraper was used with only partial success to remove some glue spots. One face had more glue spots than the other. The glue seems to seep up between adjacent pieces of veneer. Dust was removed with the hand vacuum. The photo below shows the results of this sanding. The colored veneer squares lose a lot of color upon sanding as expected. Two maple rhombi in a strip sanded funny giving a bumpy surface. The sanding removed more soft wood between harder grain. It is not clear why only these two rhombi exhibited this behavior. All in all I am quite pleased with the veneered faces.
The original plan was to wrap this pattern around the sides of the box. After the challenges of these two box faces, I am having second thoughts. A plain sheet of veneer is very tempting. It could be made a bit more complex with a plain sheet and only the hourglass shape cut into the middle.
Abalam sheets of mother of pearl are being considered for the playing triangles. All of the sheets are 5 1/2" X 9 X 1/2". They come in a range of thicknesses from 0.020" up to 0.125". Two sheets would be needed. Some are relatively inexpensive and some are over $400. Out of the two dozen for sale at Duke of Pearl. The following table lists the sheets that are at the lower end of the price range. My favorite is the Paua Abalone.
| Name | Thickness | Price | Image | Comments |
|---|---|---|---|---|
| Sparkle MOP | 0.030" | $32.40 | |
Made from tiniest shell bits |
| Donkey Ear Abalone | 0.020" | $26.10 | |
Large arcs of shell |
| Pink Abalone Light Color | 0.030" | $52.05 | |
Nice ripple effect |
| Green Abalone Rippled | 0.020" | $25.45 | |
Smaller ripples than the pink |
| Paua Abalone | 0.020" | $33.95 | |
Lots of colors |
| Paua Abalone Rim | 0.020" | $23.10 | |
Lots of colors with mild arcs |
| Sparkle Abalone | 0.030" | $40.35 | |
Made from tiniest shell bits, but decent color |
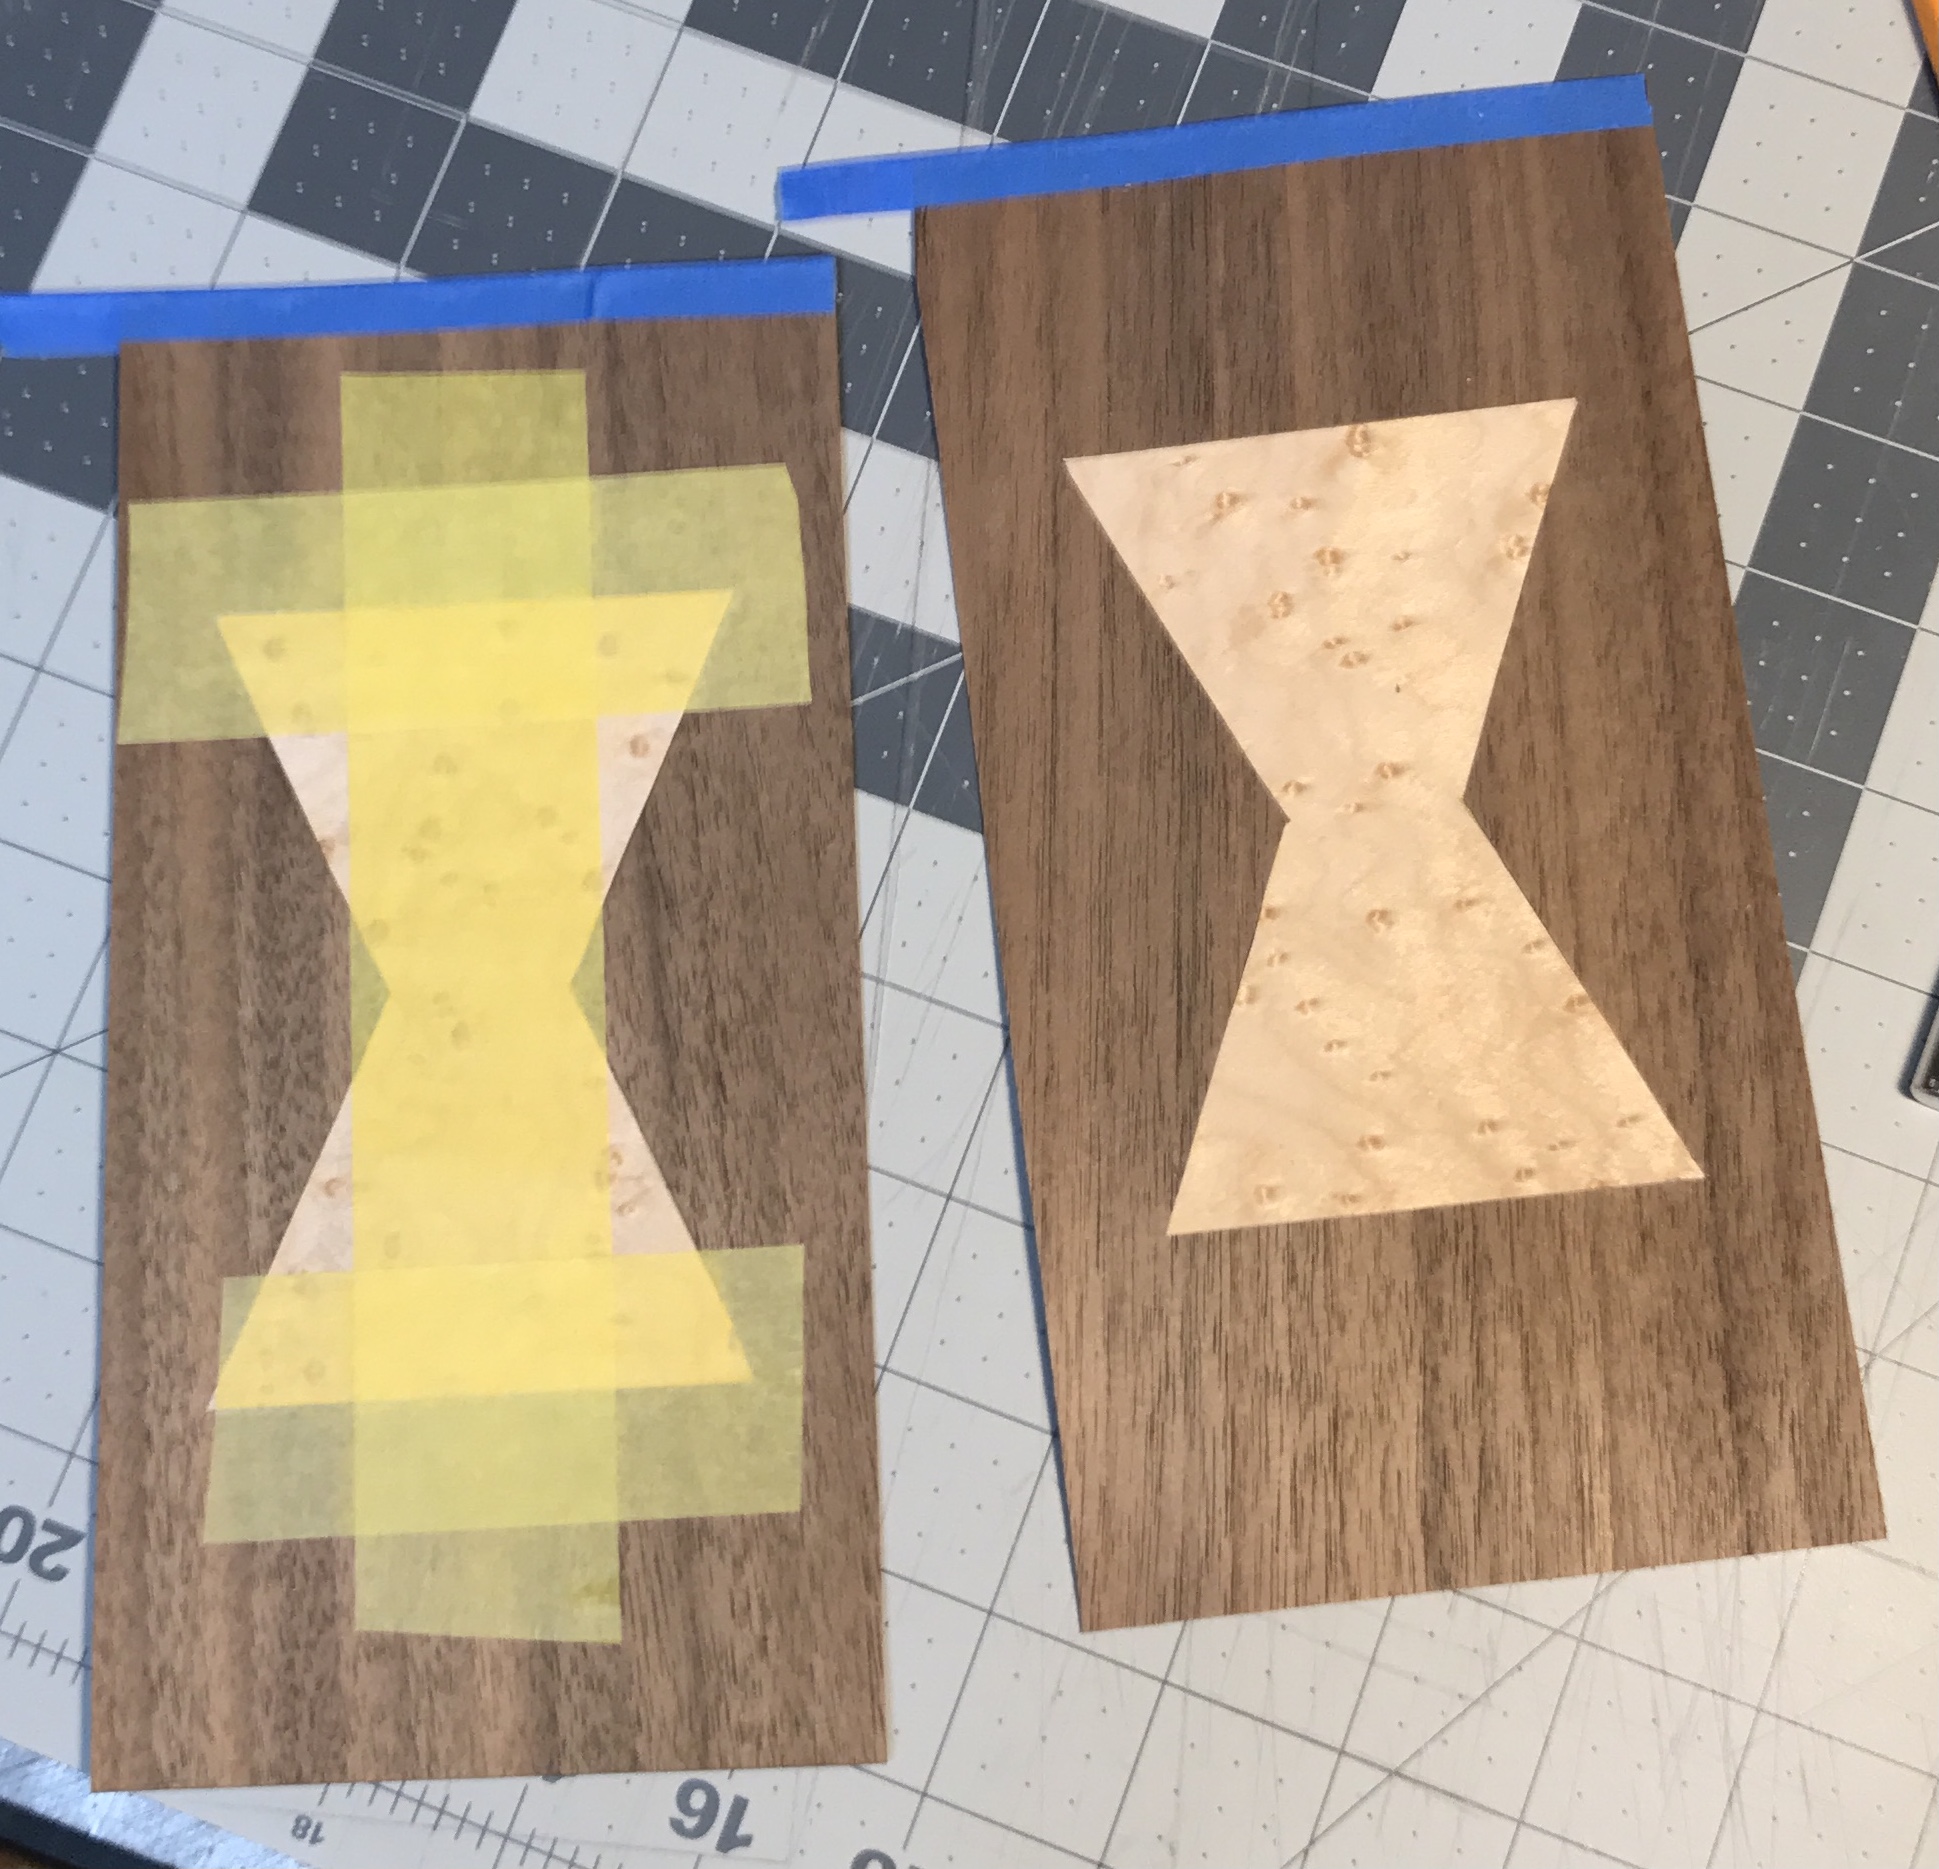
The veneer for the sides of the box were made. The two long sides had two back-to-back triangles centered and the short ends each had an hourglass shape added. The shapes were already cut out so they just needed to be cut into the background veneer. Each shape was taped in place, cut around, tape removed, placed in the cut opening, and taped again. The two photos below show the four sides of veneer.
Cleared the veneering paraphernalia off of the table saw this morning to cut the box in half. This was accomplished easily. The fence was set at a distance so the two halves were the same width. The two long sides were cut through. The blade was lowered and the two short sides were cut leaving about 1/8" of material so the box would not collapse with these last two cuts. The final 1/8" was cut with the Japanese saw. The two ends cut by hand were sanded with an 80 grit sanding block. The two box halves are shown below.
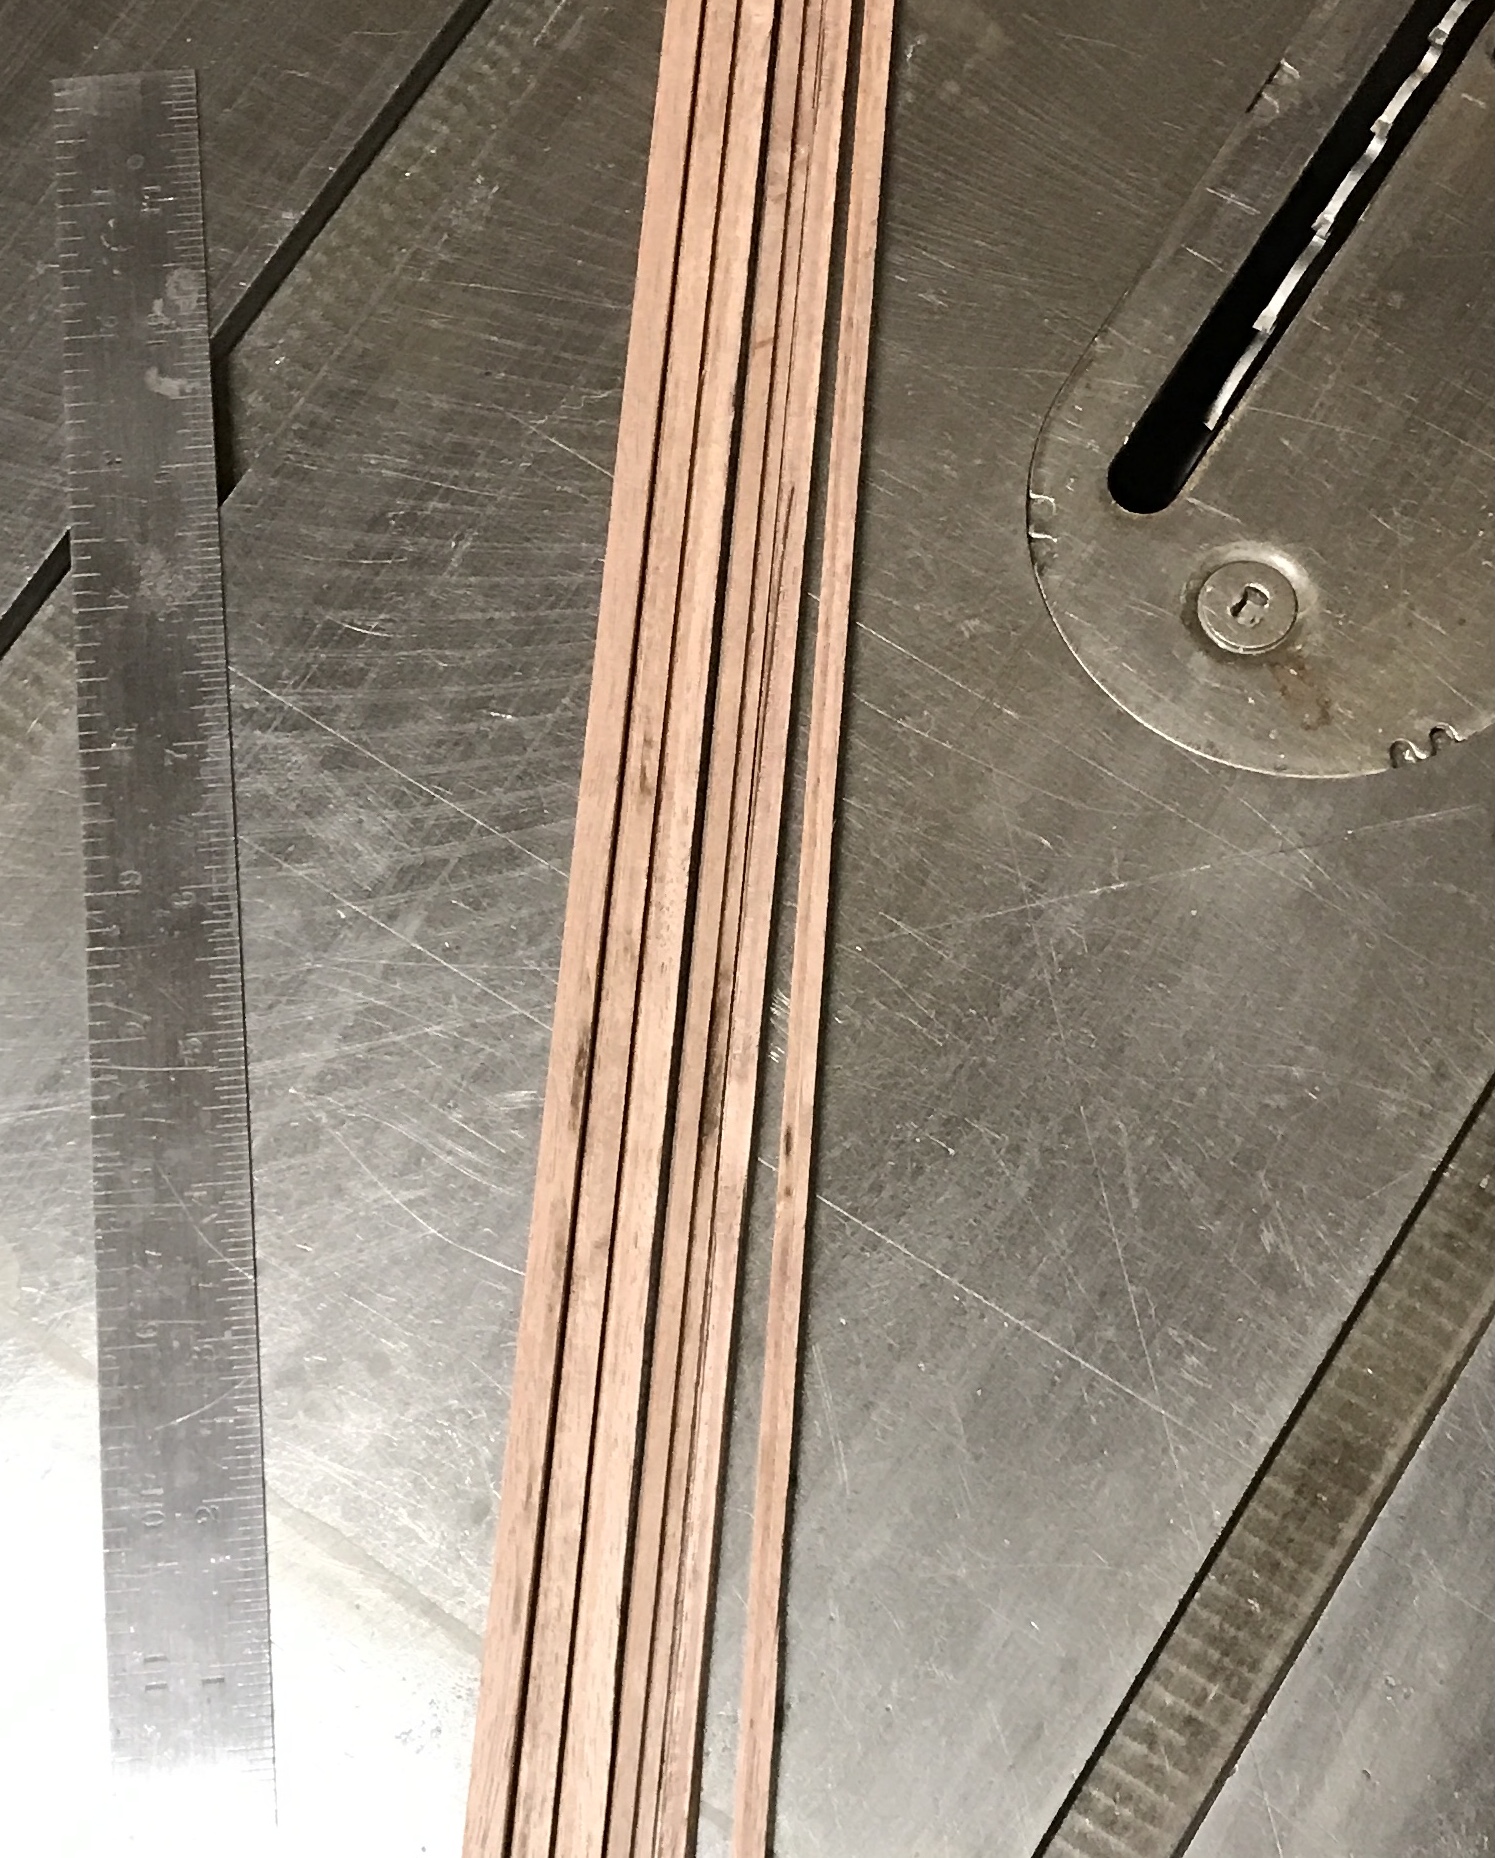
The next table saw chore was making the edging for the box halves. Four 19" and four 8" lengths of edging are needed. The edging is a simple L shape. Three 20" strips of 3/4" walnut were cut 1/4" wide. One side of each had a rabbet cut 1/8" X 1/8". The fence was moved 1/4" and the piece of edging was cut off. The profile is a 1/4" square with a 1/8" square cut from one corner. This was repeated on the remaining narrower strips. Cutting the small strips was not fun and only partially successful. After some extra effort the requisite six strips were prepared. The photo below shows these edging strips.
My choice now is to continue with box assembly. This consists of gluing the faces in place, veneering the sides and ends, and adding the edging. Alternatively, work on the inside face veneer can be done. I am again tempted to do the veneer first as it will be a simpler glue-up with the free faces. If the box is assembled prior to adding the inside face veneer, a block of wood for a caul is needed to glue on the inside face veneer. Gluing the veneer on first would require a layered approach: mesh, scrap wood, wax paper, veneer, and box face.
Before proceeding a decision needs to be made on using mother of pearl for the triangles inside. The problem was studied for a bit after realizing that the sheet size is a fraction too small to get more than eight triangles per sheet with a lot of waste. However, if the triangles are bordered by 1/16" strips the width of the triangles drops to 1" and the height to 5 1/2". This is a perfect fit for the sheets and eighteen triangles can be cut from each sheet. Either extra triangles can be made for spares or the excess can be used for the stars in the centers of the boards. There is also the option of using two different shells for even more contrast.
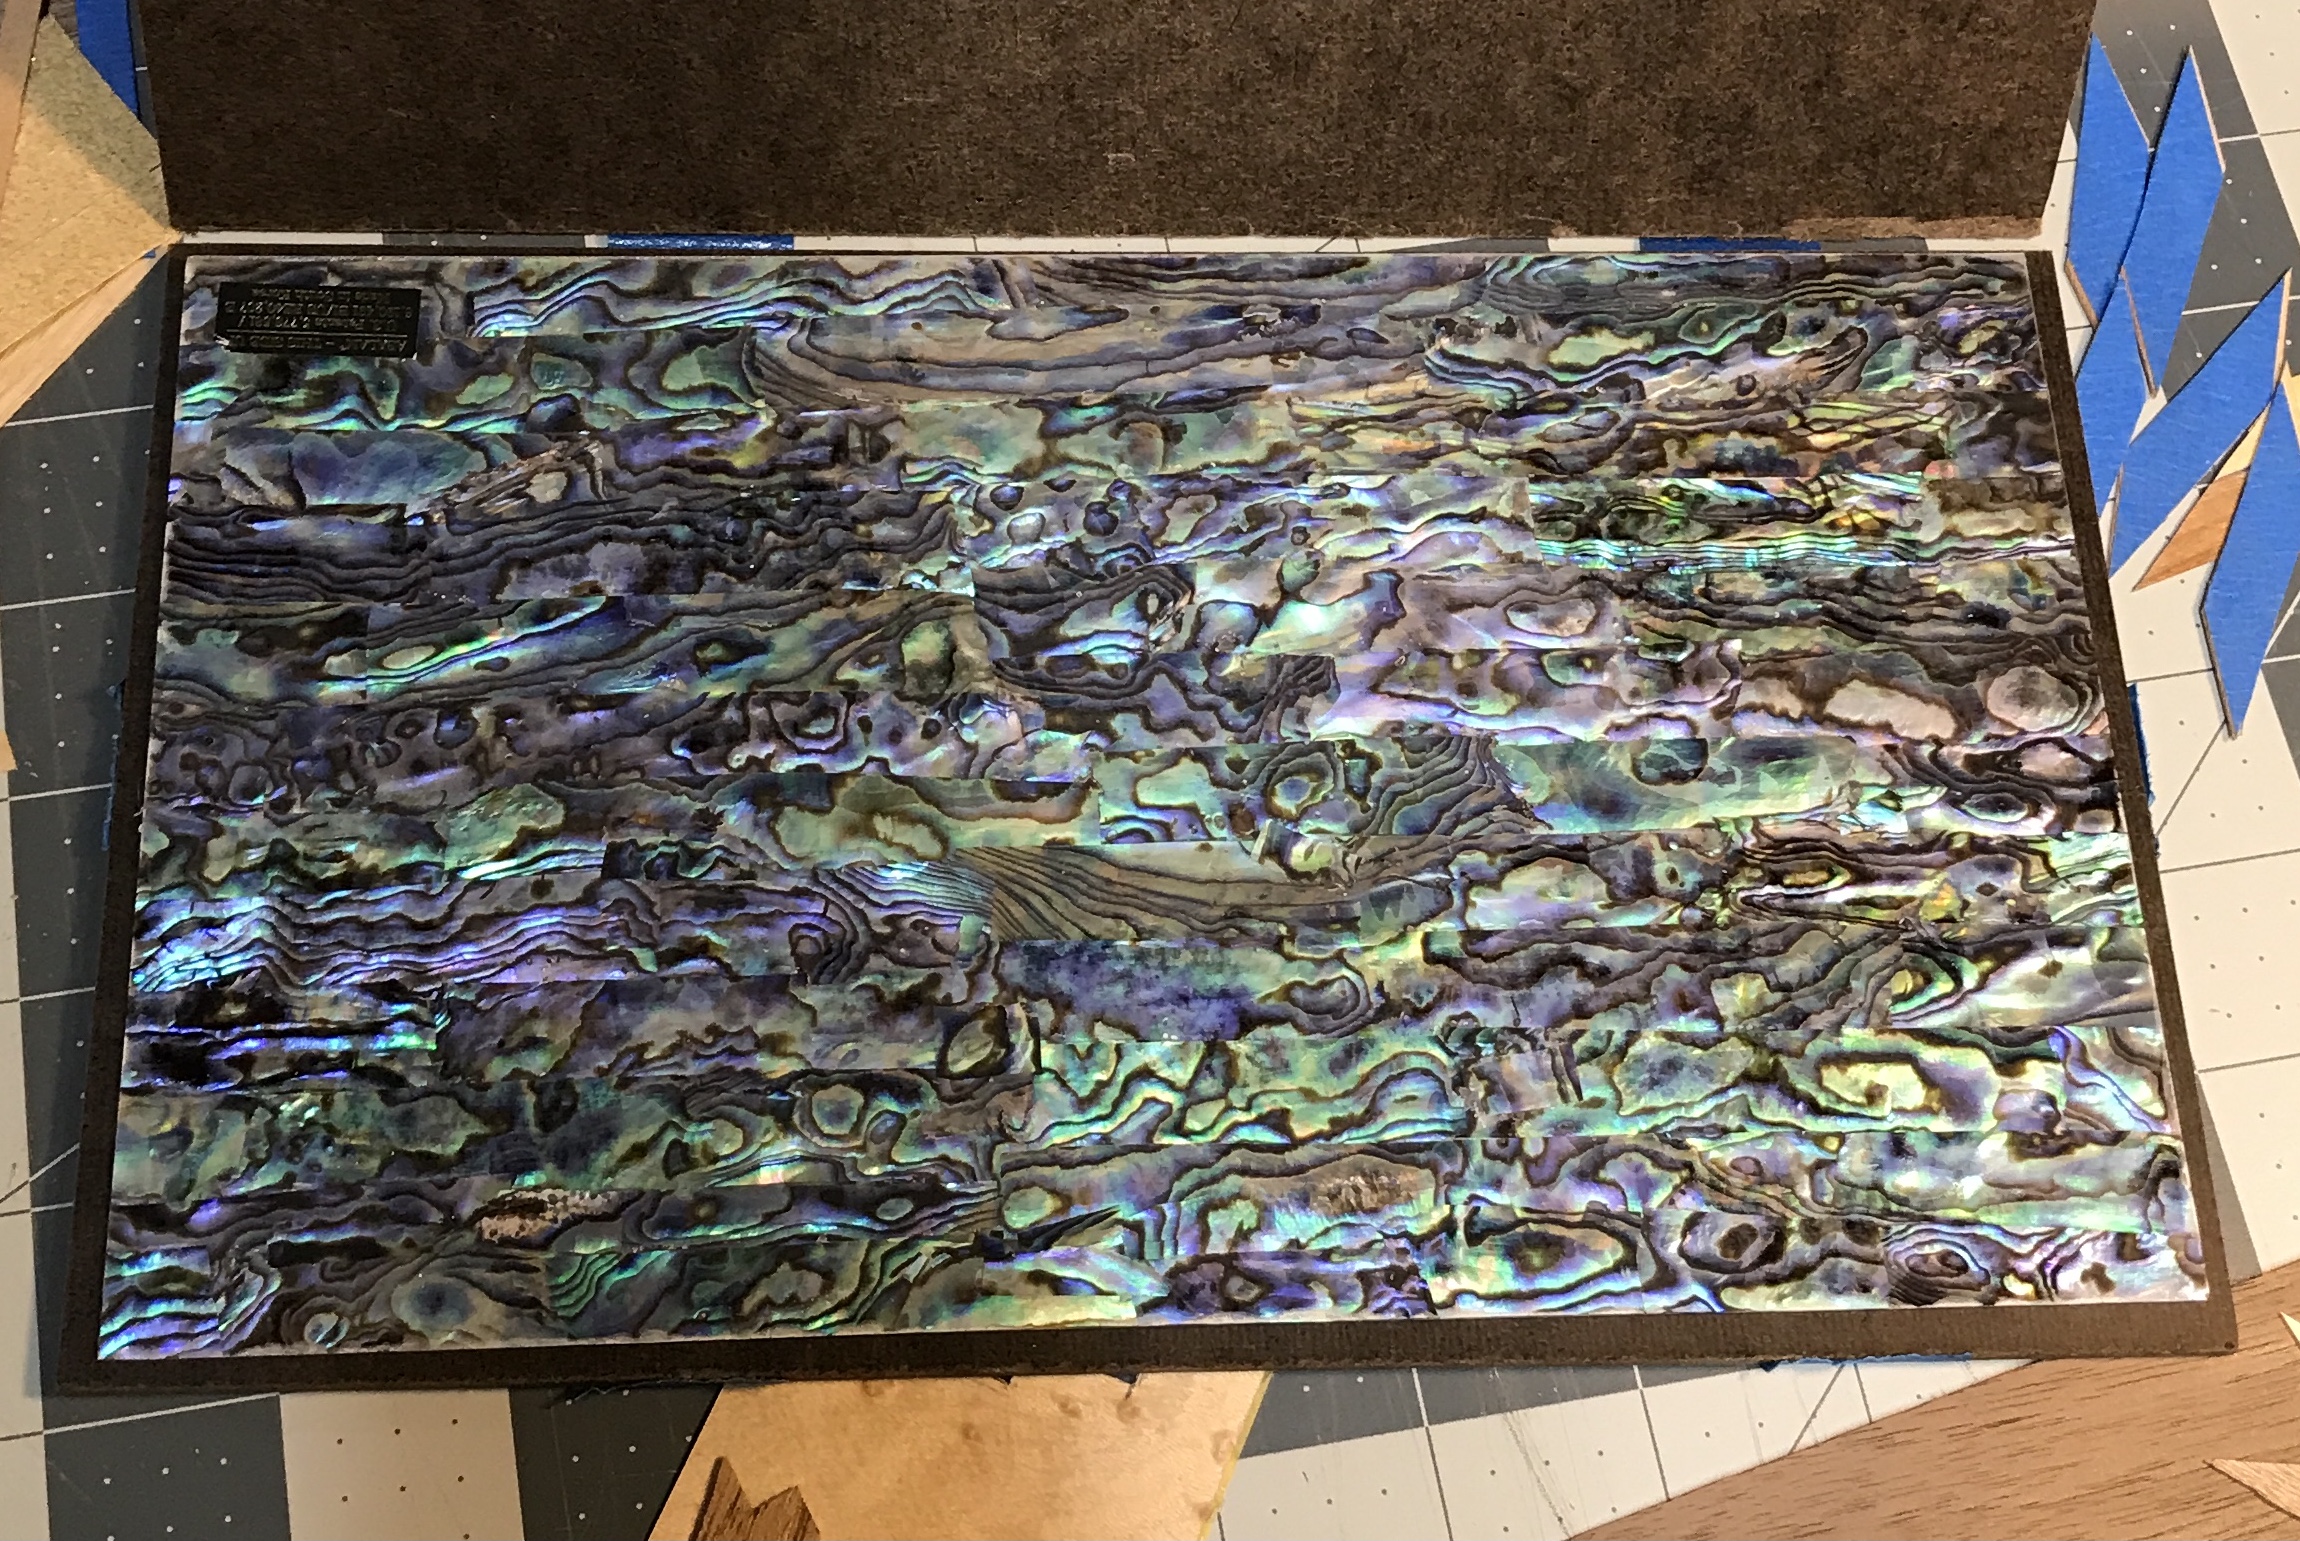
I communicated with Duke of Pearl about a number of aspects of working with the Abalam. Their response is below. I ordered a sheet of Paua Abalone and one of Paua Abalone Rim for $66 including shipping.
Thanks for the enquiry! As Ellen pointed out, it would help to know what type of shell will be used. Dark shell such as Paua, or Dark or Heart Green or Pink Abalone would look fine, but the very pale and much more transparent types will look best if backed with aluminum foil, metal leaf, or white or chrome colored paint in order to hide the wood grain underneath. You’d need to experiment a bit to see what works to your liking.
Cutting: In using a blade on .020” shell, it would be best to make multiple passes instead of one or two heavy cuts until the sheet can be cleanly snapped, to avoid fracturing. Even then, the edge will be a bit rough, so cut the pieces slightly oversized and then rub the edges on flat sandpaper to achieve a smooth final shape.
Bonding: Titebond is fine.
Sanding: Sand only enough to get rid of all surface scratches, but not for actual thicknessing. If using a clear top coat to finish the panels, it’s best to leave fine scratch marks as those will provide some “tooth” for the coating to adhere to (better than on a totally smooth or buffed surface), and the scratches will disappear with a finish on top.
The Celtic design that will be used to surround the starbursts in the centers of the playing areas is also being considered for wrapping all around the inside edges of the box. Today I will start cutting the parts for the center designs. Depending on my success with this, I will determine whether to use this Celtic design for the inside box sides. Cutting out the Z's is really hard!!! The box sides will not have this Celtic pattern.
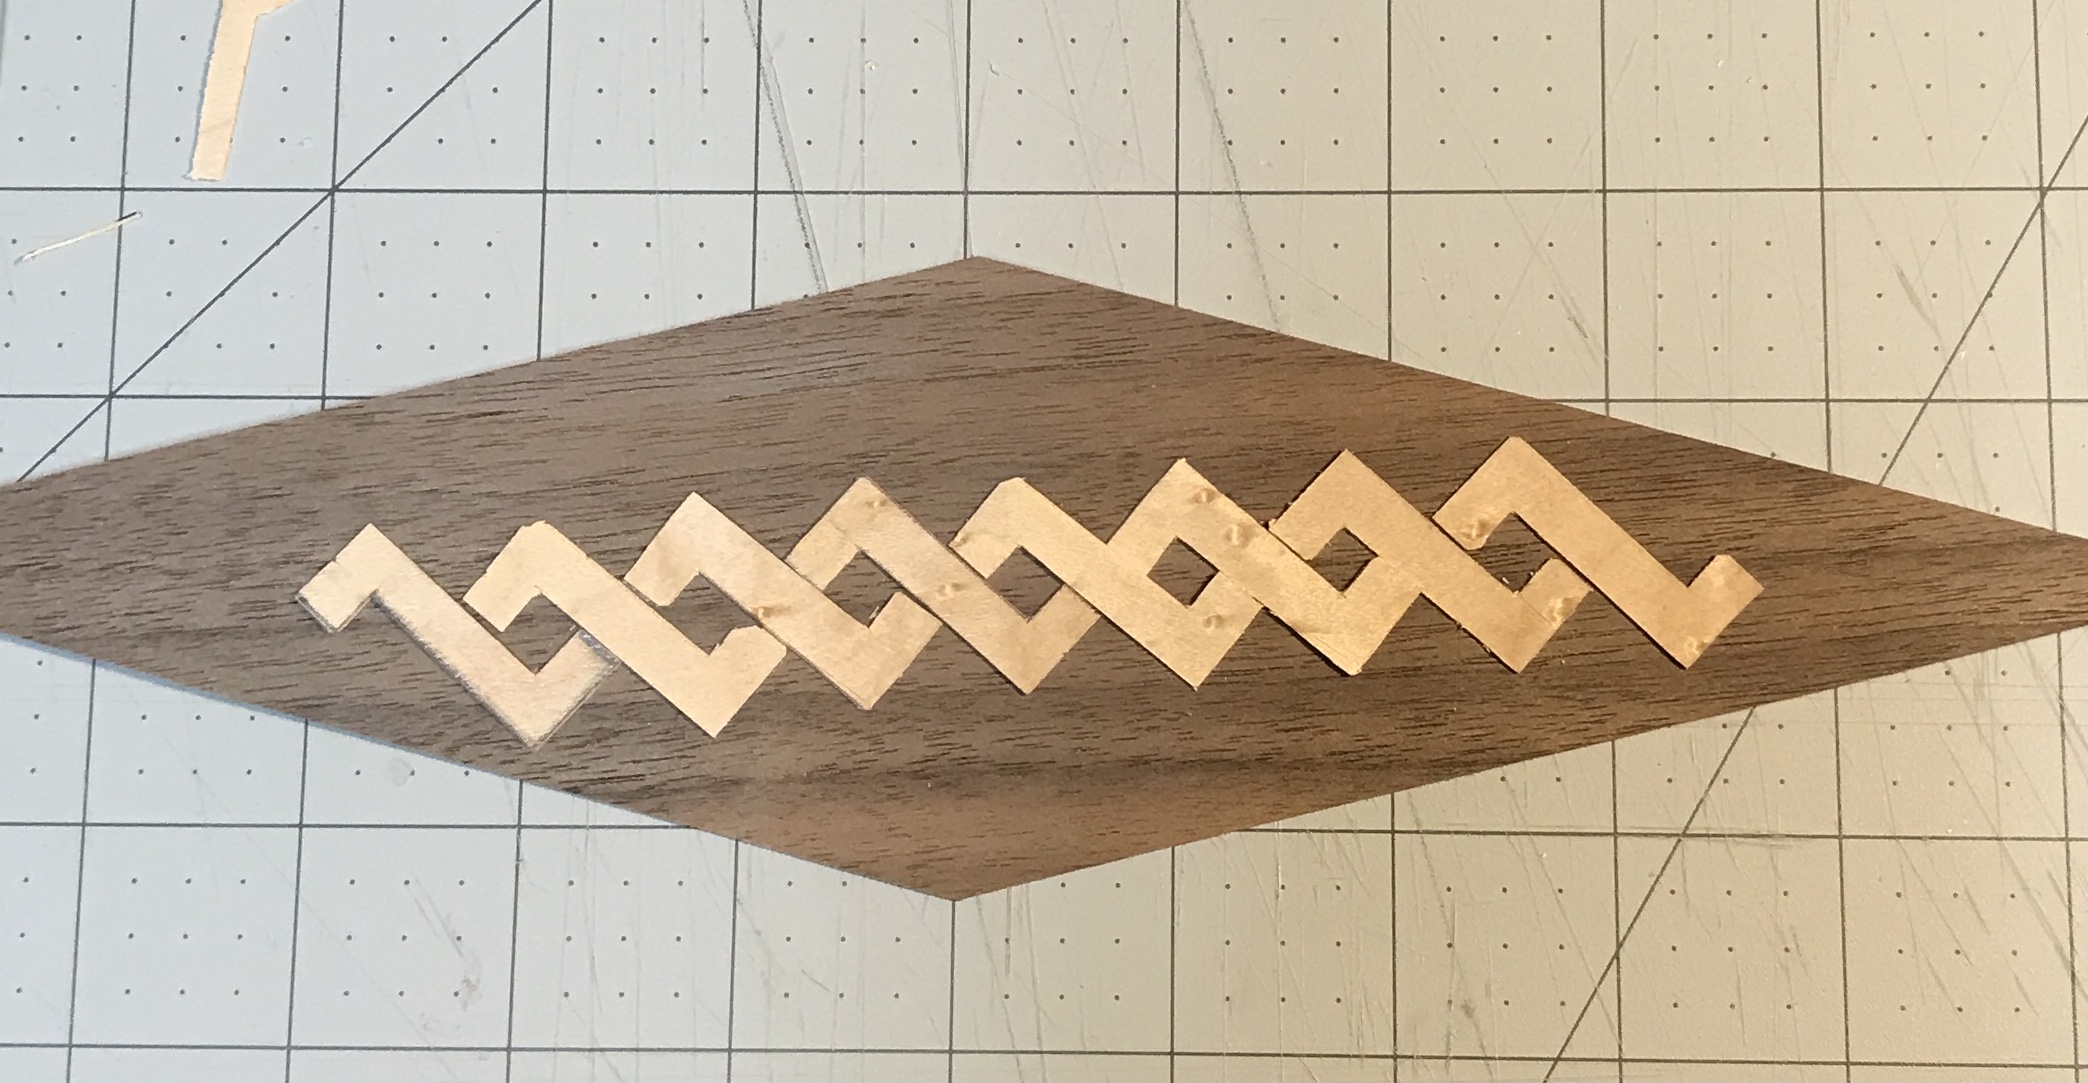
Ten Z's were cut from the curly maple. All of the narrow dimensions are 1/4". The long dimension is 1 1/4" and the tabs stick out 1/4". Two of the Z's are needed to be glued after splitting during cutting. The other eight are arranged appropriately for the chain in the two photos below. One is with the pieces abutting and the other is with 1/16" between the pieces. The curly maple figuring is pretty much lost in pieces this small.
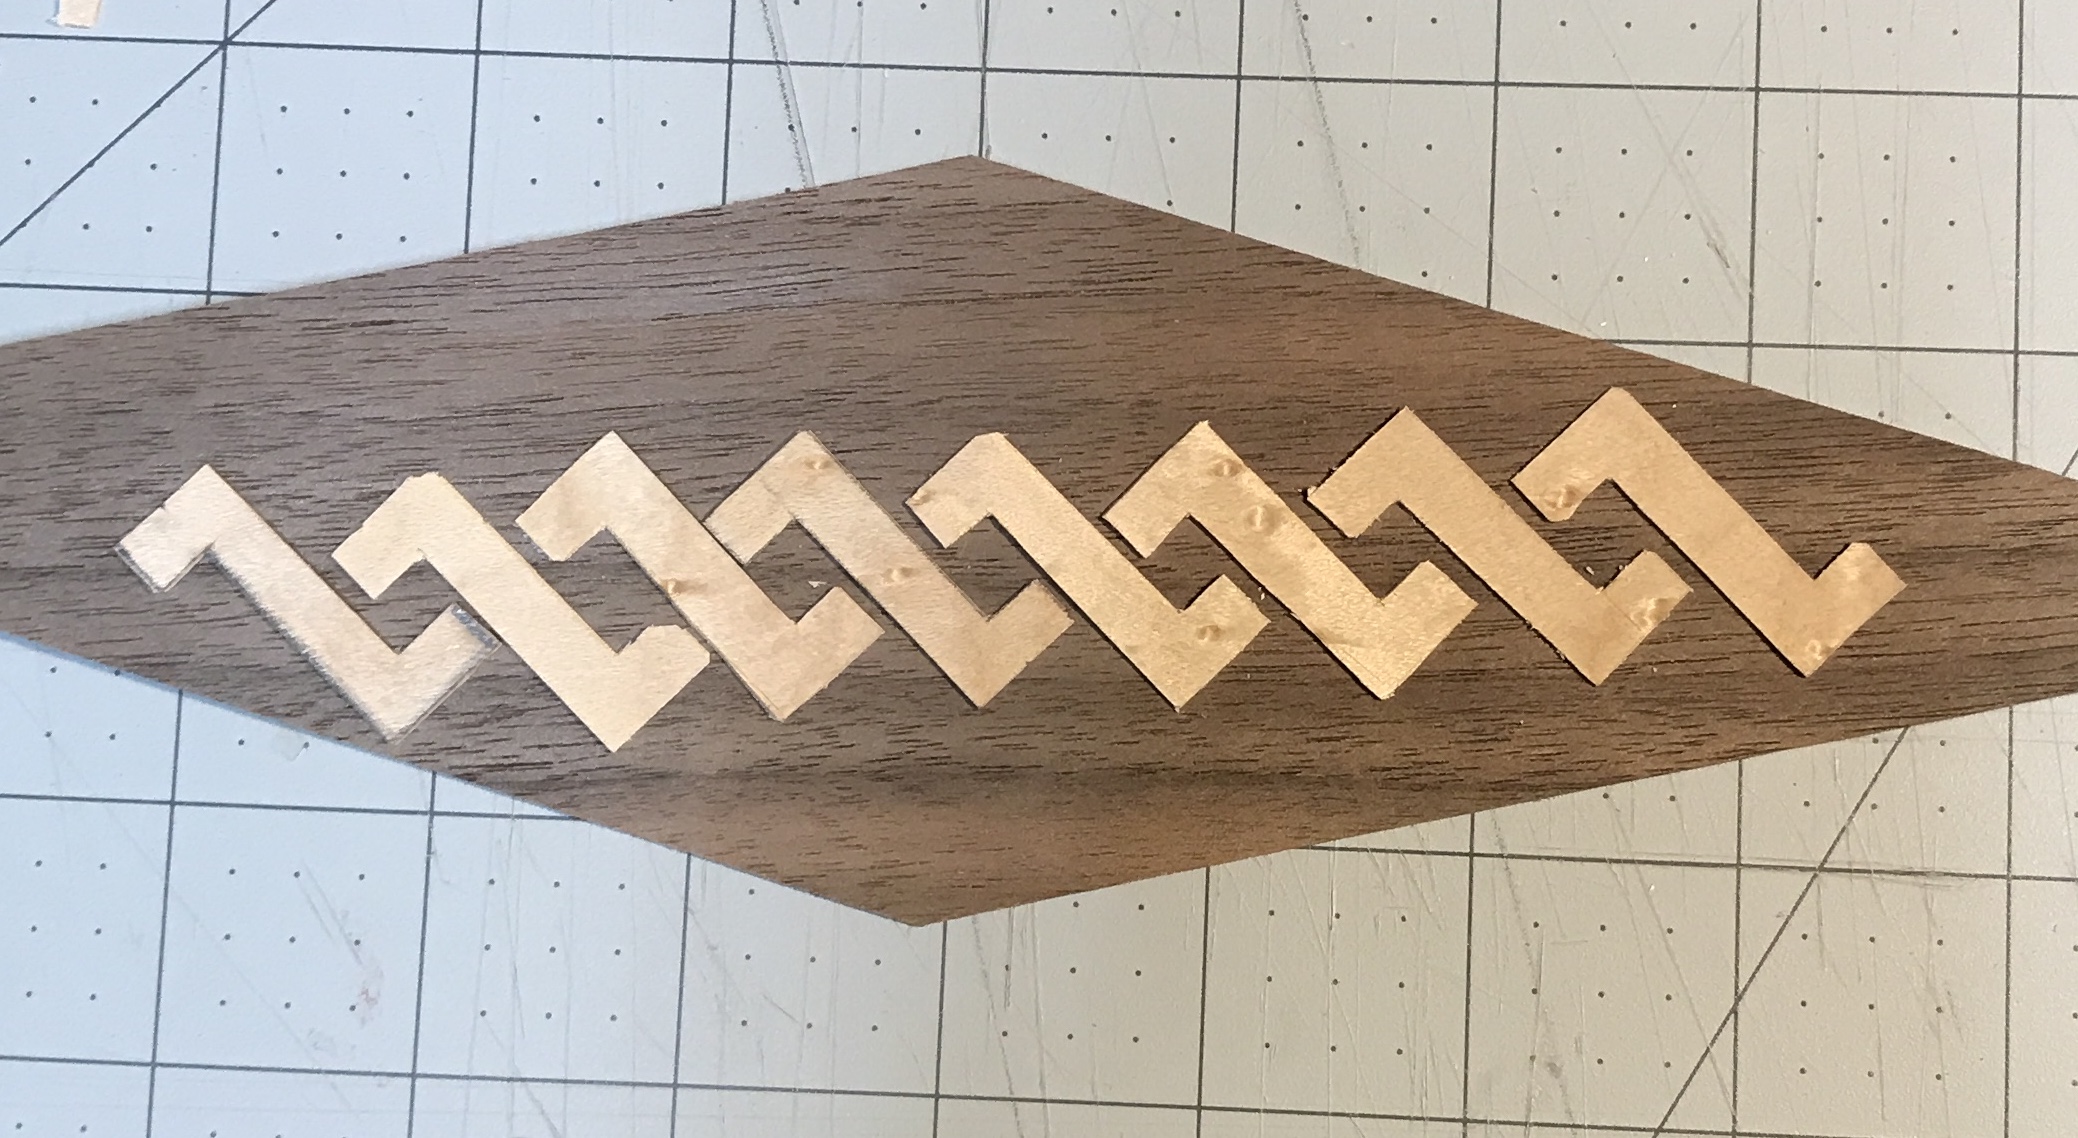
I was having difficulty keeping the veneer tight under the ruler while cutting. This is only a problem when the veneer pieces are small. A strip of 120 grit sandpaper was affixed to the back side of the ruler with 3M spray adhesive. This ruler is now fully dedicated to parquetry.
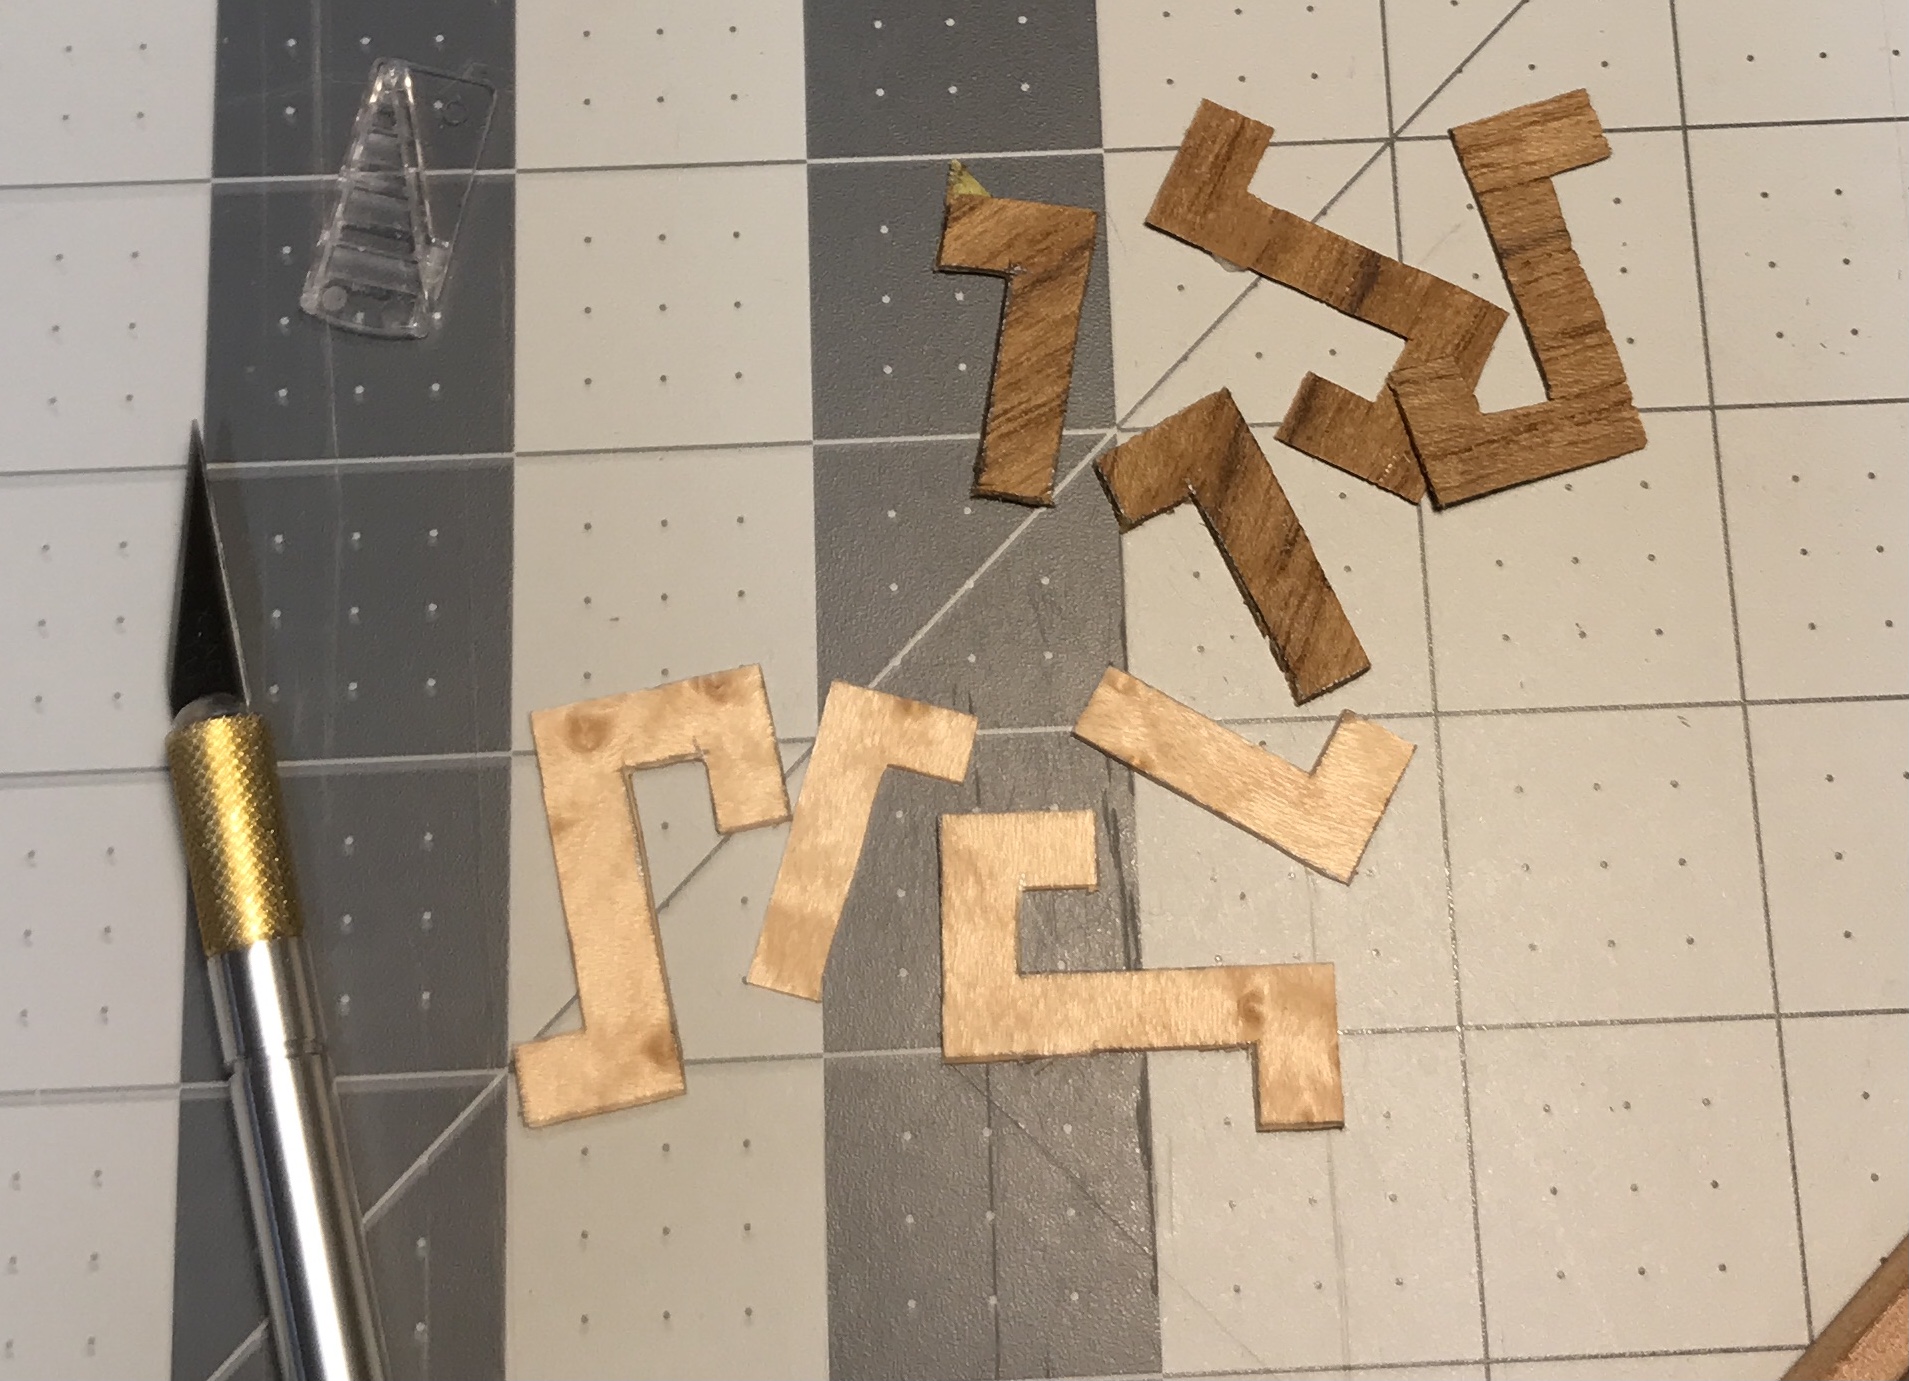
A different veneer was chosen for the second set of Z's. This slightly orange wood had ten pieces cut from it. Three needed gluing after splitting. Some of these pieces are arranged with the curly maple variant in the photo below. The pieces for the corners need to be made next.
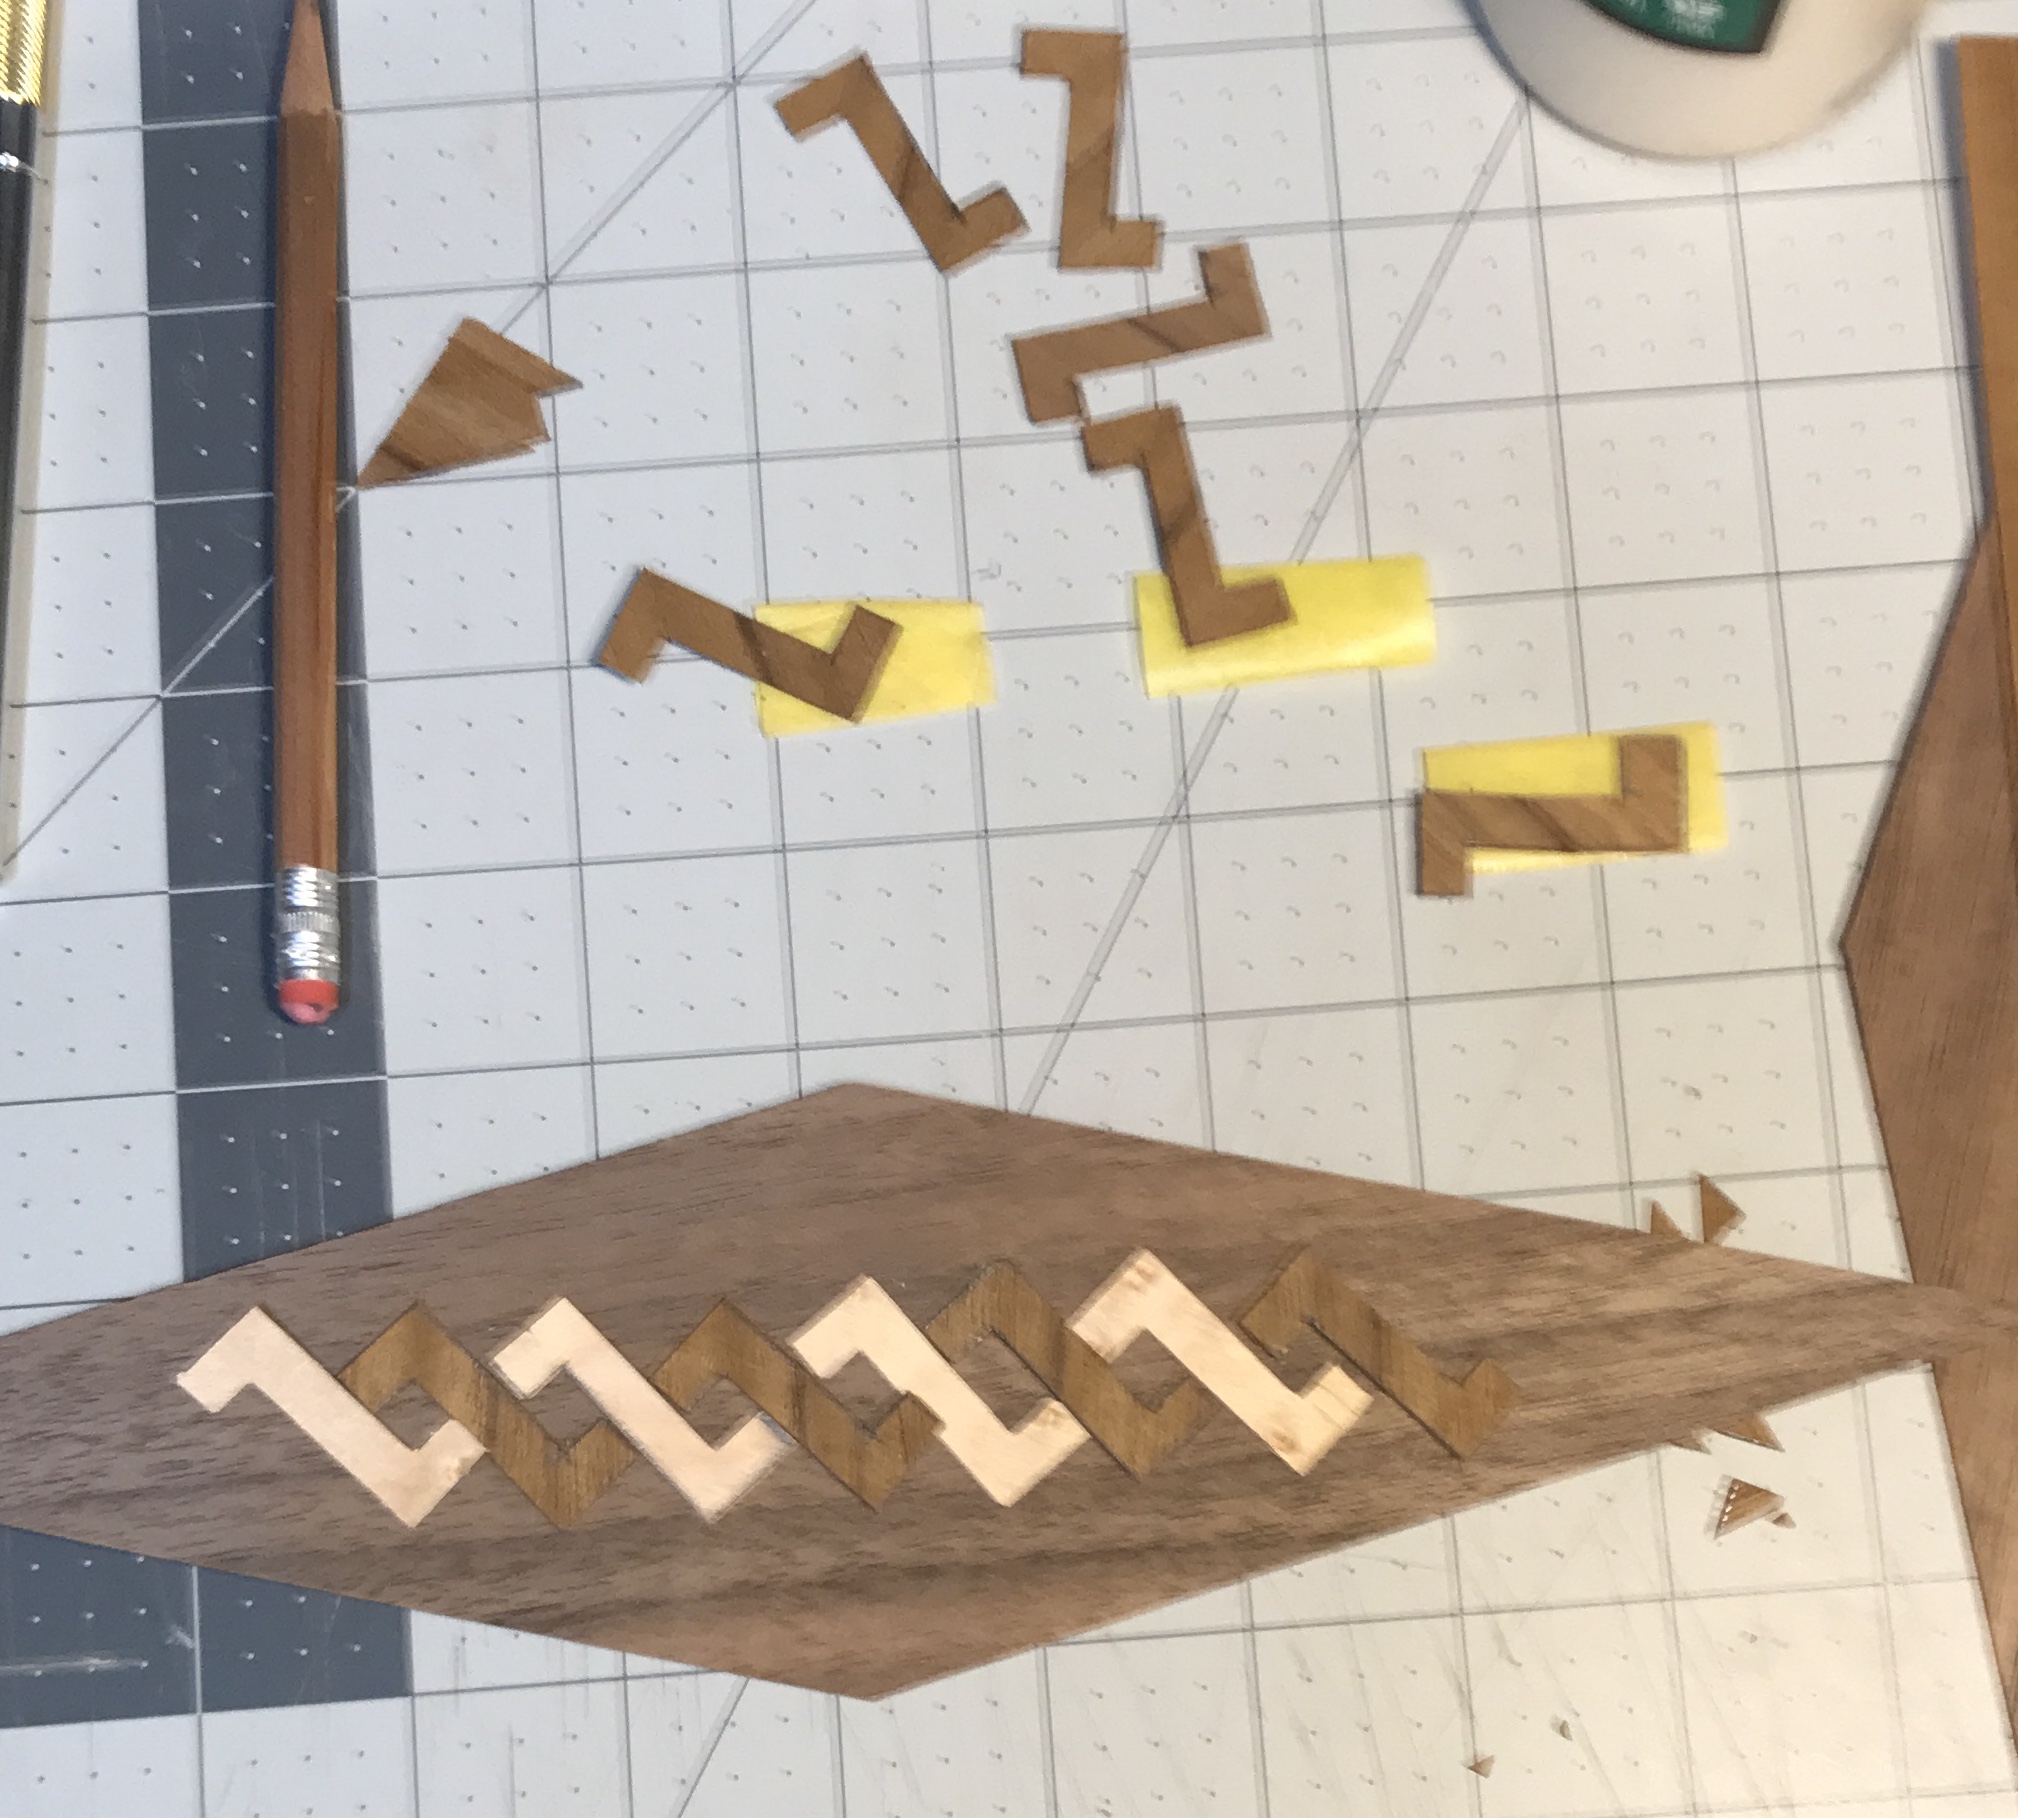
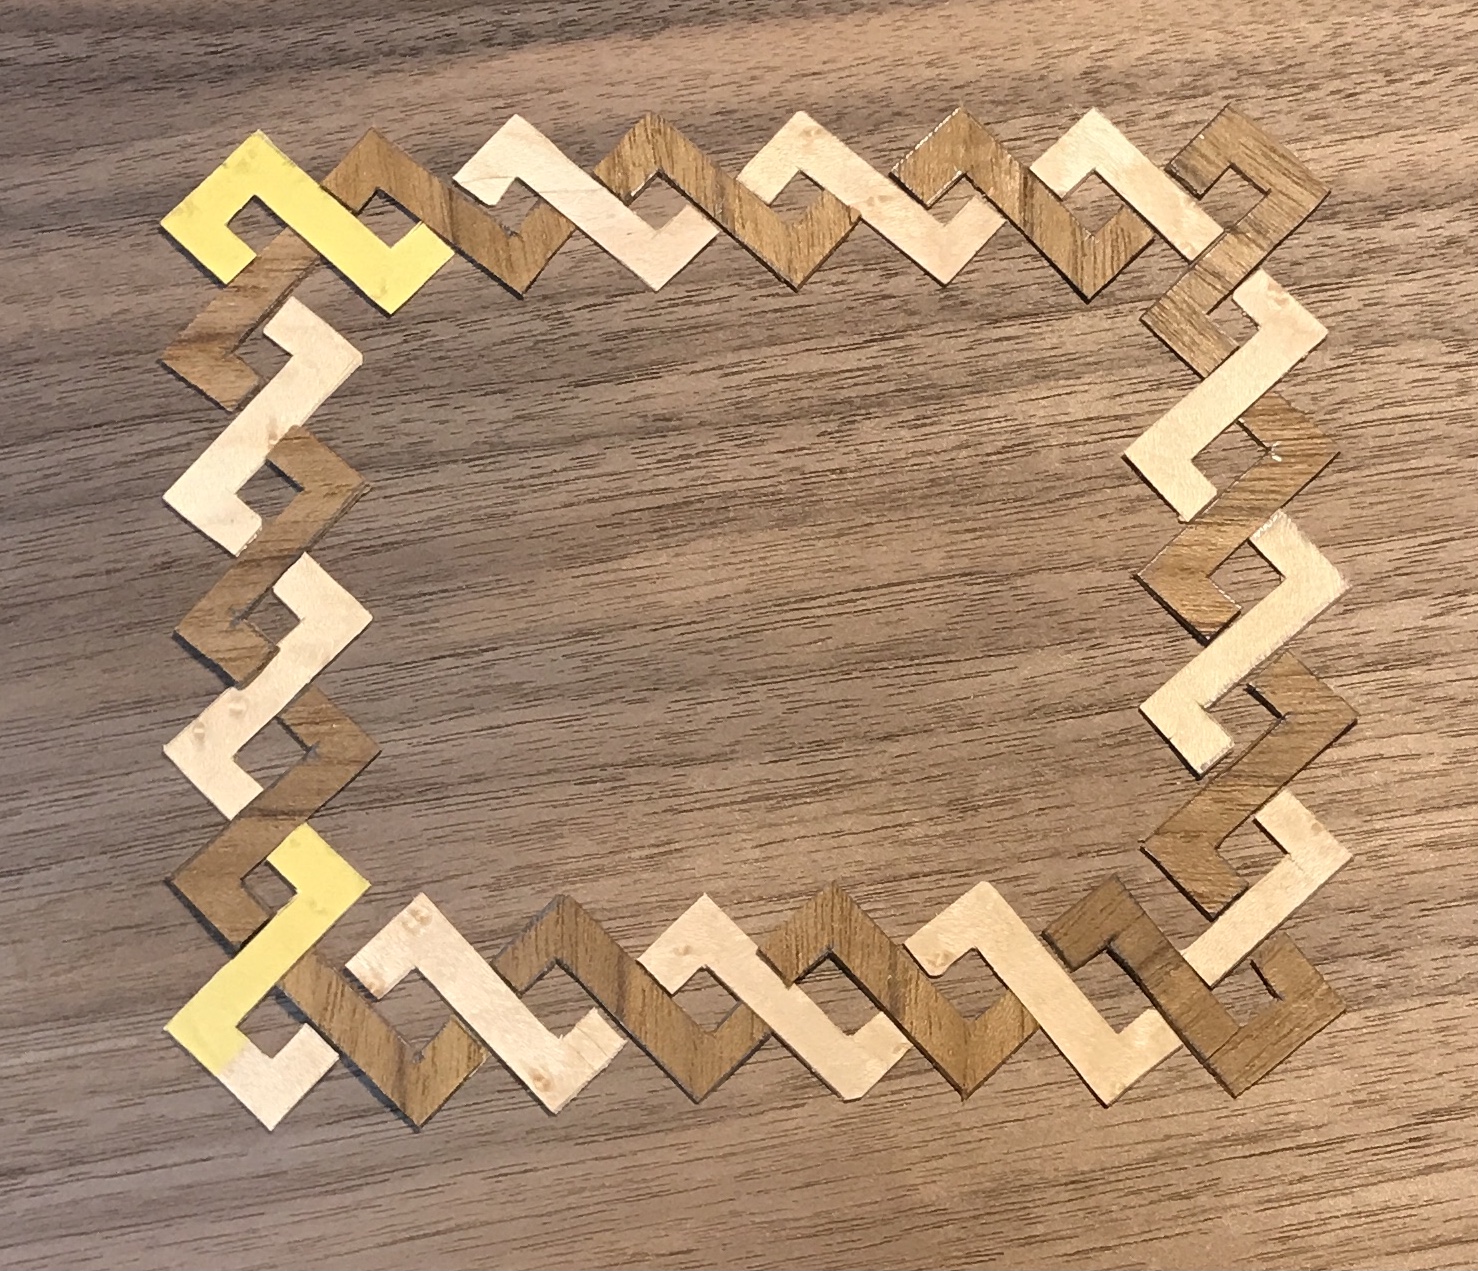
Over the last two days all of the Celtic design pieces have been completed. The super Z's and the L's were the last to be cut. In the orange wood there was significant breakage. Using yellow tape on the back side helped tremendously. The completed super Z's and the L's are shown in the first picture below. The pieces were then arranged as needed for the Celtic knotwork frame as seen in the second photo. A second set of all pieces needs to made for the facing identical design.
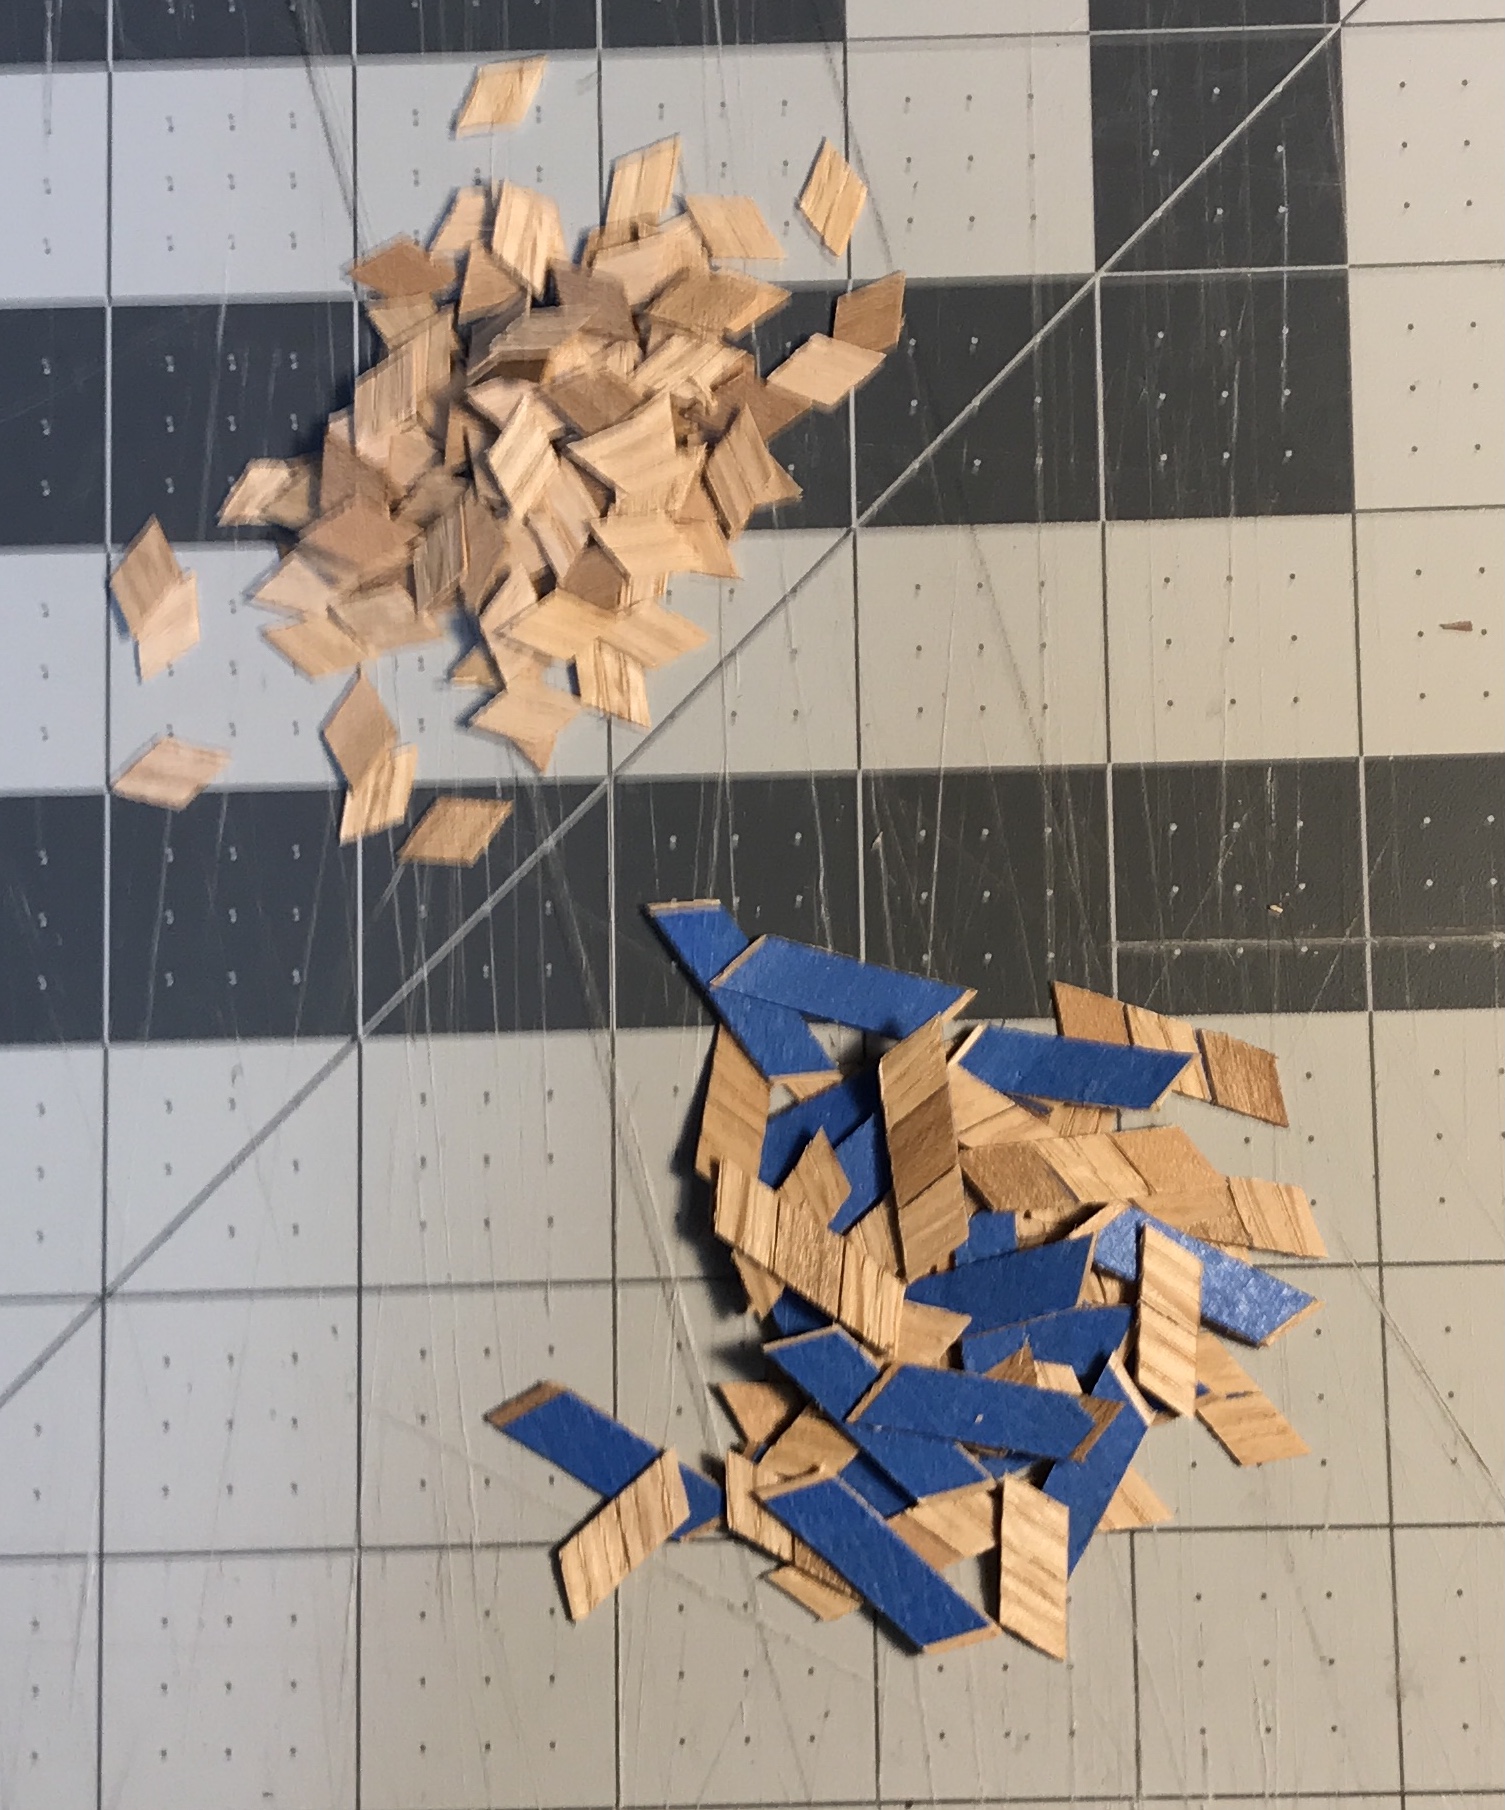
The Celtic knotwork is very challenging and somewhat frustrating. Cutting it into the background will be a significant challenge. Consequently, the opposite side of the board will use a different design to surround the central starburst. Cascading cubes will fill the same space on the opposite side. After a little sketching it was clear that the rhombi should be 1/2" wide on the long axis. This means starting with a 1/4" strip of wood cut at 60°. Two colors of wood will be used, though the curly maple may be replaced by a different maple with a clearer grain pattern. In class two different wood strips were taped together, grain to grain, and cut as one. The cubes will produce a solid sheet that will be cut to fit the frame.
The starbursts may also be different on the two sides. The Celtic knotwork frame will surround a starburst where points are alternating colors of wood. The cube filled frame will have a starburst where each point is made of two different colors of wood, i.e. make a point, split it in half, and pair one half with another of different color.
After a couple of hours there are 4 square inches of pieces! About 18 square inches are needed!!
A jig was needed. After a fruitless search on the internet I designed my own very simple jig/setup. Two layers of tape were applied to the cutting mat at 60°. The straightedge, ruler with a sandpaper backing, was clamped to the table at 60° and 1/4" from the tape. The ruler is set on two pieces of veneer at both ends. The 1/4" is measured perpendicular to the straightedge. The jig is shown in the photo below.
Using the jig was simple. Three 1/4" strips of veneer were taped together with blue painter's tape. These taped strips were slid under the ruler and butted against the tape stop. Either the top or bottom edge of the strip was aligned with dots on the mat. The straightedge was held tight against the veneer strips and a cut was made along its edge across all three veneer strips. Care was taken to cut through the last strip at its lower edge to avoid tearout. The angle of the straightedge was checked on occasion, though it never shifted. Four times as many pieces were cut as before in less than half the time. The only difficulty was cramping in my fingers from making so many cuts! The photo below shows the completed pieces. I now have about 20 square inches of pieces.
It is not completely clear how best to assemble these pieces into the desired cubes. Tape with the sticky side up may be used. The pieces will be put together so they form a picture frame slightly larger than the required dimensions. The edges will then be trimmed to fit. The frame is 5 1/4" X 6" on the outside and 3 3/16" X 3 7/8" on the inside as planned. It is 1 1/16" wide.
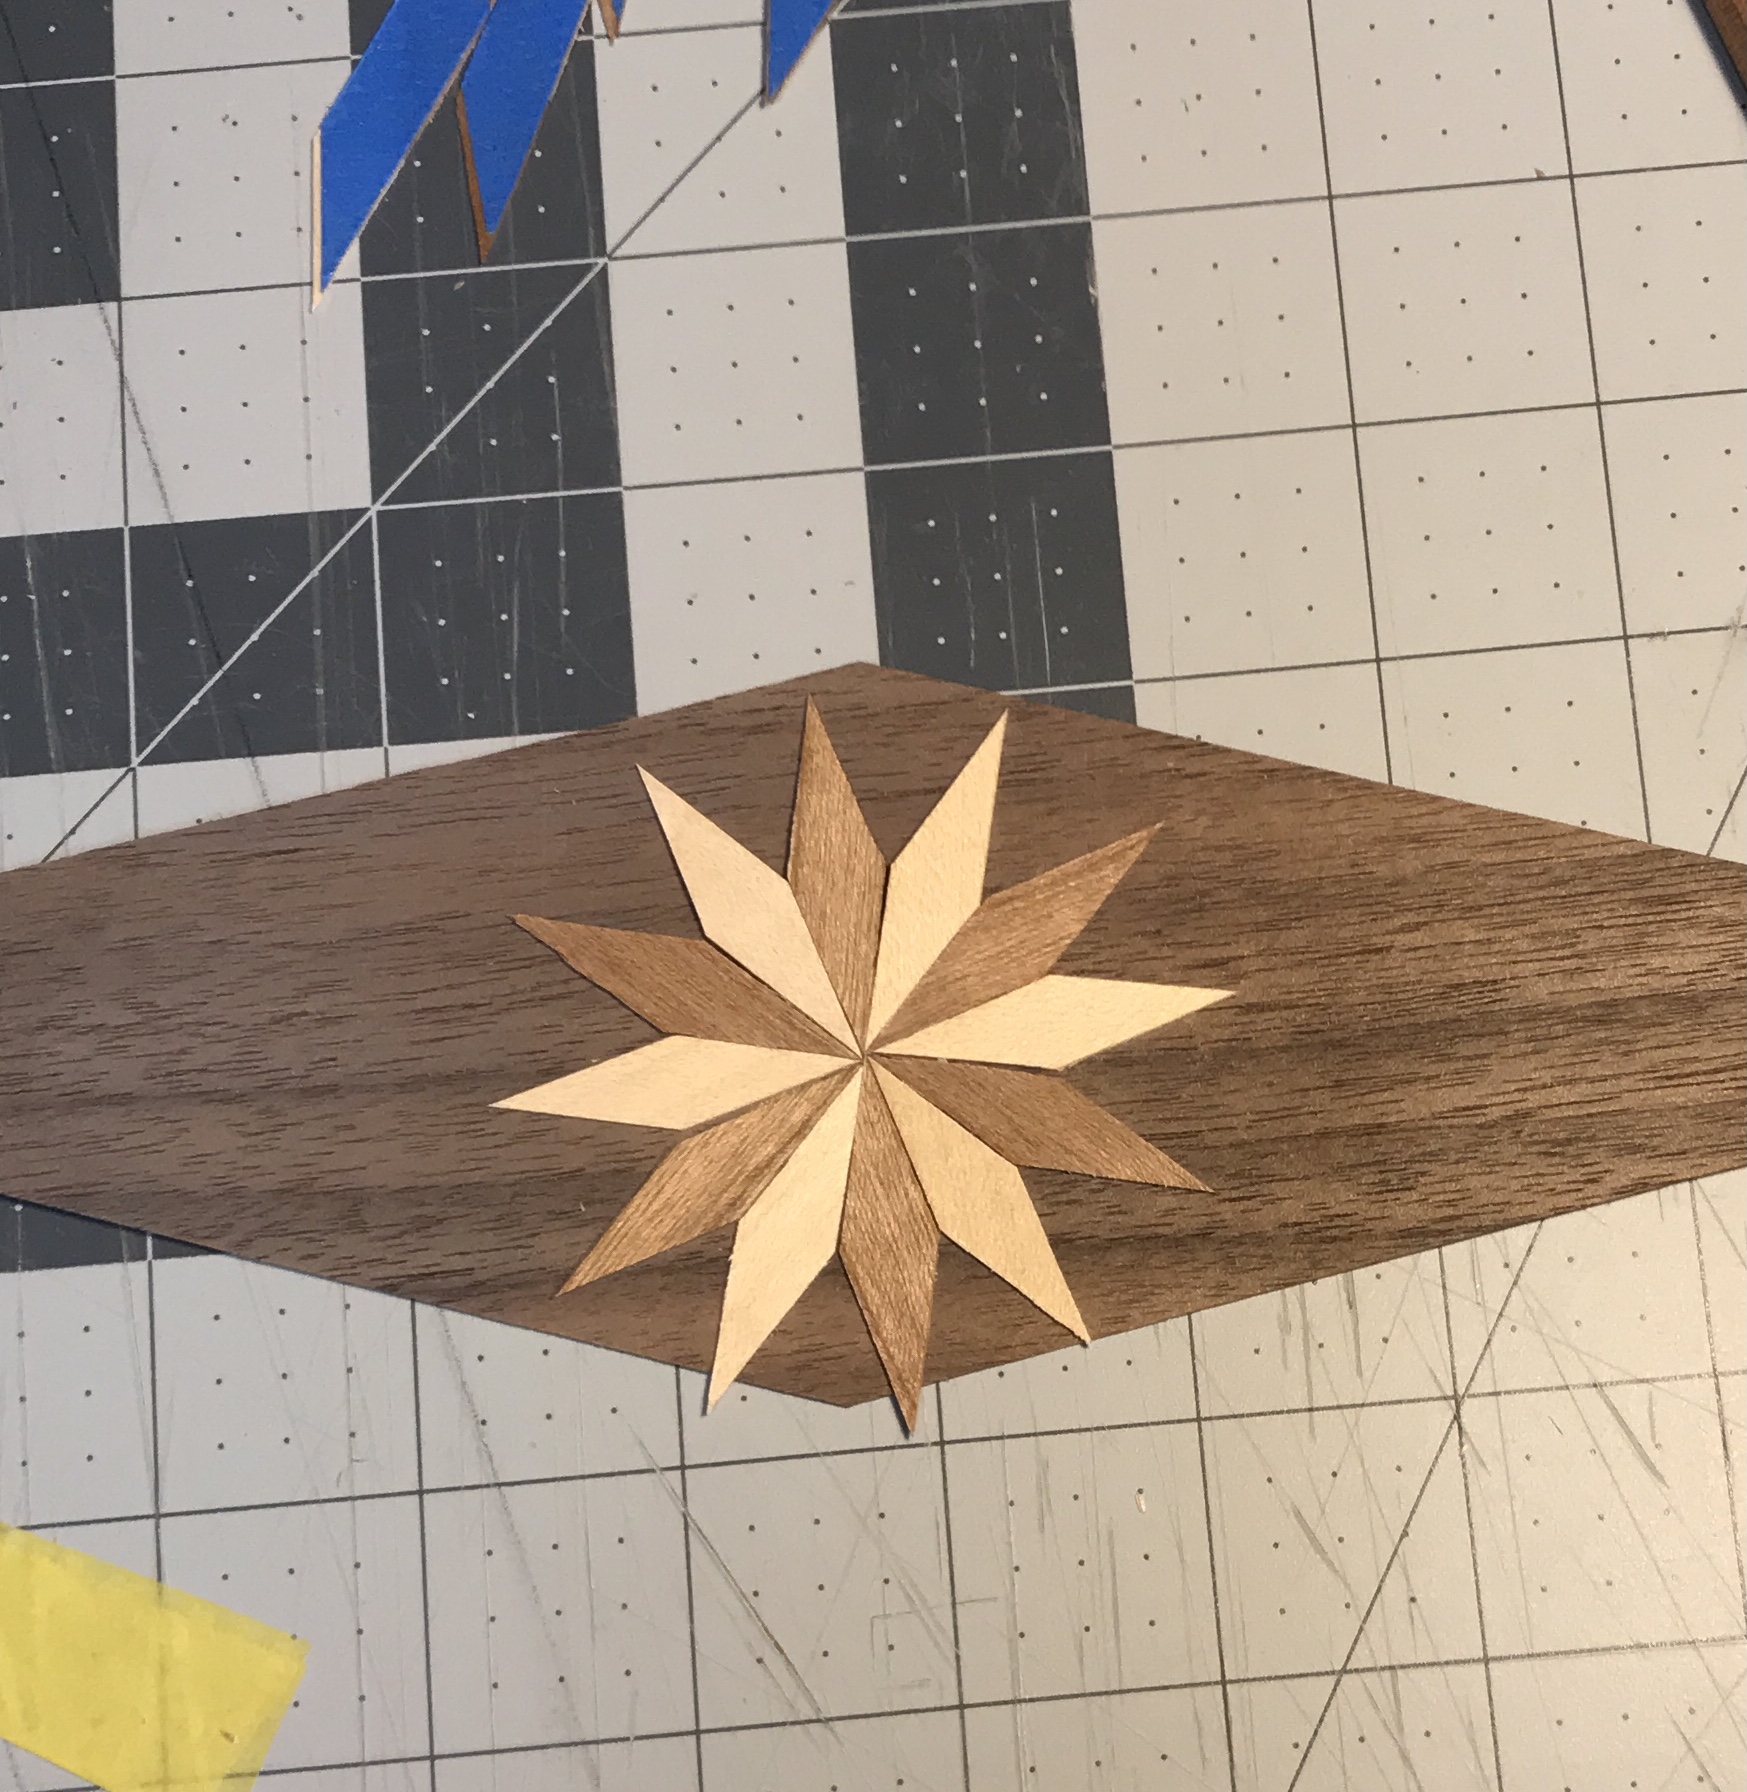
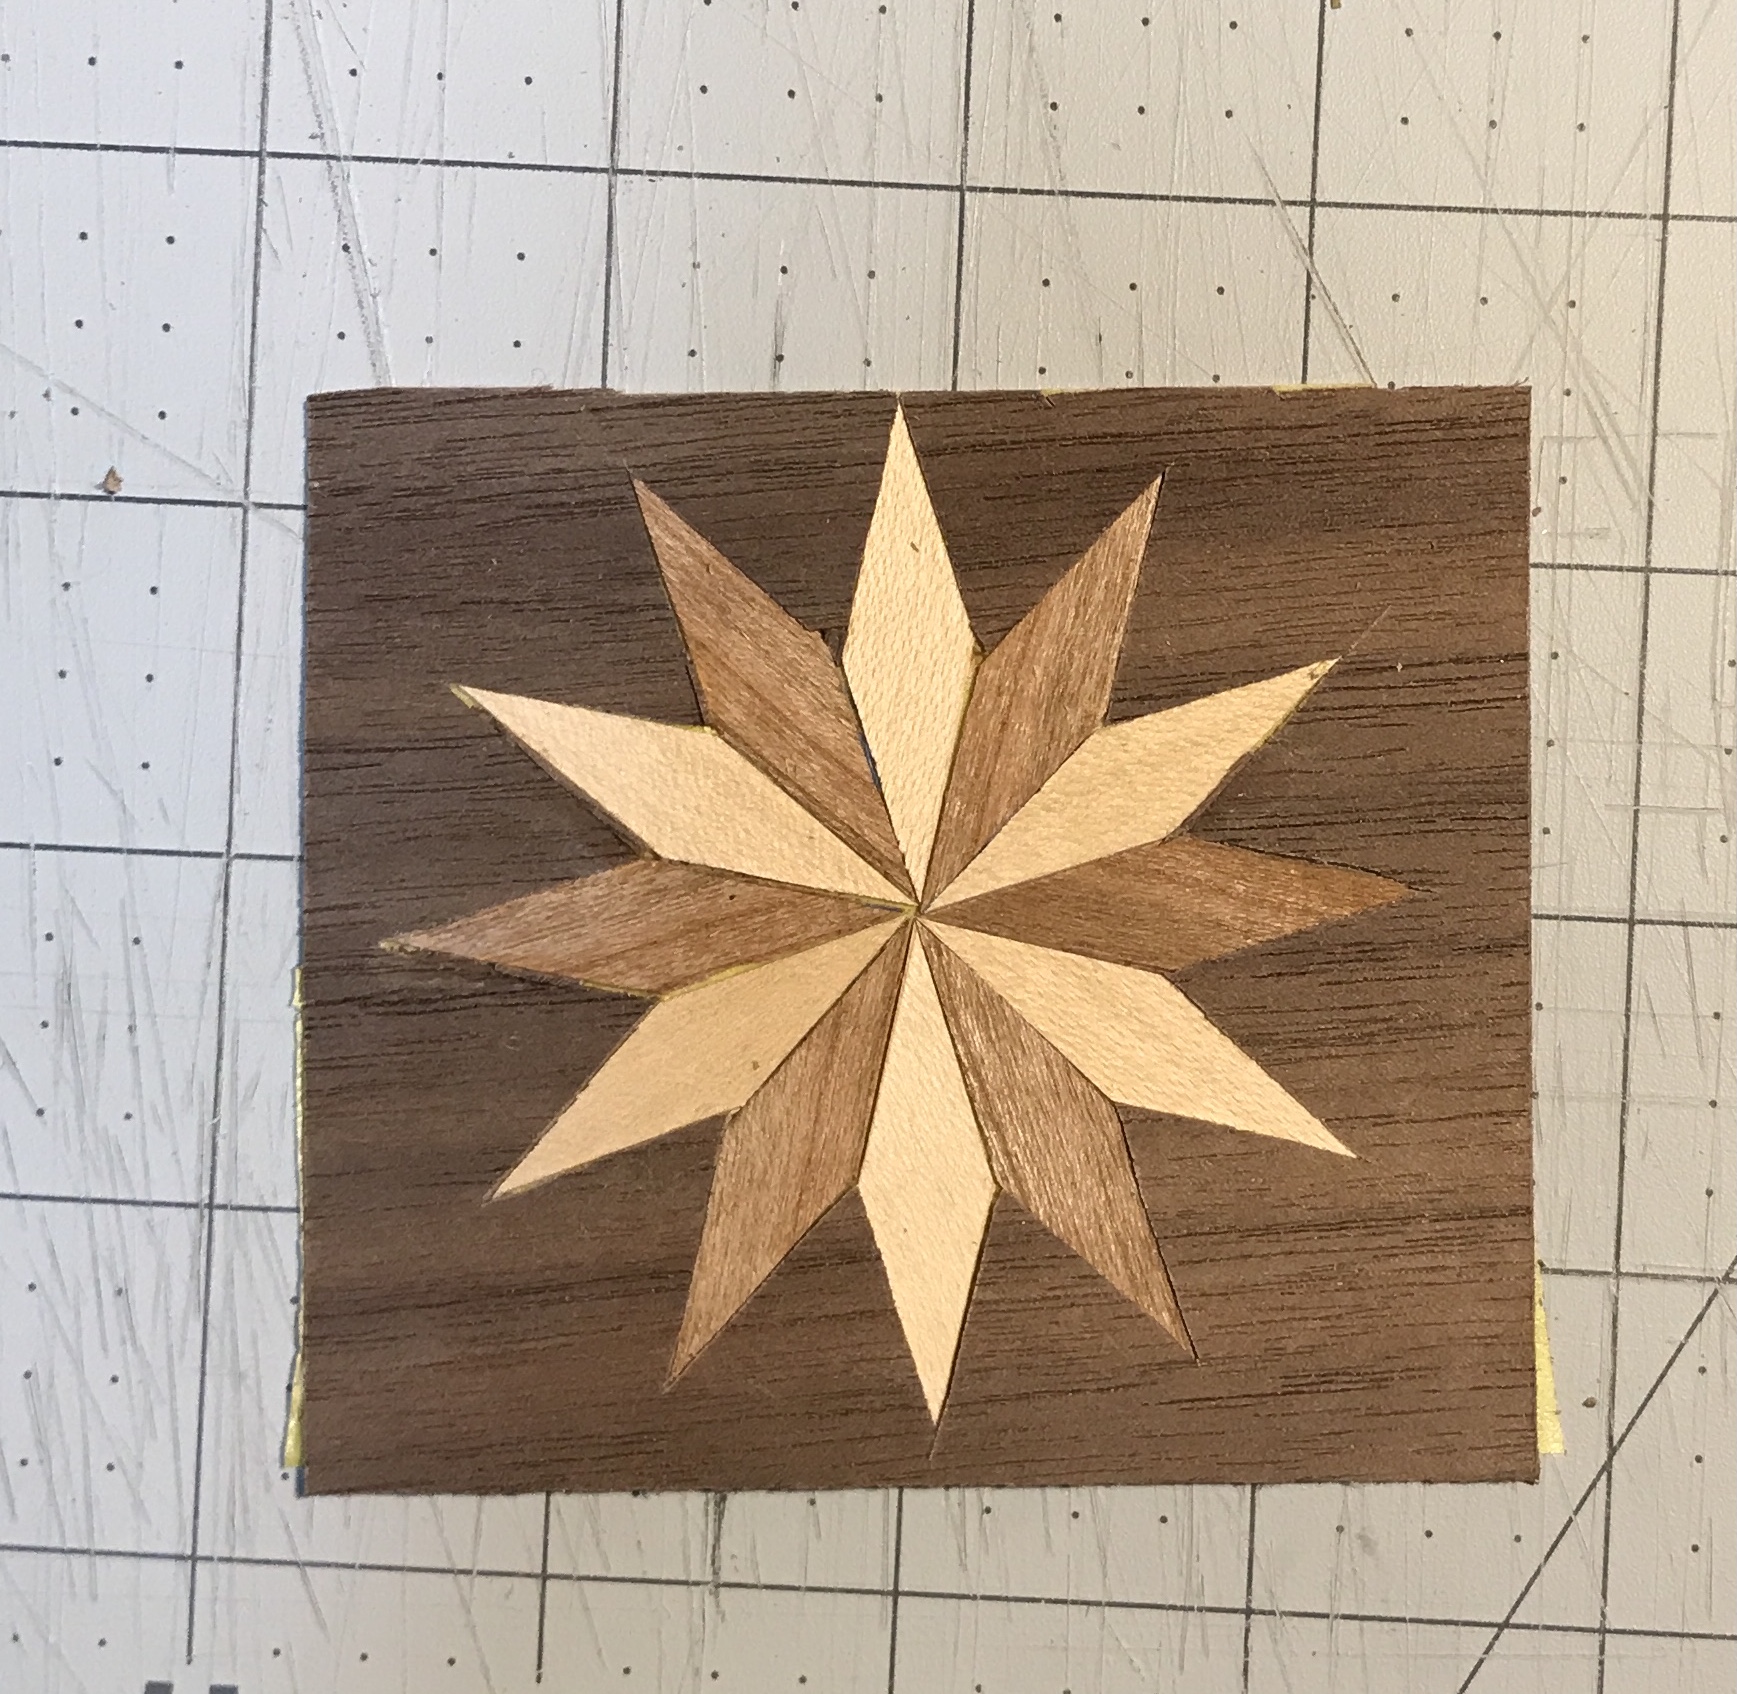
The cutting went so well that the diamonds for the starbursts were tackled. 3/8" strips of two different veneers were cut. Two were taped together lengthwise. A tape stop was set at 30° and the ruler was set up at 30° 3/8" away. The taped pairs of veneer strips were cut into pieces as shown in the first photo below. Twelve of these pieces were removed from the tape and arranged into a starburst on the background veneer as shown in the second photo. Wow!
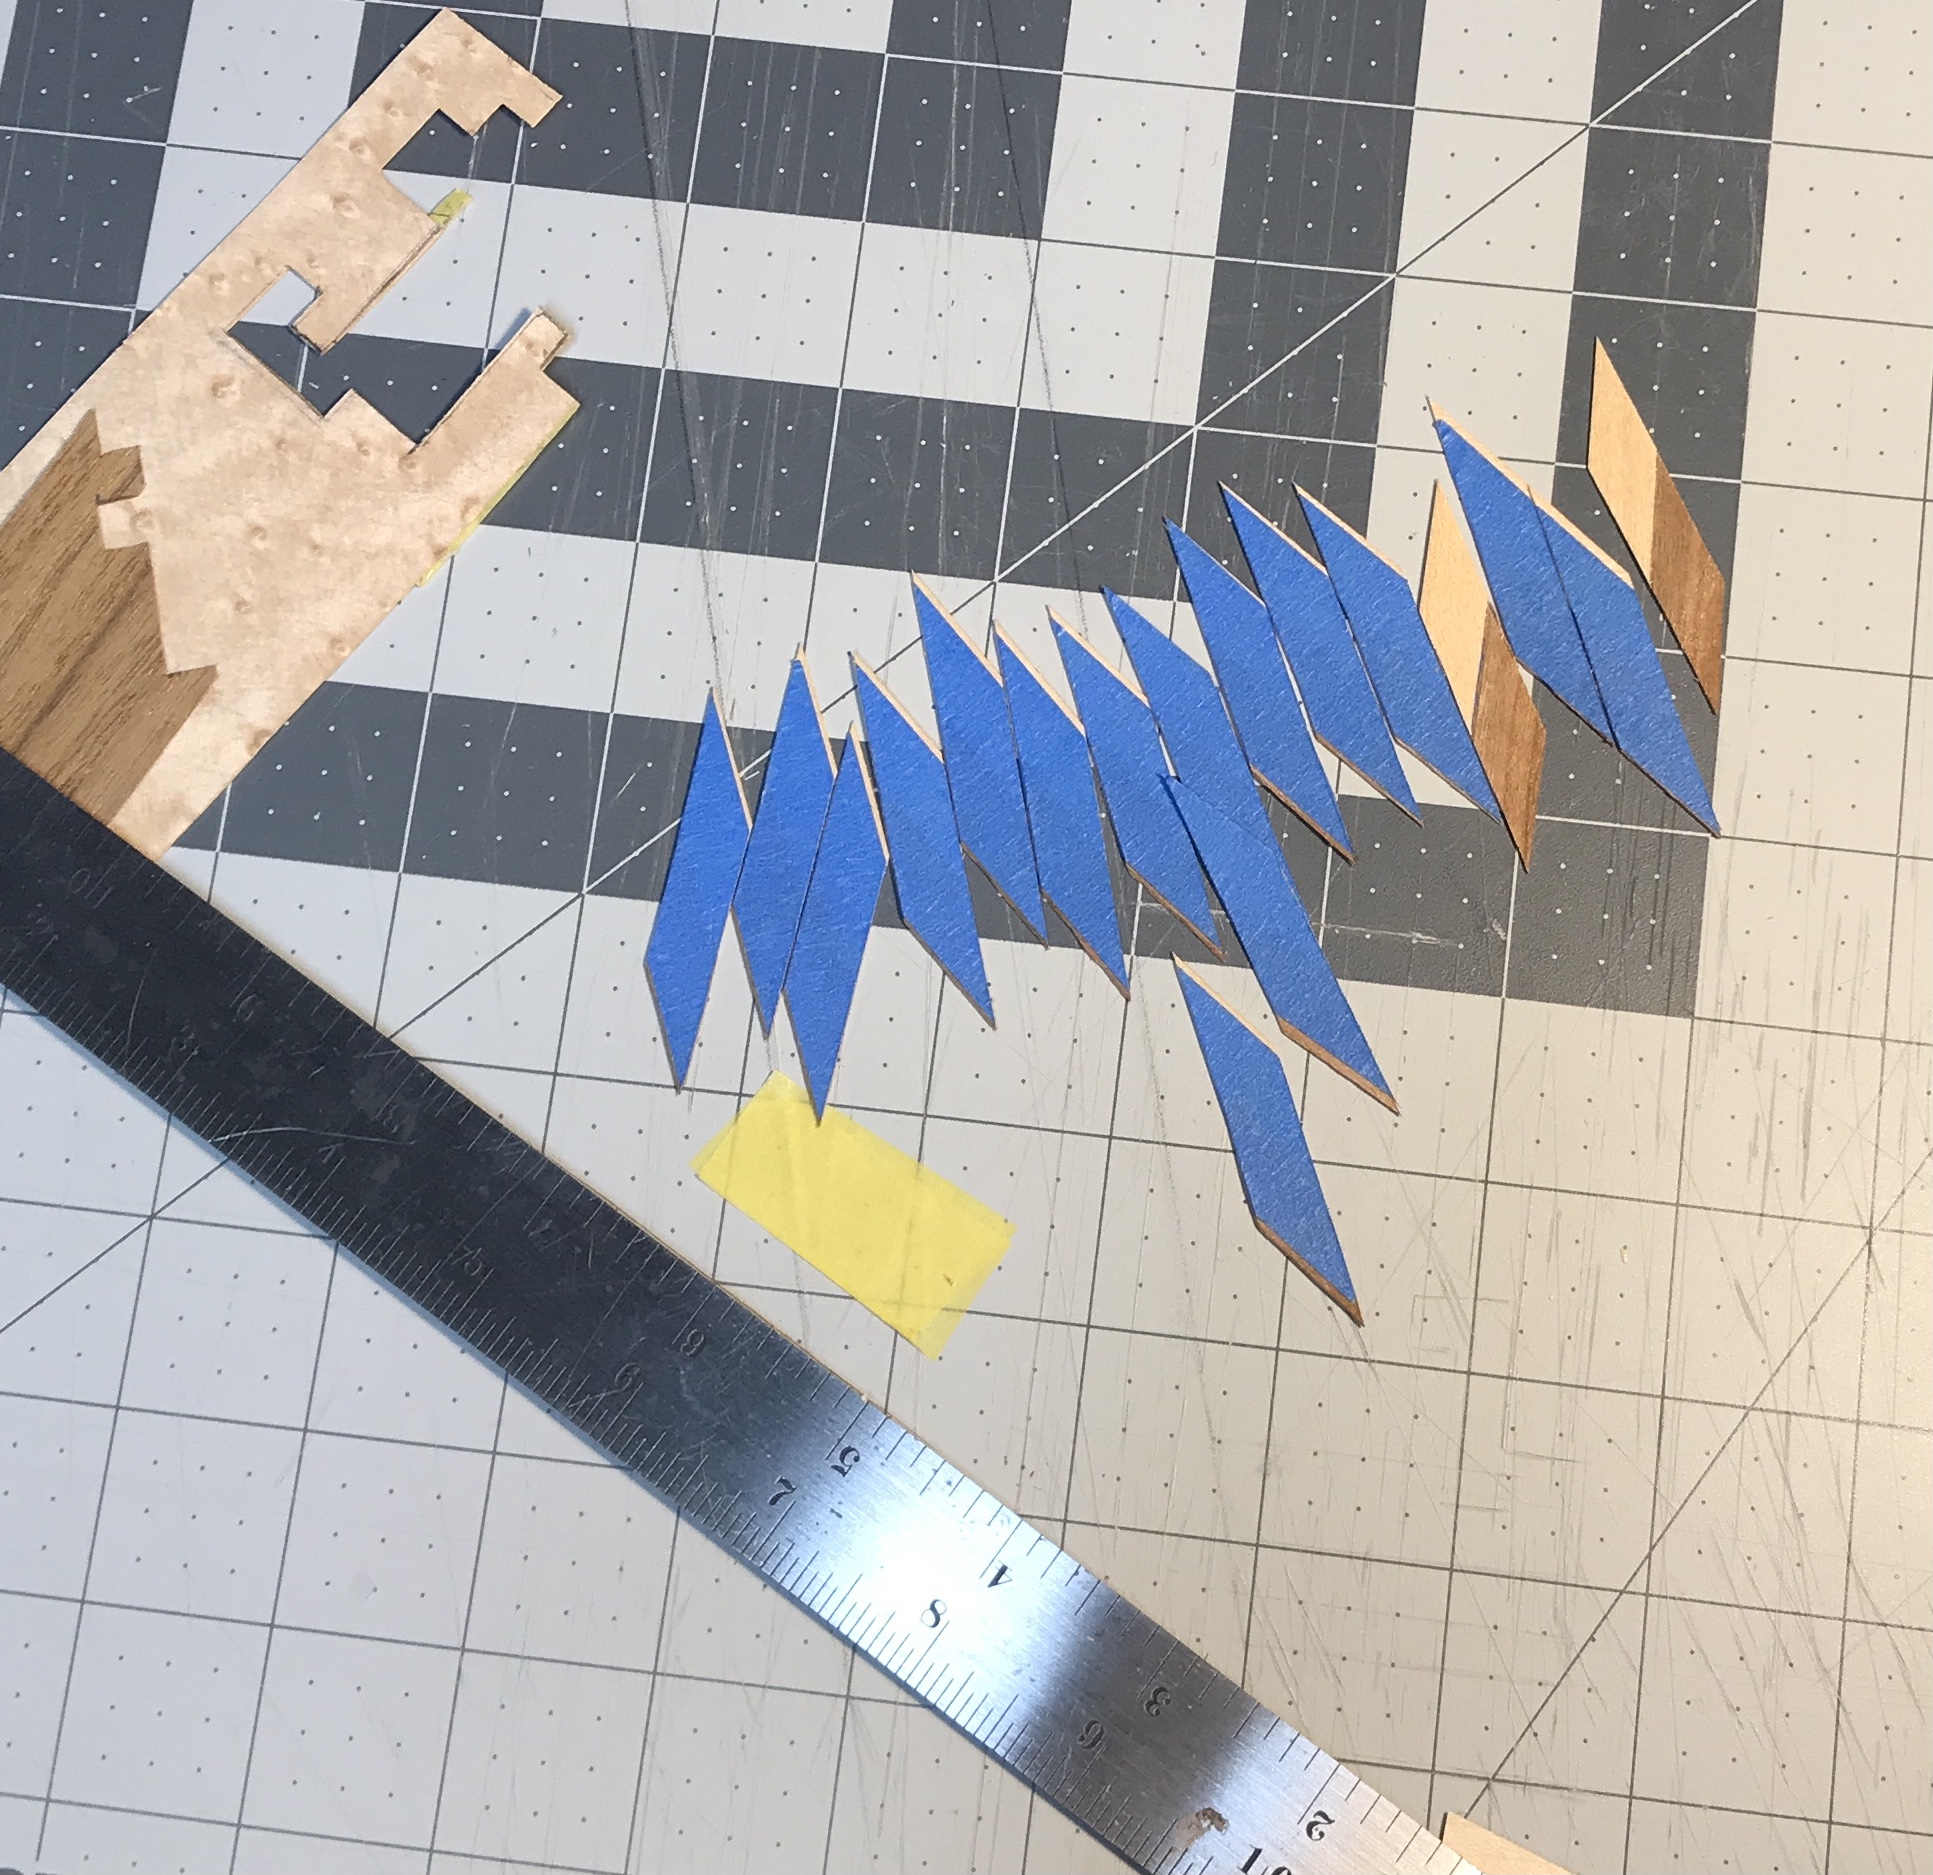
Two of the darker diamonds have their grain running differently than the other four. This will need to be checked when the actual arrangement for cutting into the background takes place. This altered grain direction cannot be discerned for the lighter diamonds.
A sheet of mother of pearl arrived yesterday. It is gorgeous and is pictured below. Two different sheets were ordered, but one was not available and a refund was issued. An attempt will be made to cut the sheet this morning. If I can get reasonably clean cuts, a second sheet will be purchased. The triangles need to be 1" wide at the base and 5 1/2" long, so this sheet should yield 18 triangles. This gives (tan(x) = 0.5/5.5) an angle of 5.19° from vertical.
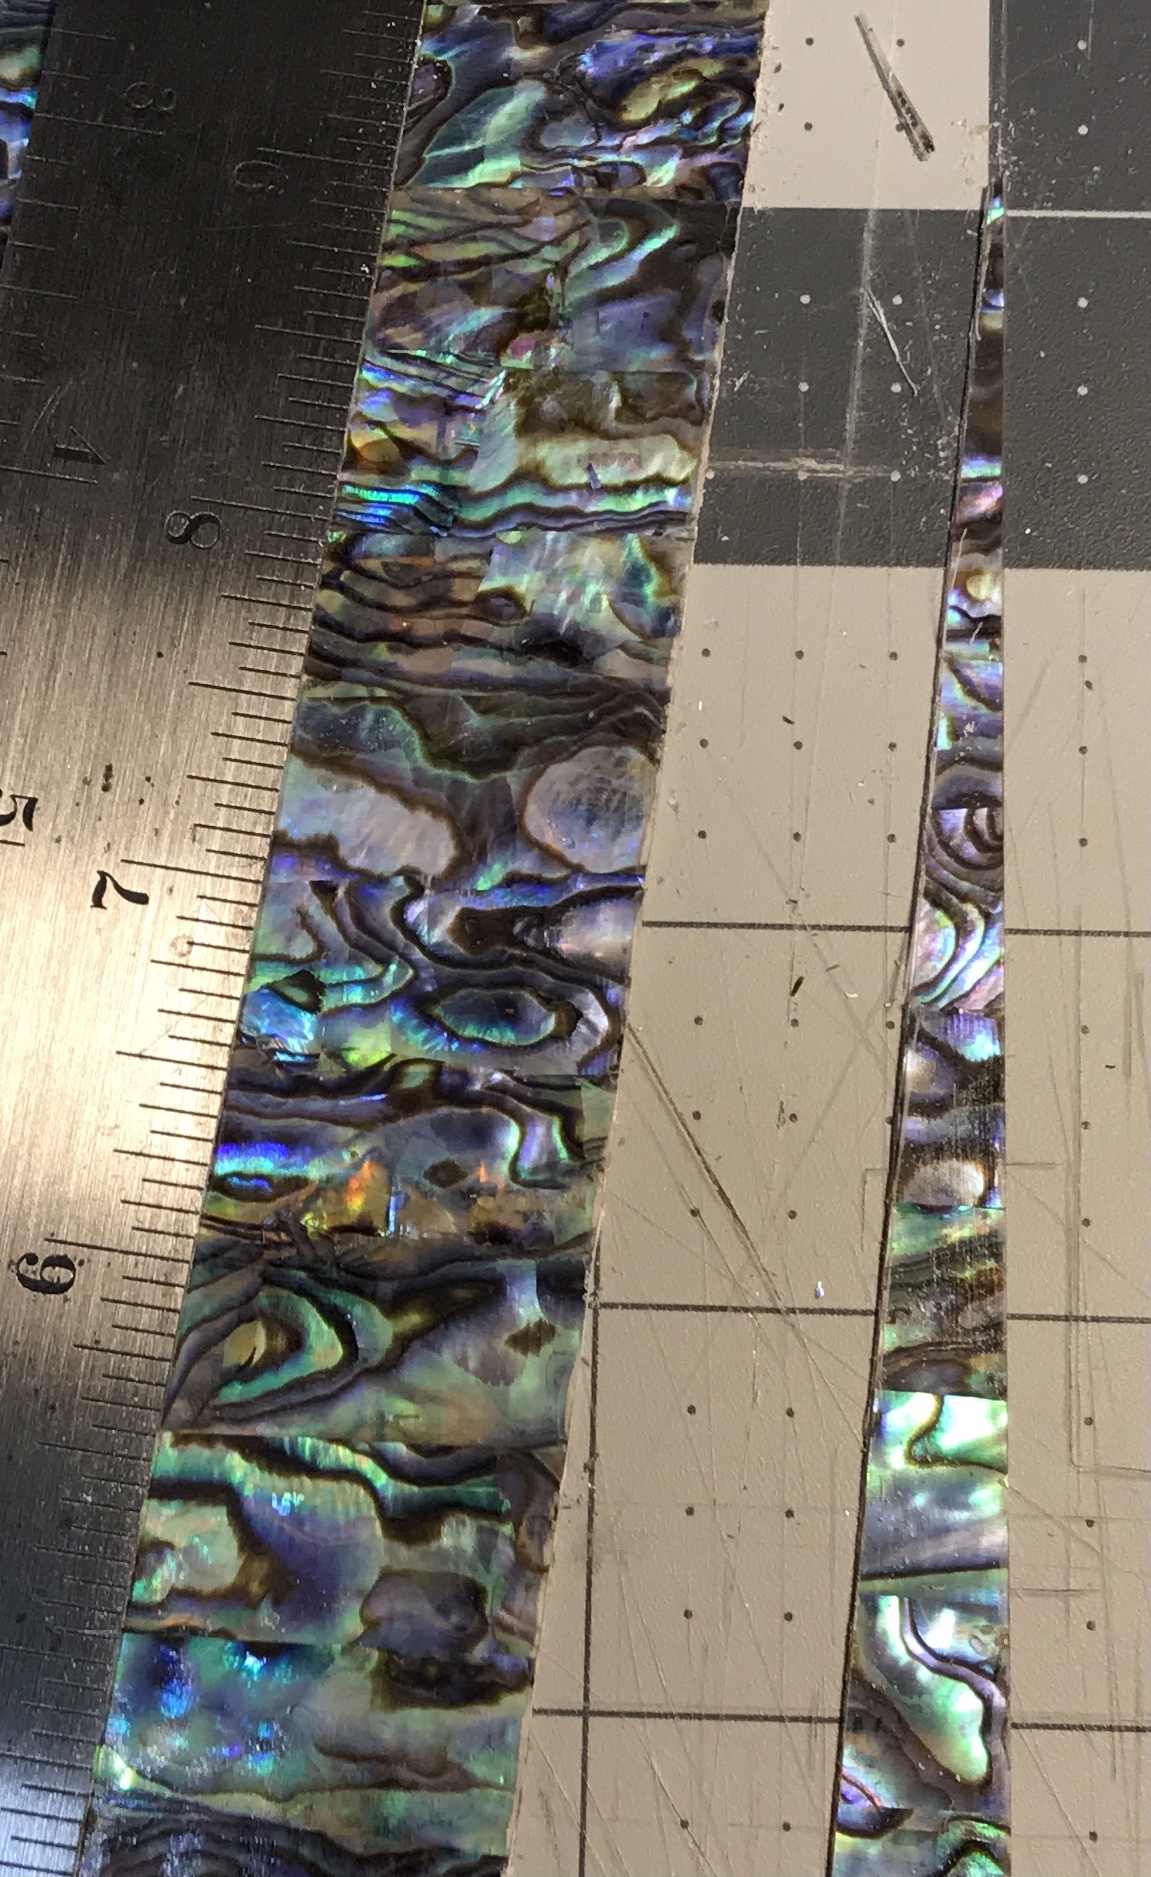
The Abalam can be cut with an X-acto knife. The ruler was aligned with the top corner and a spot 1/2" in from the bottom edge. It takes many passes with significant pressure. The cutting leaves a slight ridge along the cut edge. The edge is smooth. The picture below shows the first cut.
Before going further the sides need to be marked. There is a front and back side and they are not easy to tell apart. The back side needs to be marked on each piece.
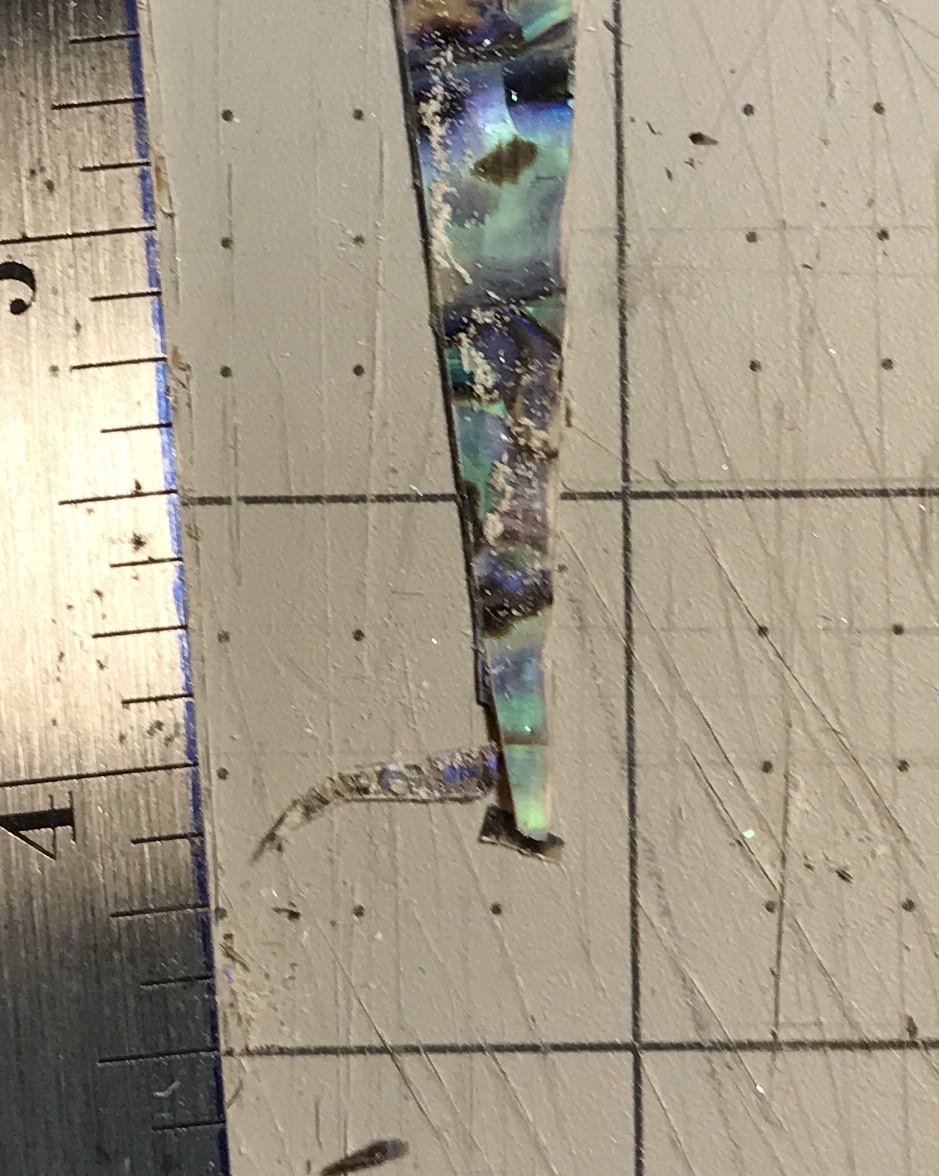
The back side was simply marked with a Sharpie line across the center from side to side. The ruler was aligned with the bottom corner and 1" from the top corner. The cut was made as before. The point shattered as the cut proceeded. In total about 1/2" of the corner is broken as seen in the photo below. What is the best way to proceed? I could try two other ways of cutting the Abalam. It could be sandwiched between sheets of masonite and cut with either a jeweler's saw or a scroll saw. Both present other problems and I am not convinced a sharp point can be made with either. The alternative is not having a sharp point in the Abalam.
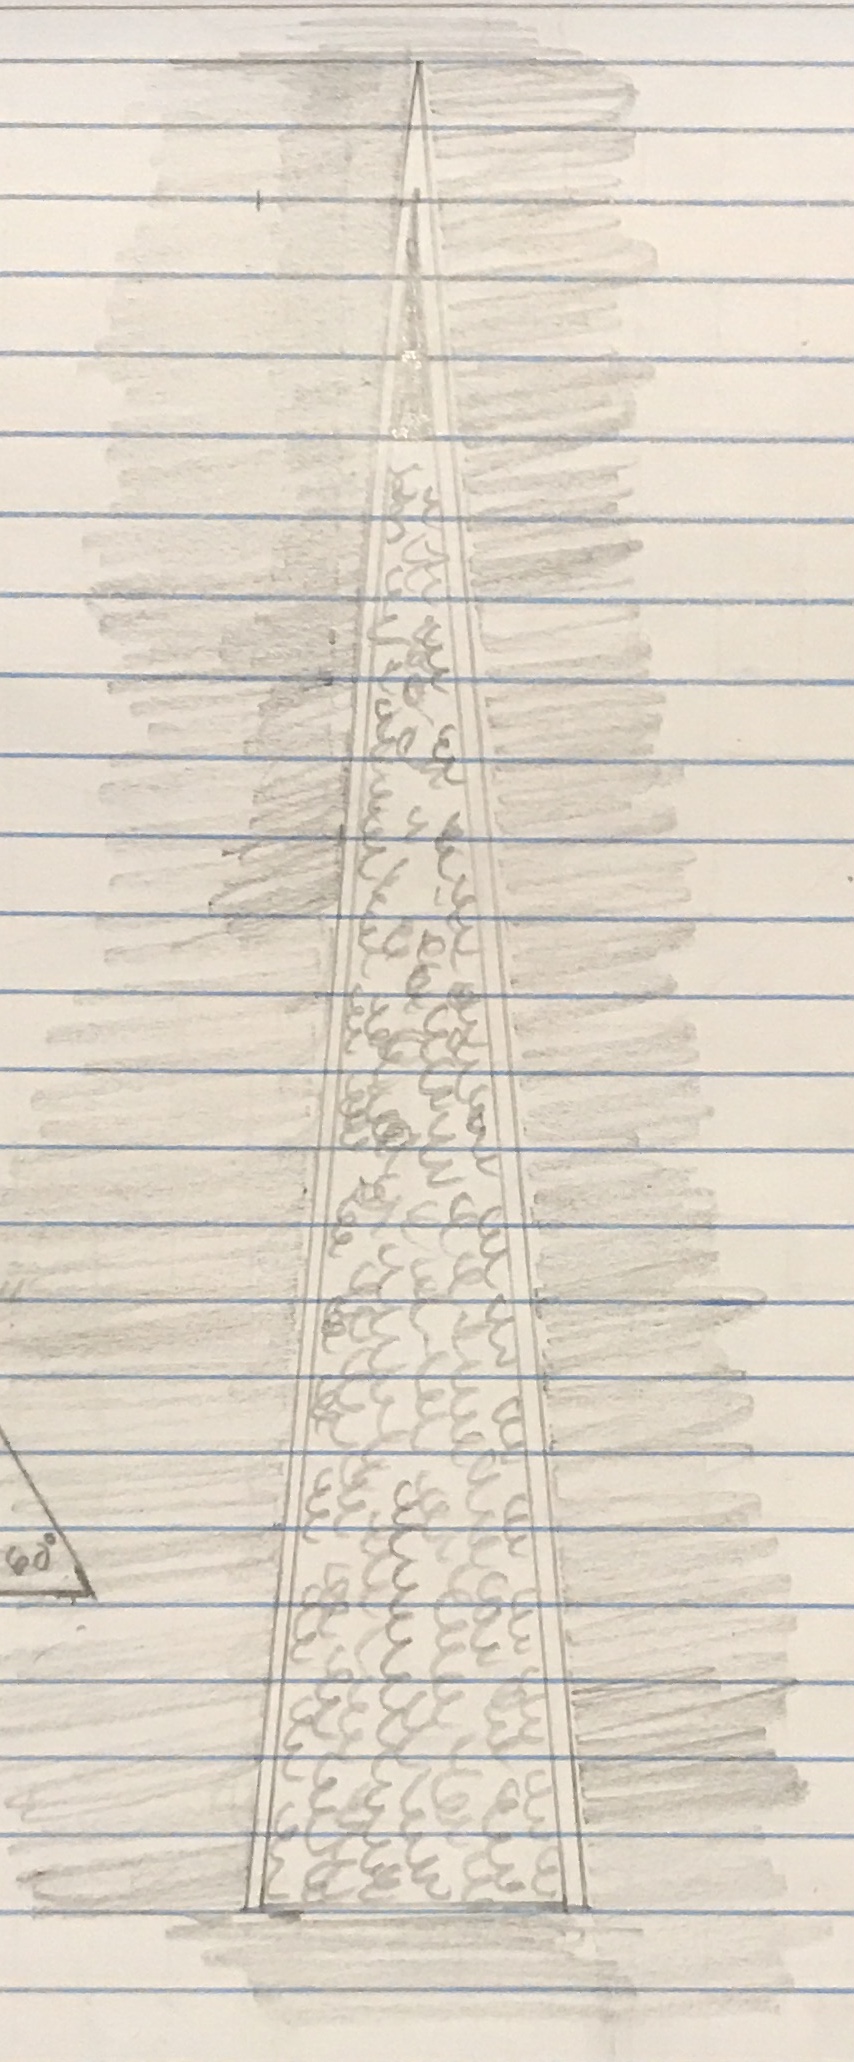
The tip can be cut off at 1/2" and replaced with a piece of veneer cut to fit. I have seen this technique in some backgammon boards, though not with mother of pearl. A sketch of this possibility is shown below as well as a mockup. The veneer point is a different veneer than the background, but there is still insufficient distinction. It needs to be black. This is the new path forward.
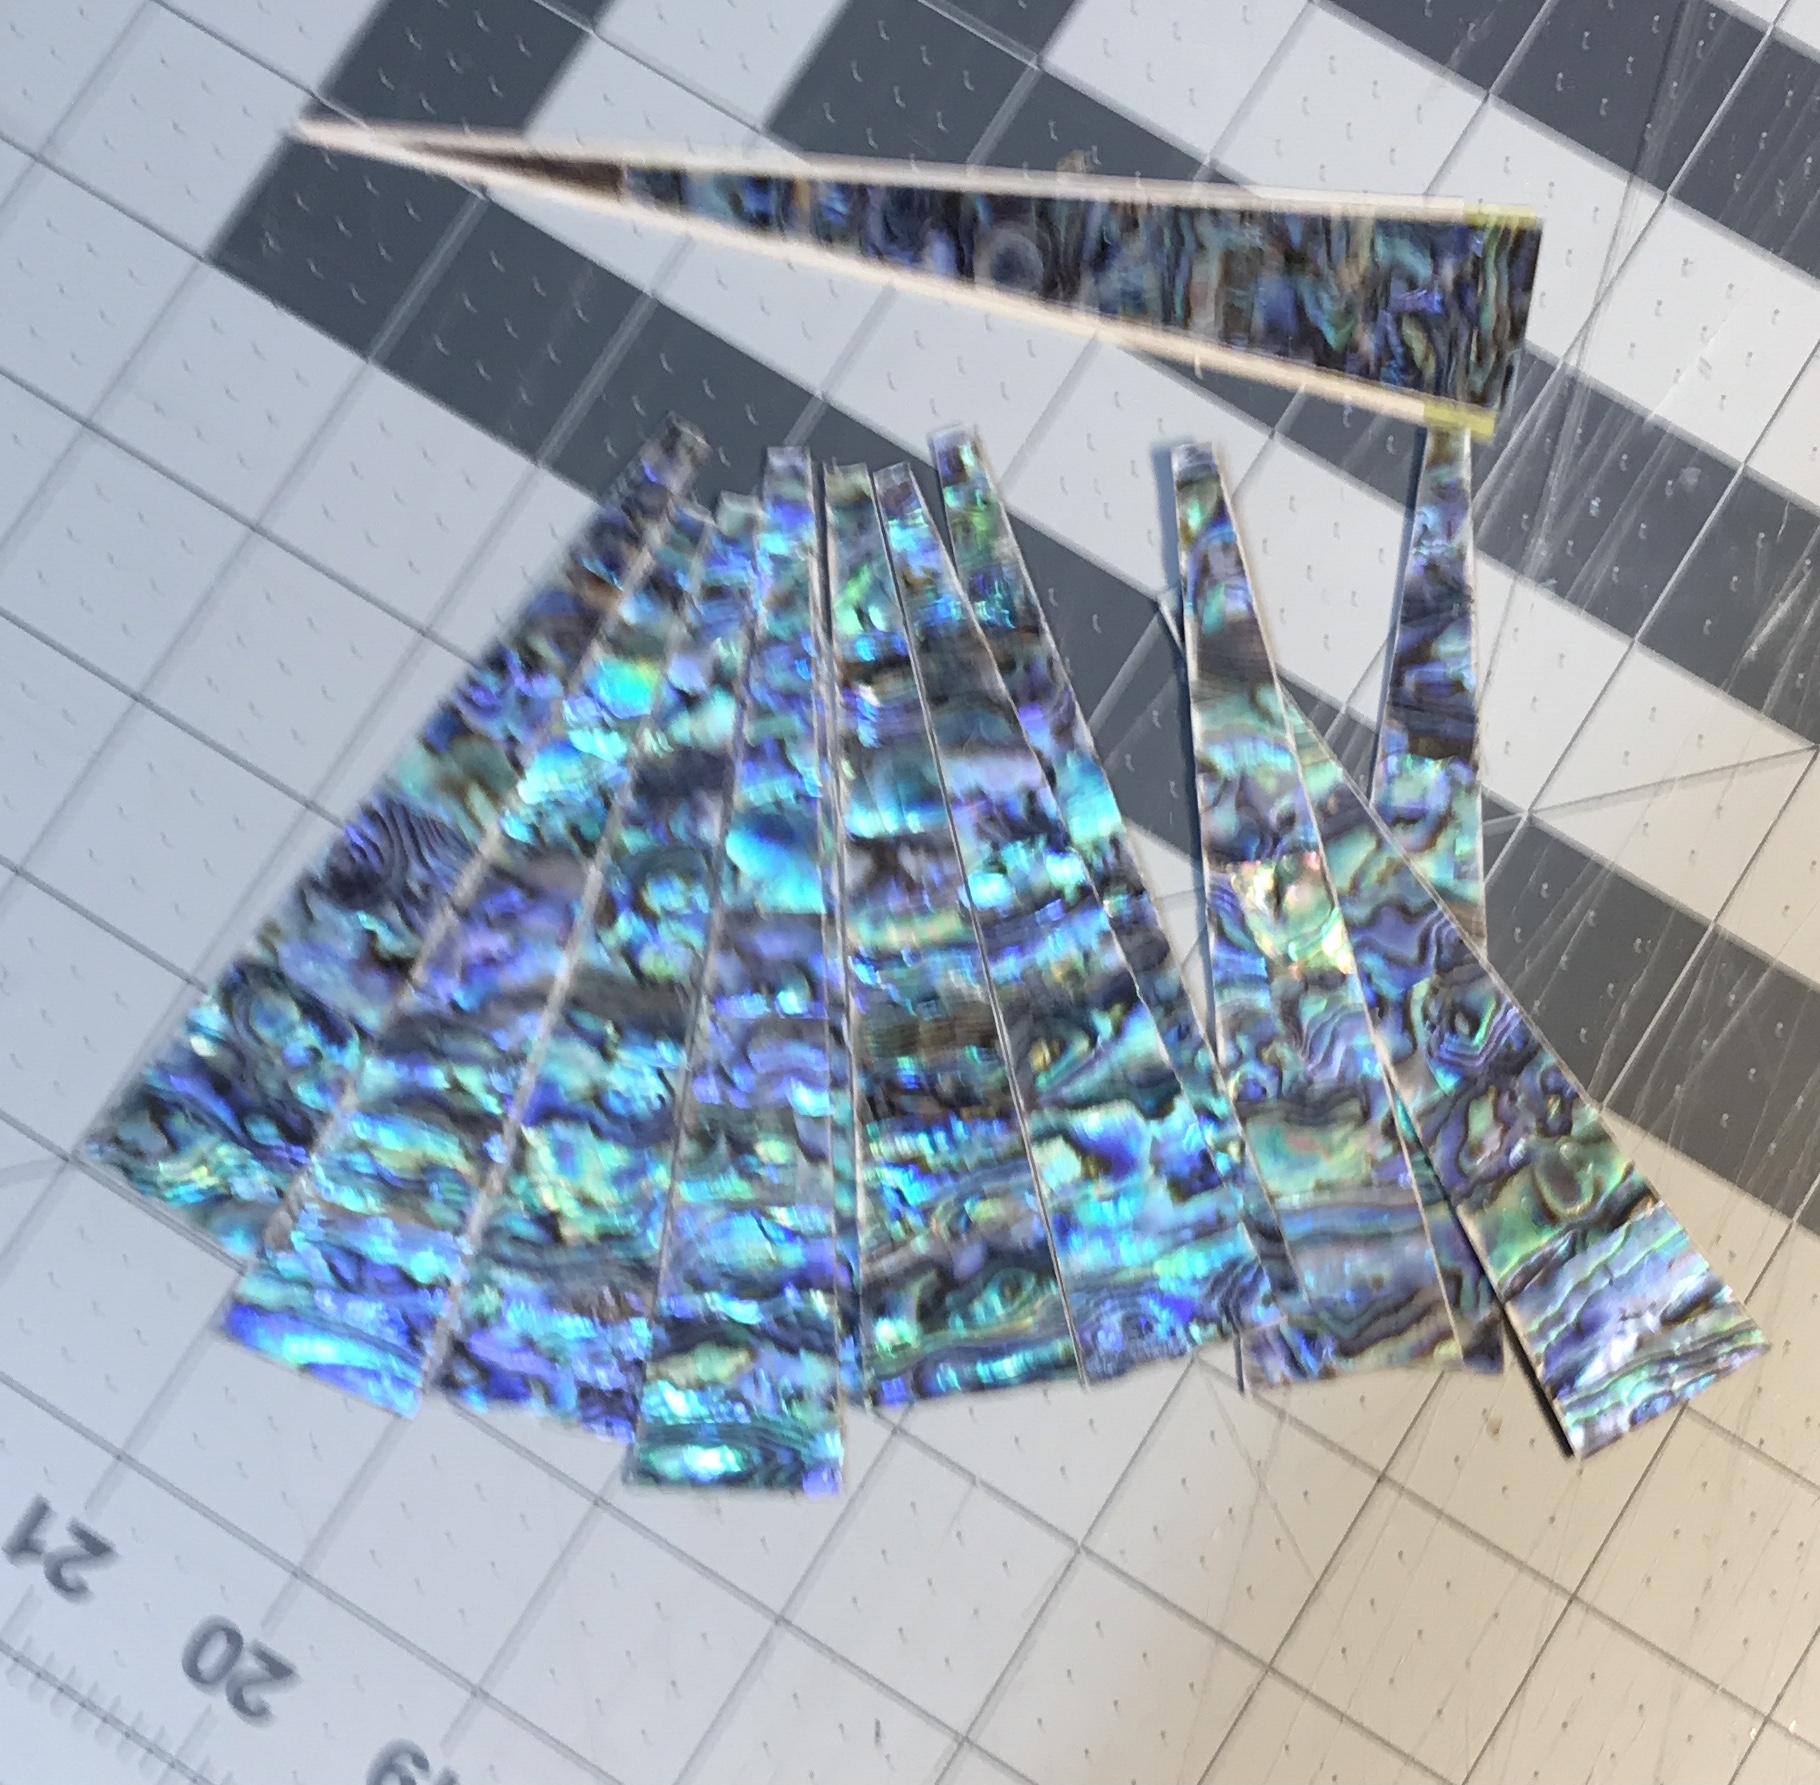
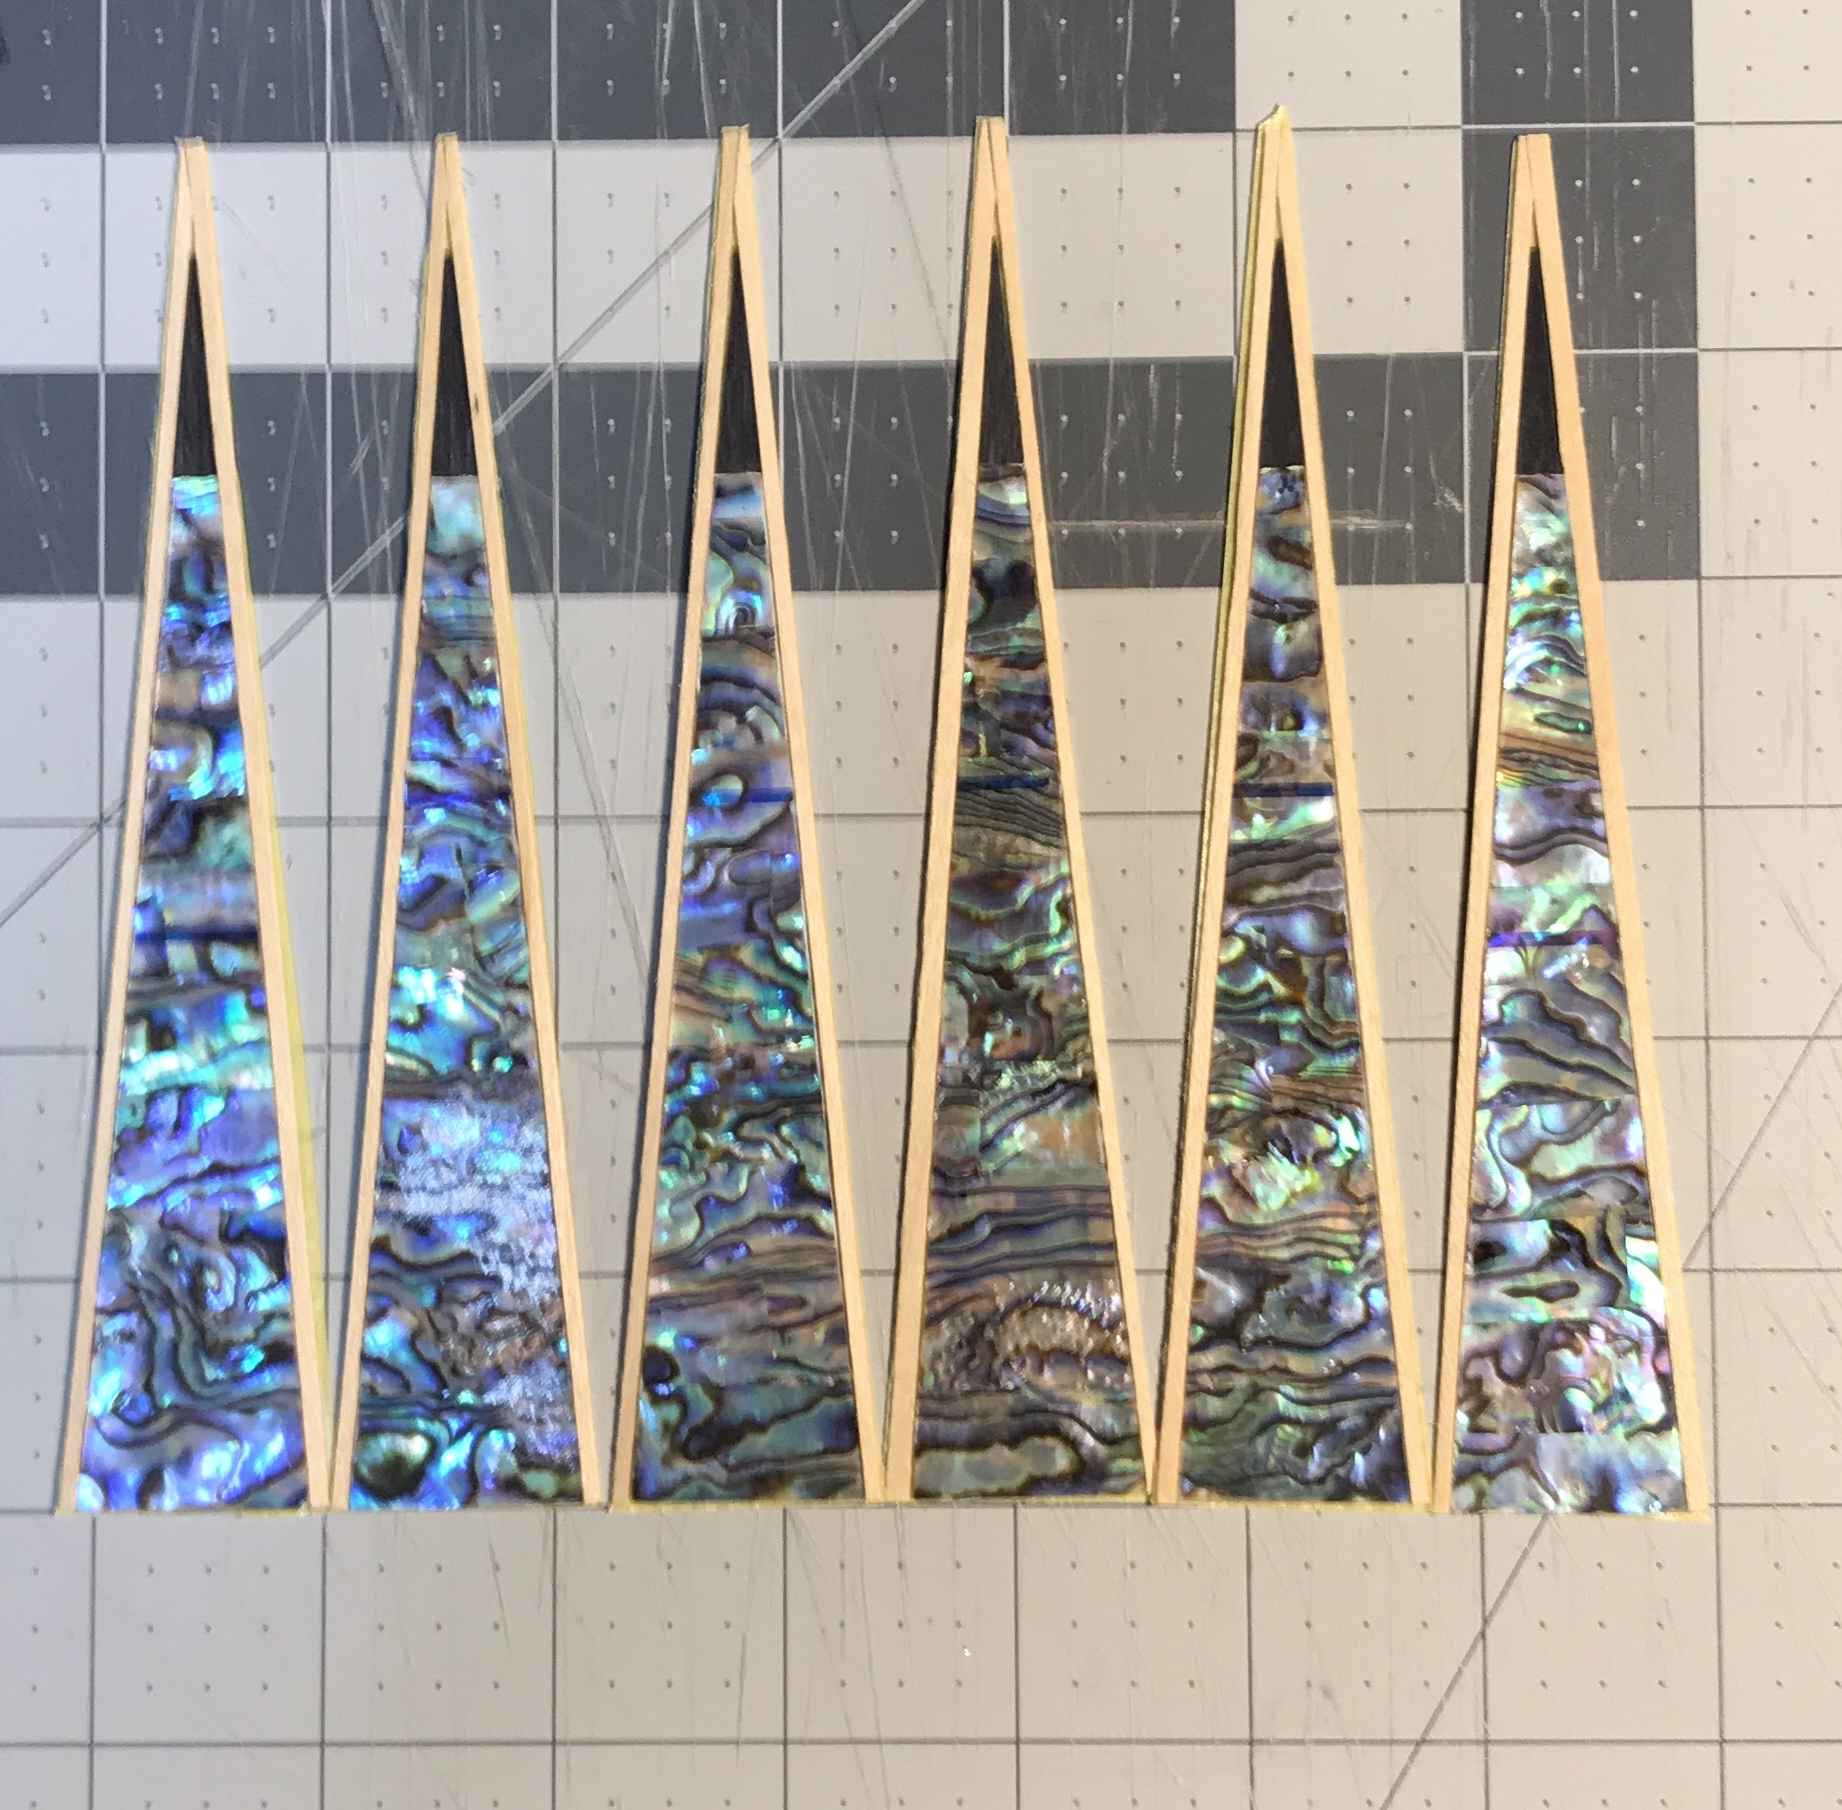
Cutting proceeded apace this morning. Either fifteen heavy cuts or thirty lighter cuts were needed to cut each triangle free. The tips were cut off leaving 4 1/2" of truncated triangle. The lighter cuts were easier on the hands. The blade needs to be changed more frequently than every six triangles which is about where it was replaced. The photo below shows the first twelve truncated triangles as cut.
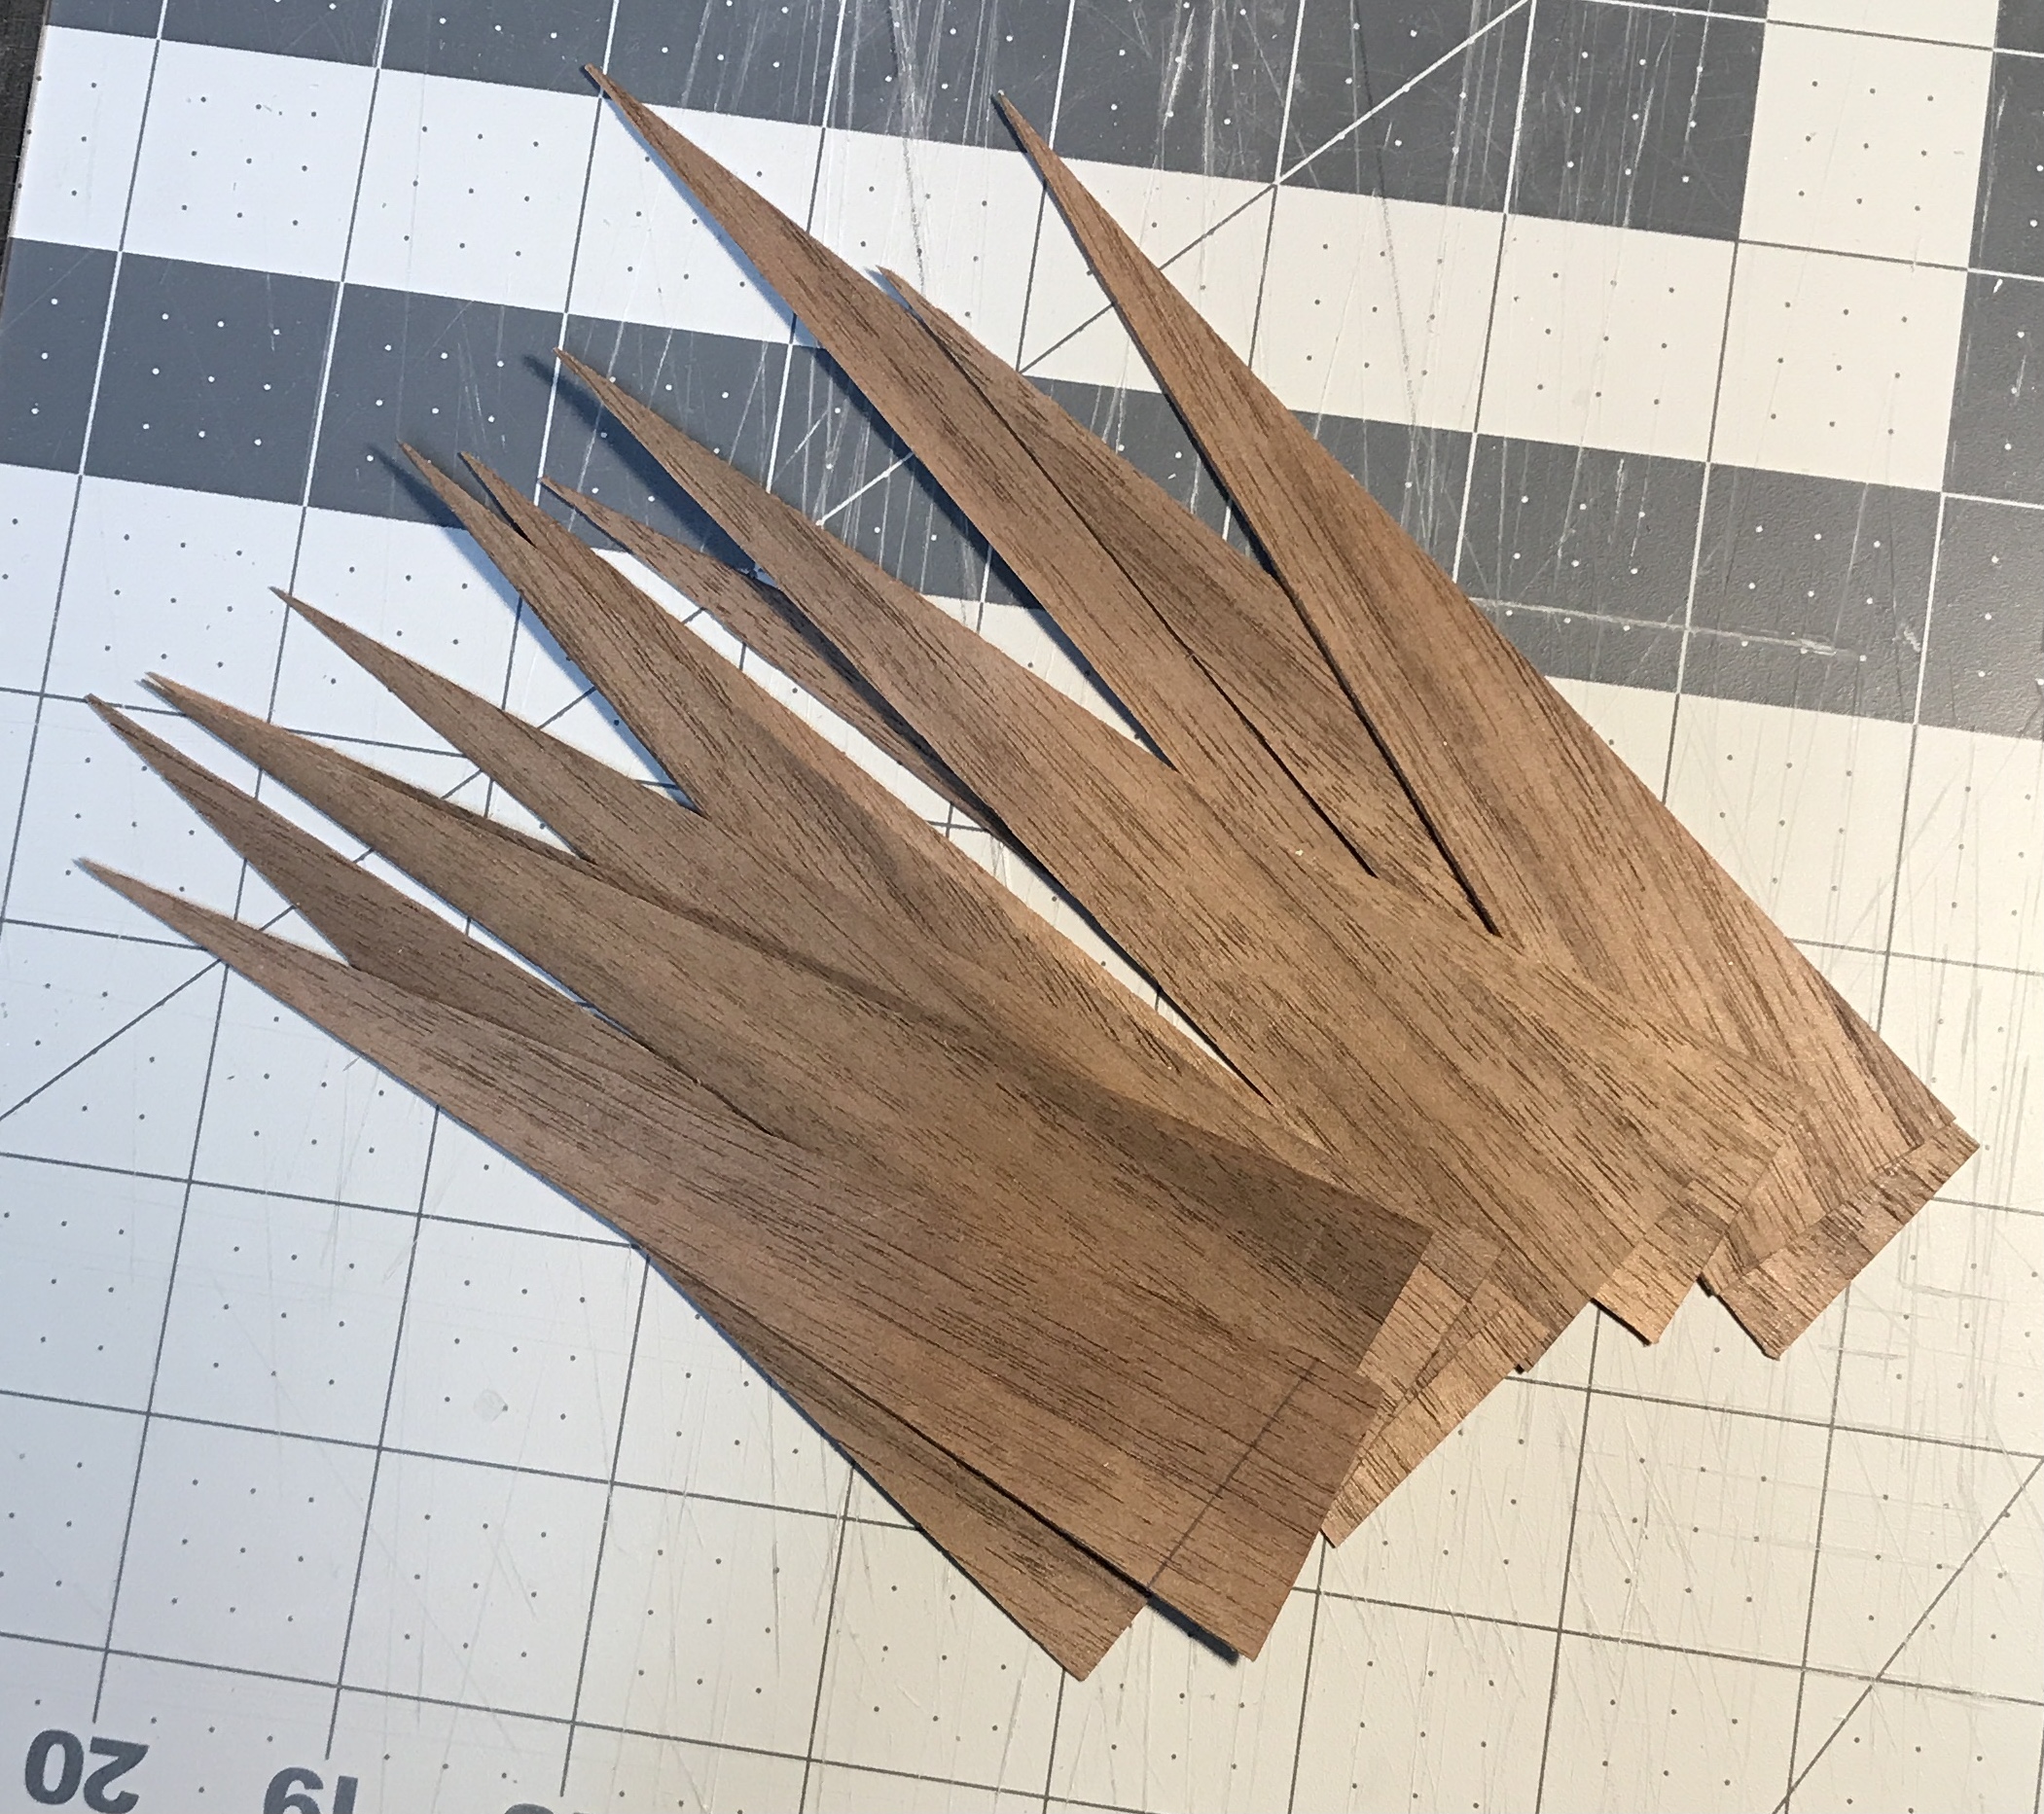
The next step was cutting the triangles for the background. A strip of the background veneer was cut to 6" long in the direction of the grain. The first cut was made from one corner to 5/8" deep on the other side. The triangles were then cut alternating the direction of the triangle with each cut. The base width of the triangles was cut to 1 1/4". The twelve triangles are shown below.
The slightly shorter, 1/2", Abalam triangles will be separated from the background triangles with 1/16" strips of off-white maple veneer. The strip jig was set up to cut these strips. A drill bit was used to set the stop straightedge at 0.073". This is 1/16" plus half the width of the X-acto blade. The square was pressed down on the veneer and three light cuts usually were sufficient to free the thin strip. The last cut put enough pressure on the stop to move it slightly, so its position was reset between strips. The twelve 15" long strips are shown below next to the cutting setup photo.
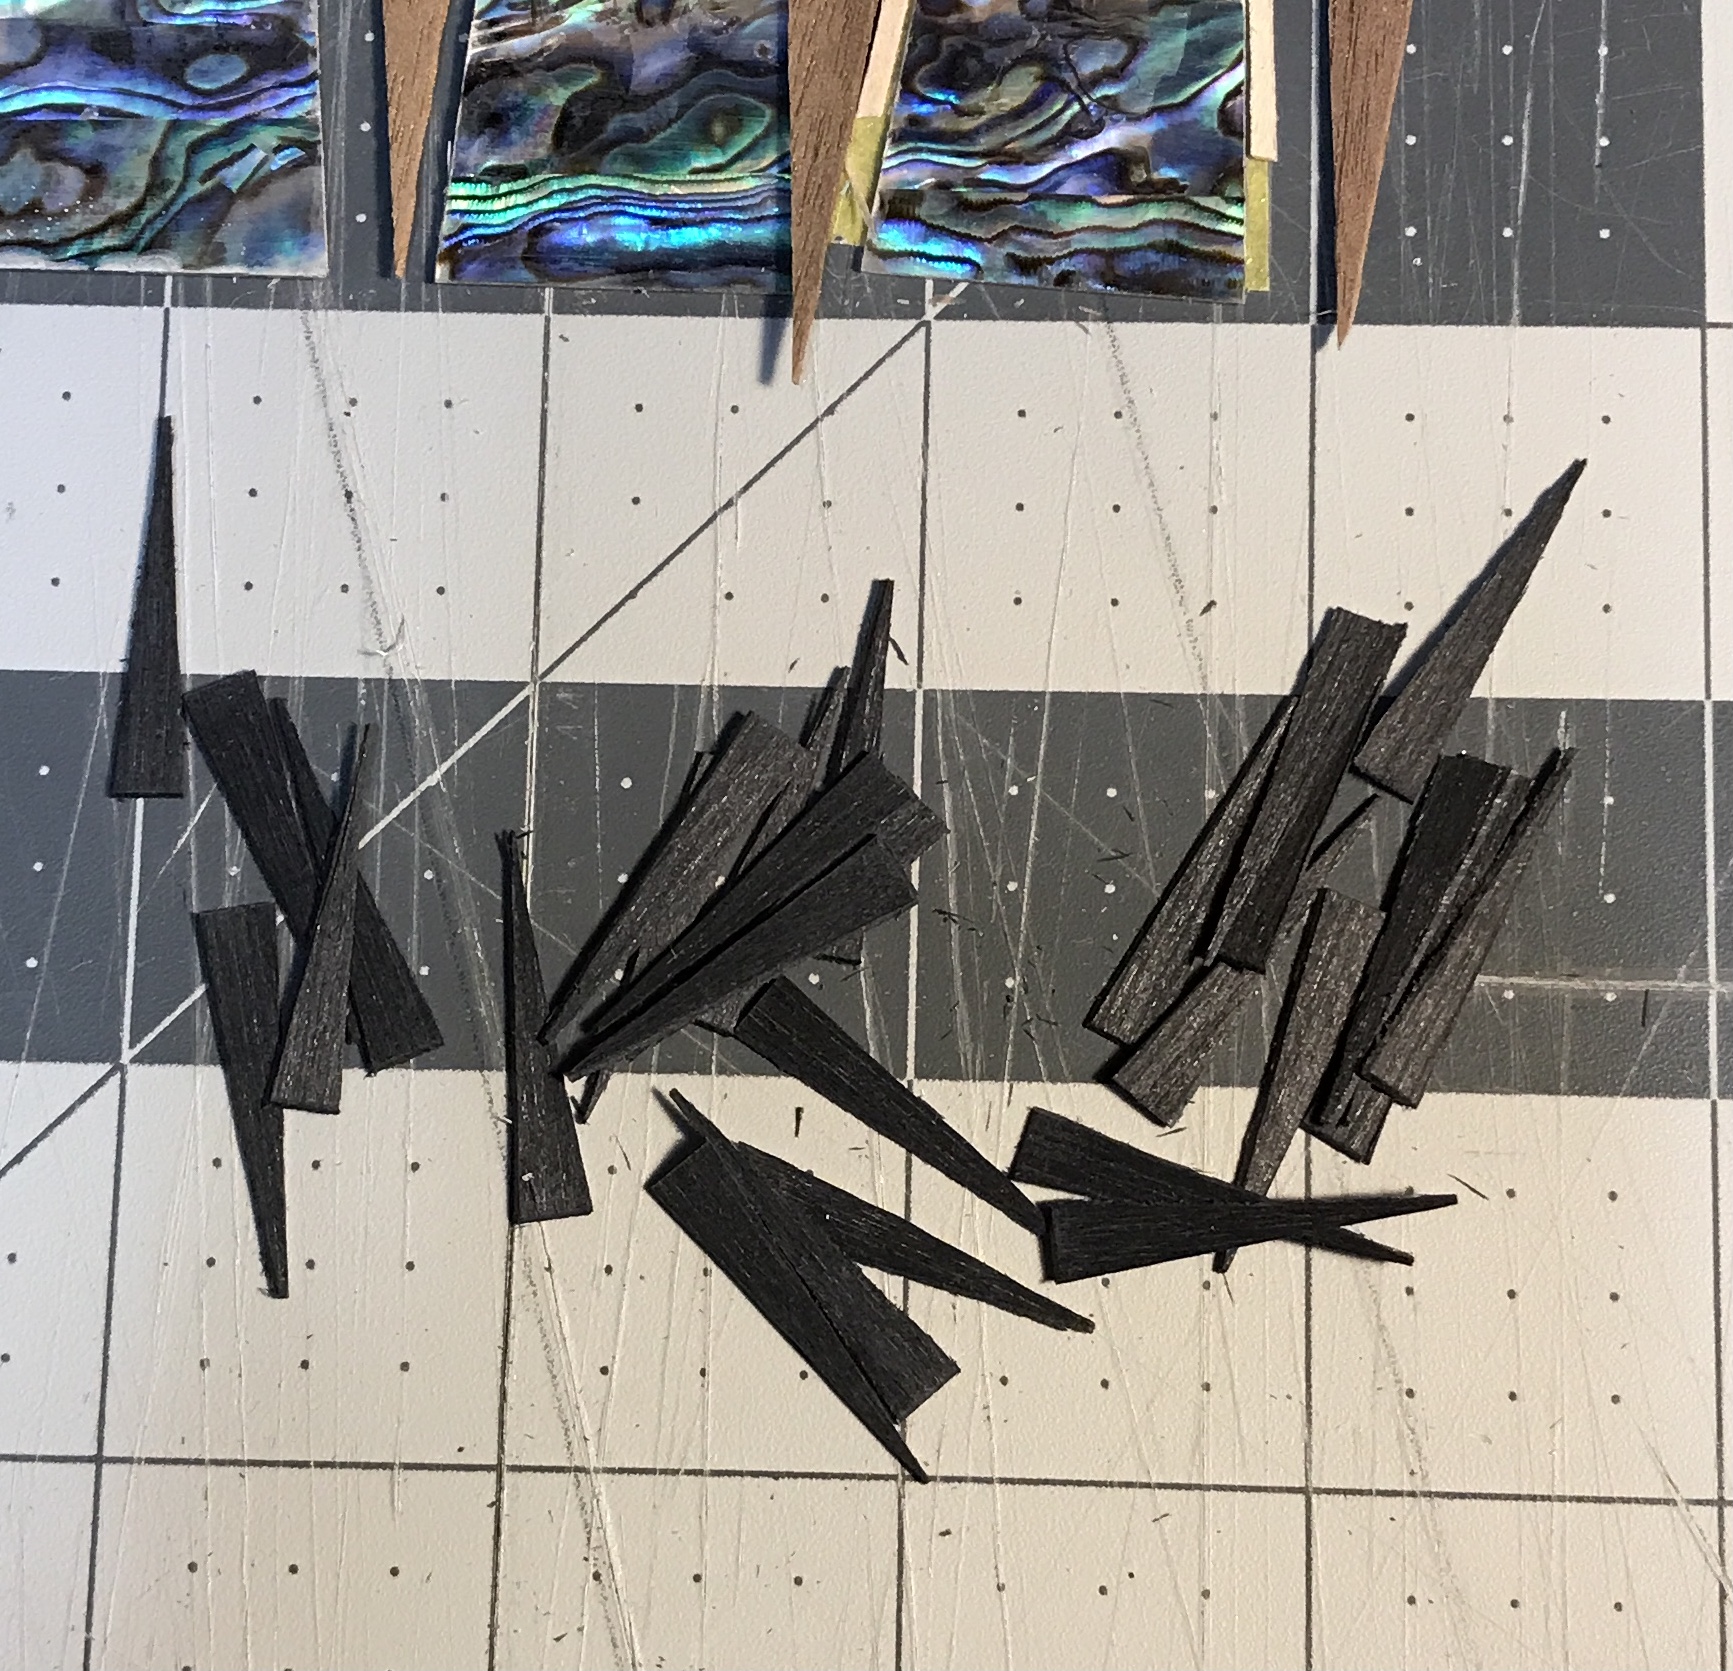
Tiny triangles were next. The end of the sheet of black dyed veneer was trimmed perpendicular to one side. A 1" wide section was cut off perpendicular to the grain. The ends of the truncated triangles were calculated to be 0.182" wide. They measured 3/16". The strip of black veneer was aligned with a line on the cutting mat. The straightedge ruler was laid across one corner and 3/32" in from the adjacent corner. This waste triangle was cut off. The next cut was made from one corner to 3/16" from the adjacent corner. This cutting was repeated switching the two corners after each cut. twenty-eight triangles were cut off. Twenty-four are needed, but a few extra never hurt, especially with such small and fragile pieces. The photo below shows the completed triangles needed to complete the tips of the truncated triangles.
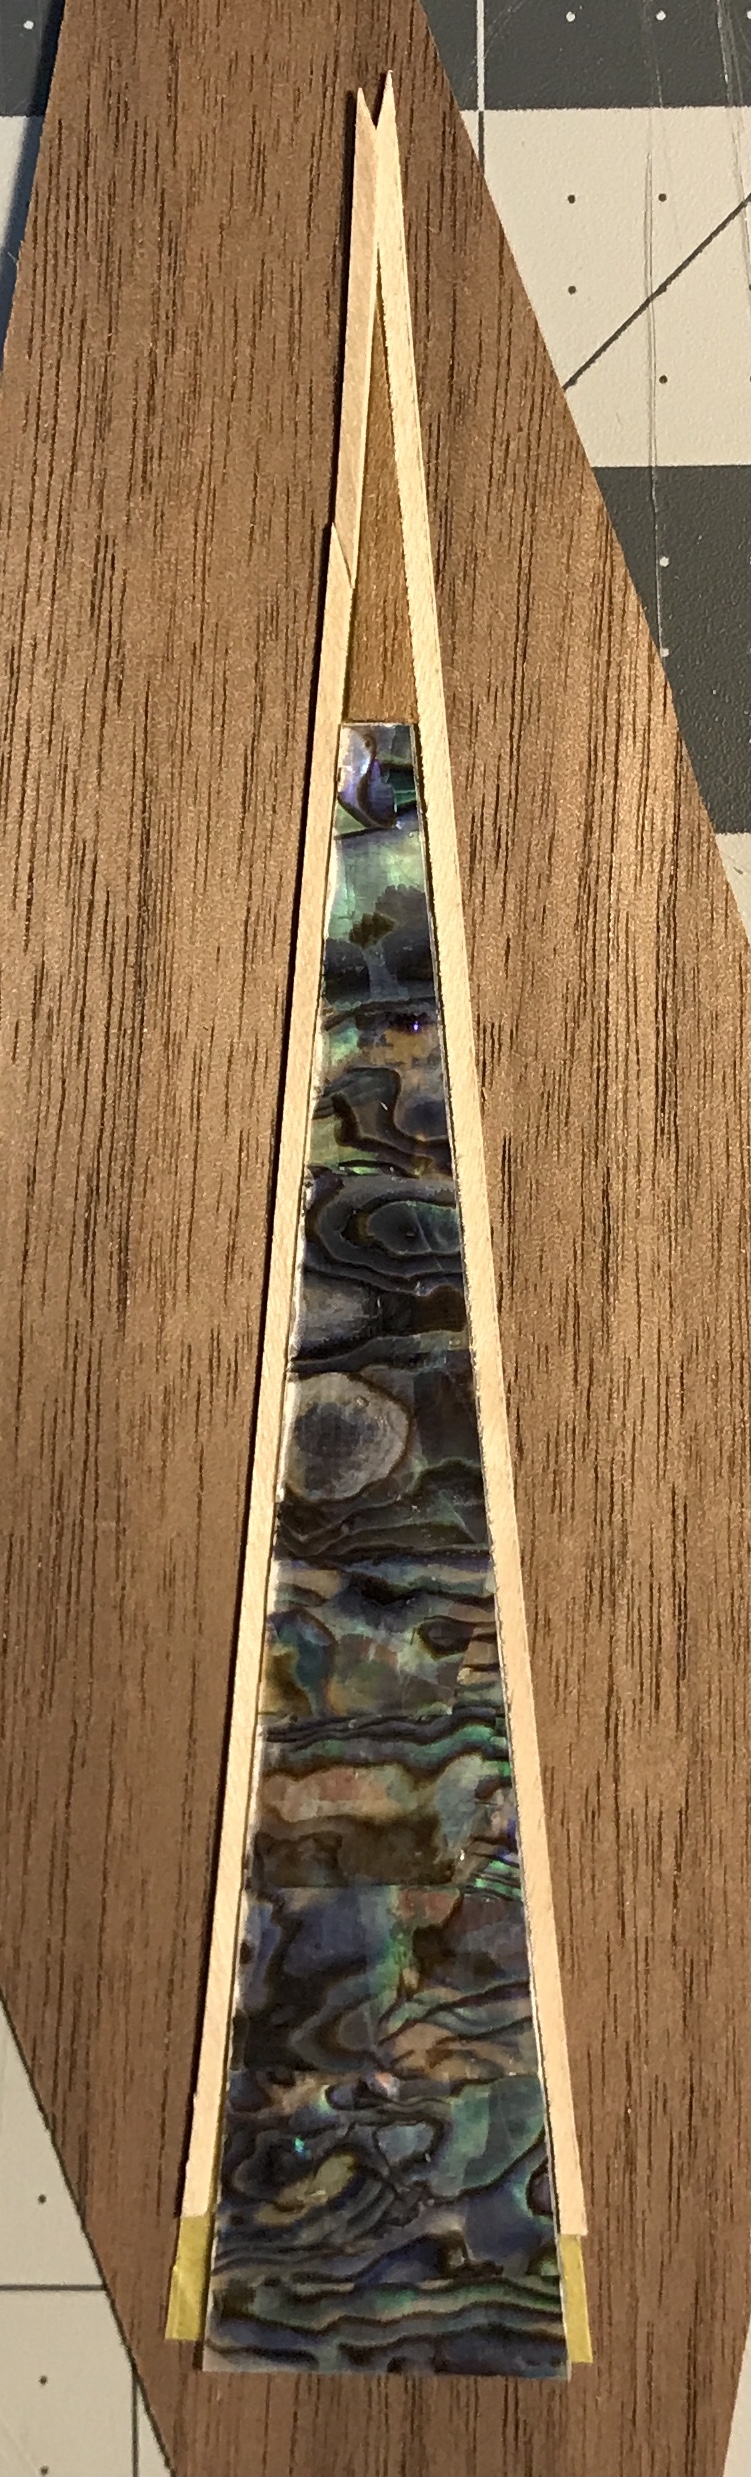
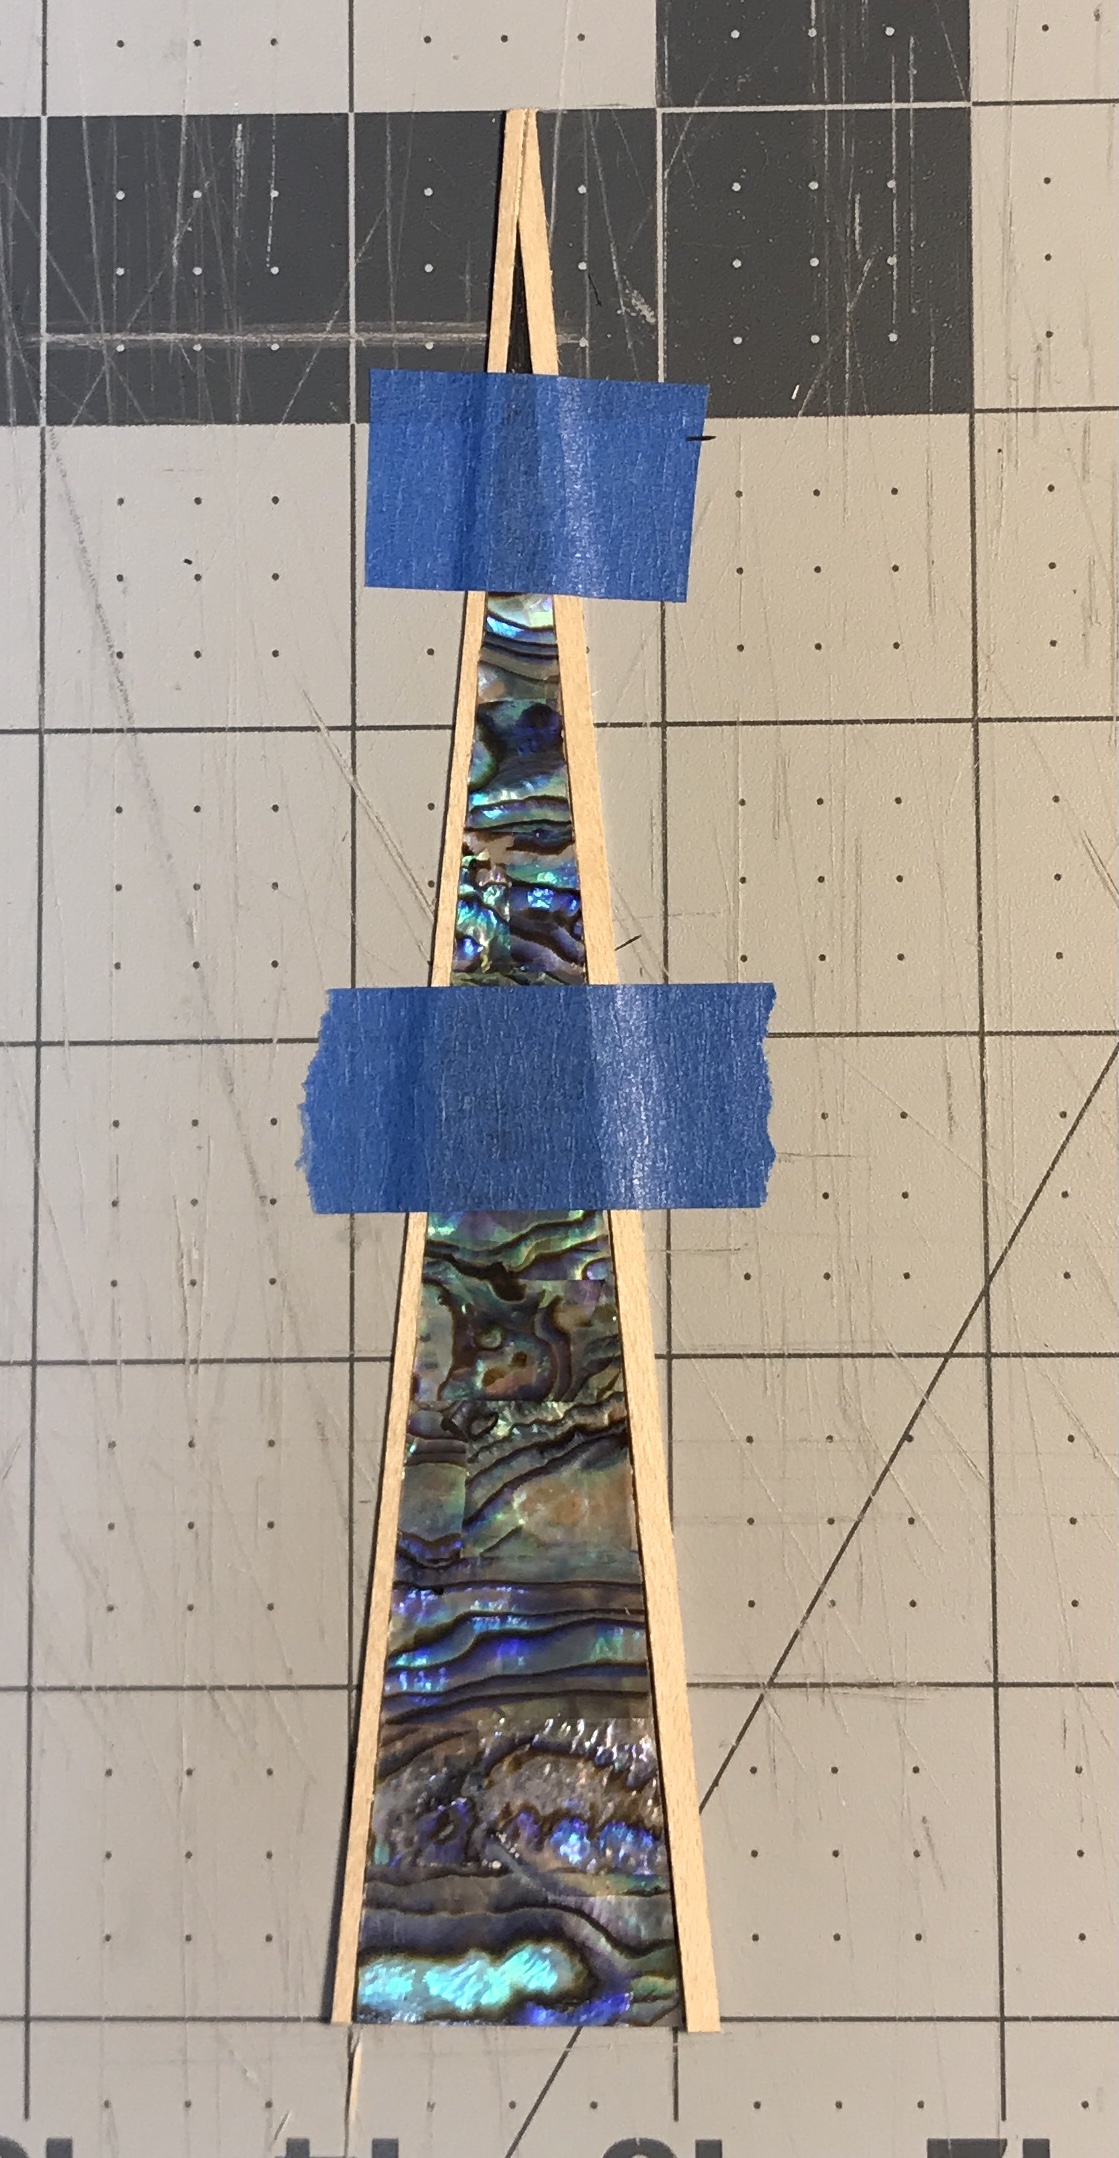
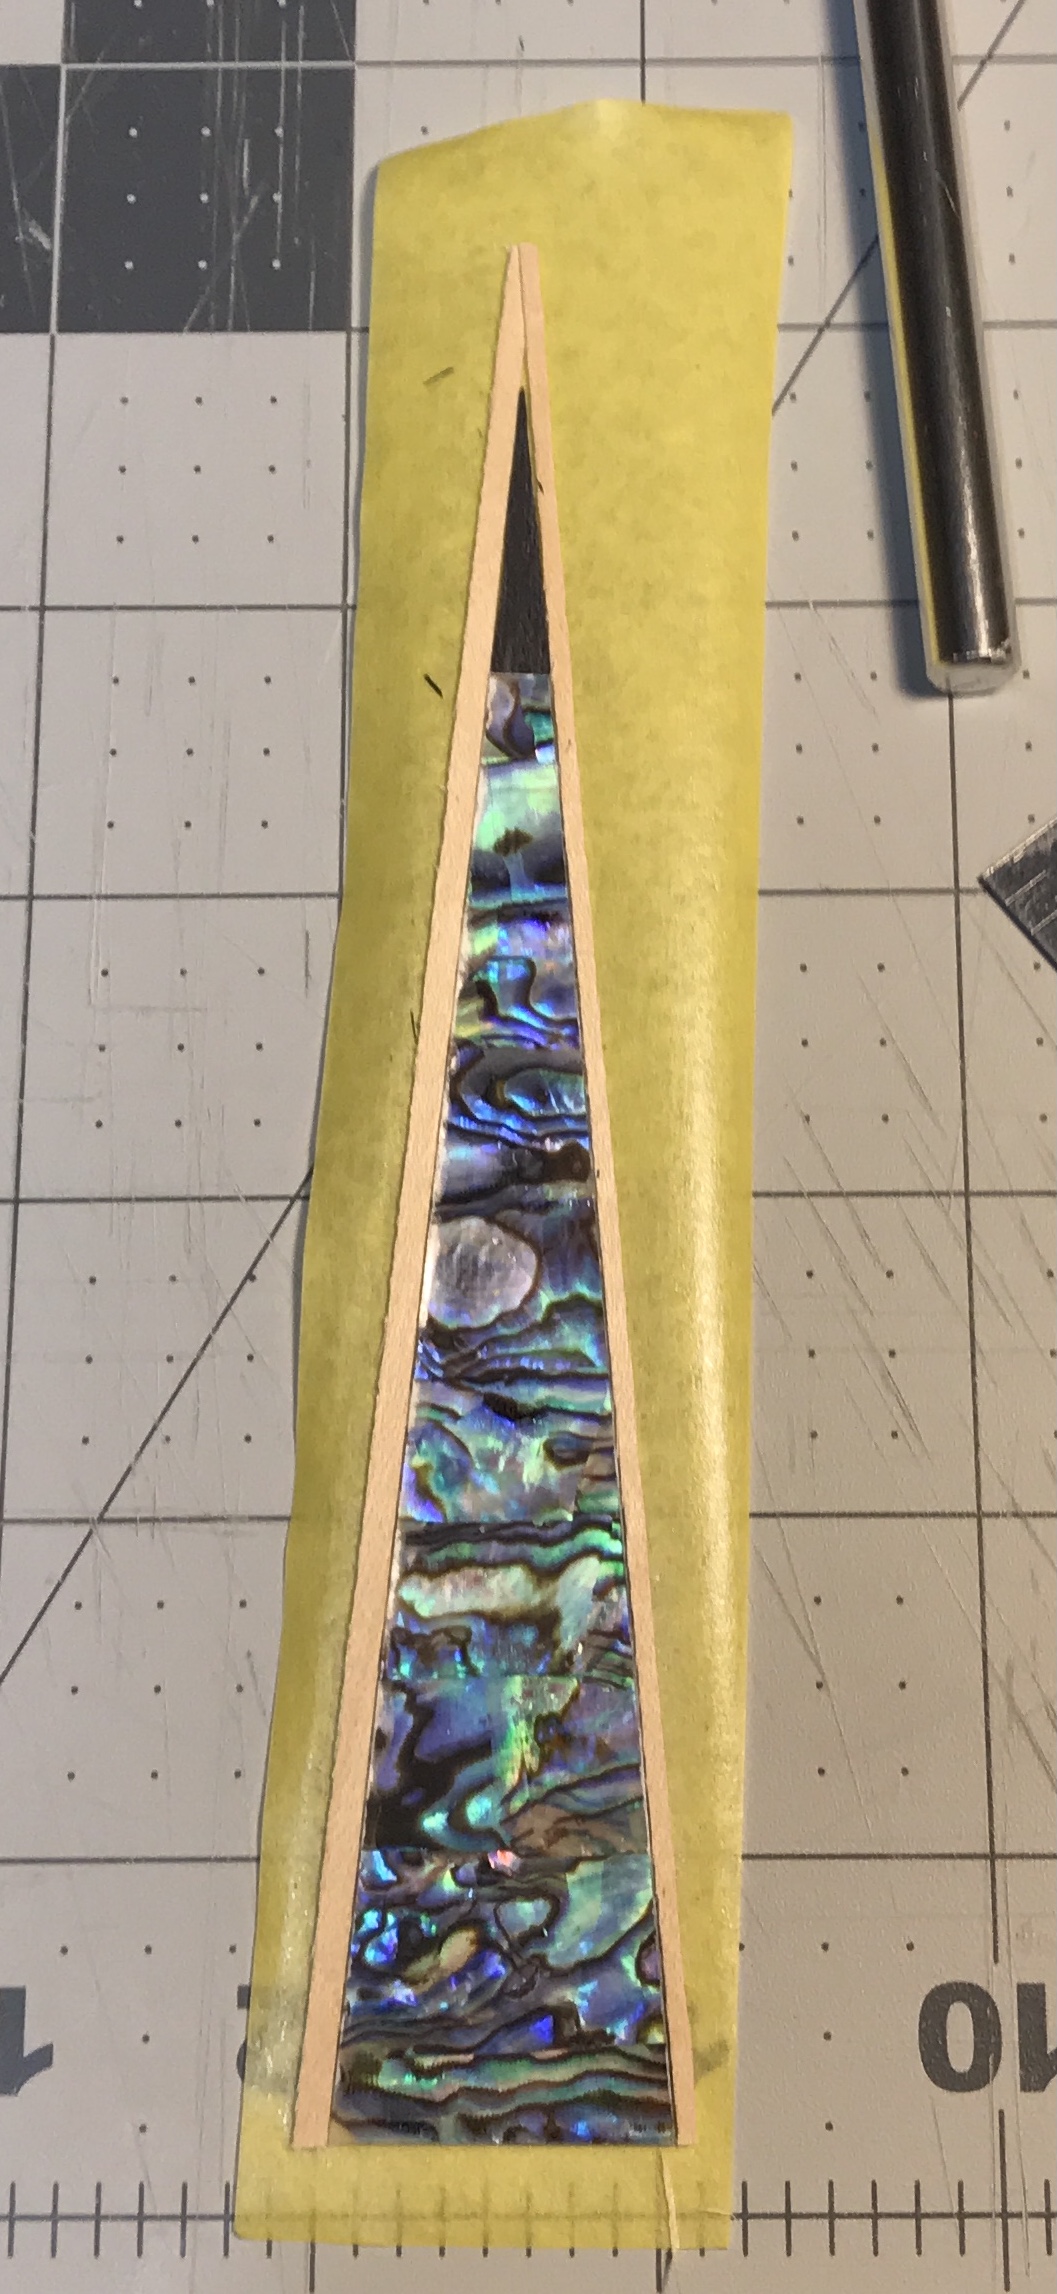
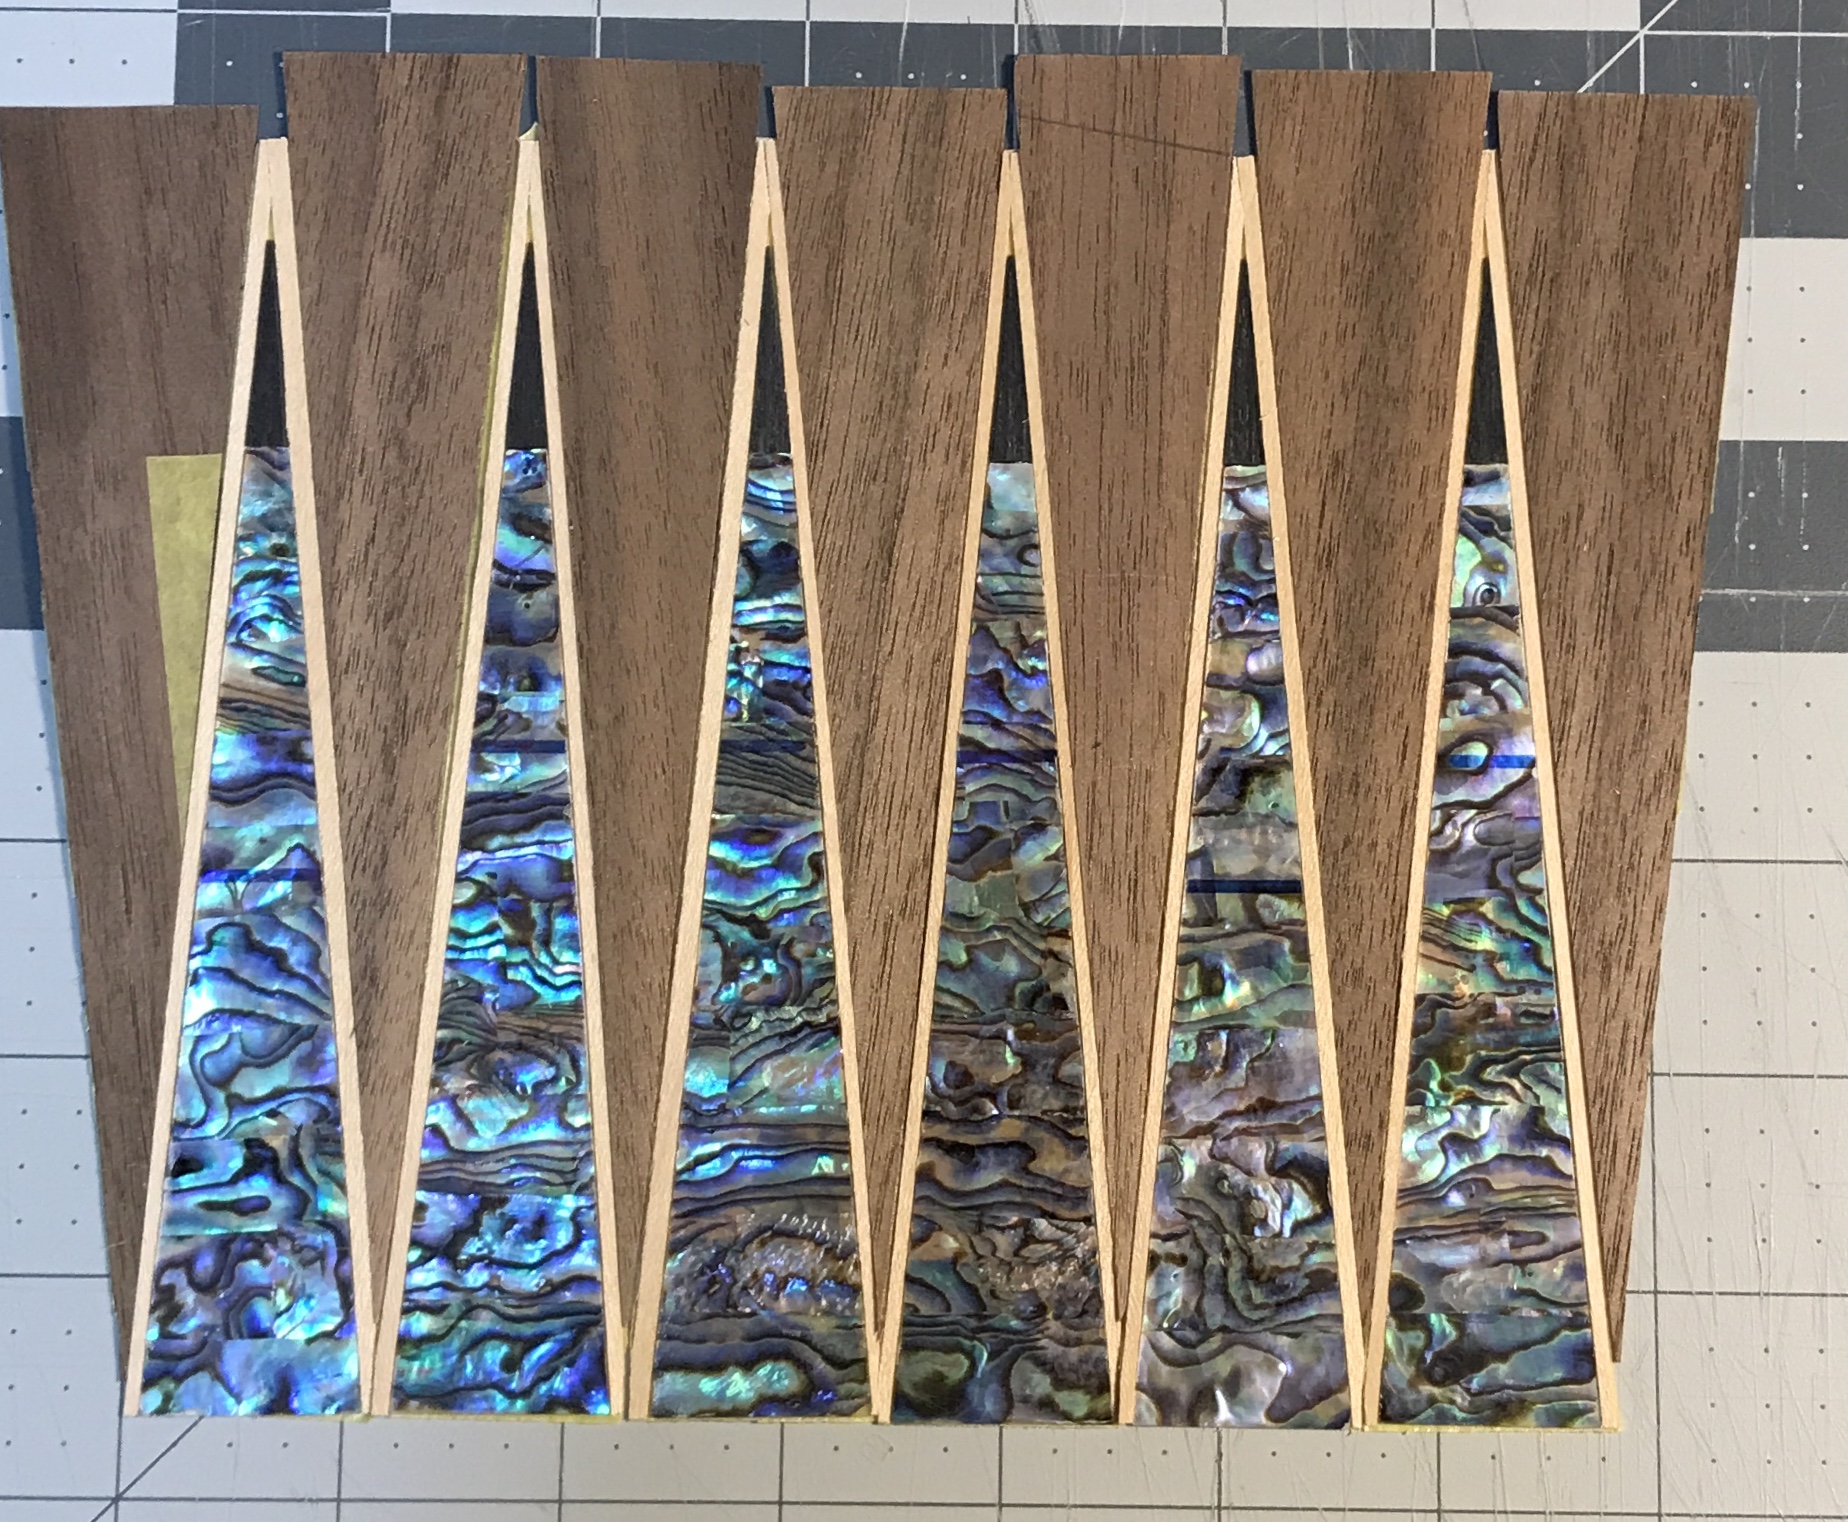
It is time to put an inside playing surface together. The 1/16" strips were cut long but at the correct angle at the bottom. With one strip laying on top of the other beyond the point, the straightedge was laid down and bottom strip was carefully cut at a very acute angle. Two pieces of blue tape held the four parts together during this cut. The blue tape was then replaced with a 7" strip of yellow tape holding everything in place. This shown in the two photos below.
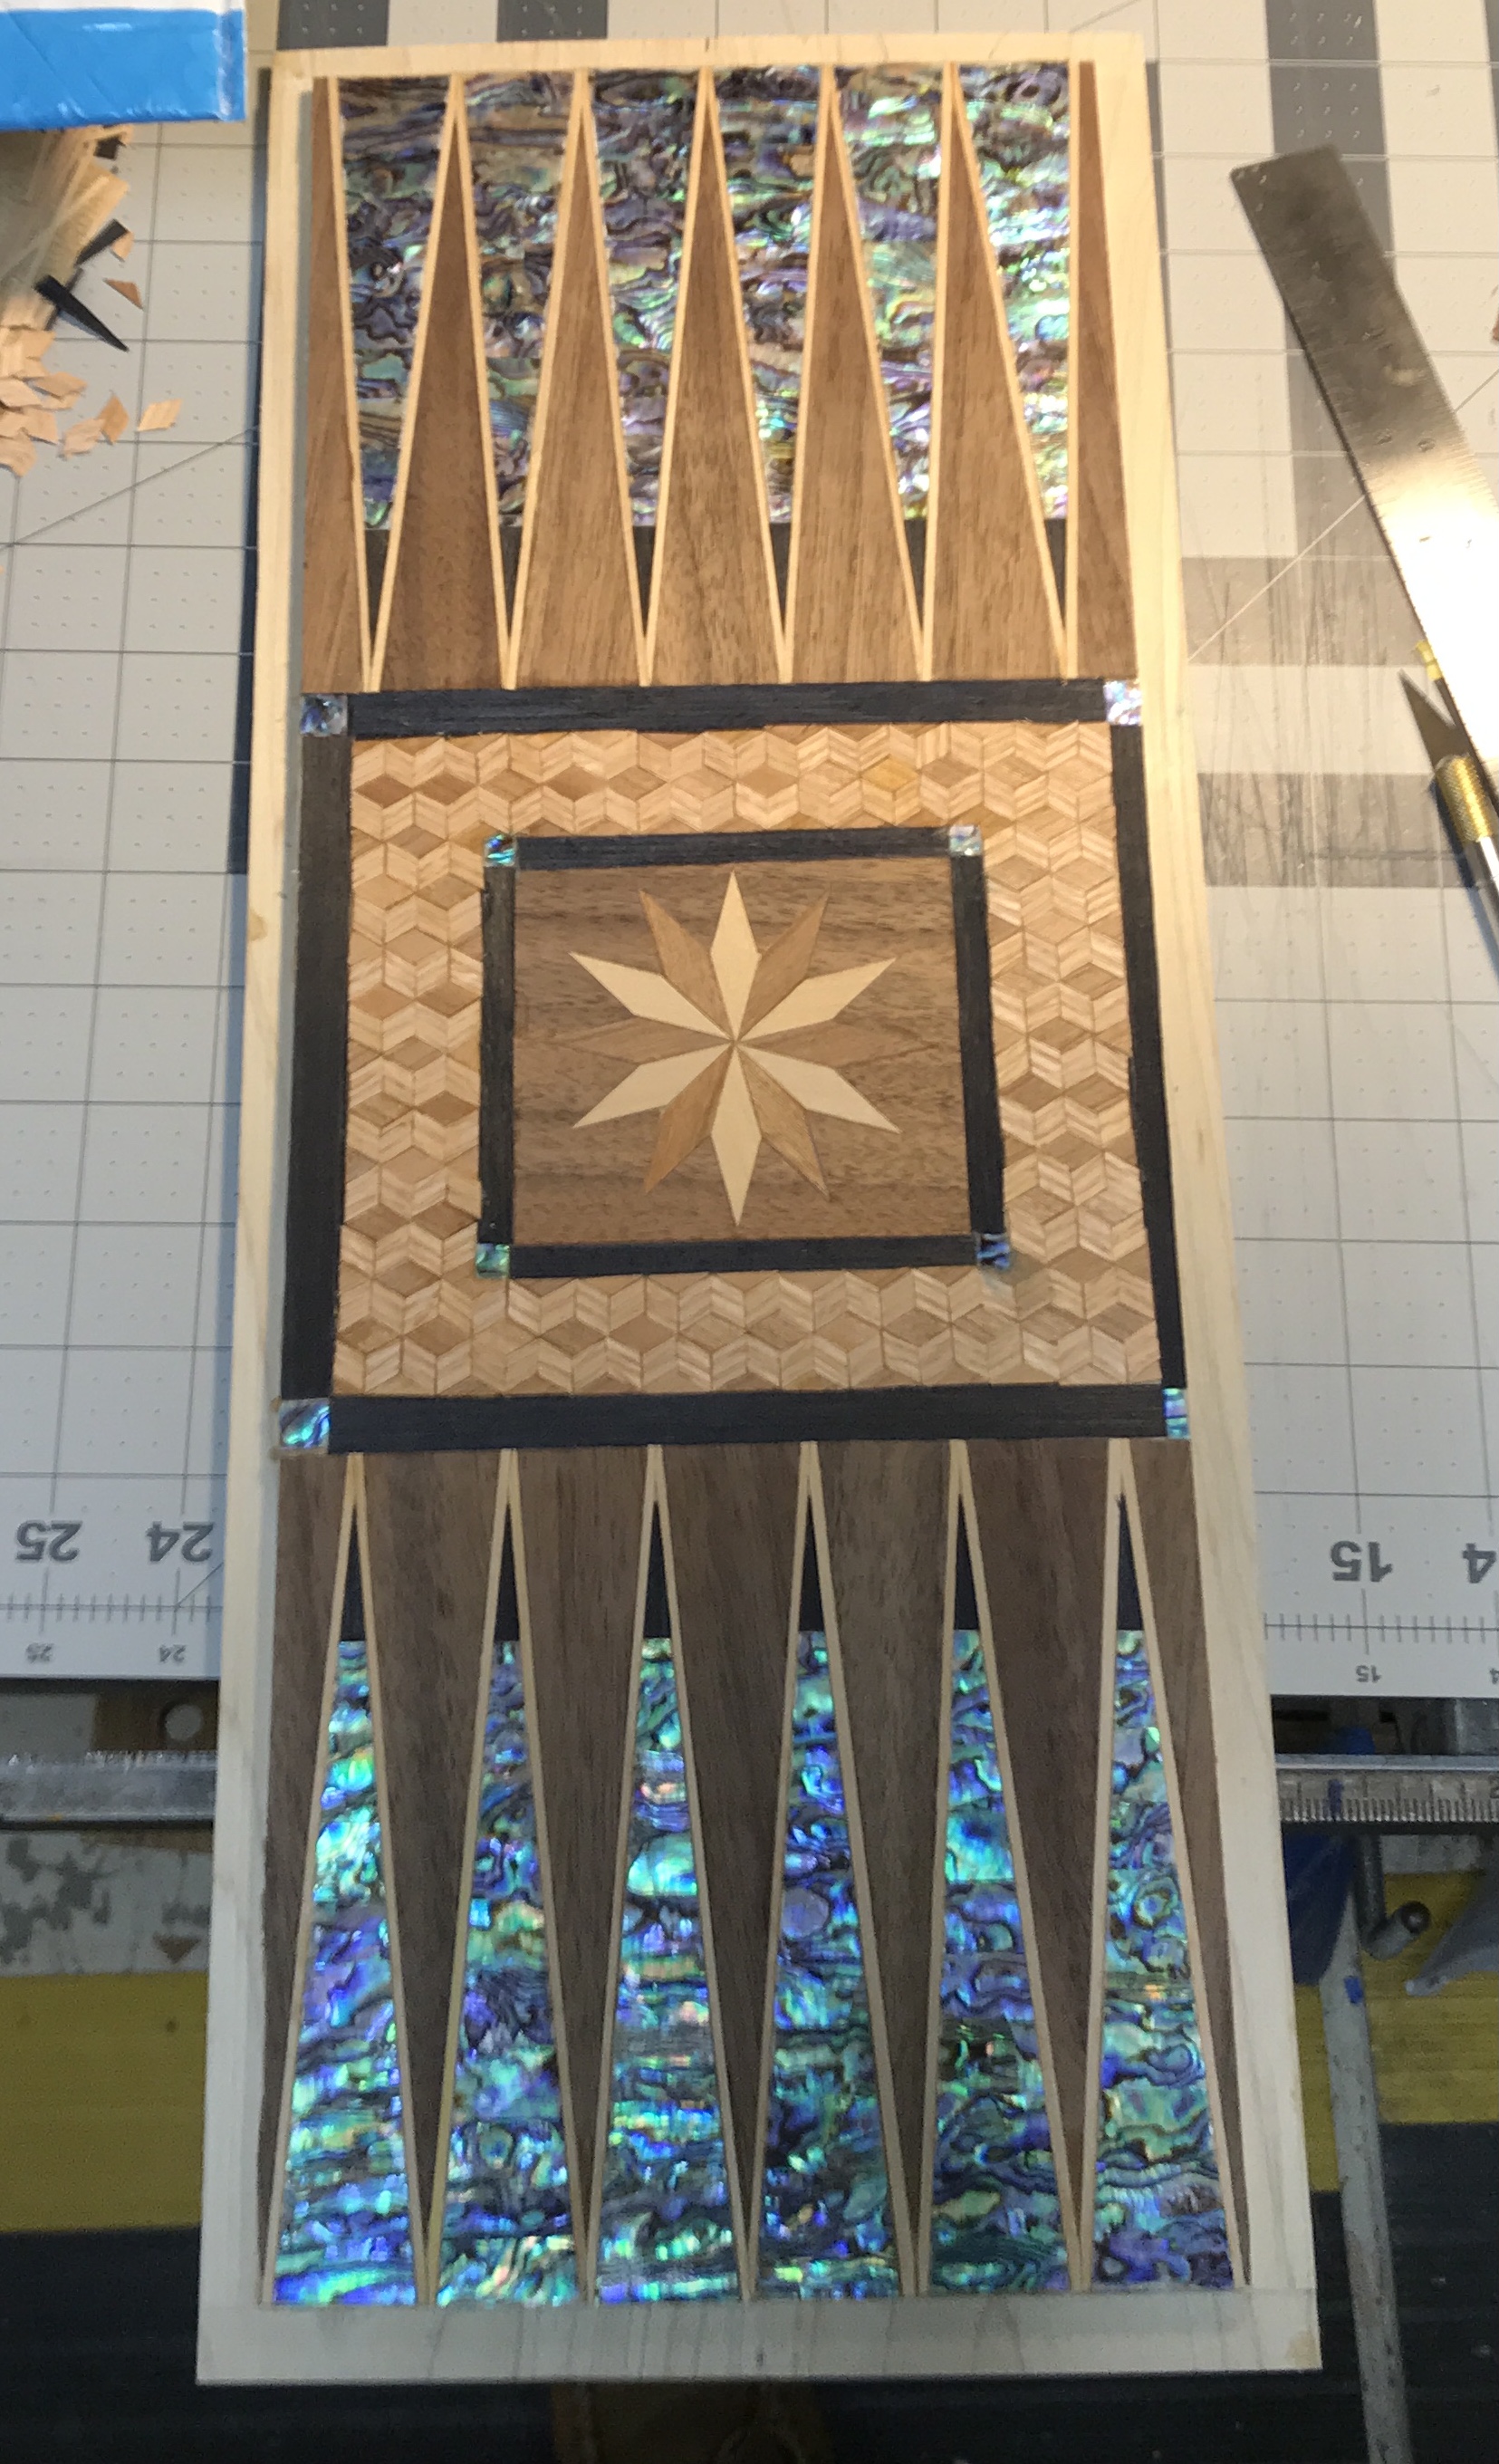
The tape was cut off the sides of each of the playing triangles. The photo below shows the six completely taped playing triangles. Notice the blue marker line across each trapezoidal piece of Abalam. This is the "bad" side and will be glued to the box. I can't tell the difference between the faces, but one side has my mark. The second photo shows the six playing triangles with the background triangles inserted, a rough mockup. It is looking very respectable.
Now was the time to go beyond the mockup and tape the different triangles together. Two problems quickly became apparent. The first was the background triangles don't fit! All of that careful planning, ha ha! They seem to be too wide. The second issue arose when I decided to check the width of the assembled playing triangles. With the corners all touching the width is 7". The inside box face is 6 3/4" wide. This should be a relatively easy fix. The touching corners of the strips just need to be trimmed to bring the triangles closer together. Almost 1/16" needs to be removed at each touching corner. A tougher fix will be either custom fitting each triangle or cutting them to a slightly smaller angle.
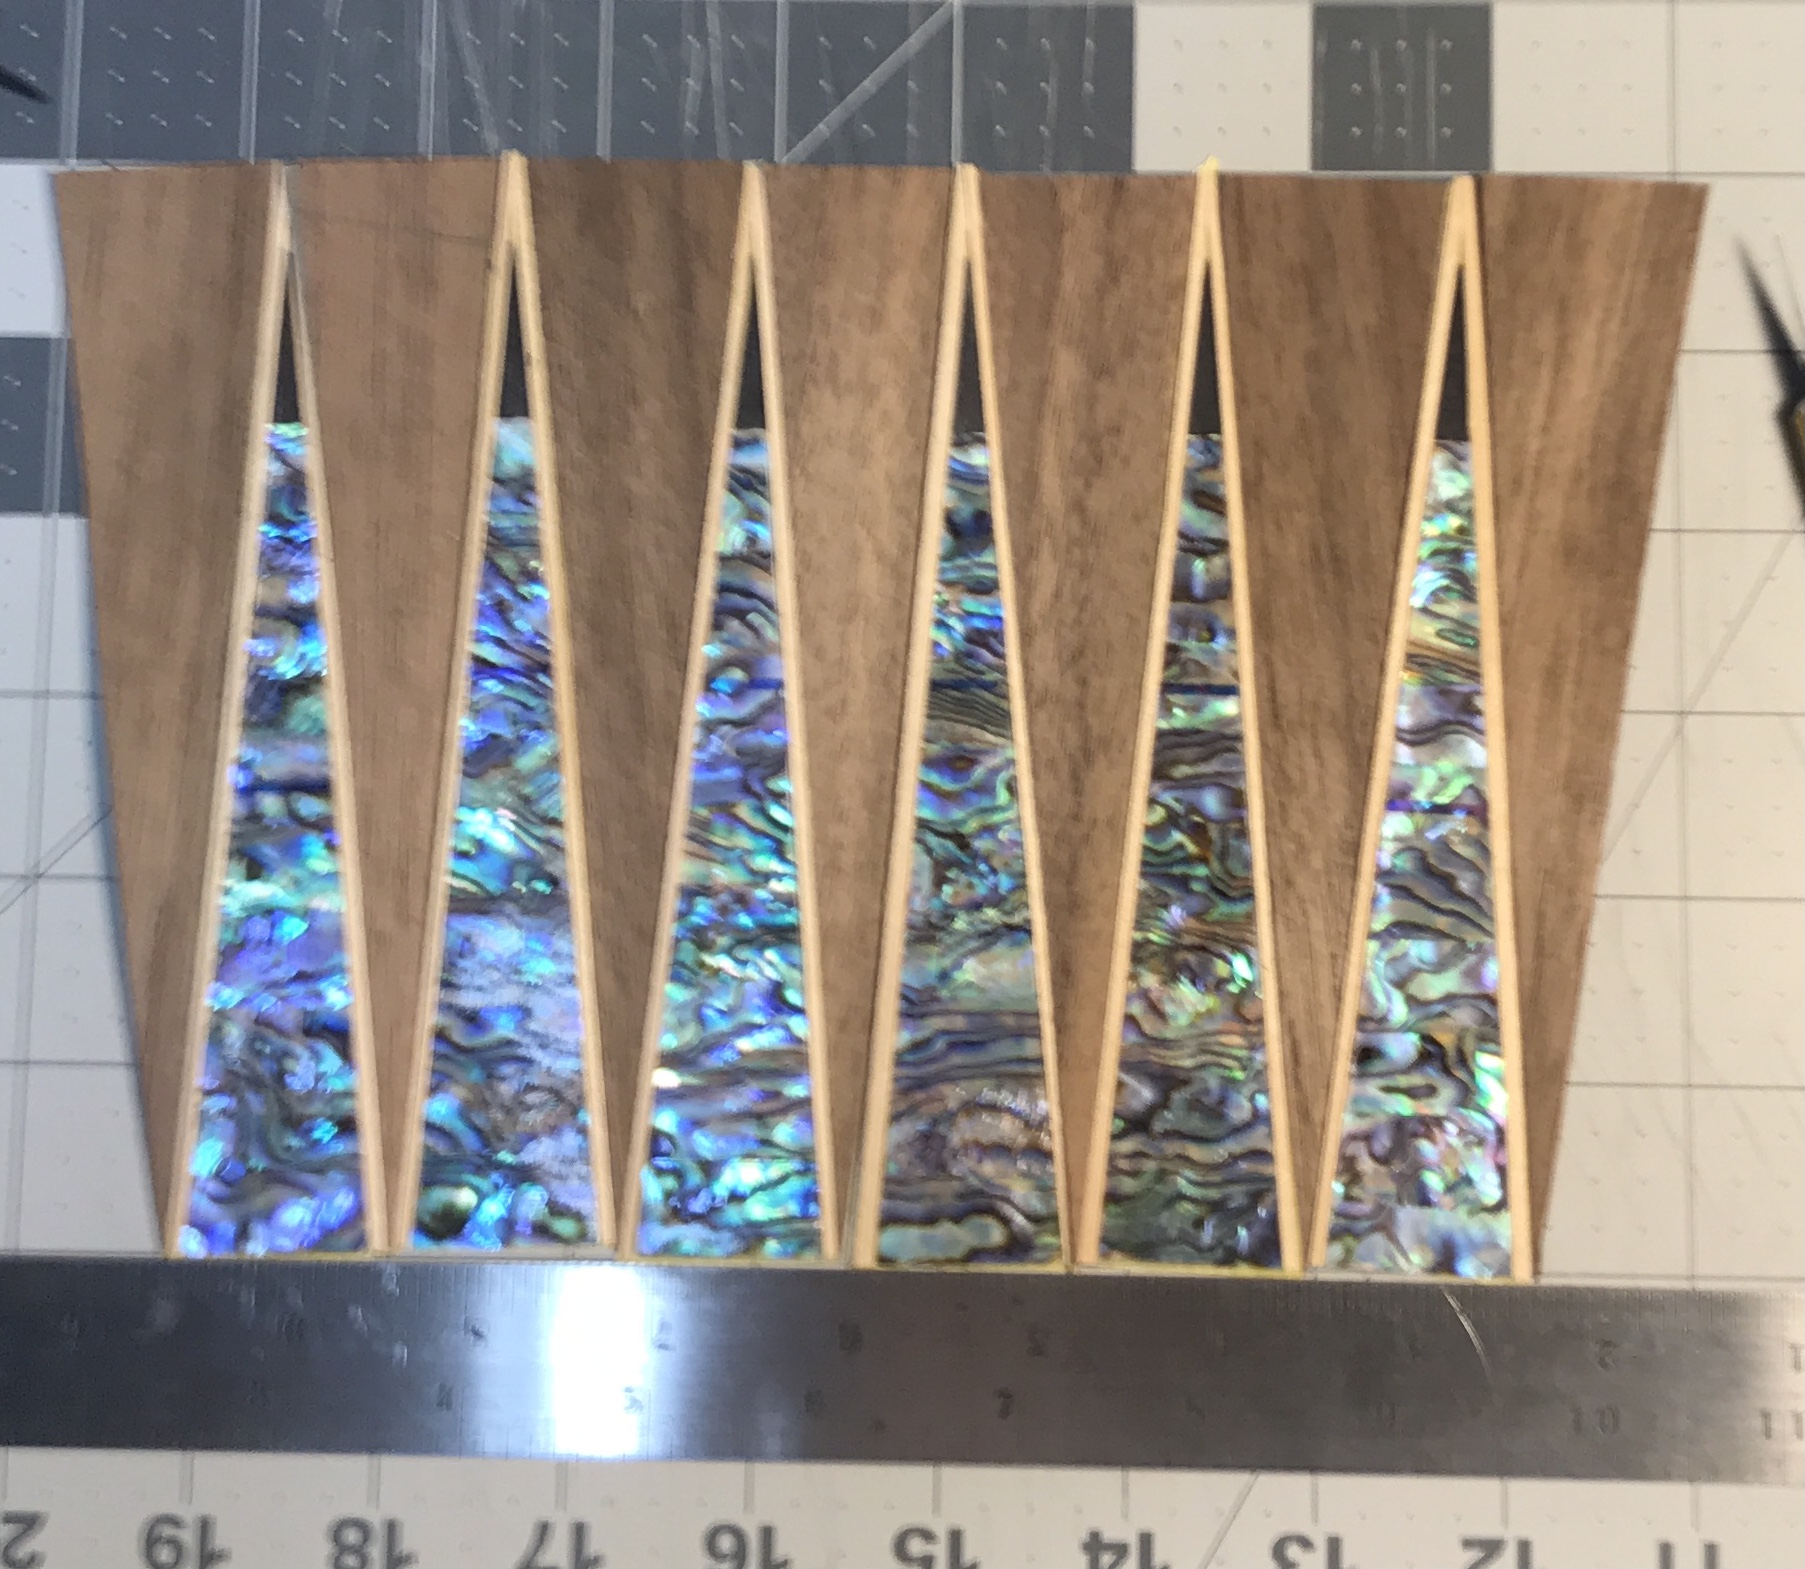
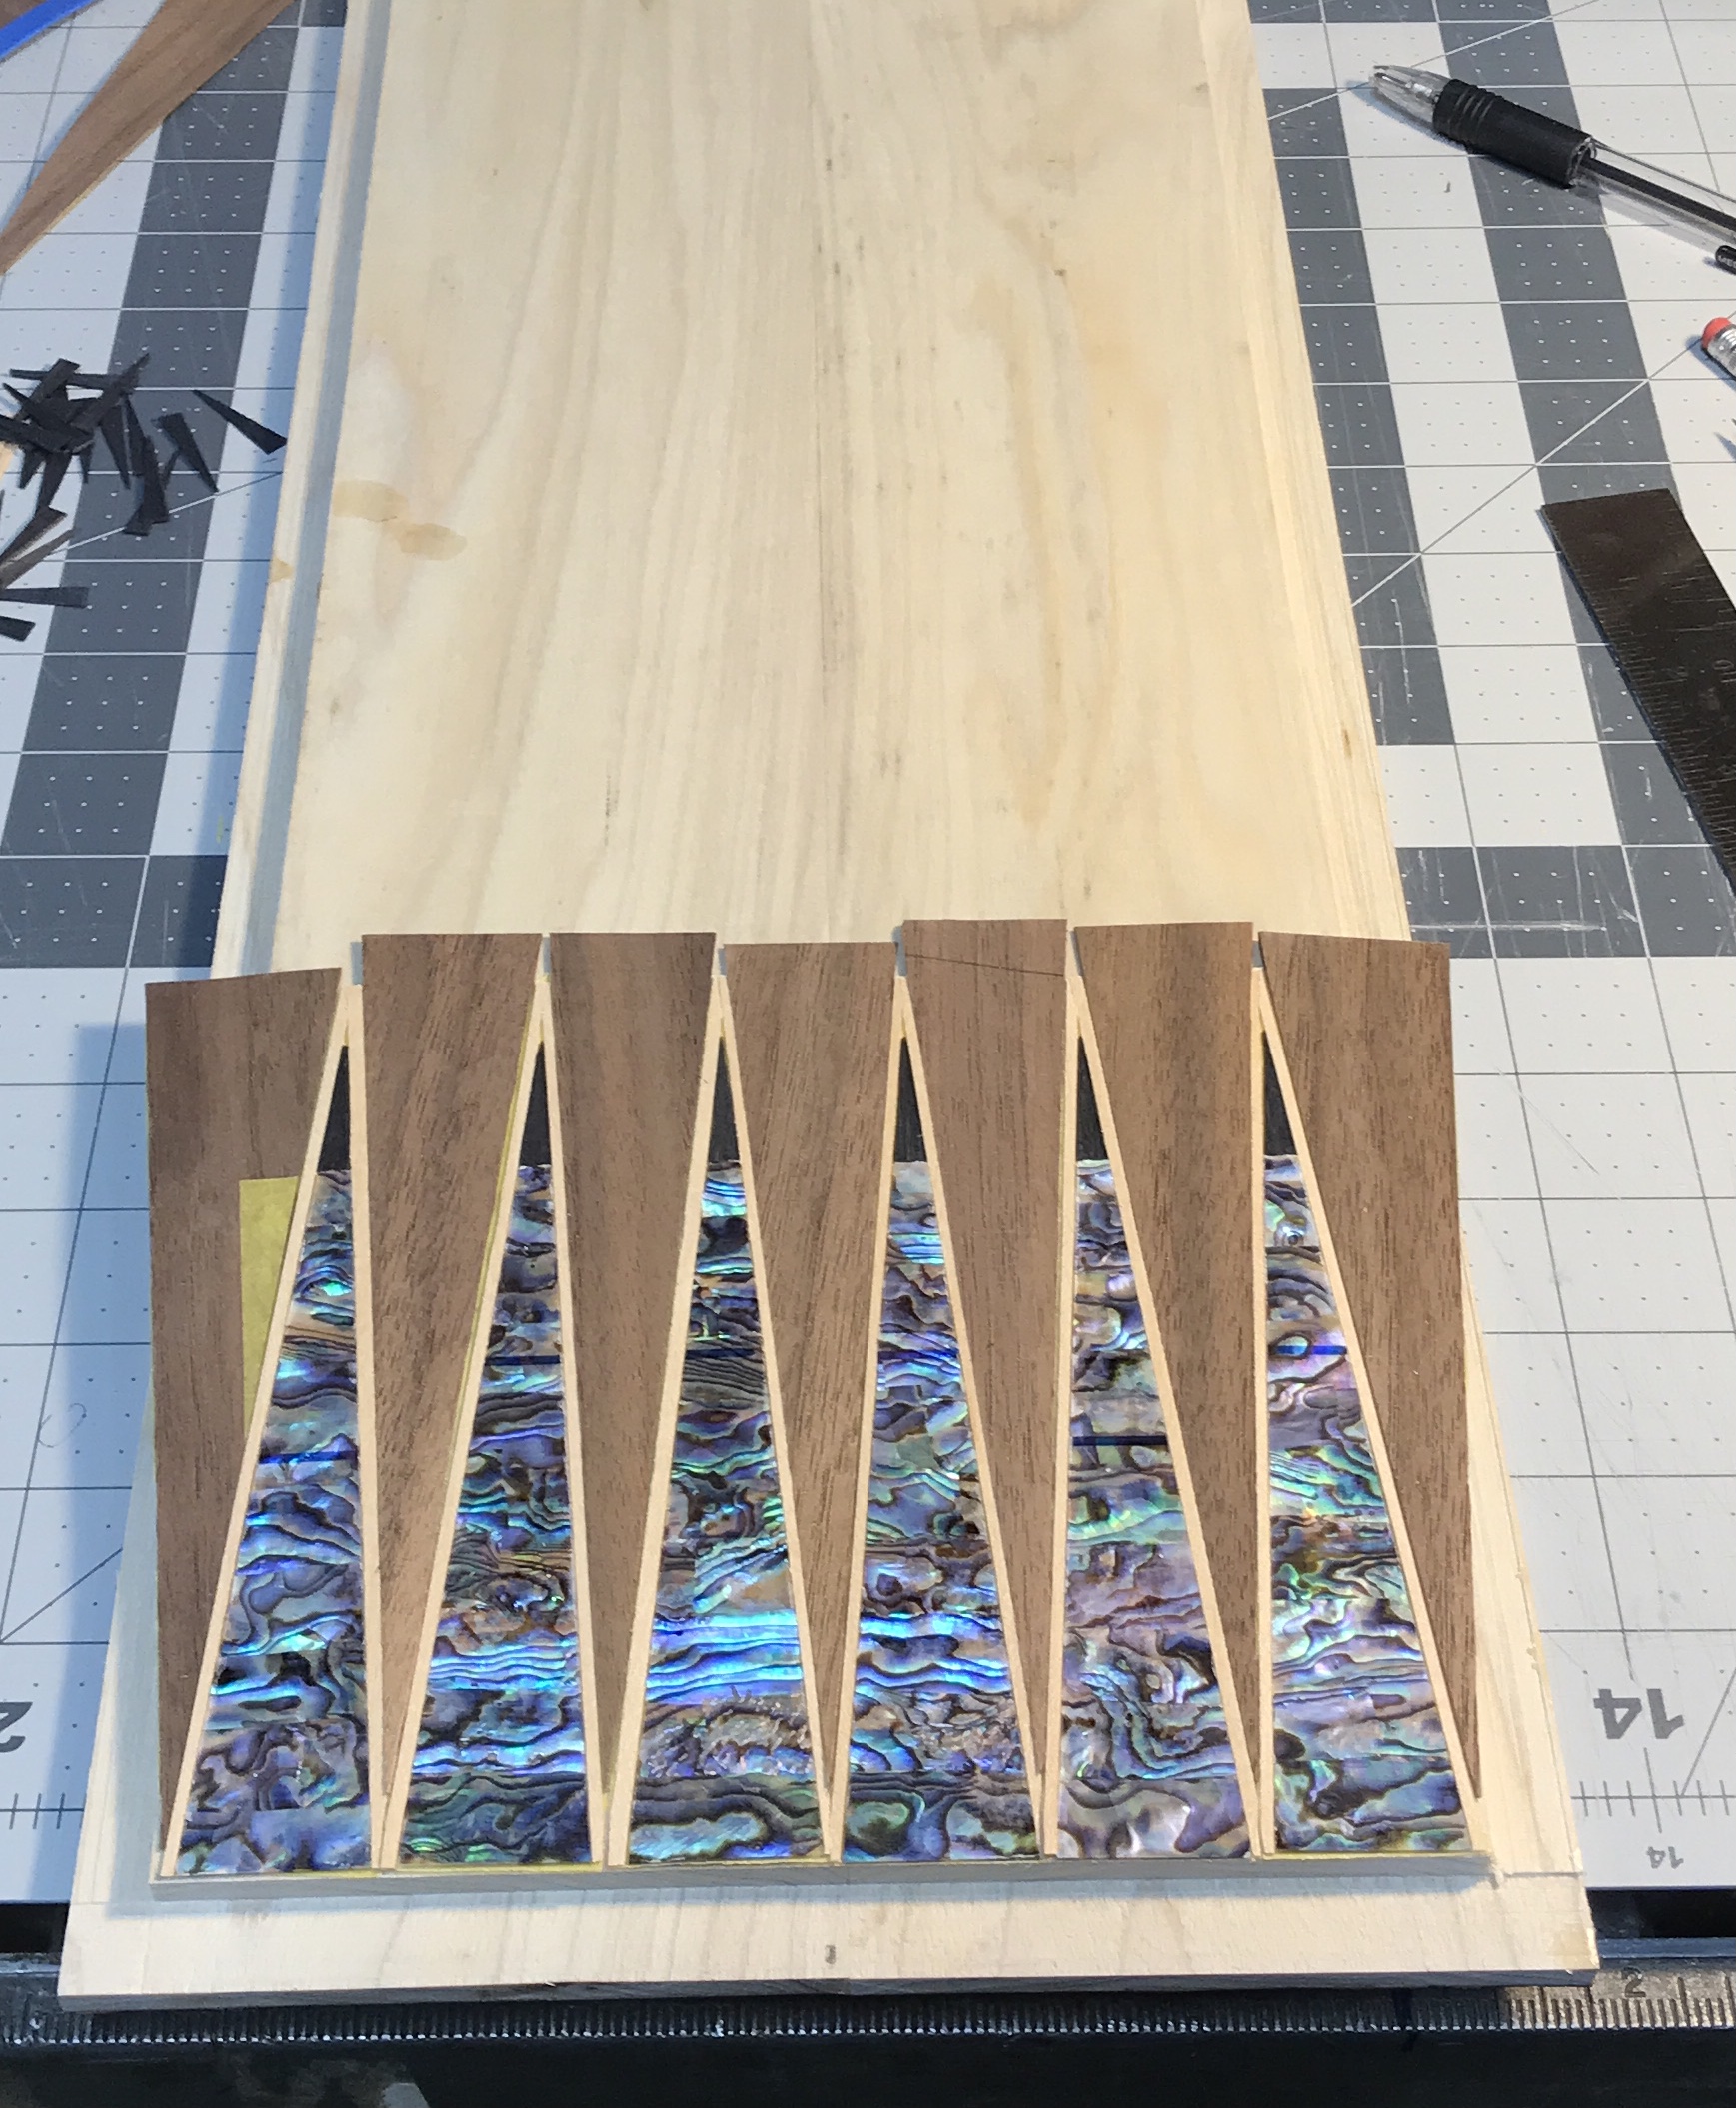
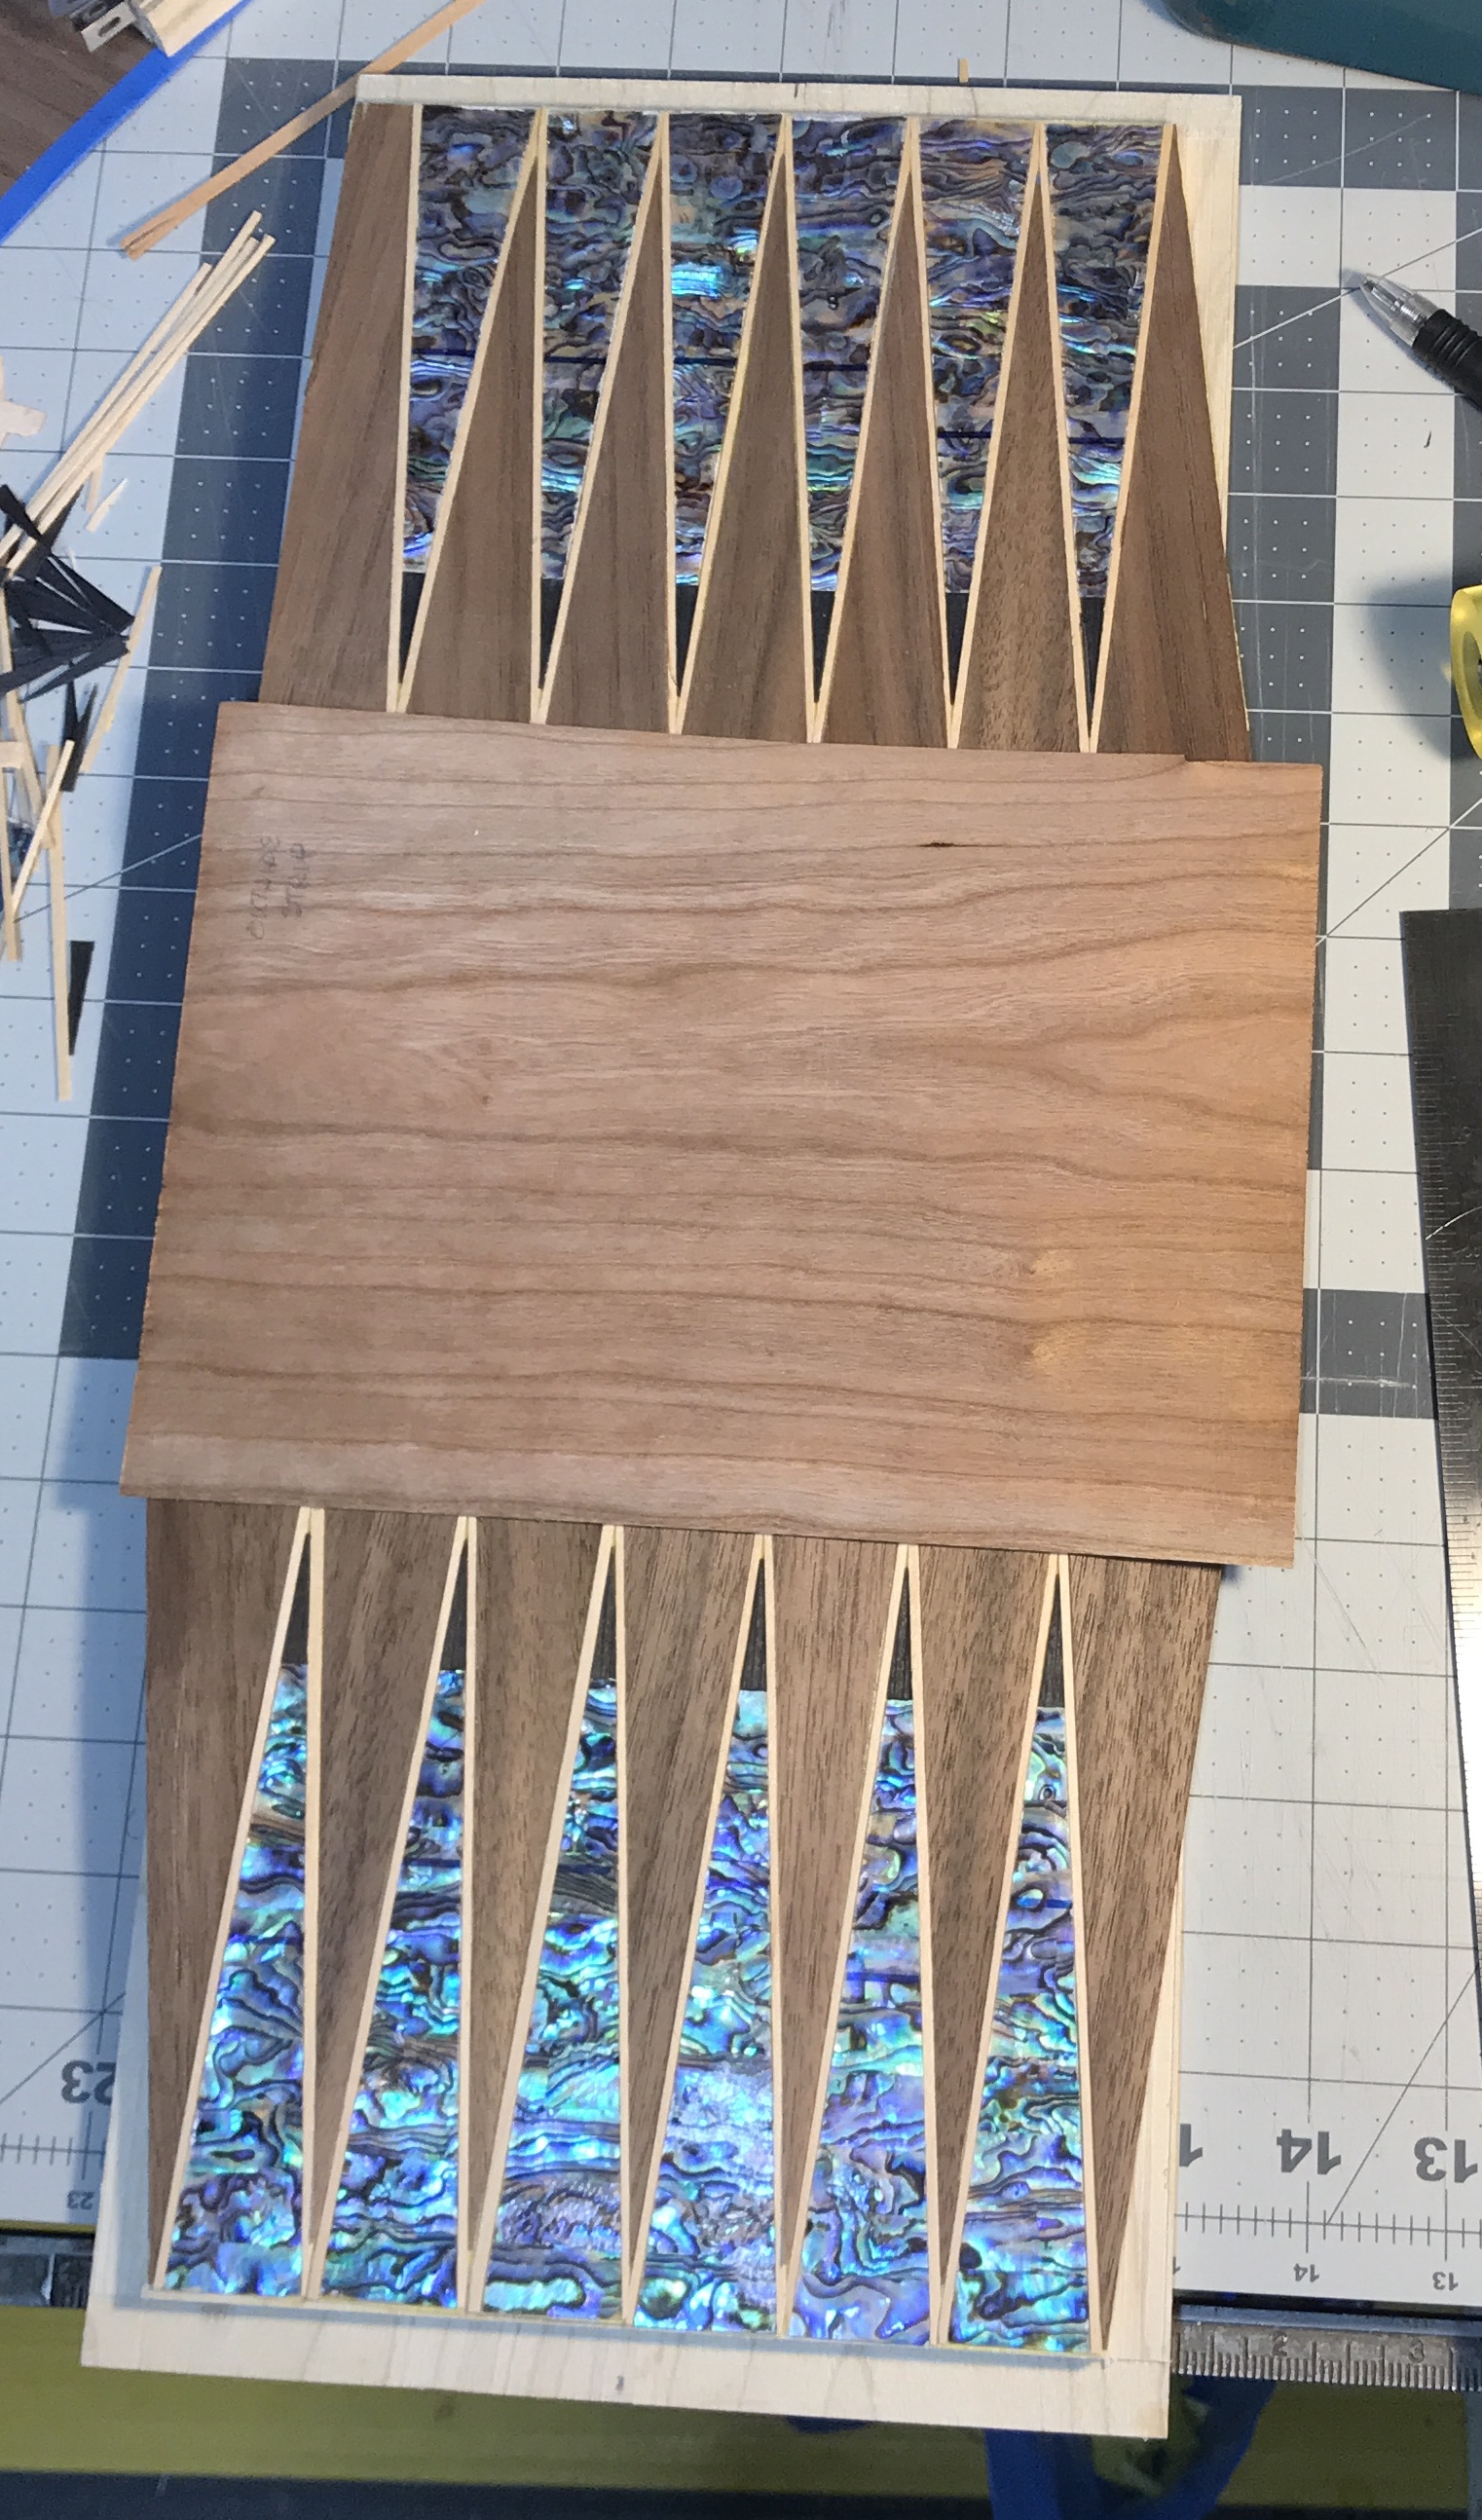
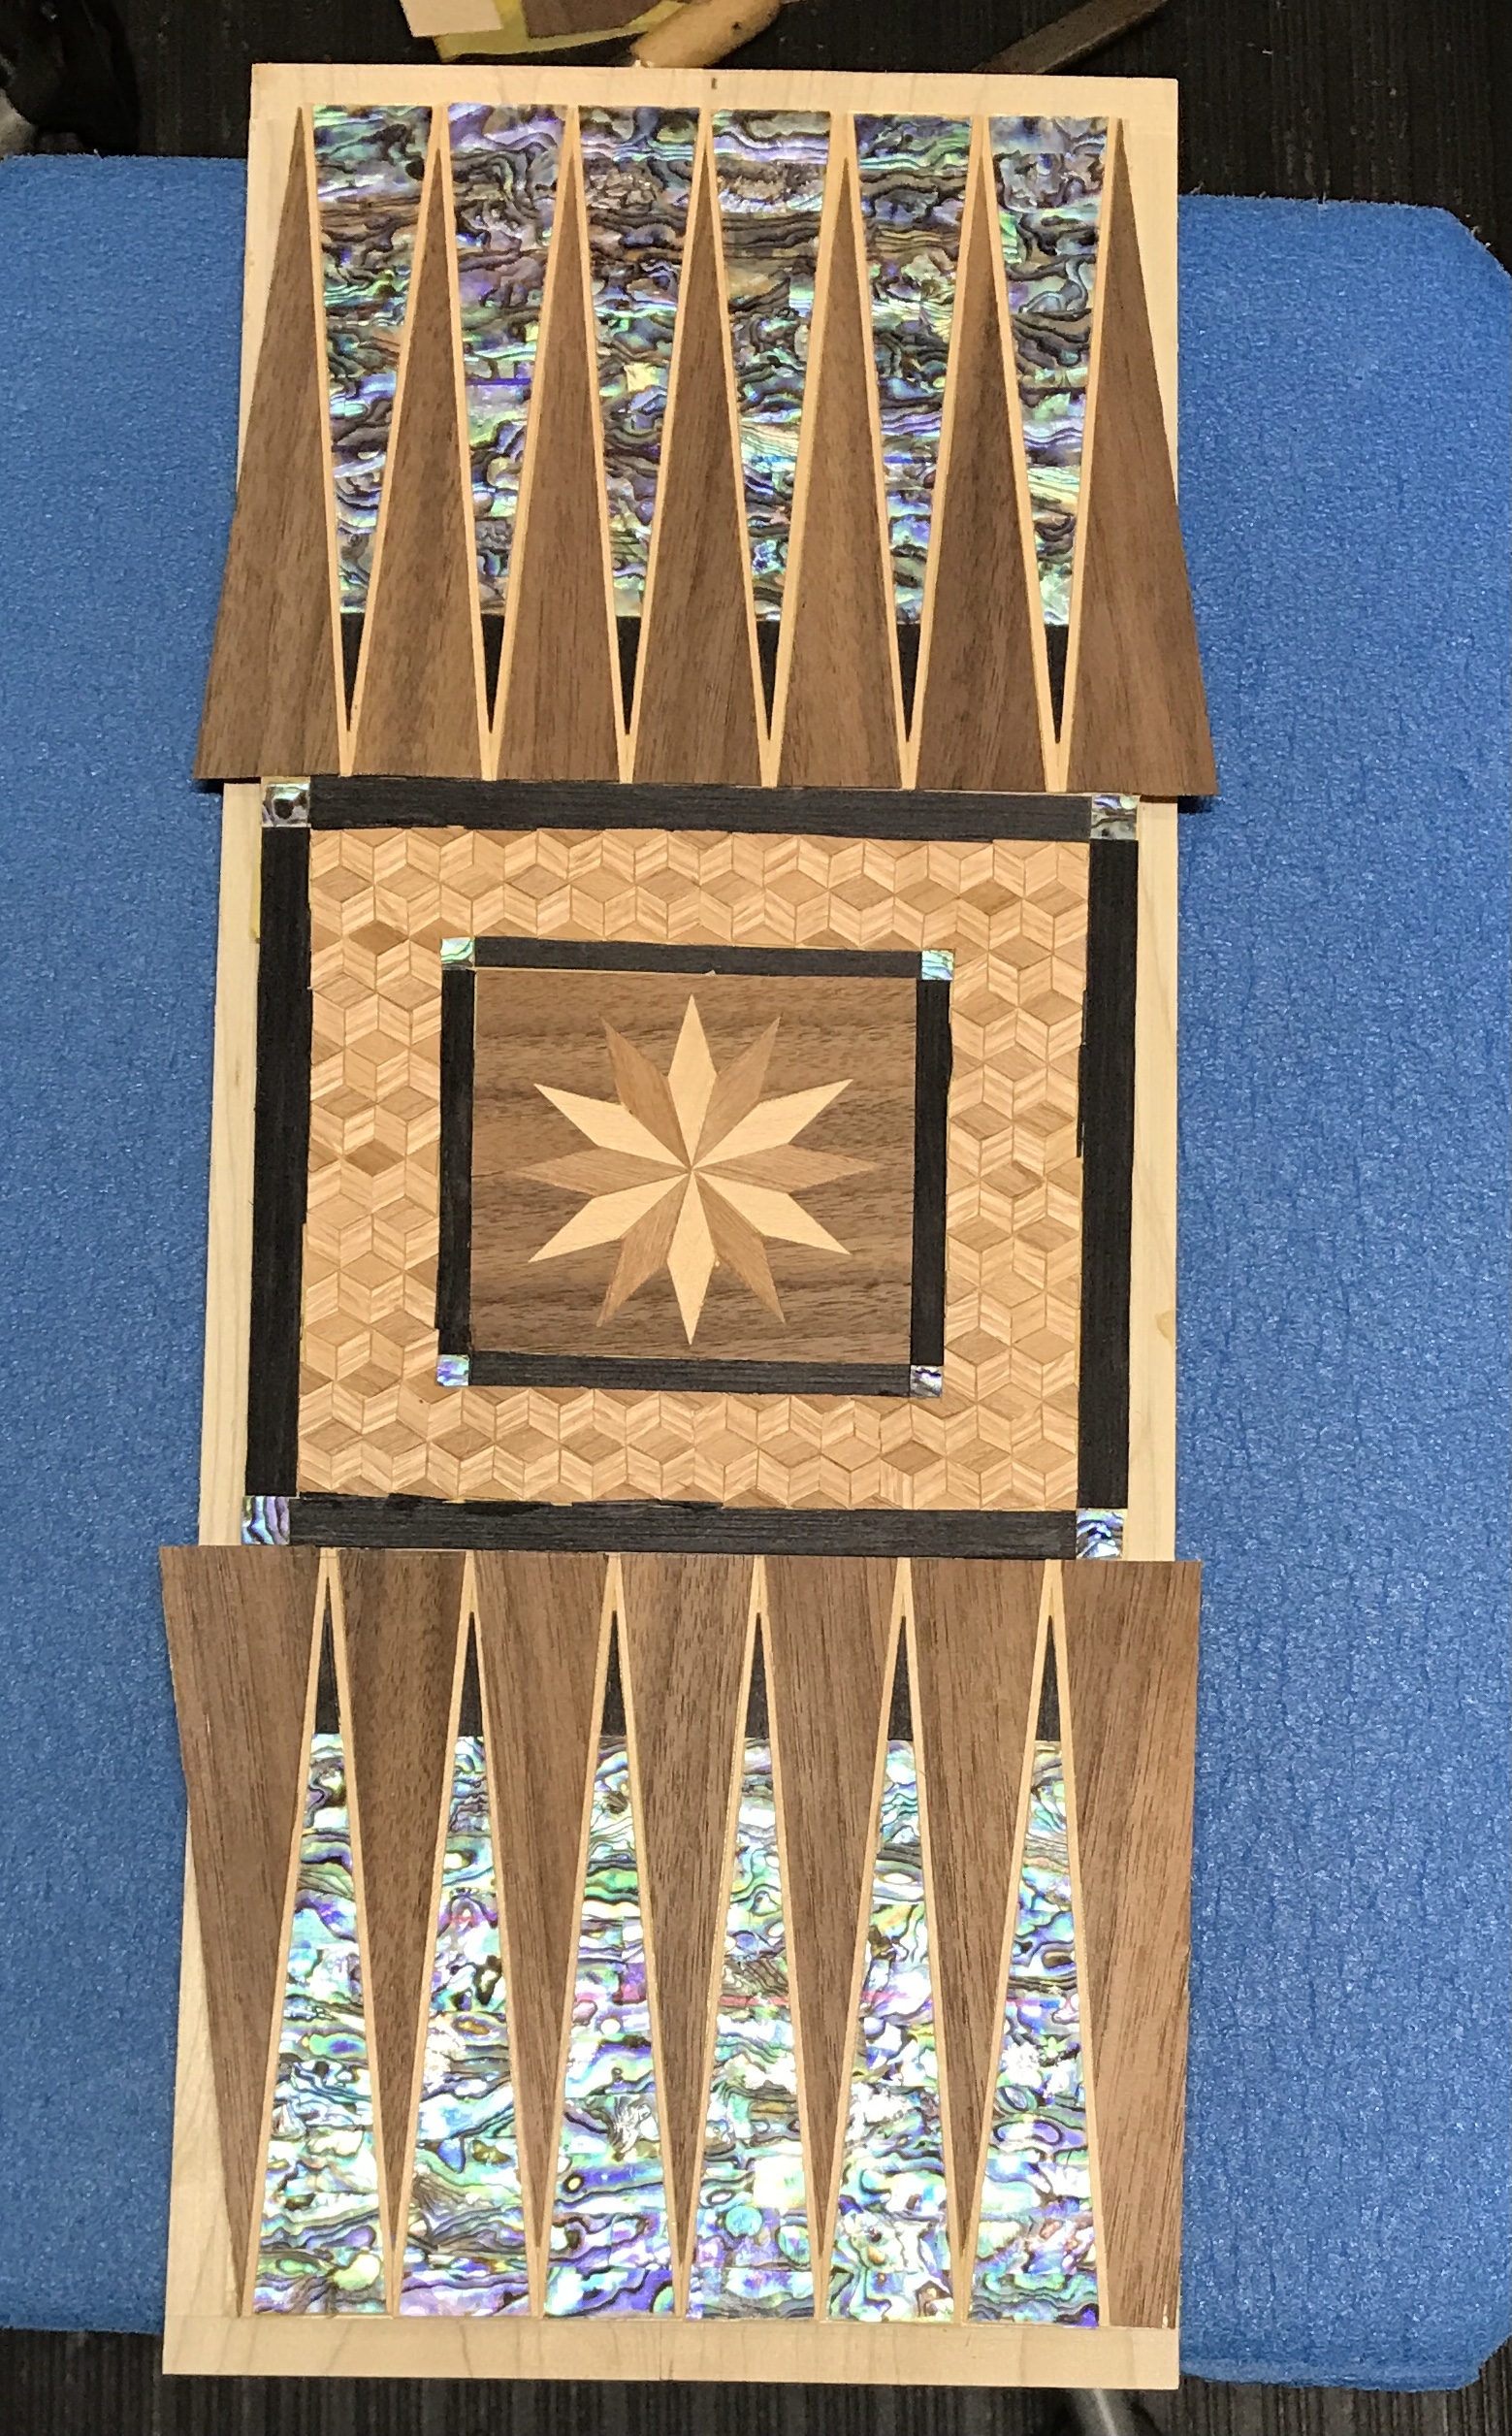
The background triangles were not that difficult to cut to fit. A triangle was slid down one side of the opening with that playing triangle flush on the surface. The playing triangle on the opposite side was allowed to slide up over the triangle to be cut. This triangle was marked in two spots with the knife. The triangle was cut along the marks from top to bottom as needed. The triangles all fit perfectly. The first photo below shows the first triangle cut to fit. The second shows the complete set of triangles cut to fit after taping. The third shows this set of playing triangles sitting on the inside face of the playing board. The other six playing triangles were treated the same as the first six. The strips were cut to fit, a black triangle was inserted, the strips were adjusted at the top, and the playing triangle was taped. When all six were finished and aligned the background triangles were cut to fit. The fourth photo shows the two sets of playing triangles in a mock setup on the board. Nice!
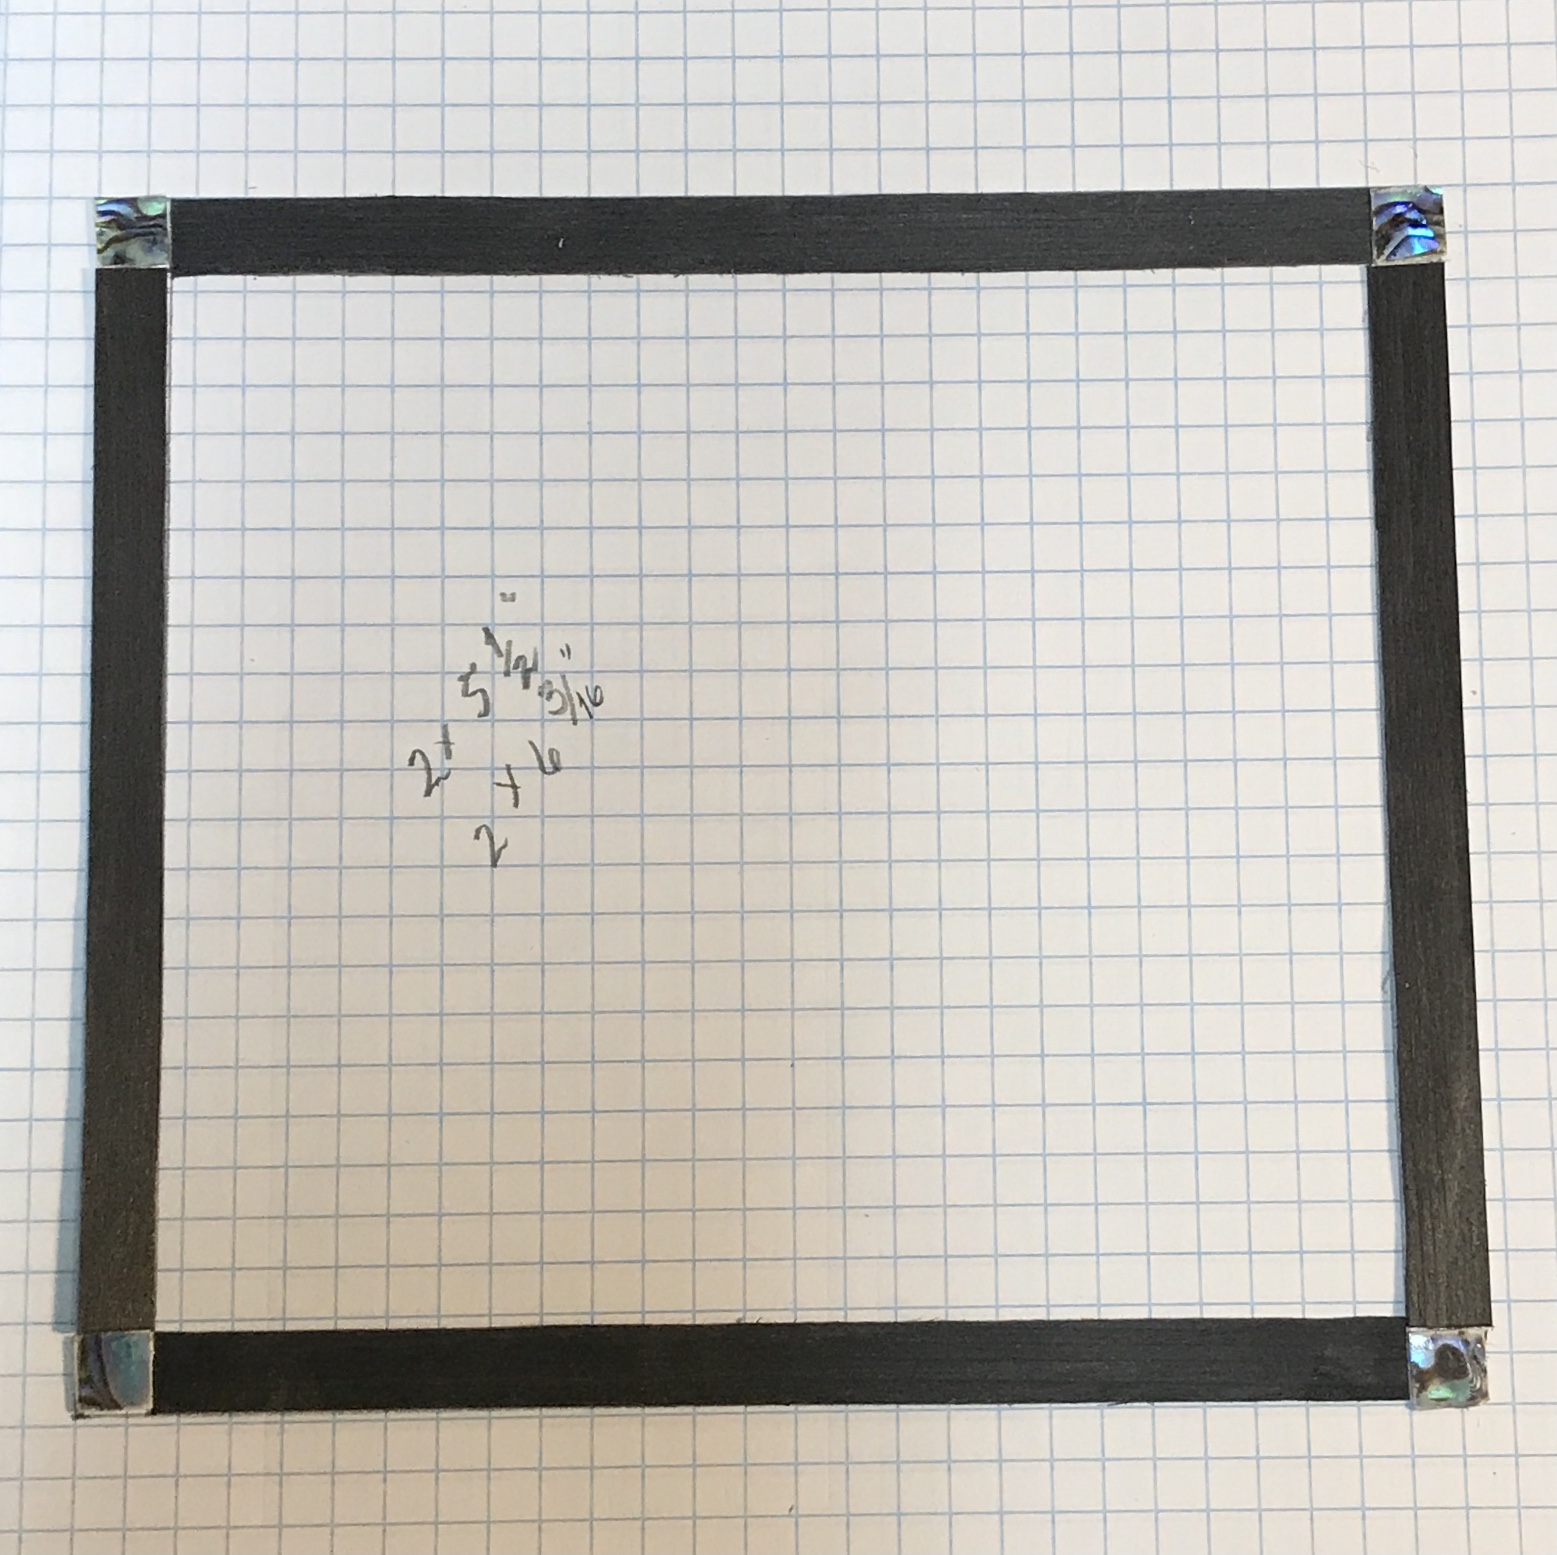
The next step is building the centerpiece. The first thing was making the outer frame. Two long strips of 3/8" wide black dyed veneer were cut. These were cut into the appropriate lengths, 5 1/2" and 6 3/16", for the sides of the frame. A scrap of Abalam was cut into four 3/8" squares for the corners. This frame is laid out in the photo below.
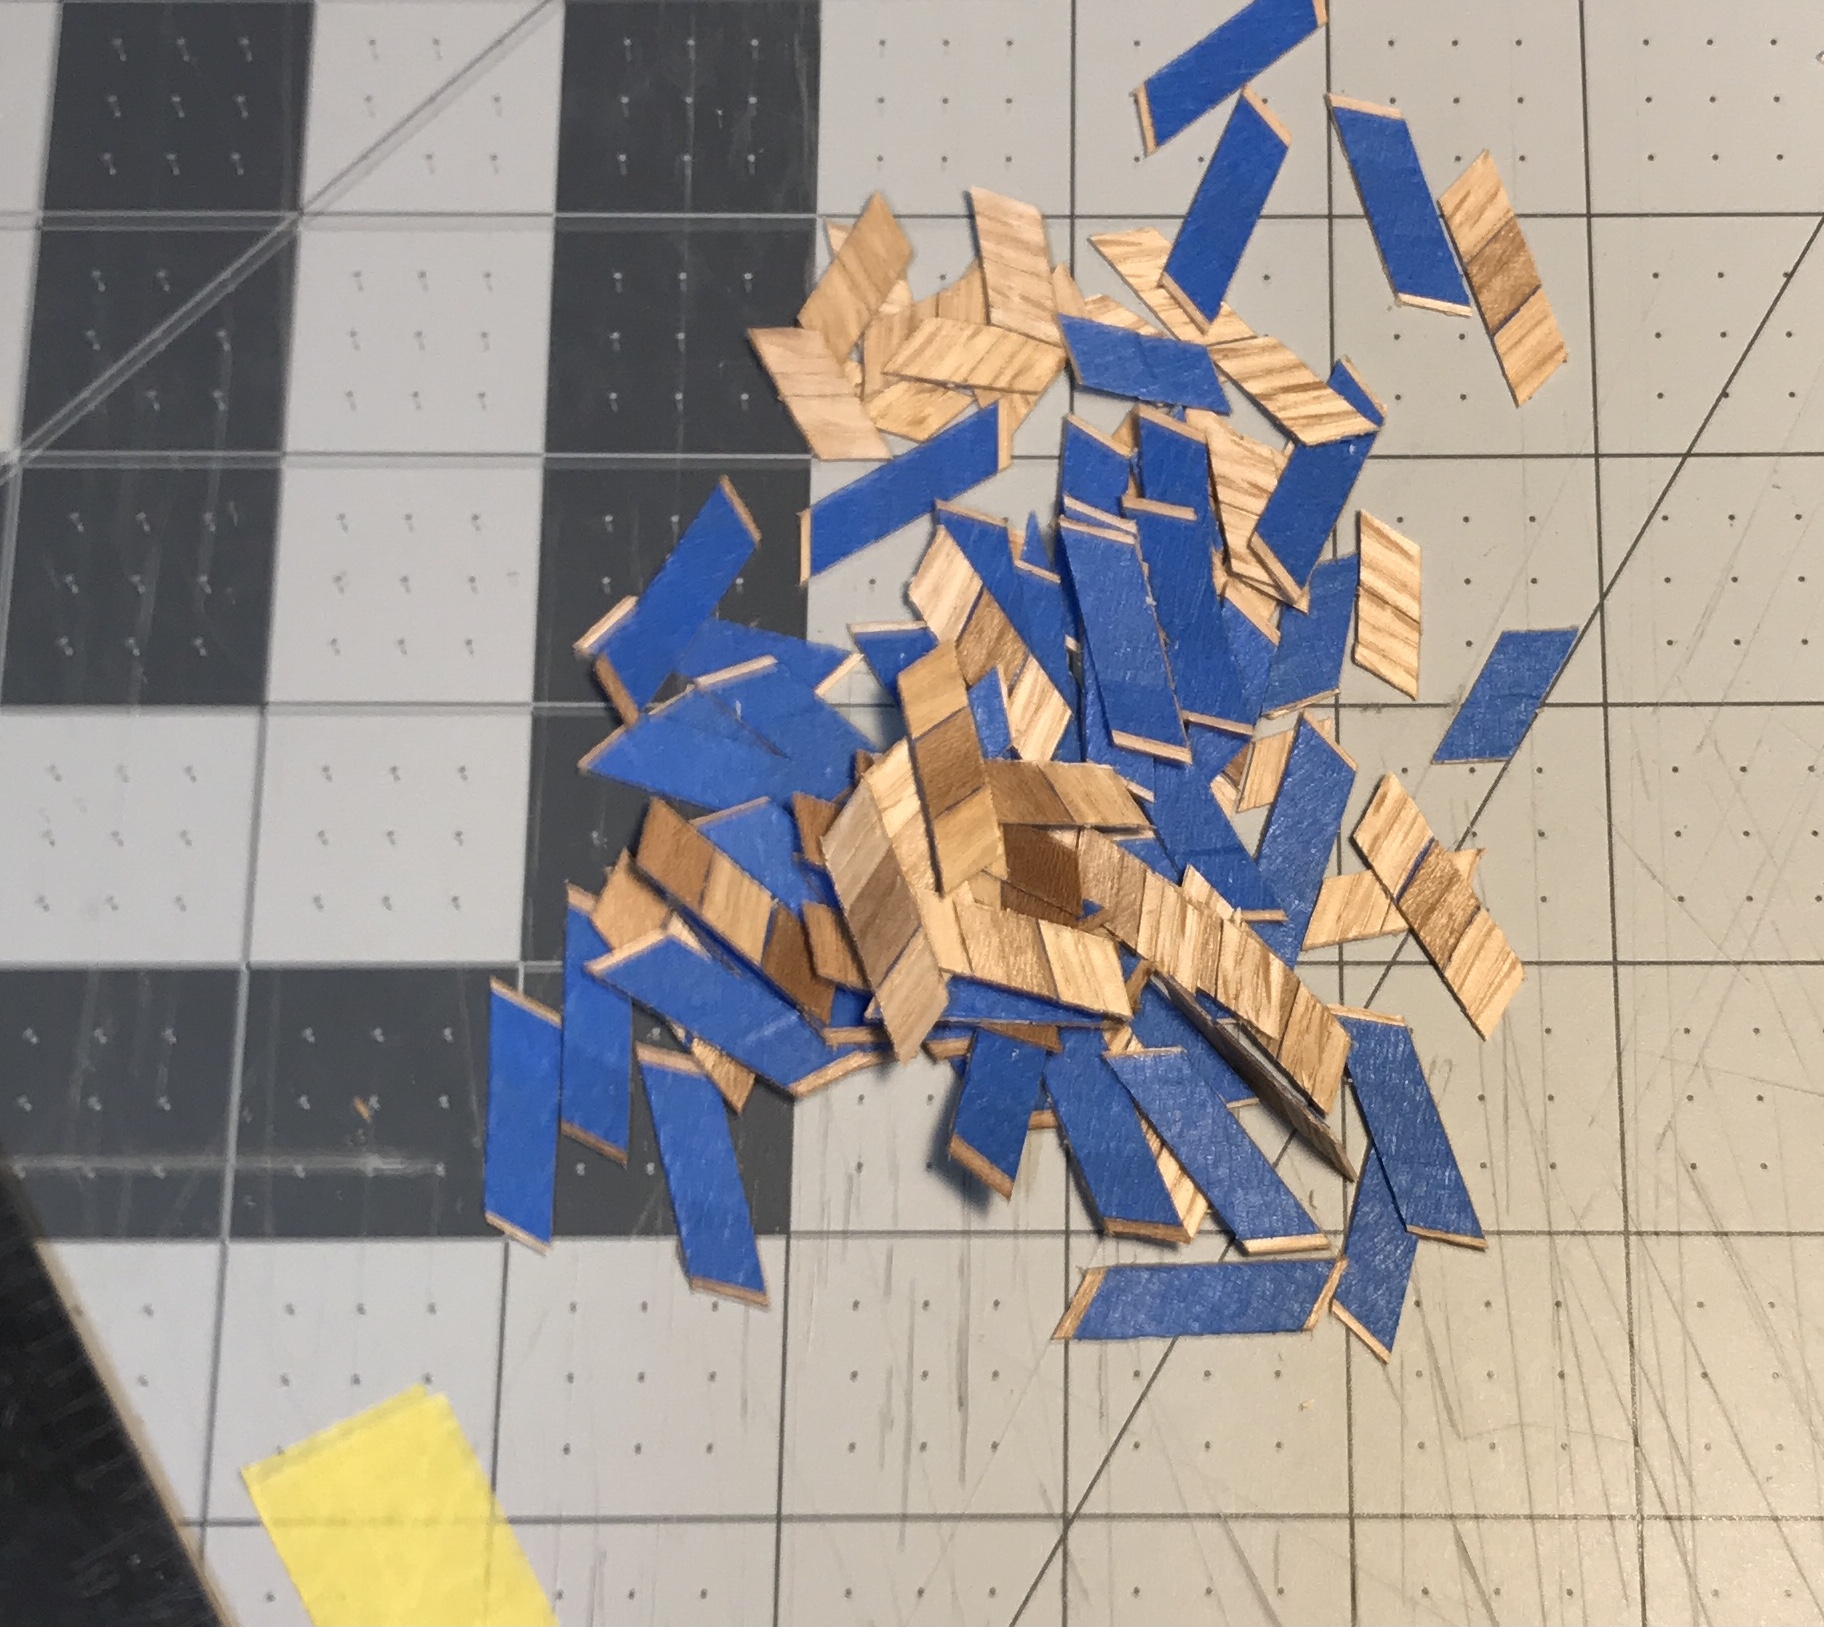
This frame will be filled with the tiny cubes for a width of 1" and will be delimited on the inside with a second frame. The tiny rhombi were all held together with tape. After a few of them splitting the proper technique for removing them from the blue tape was discovered. The tape needs to be pulled in the direction of the grain. Forty-five minutes later all of the parts were separated from the tape.
Assembling the cubes from the rhombi turned out to be quite demanding. Tape was taped sticky side up to the cutting mat. The rhombi were individually placed on the tape. The grain direction for the darker wood was altered with every row. The first length of cubes is seen in the first photo. It has a slight tilt, that mey require repair. Once 6+ inches were laid out the second side was built similarly using tweezers. The second photo shows the cubes at this stage. The work was stopped due to mental fatigue. The pile of rhombi is getting low. More rhombi might need to be cut.
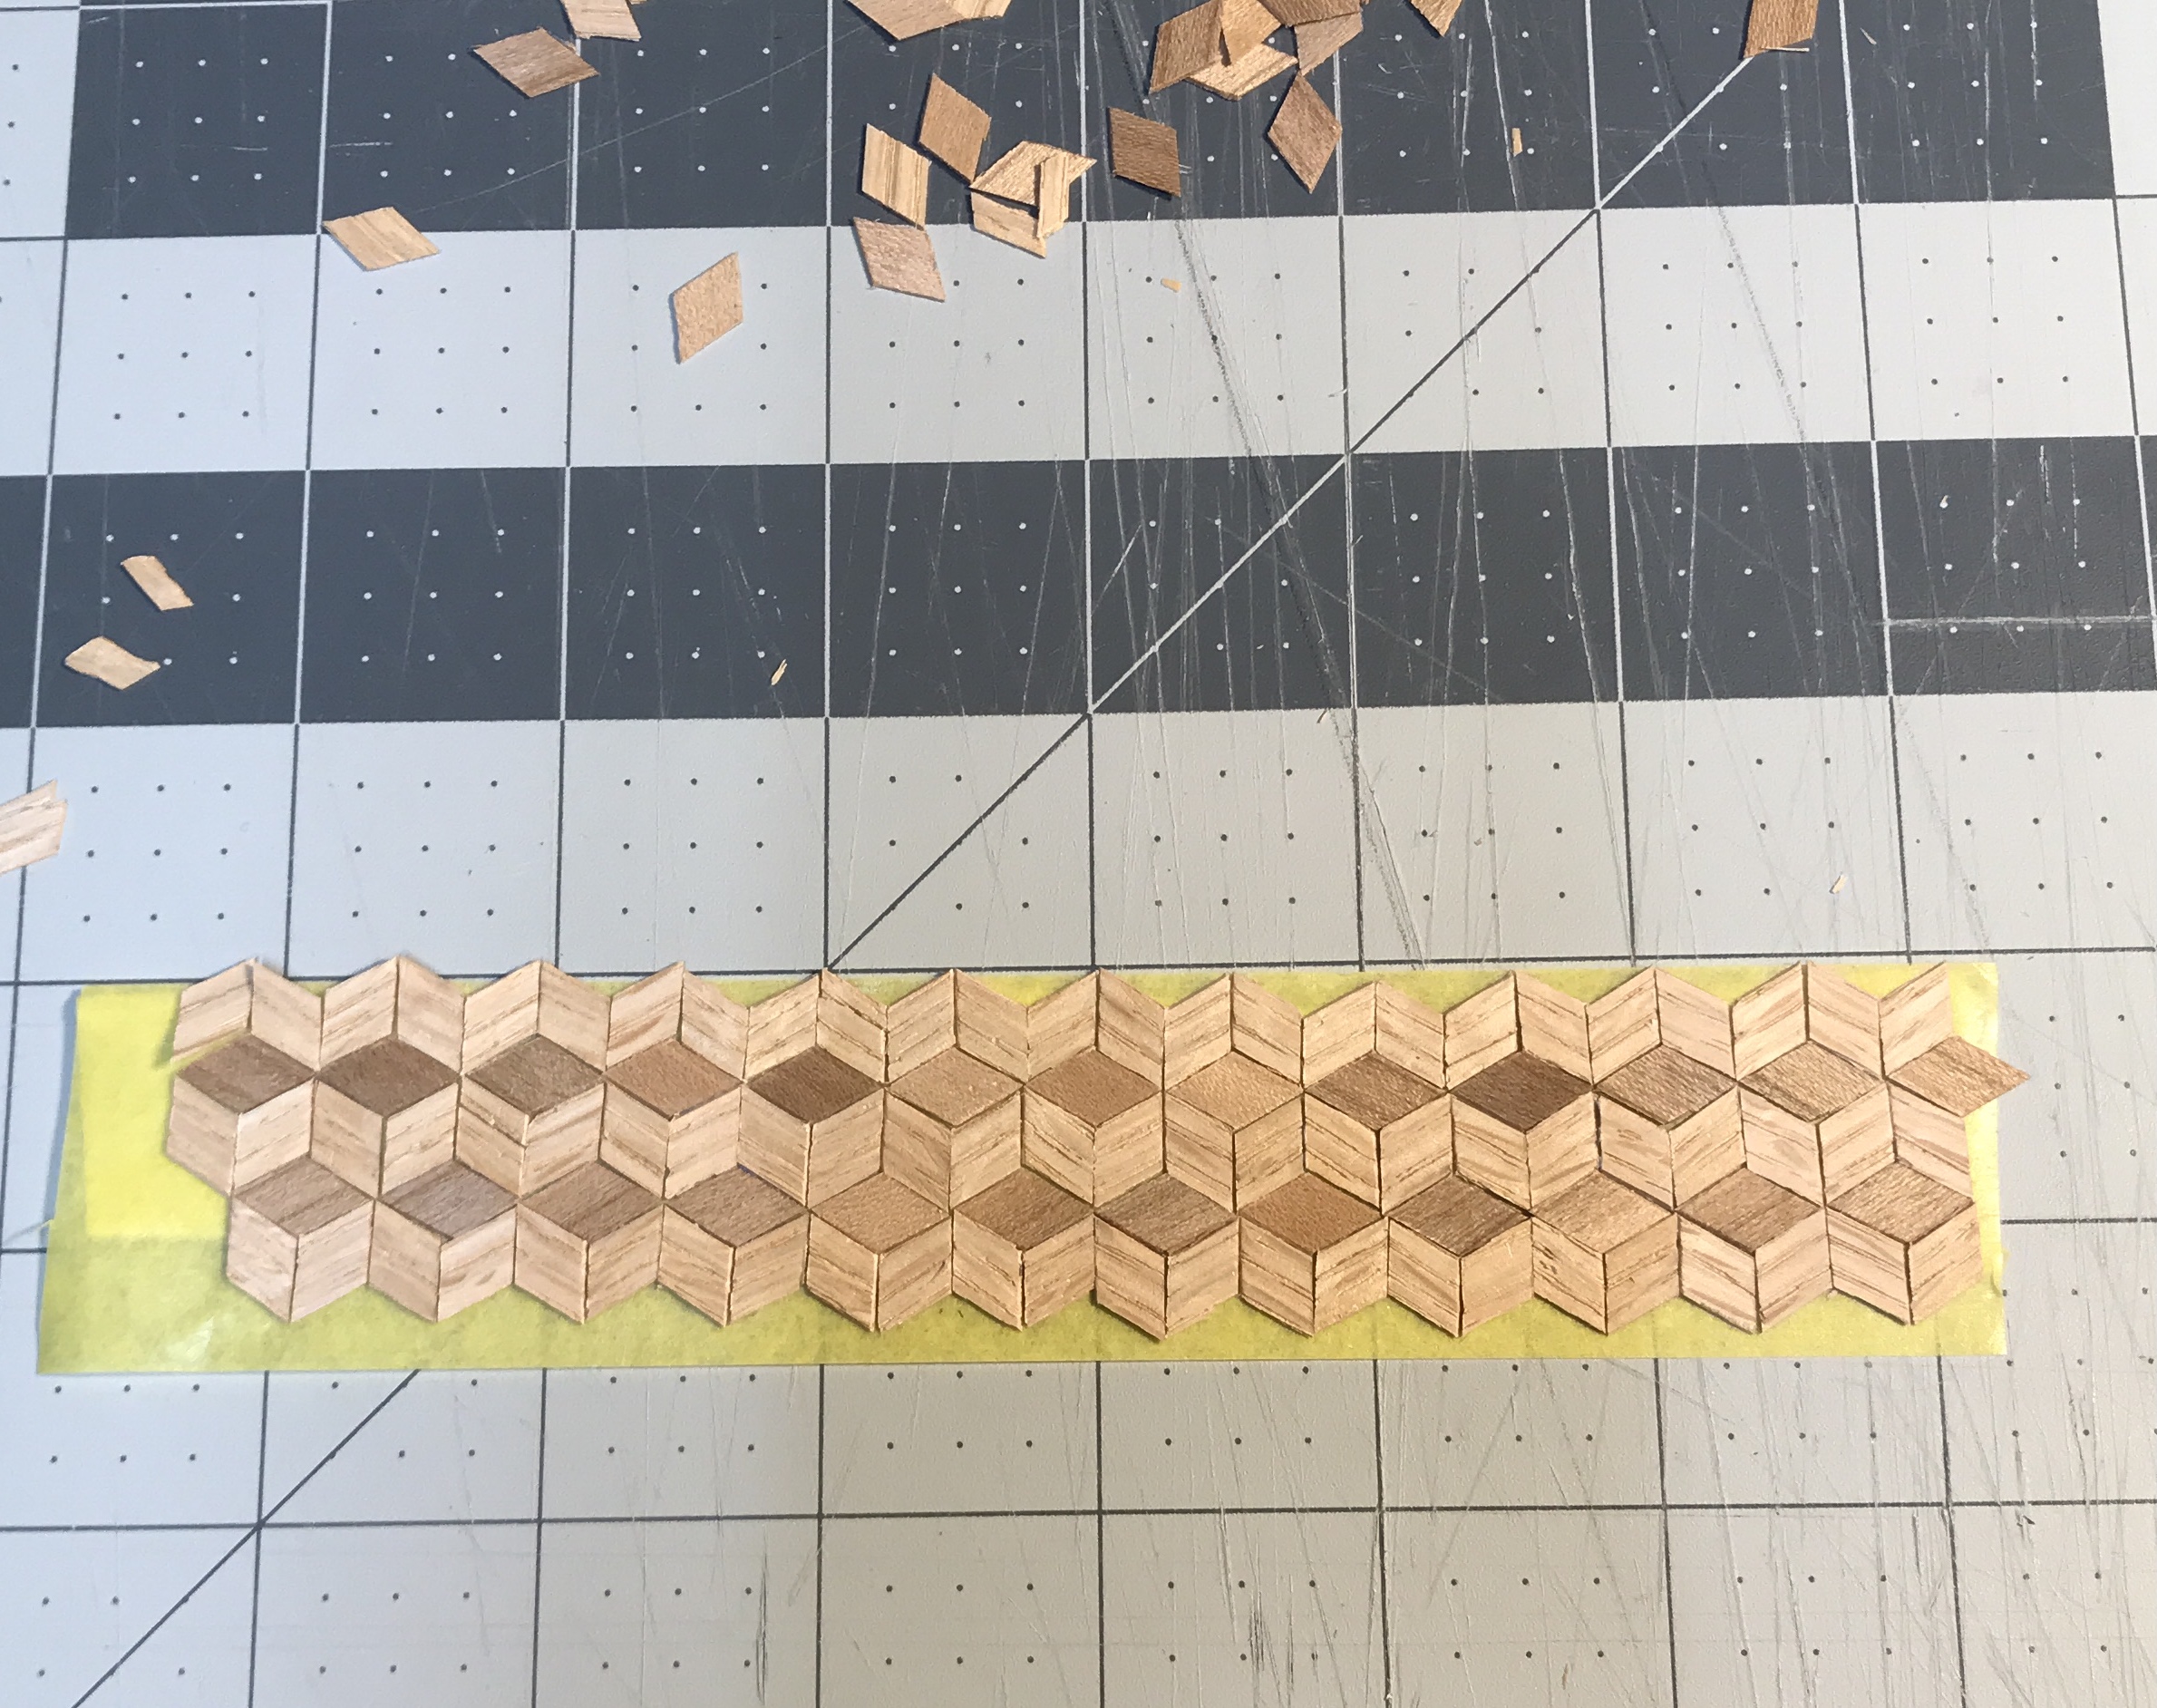

The left side was completed followed by the top. There were not enough light colored pieces, so an additional 25 were cut. Then the top could not be completed because both sides were slightly bowed in and the last pieces were at least 1/8" overlapped. The sides were adjusted with much consternation and the top finished. The last piece had to be thinned just a bit to fit. The entirety is slightly larger than the enclosing frame. The photo shows the completed set of cubes.
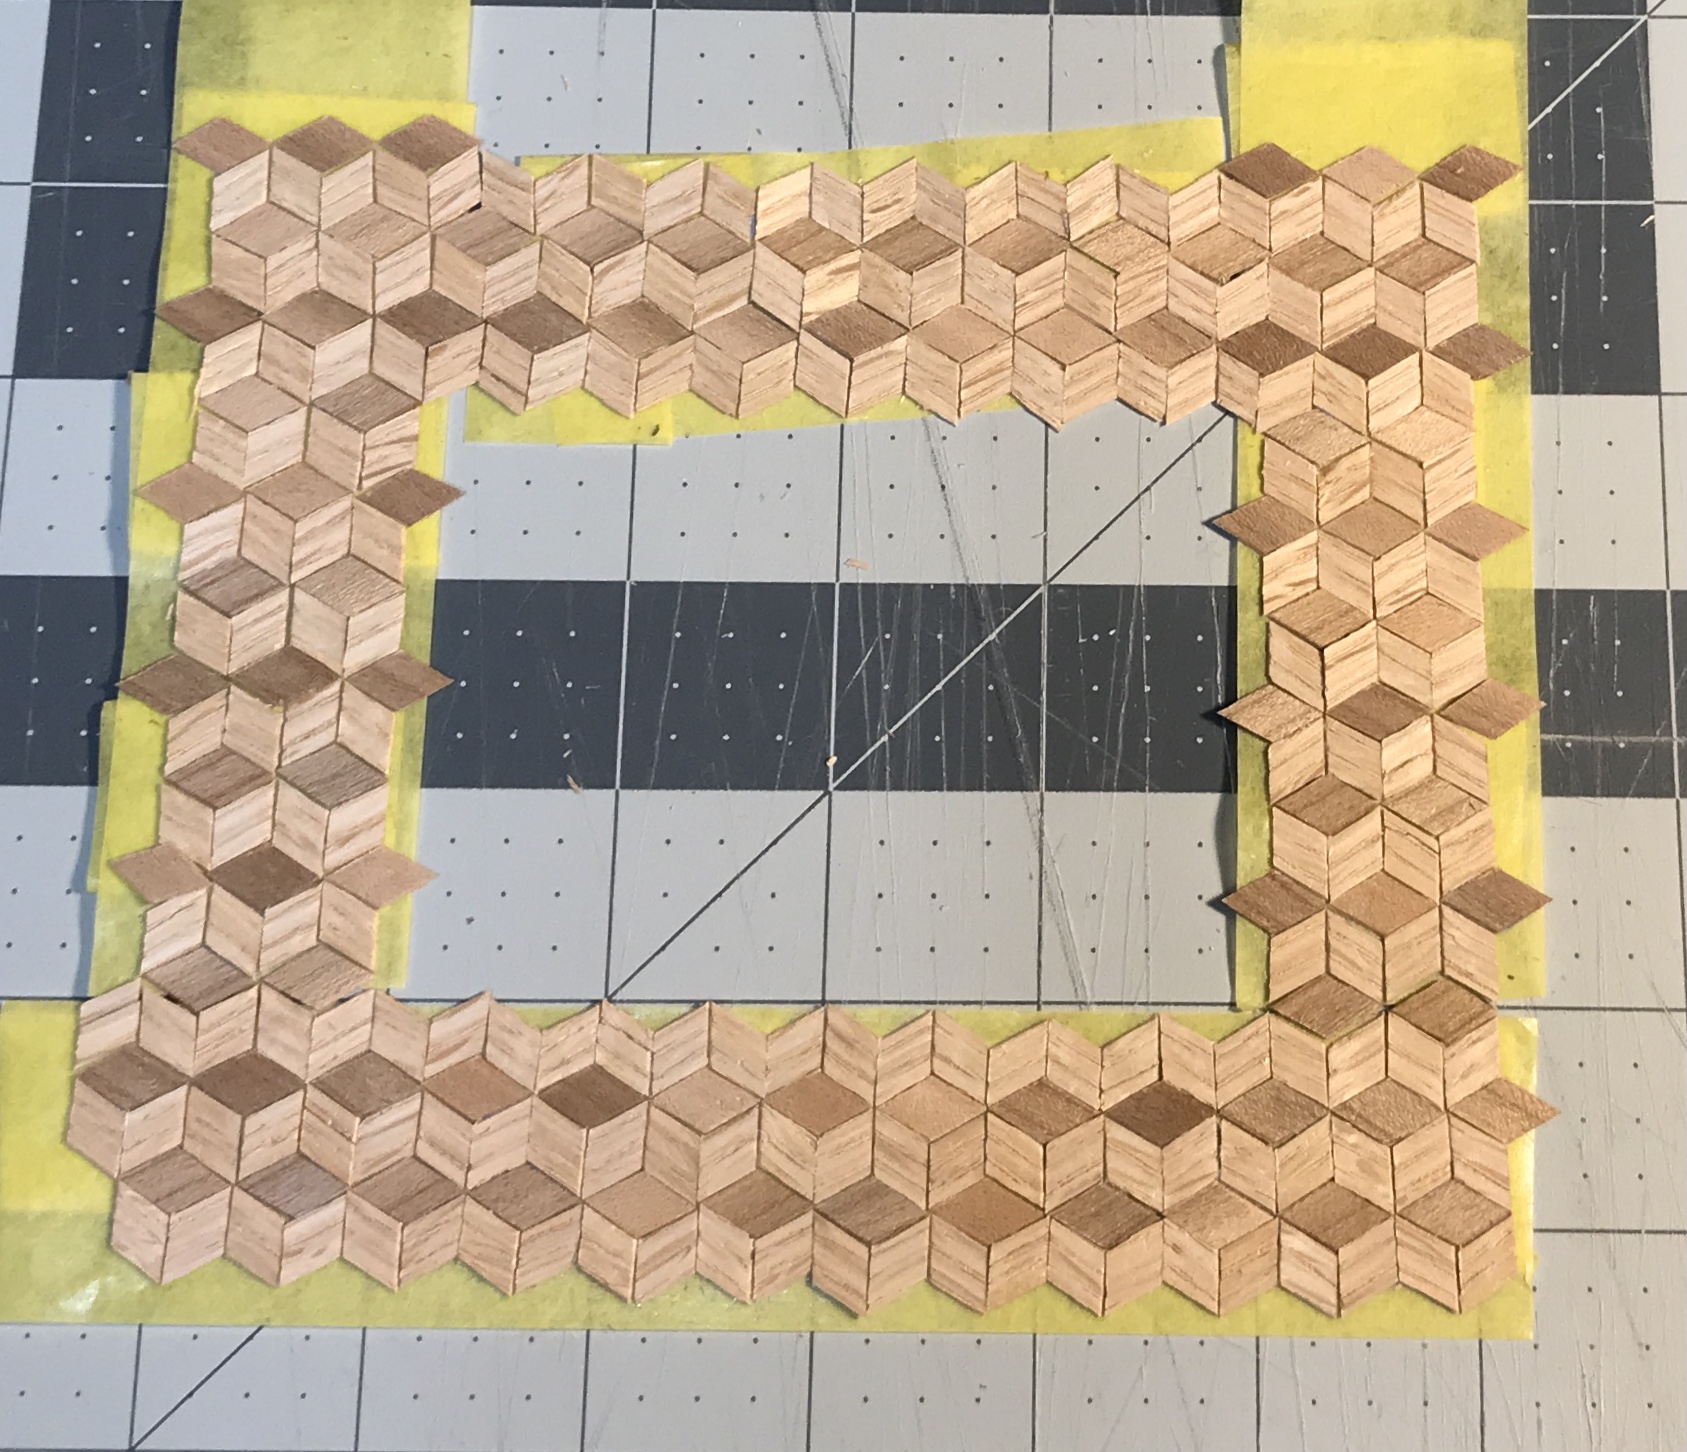
Today was the time to finish the central part of this side. the darker rhombi were easiest to split in half so they determined the width of the cube rectangle. The dark rhombi on the ends that stick out in the photo above were cut in half. Similarly, the dark rhombi on the top and bottom were cut in half longways. All of the triangular areas were filled in with these halves. The same things were done to the interior border. Before filling the triangles a row of light rhombi was removed on the top and bottom inside edges. The four dark rhombi in the inside corners had one quarter of the rhombus removed. This work is shown in the photo below.
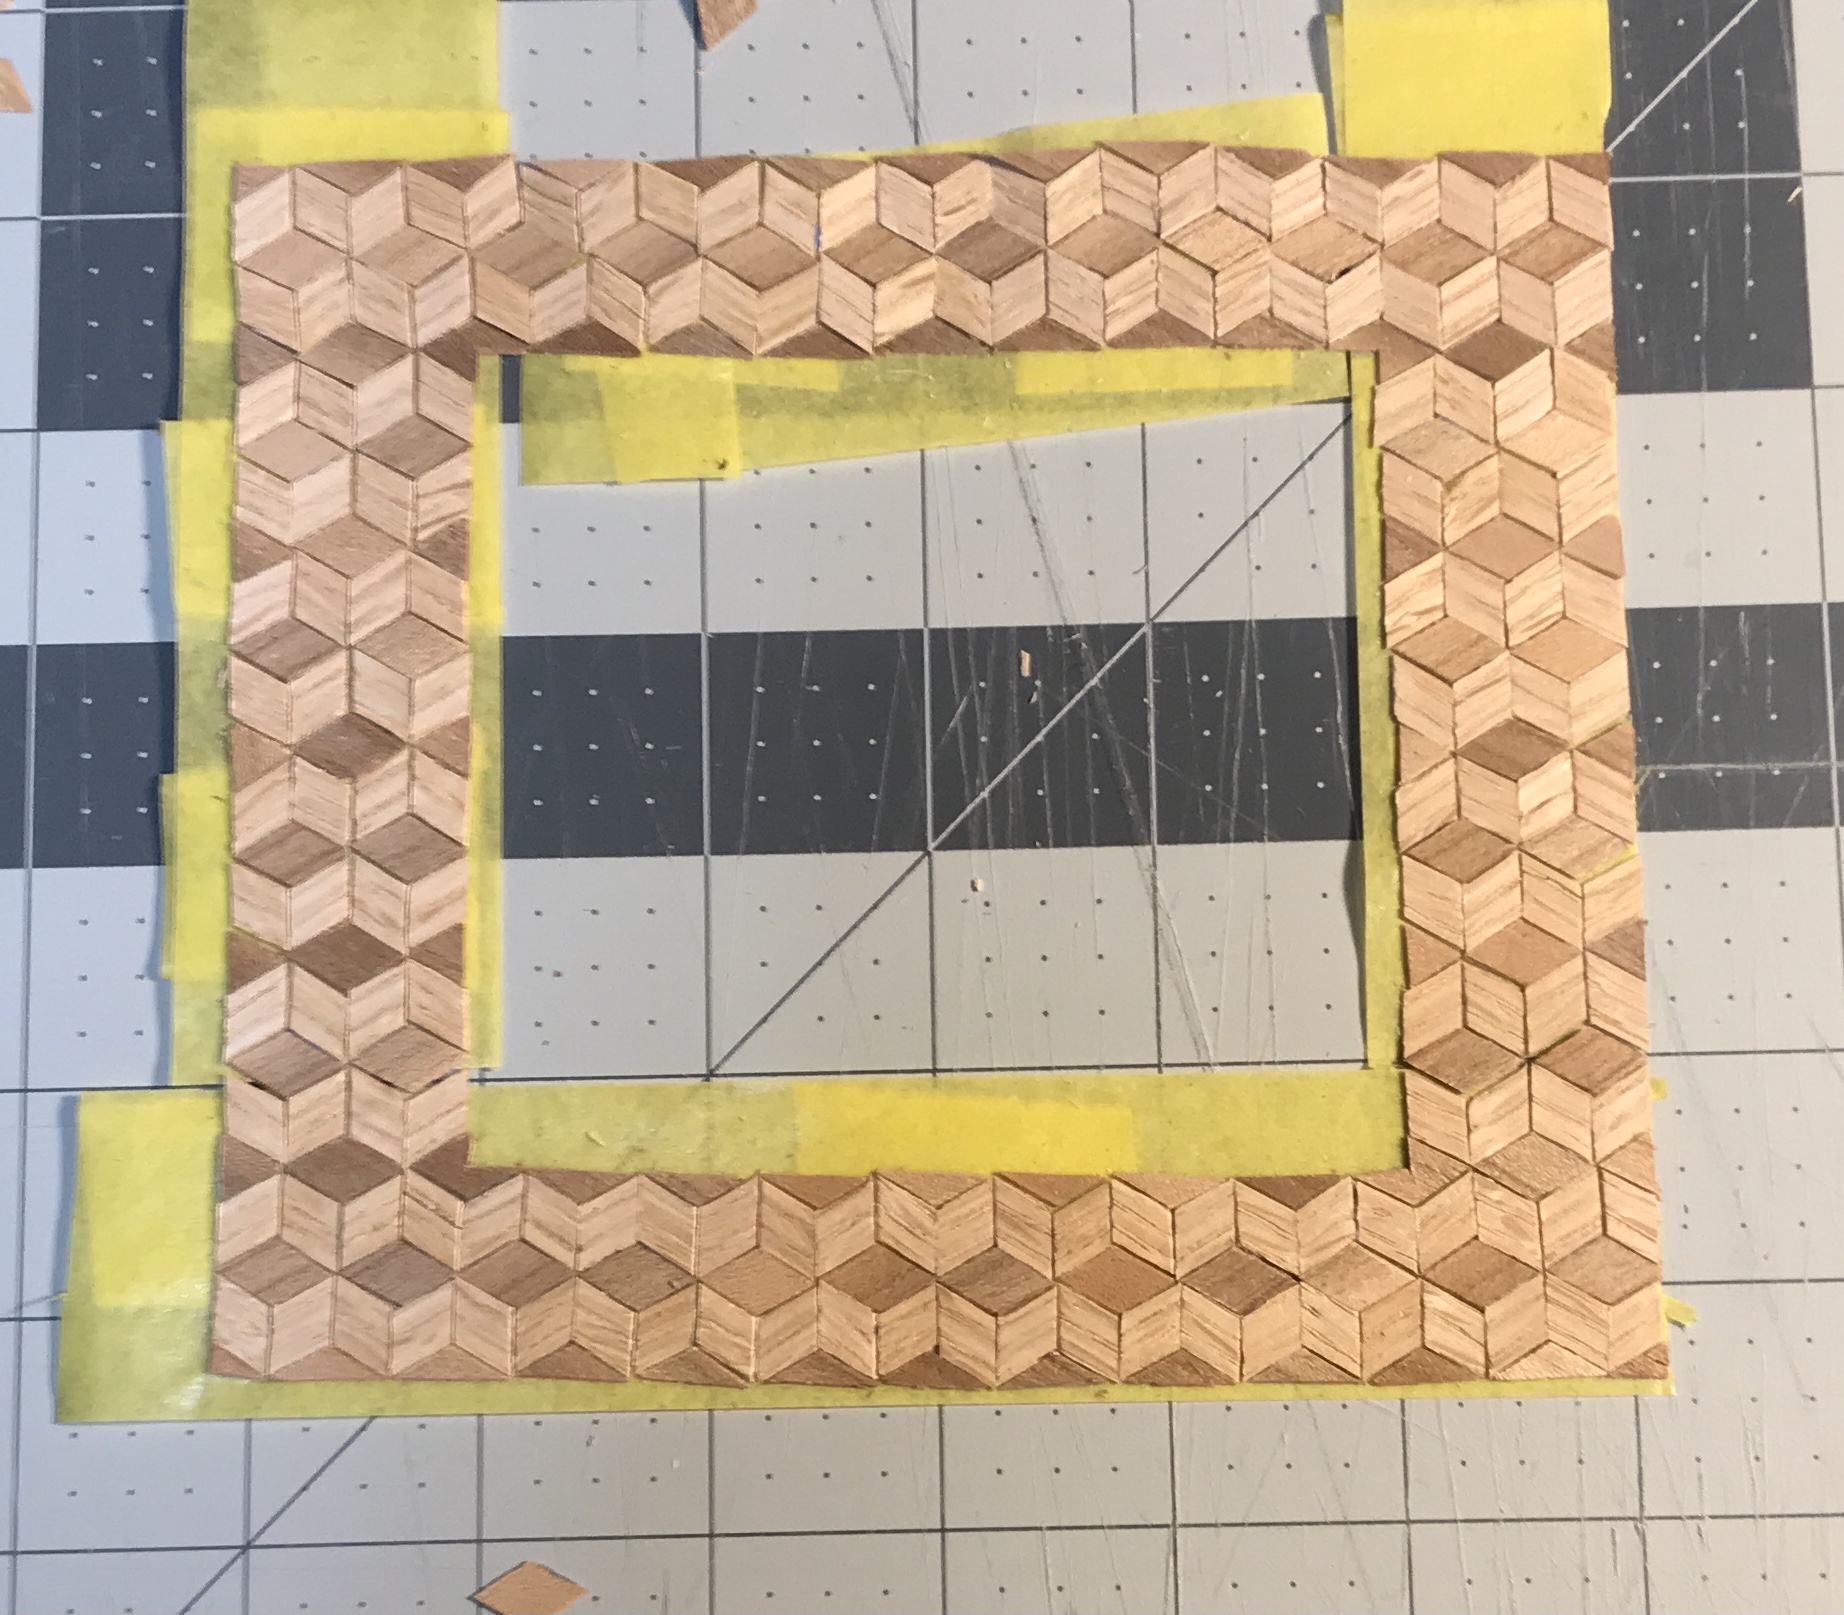
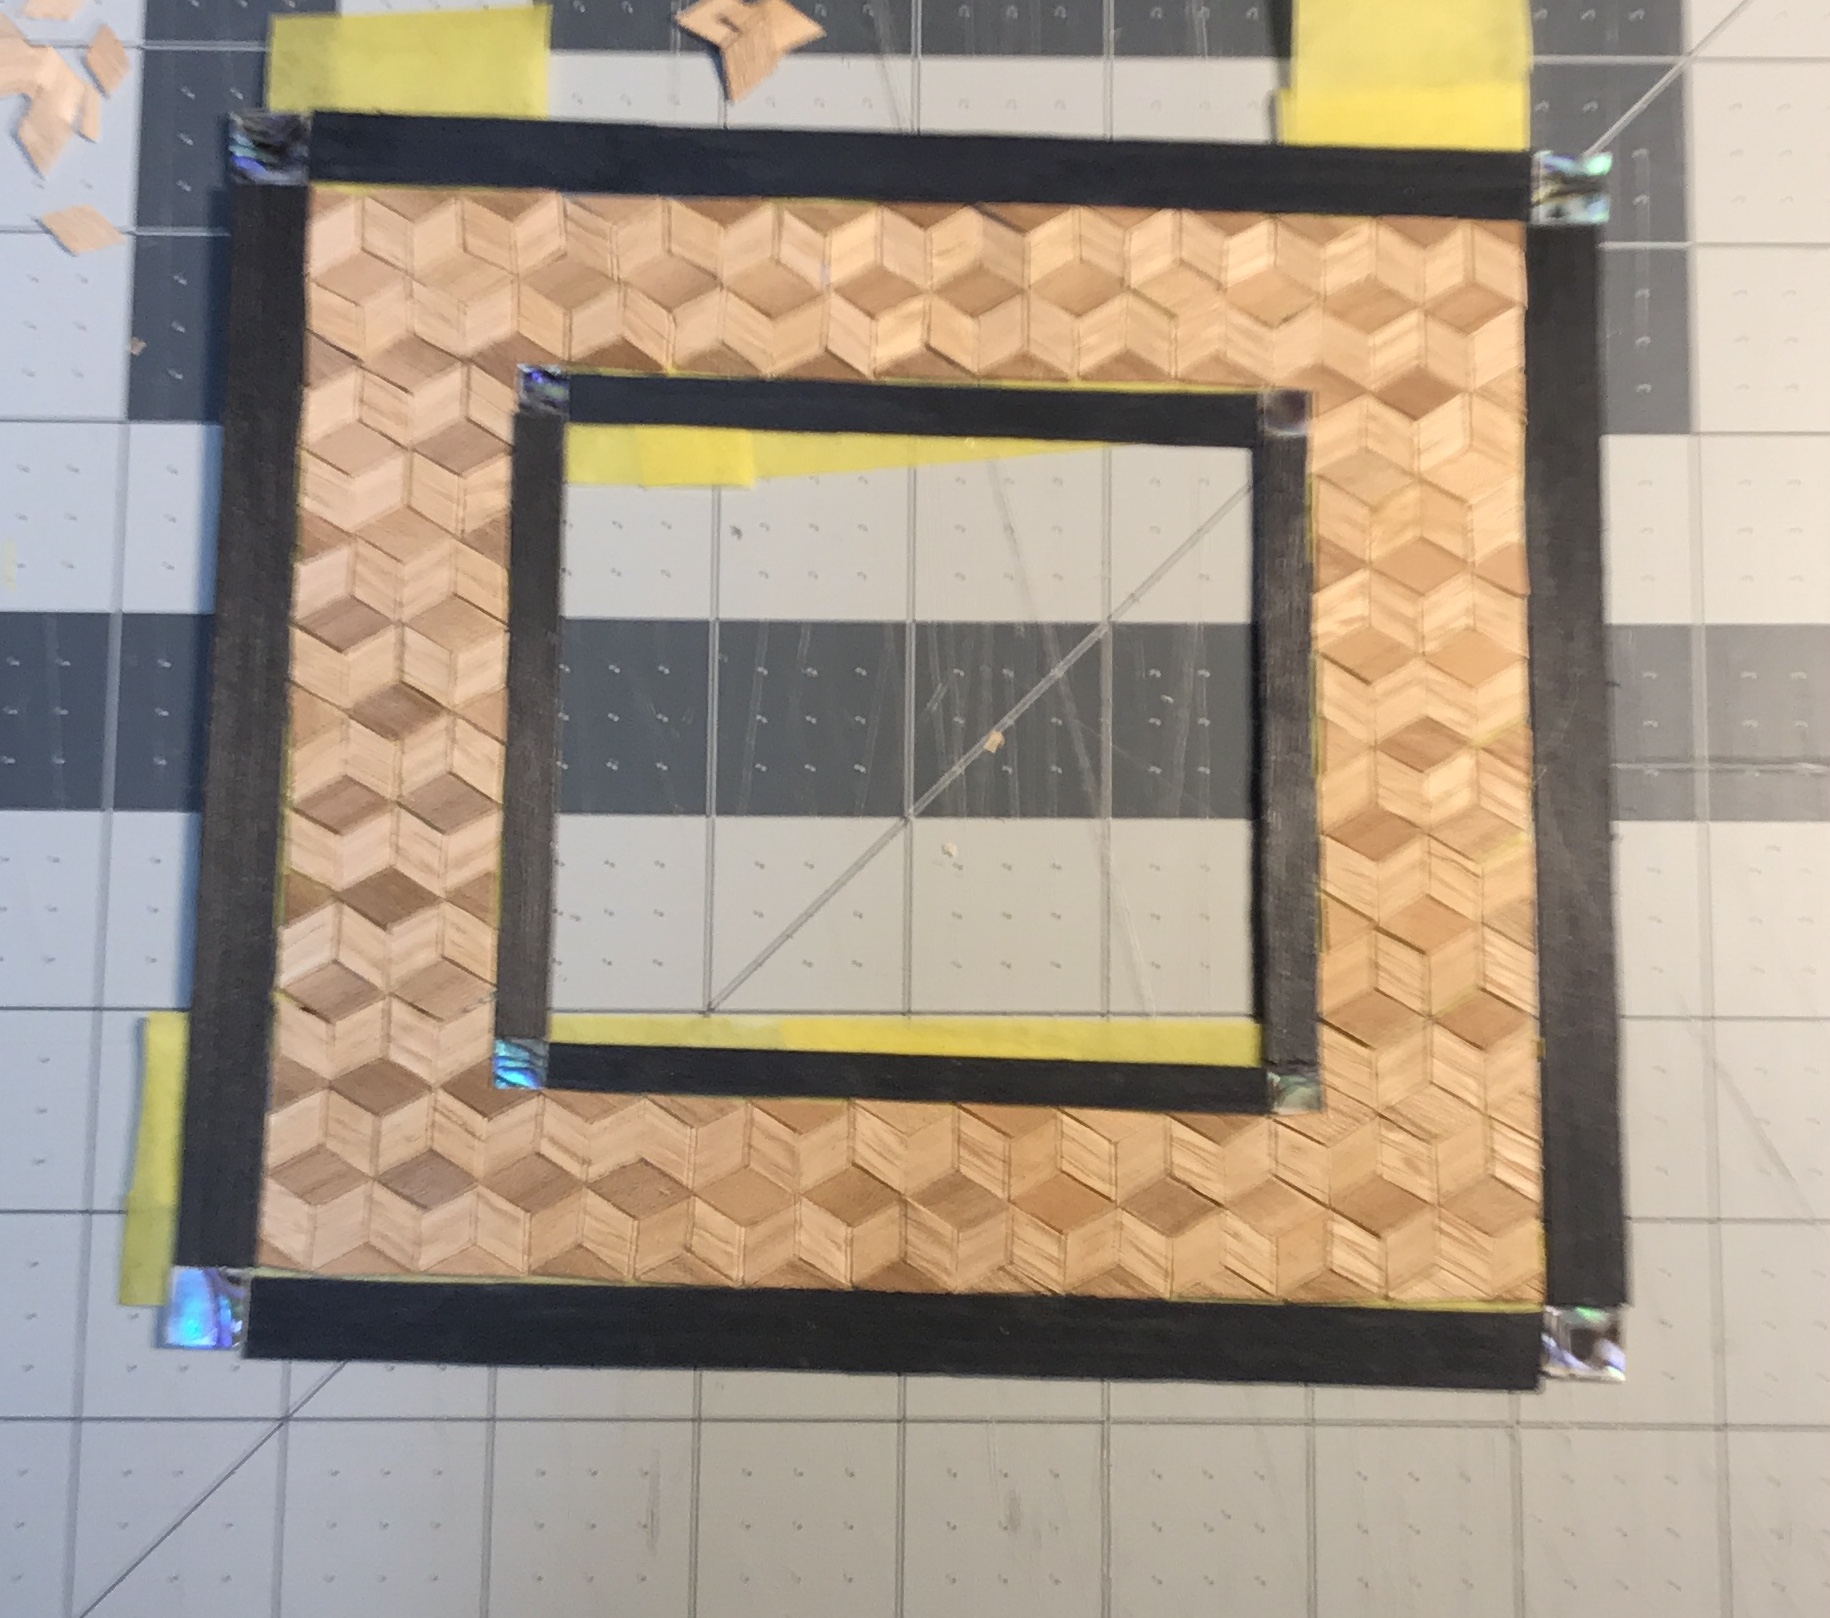
The outside frame made above did not quite fit. The frame pieces were remade and the new frame members along with the Abalam corners are shown in place below. The inside pieces were cut next. These are only 1/4" wide. Four 1/4" squares of Abalam were cut for the inside corners. None of the outside or inside edges are completely straight. Some filler may need to be added. The second picture below shows both frames in place.
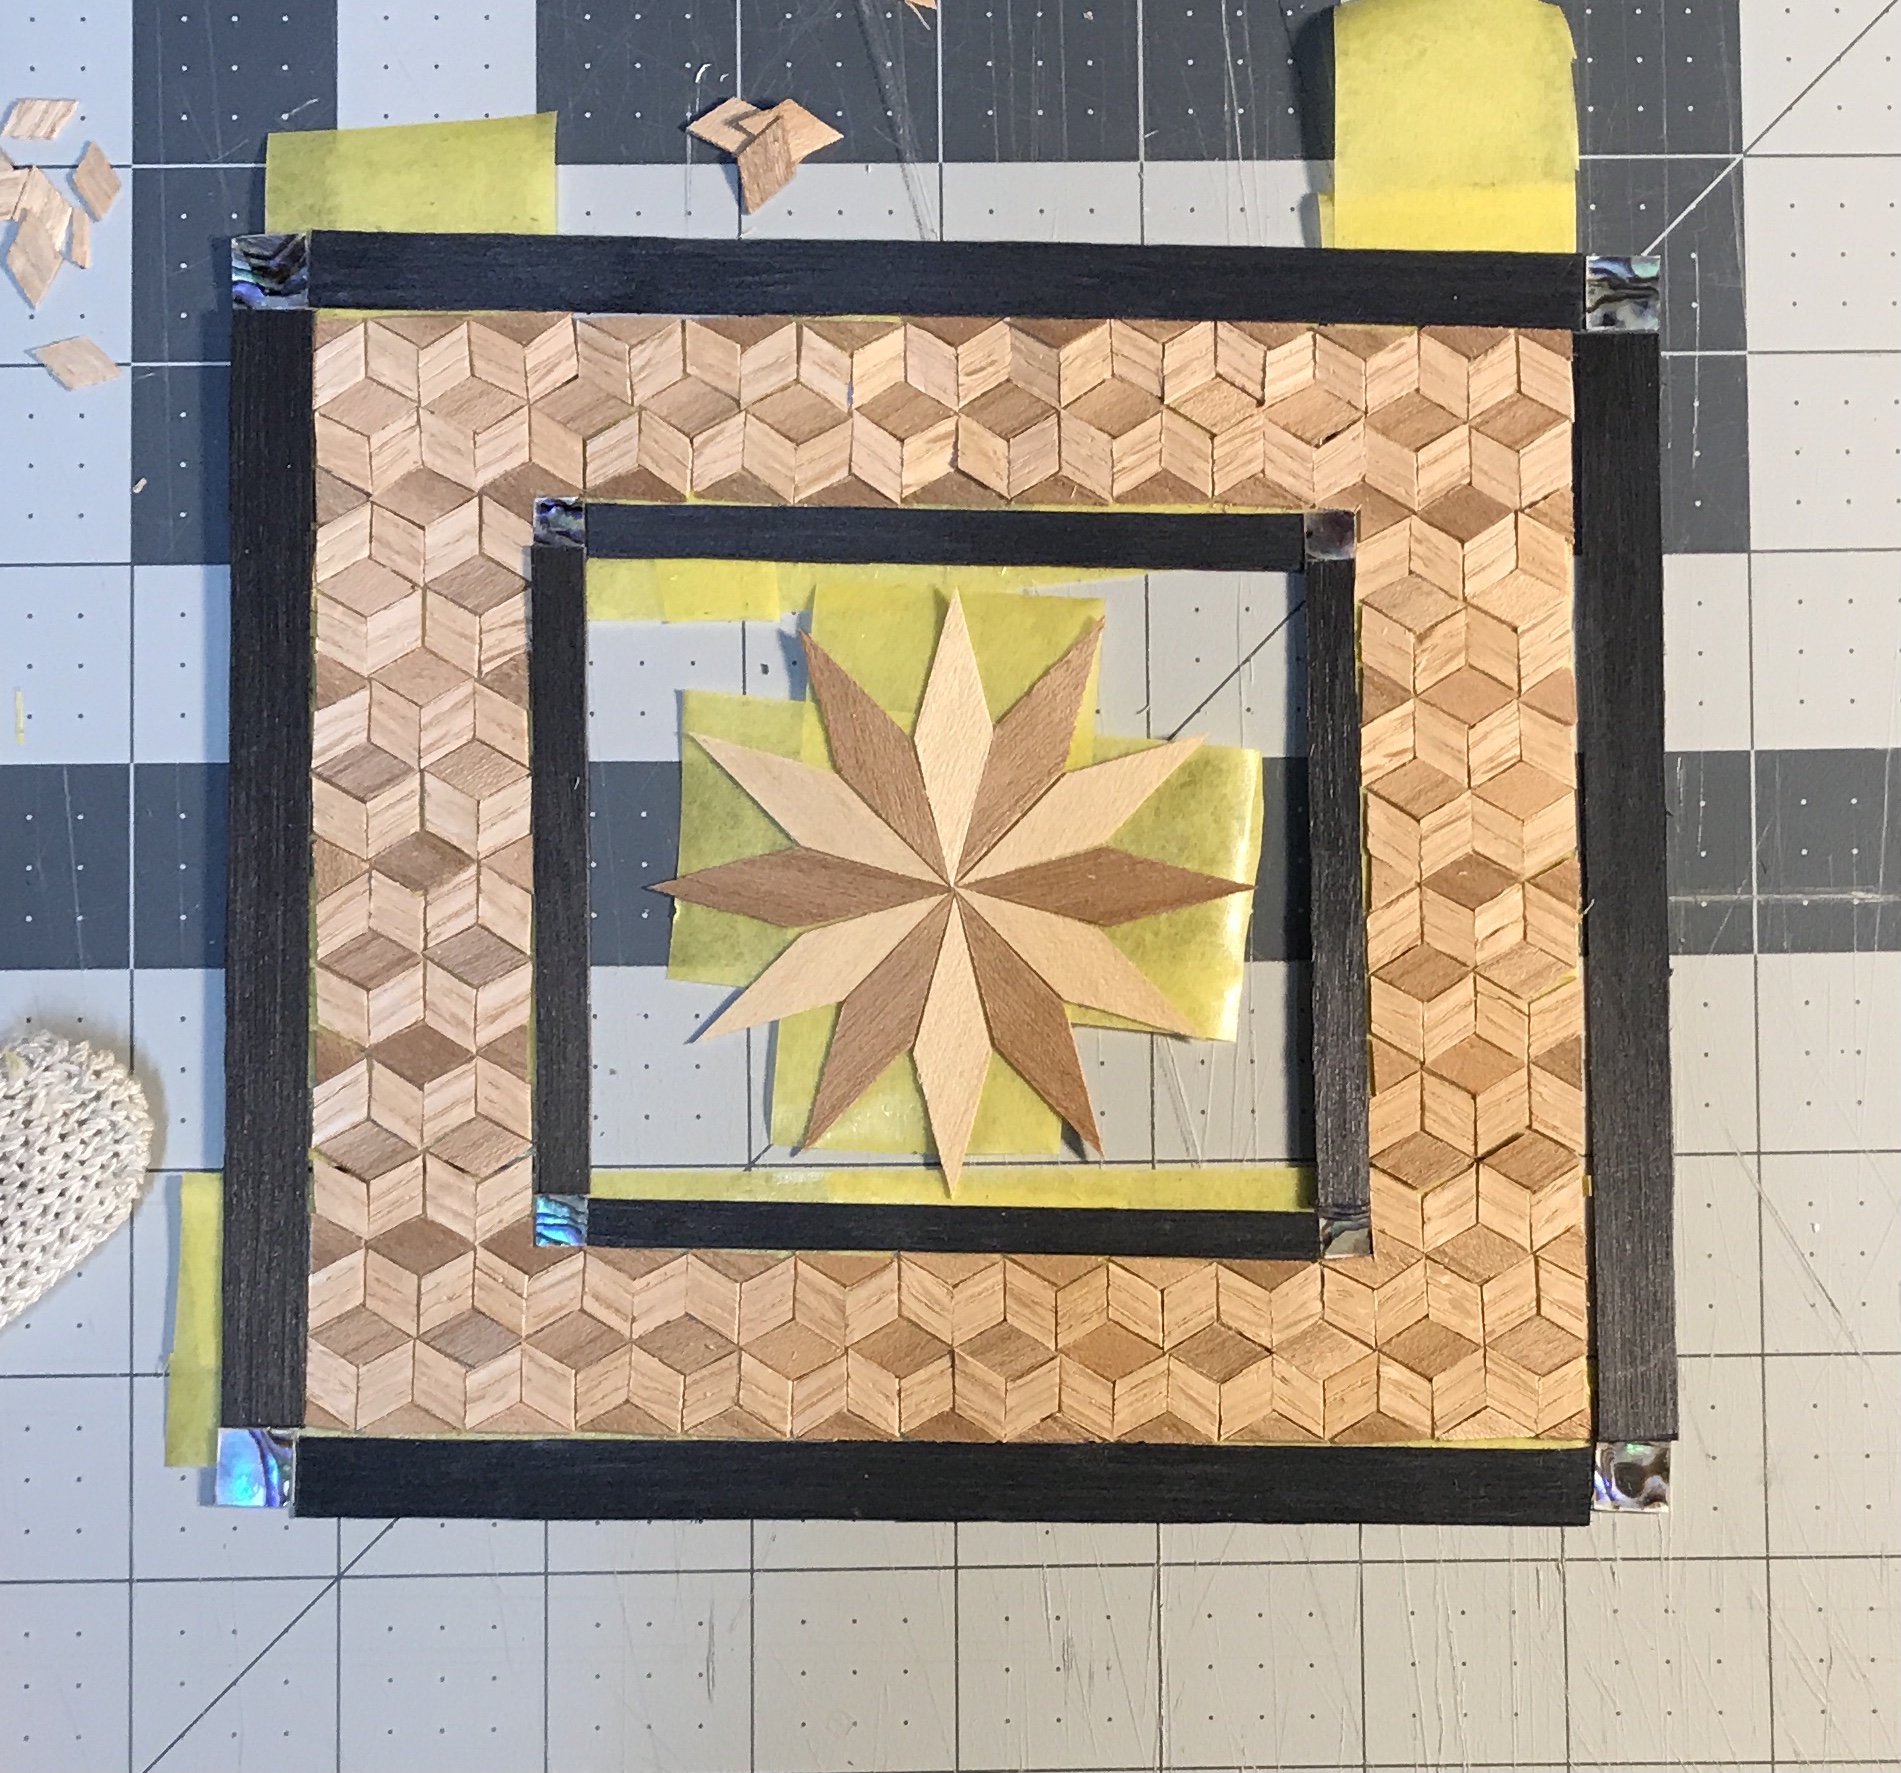
The starburst was assembled and taped. It can be seen placed in the interior in the first photo below. The second photo shows the starburst taped to the "cut to fit" piece of background veneer. The starburst was carefully cut into the background rectangle. After cleaning up the cuts the starburst was pressed into the background. This is seen in the third photo. Finally, the starburst was set into the middle of the cube frame.


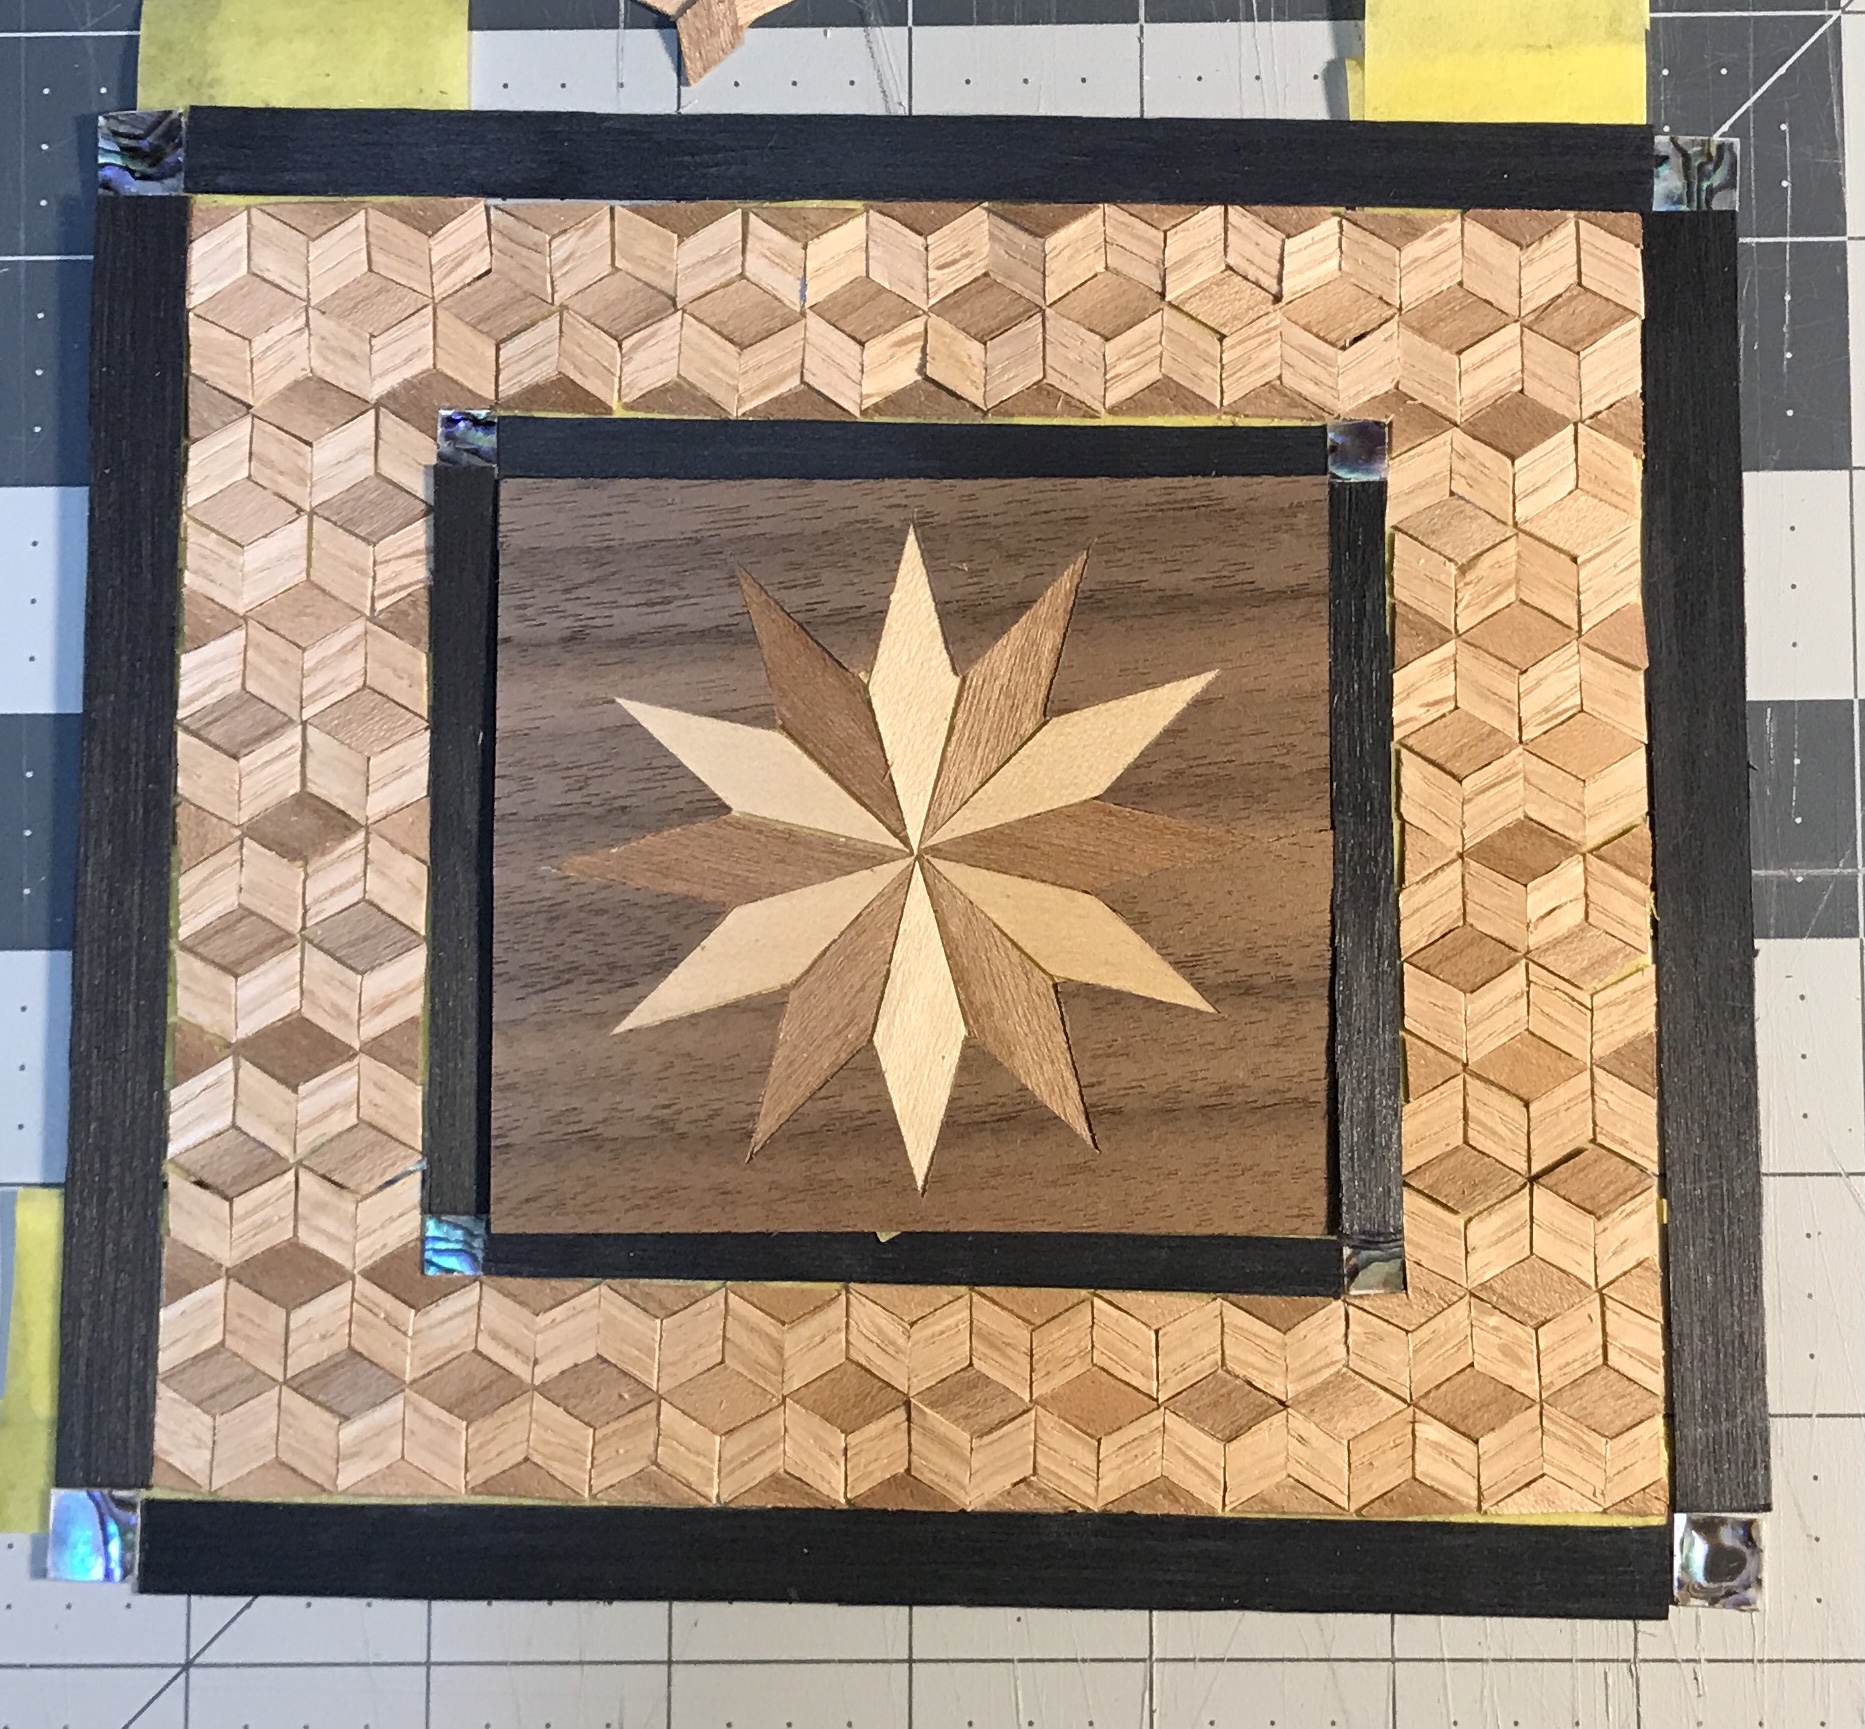
The next goal is putting this side together and gluing it to the inside face. Three hours were spent removing the tape holding the cube frame to the table and rebuilding about half of the cube frame!!! In the end it was finished. The inside and outside frames needed to be trimmed. A 3/8" square Abalam corner was lost and replaced. The entirety was retaped. The gaps between the cubes and the frames were filled where needed. The photo below shows the completed central part of the inner face.
After cutting off the excess tape seen in the photo above, the three taped sections were laid out on the inner face. All three were carefully aligned with the face and each other. The triangles were marked for cutting. This was done in sections and proceeded smoothly. The three parts at this stage are laid out on the face. The sides still need to be cut. The face at this step is shown below.
The sides were cut to fit the face. The triangles were straightforward. The central section took more effort as the central section was about 1/8" too wide on one end and 1/16" too wide on the other. The challenge was the Abalam pieces. They were cut to fit and then the black frame piece was cut to fit. The results of this are seen in the first photo below. (Notice one set of triangles incorrectly oriented.) Glue was spread on the face and the three sections were carefully arrayed on the glued surface with all parts in the correct orientation. The whole was put in the vacuum press for 1.5 hours.
And the tape was removed. Care needs to be taken when removing the tape from the black dyed veneer. It peels the most. Peel across the grain slowly. All else went exceedingly well. Sanding is needed, but otherwise it is finished. The photo below tells the story!
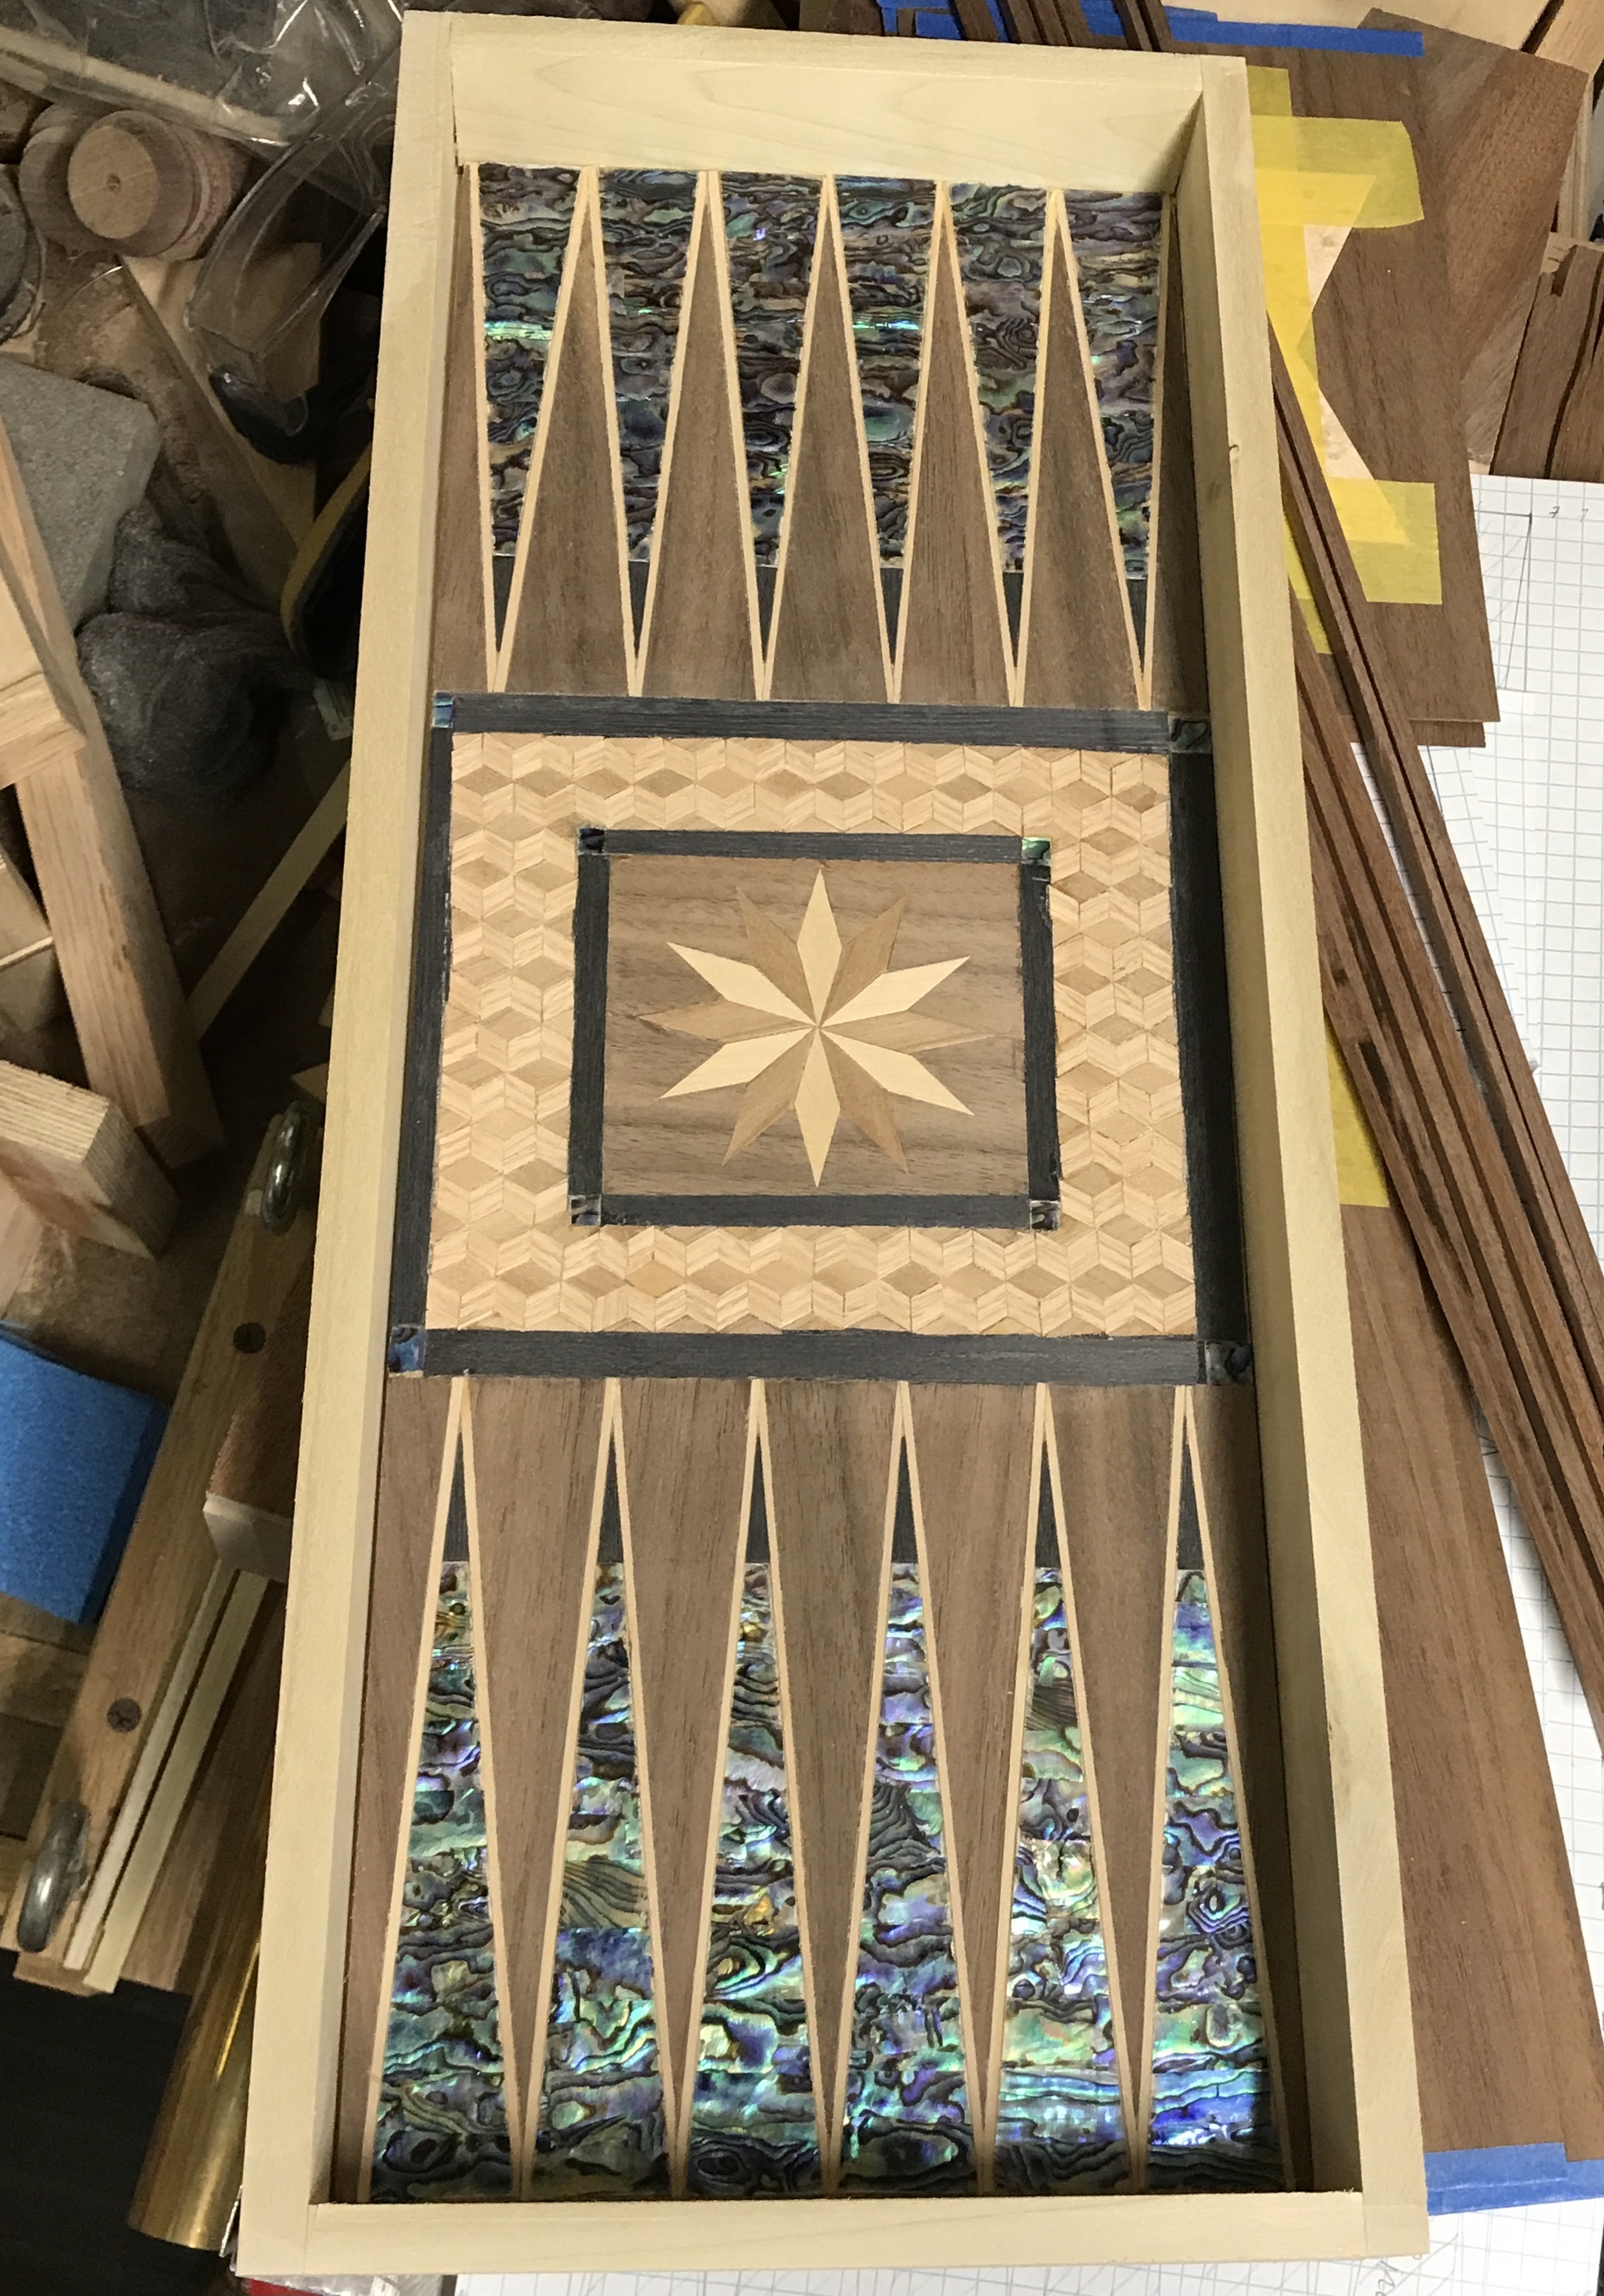
The email from Duke of Pearl indicated that light sanding was okay as the scratches get filled and hidden by the finish. Of course that is usually guitars with a very thick polyurethane finish. I decided not to sand the Abalam. I made a template for the triangles and used it to cut triangle shaped pieces of yellow tape. The triangles were all covered. The small Abalam squares at the corners of the frames were also covered with tape. I didn't think the tape would hold up to an oscillating sander. The veneer was all sanded by hand with 220 grit paper. A few of the bigger gaps were filled with glue and sanded. The dust was removed with the vacuum and brush. The picture below shows the completed playing surface in the box.
The playing face of the second side is next on the agenda. A 6" X 7" rectangle of background veneer was cut. The diagram of the Celtic knot was measured. A centered 5 1/4" X 6 1/8" rectangle was drawn on this veneer. This rectangle serves as the outer limits of the knot. The pieces for the knotwork were laid out as carefully as possible and taped in place. The knot did not fit completely within the proscribed rectangle, but was pretty close and came together nicely as the last piece was added. The taped Celtic knot is shown in the photo below. Cutting this into the background will await the morning, when I am raring to go.
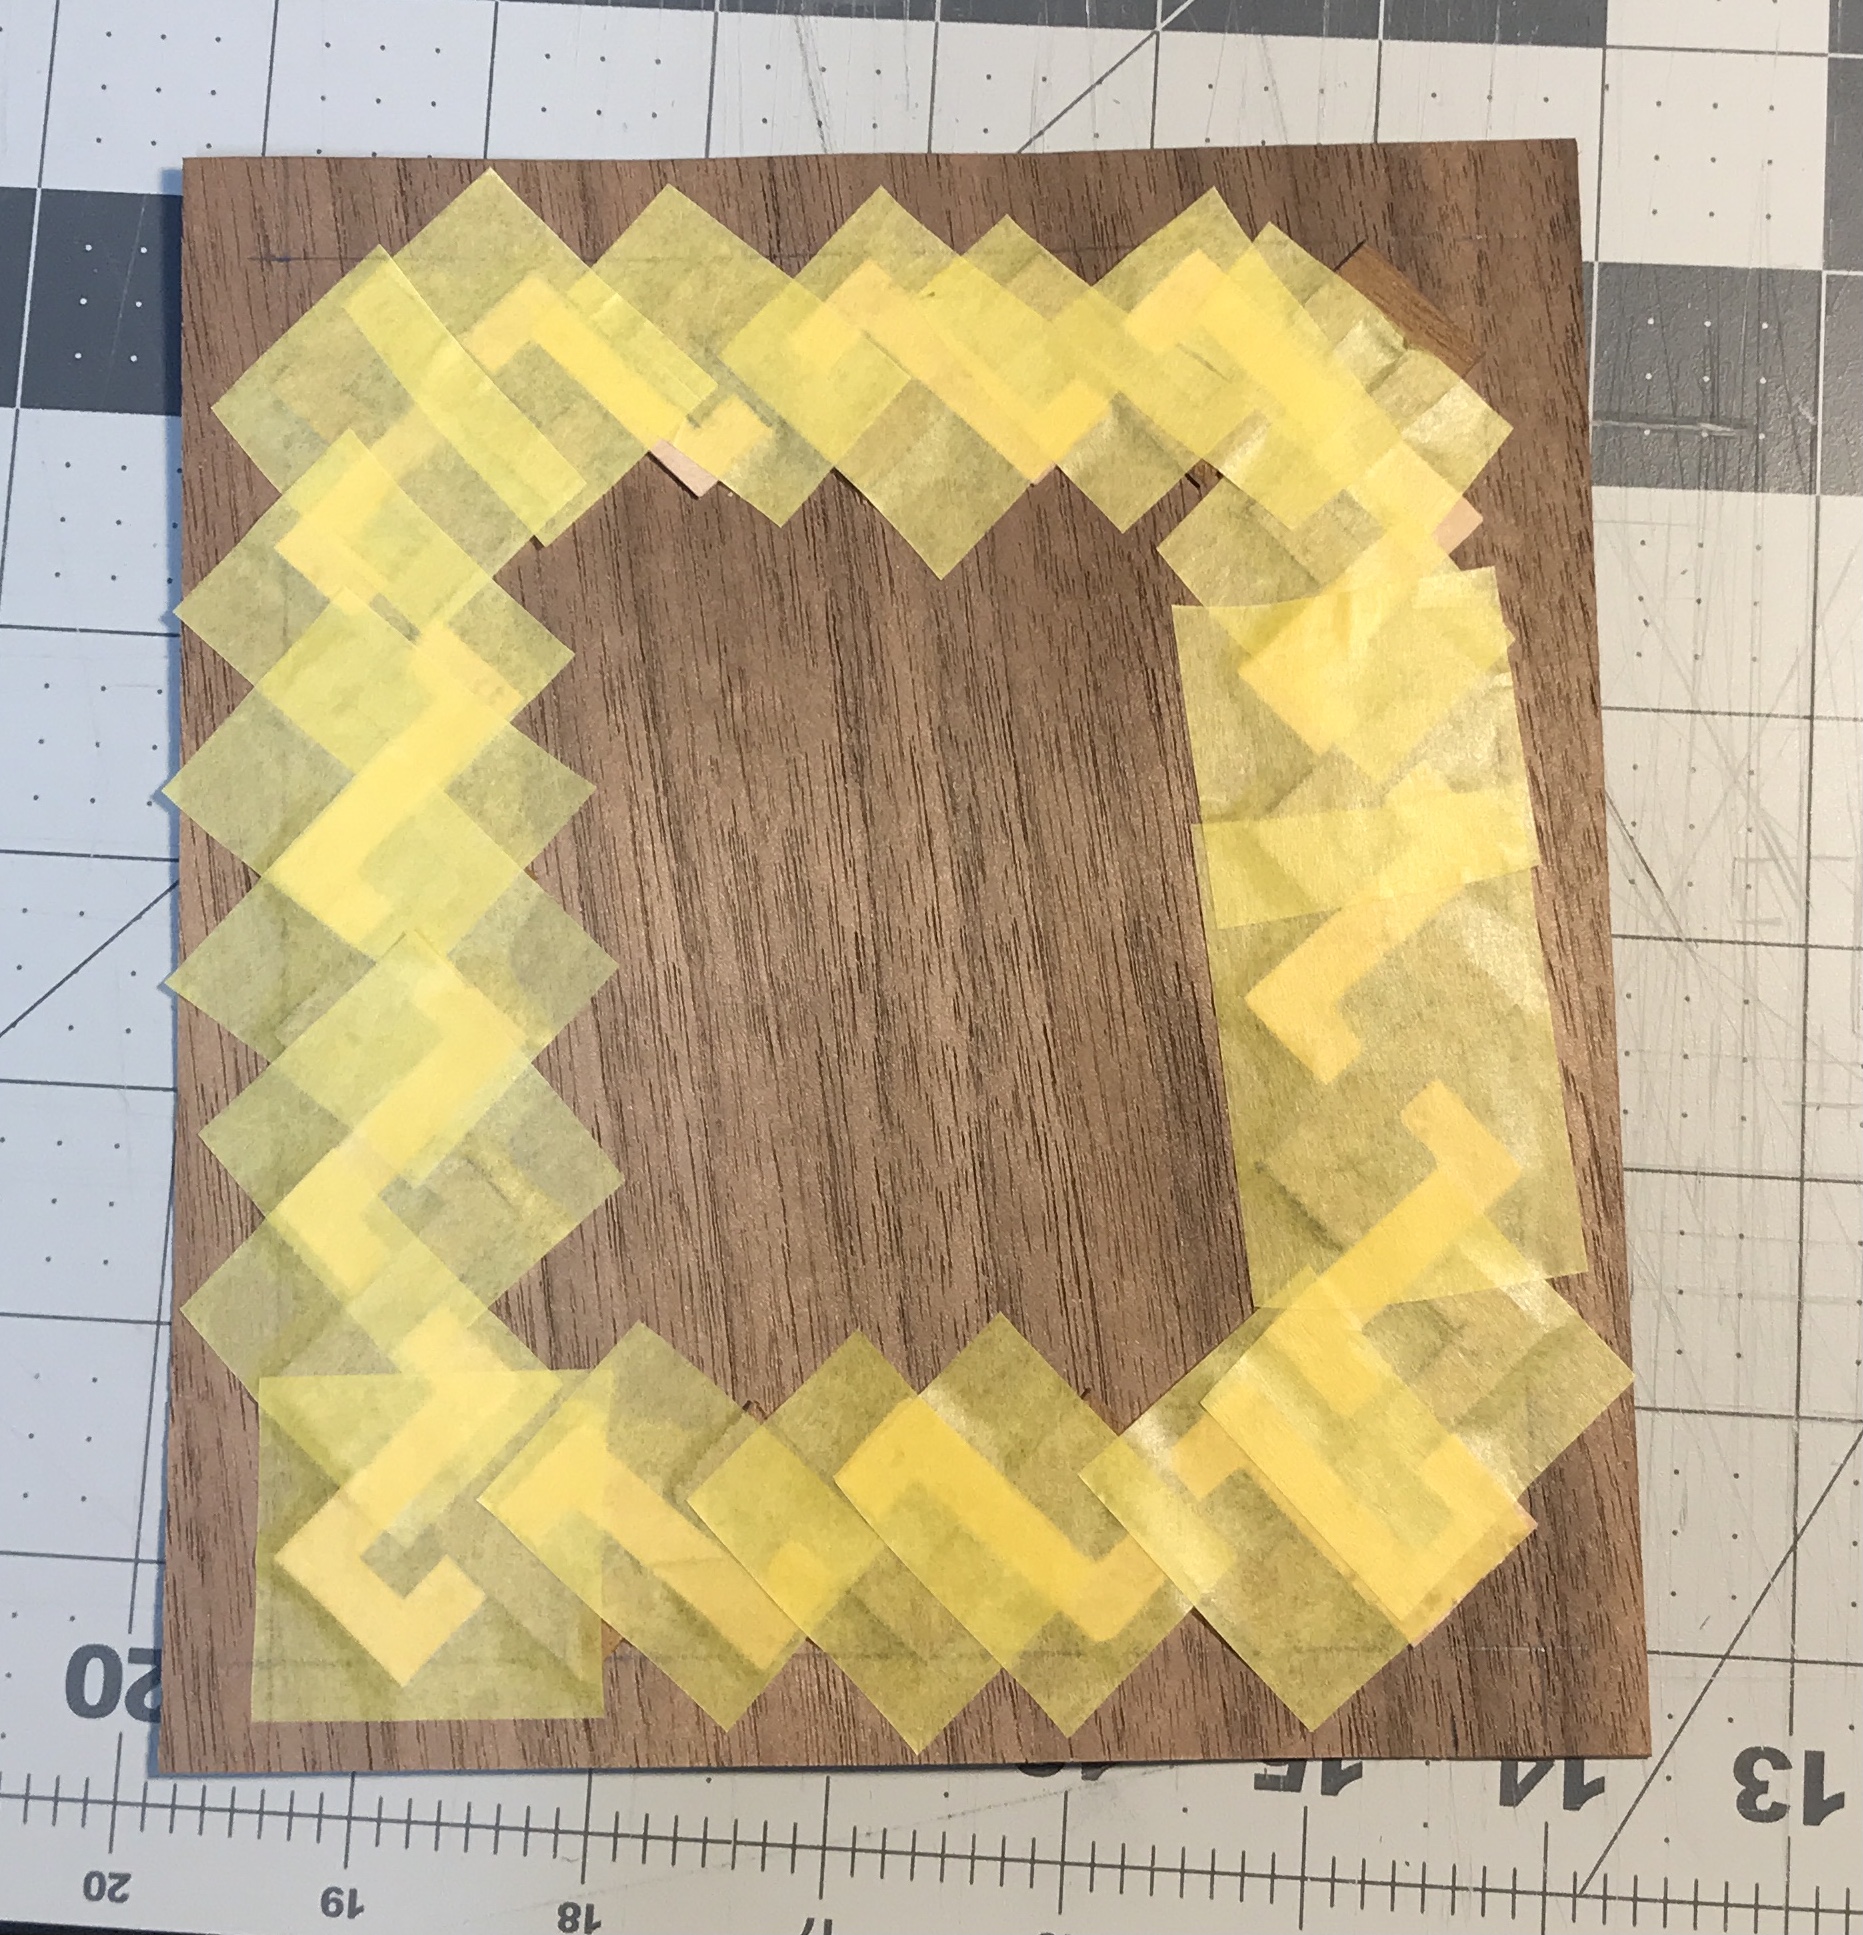
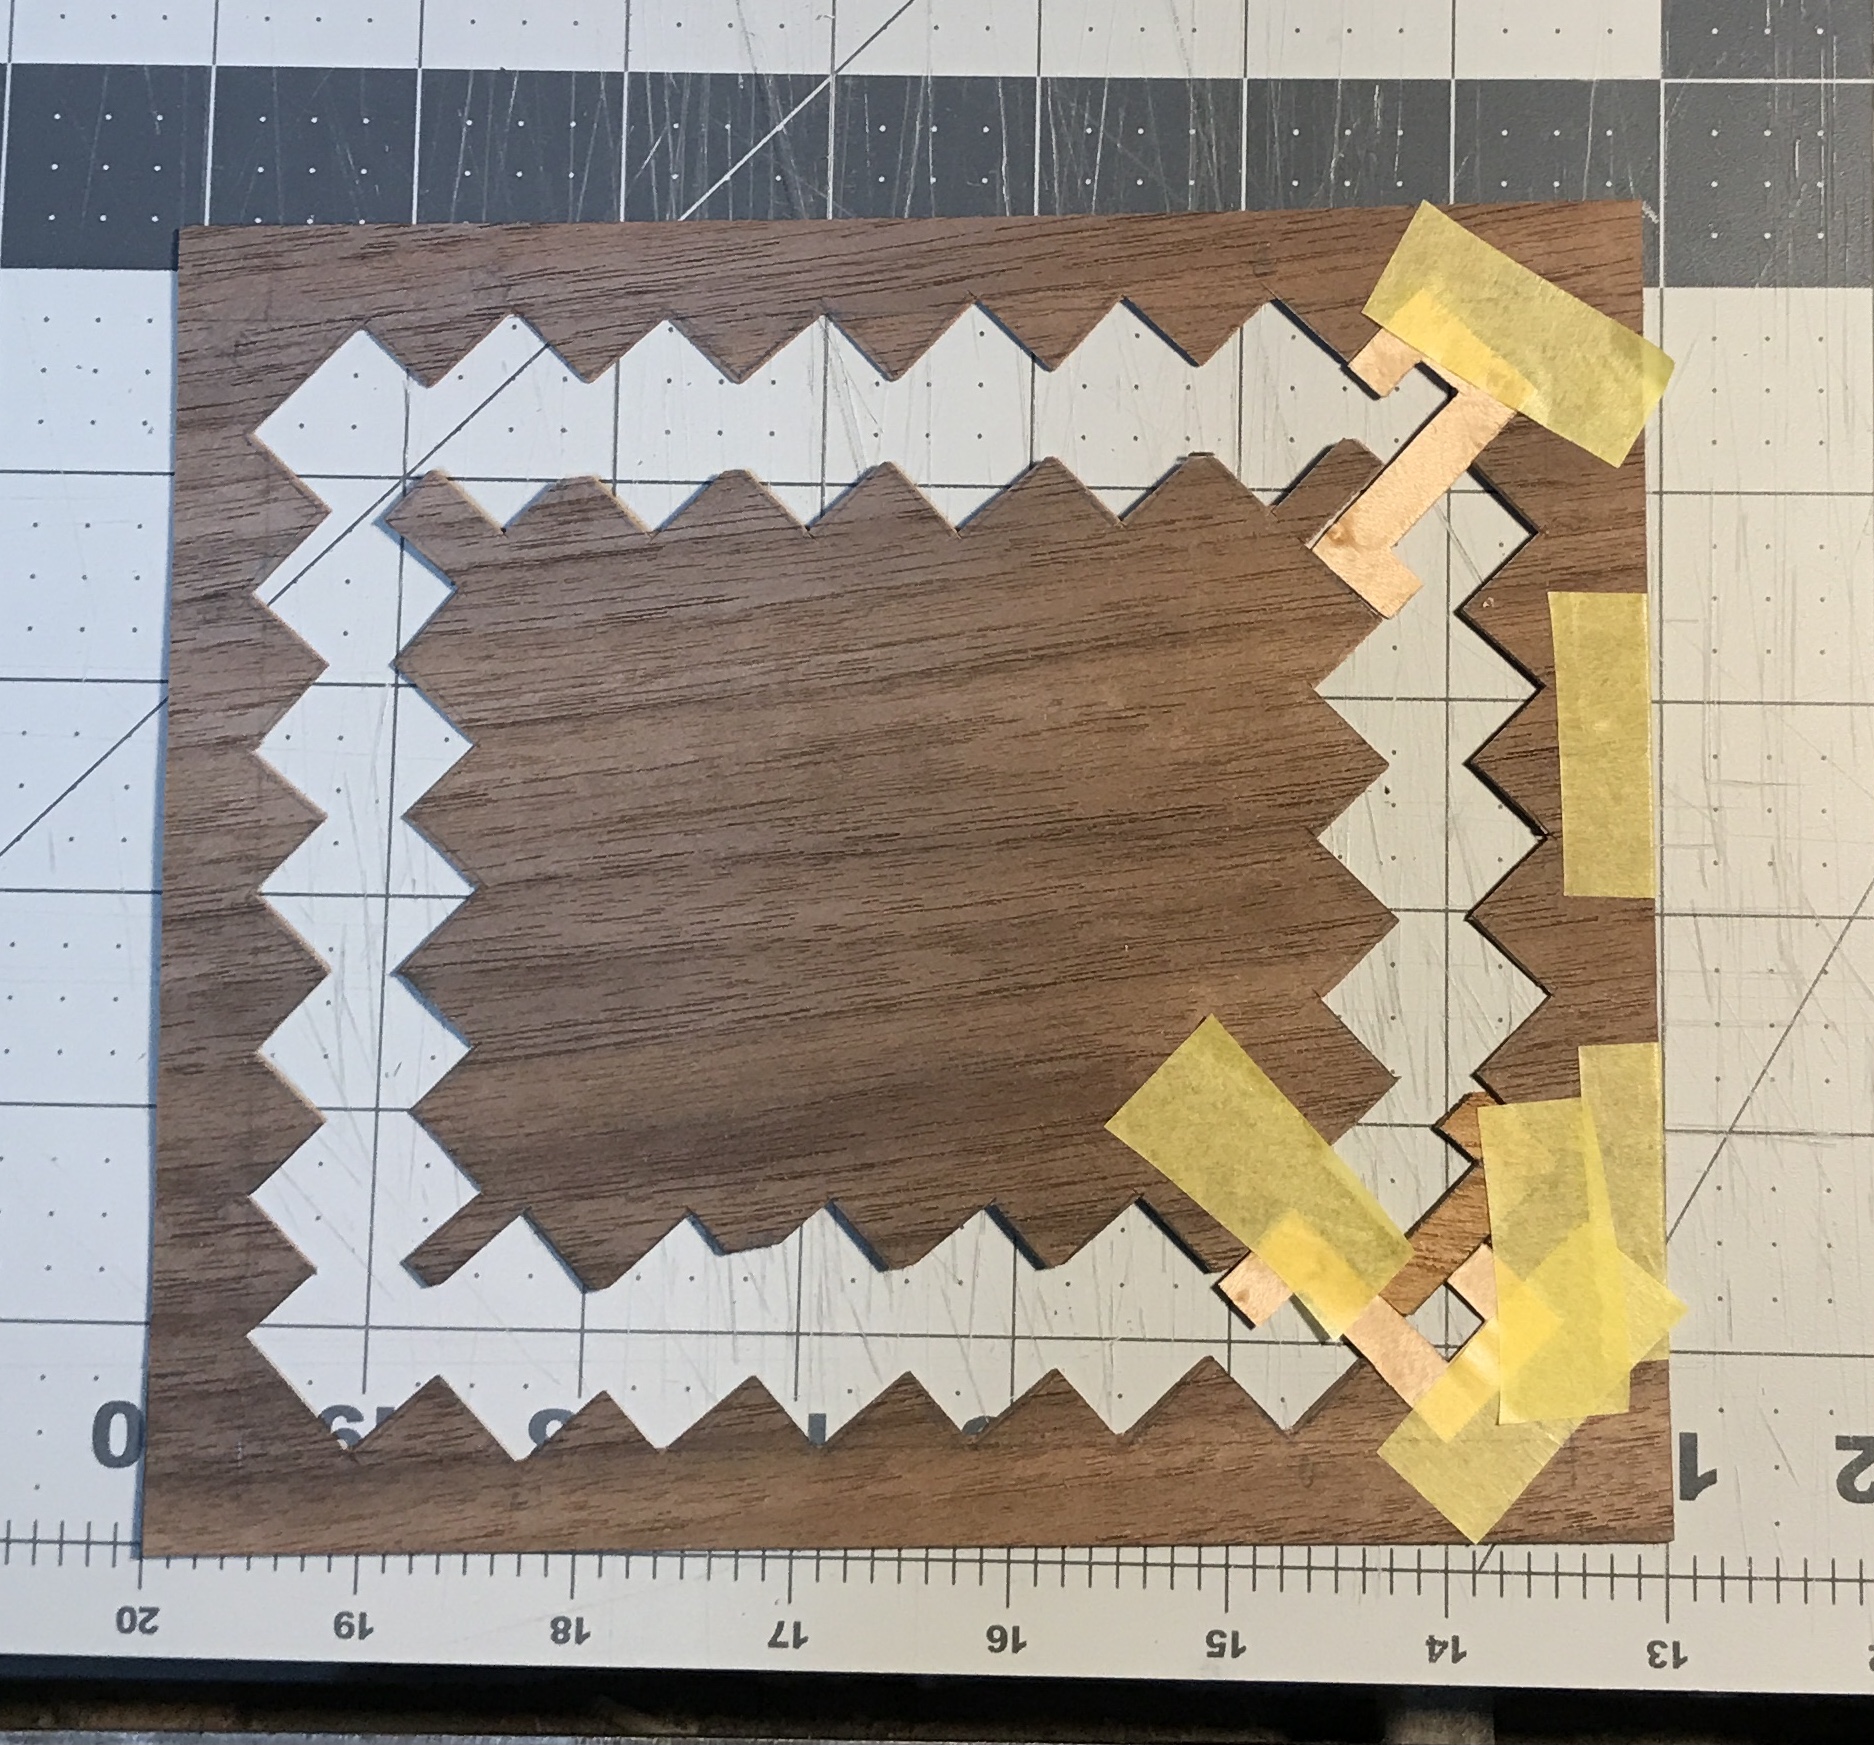
I was raring to go, but the parquetry was not. The first effort was cuttung around the pieces in the standard fashion. This did not work. It was extremely difficult to see where one piece began and another ended. The pieces kept breaking and the background veneer shattered. The second approach was eventually completed. The pieces were traced in place with a very sharp pencil. The entirety was then cut out trying to cut just inside of the lines. There was some breakage of sharp corners on the inside section. The first photo shows the first few pieces aligned and taped in place. After overcoming some challenges a half a dozen pieces were taped in place. The second photo shows the flip side. All of the gaps and misfits are readily apparent. Time to find something different.
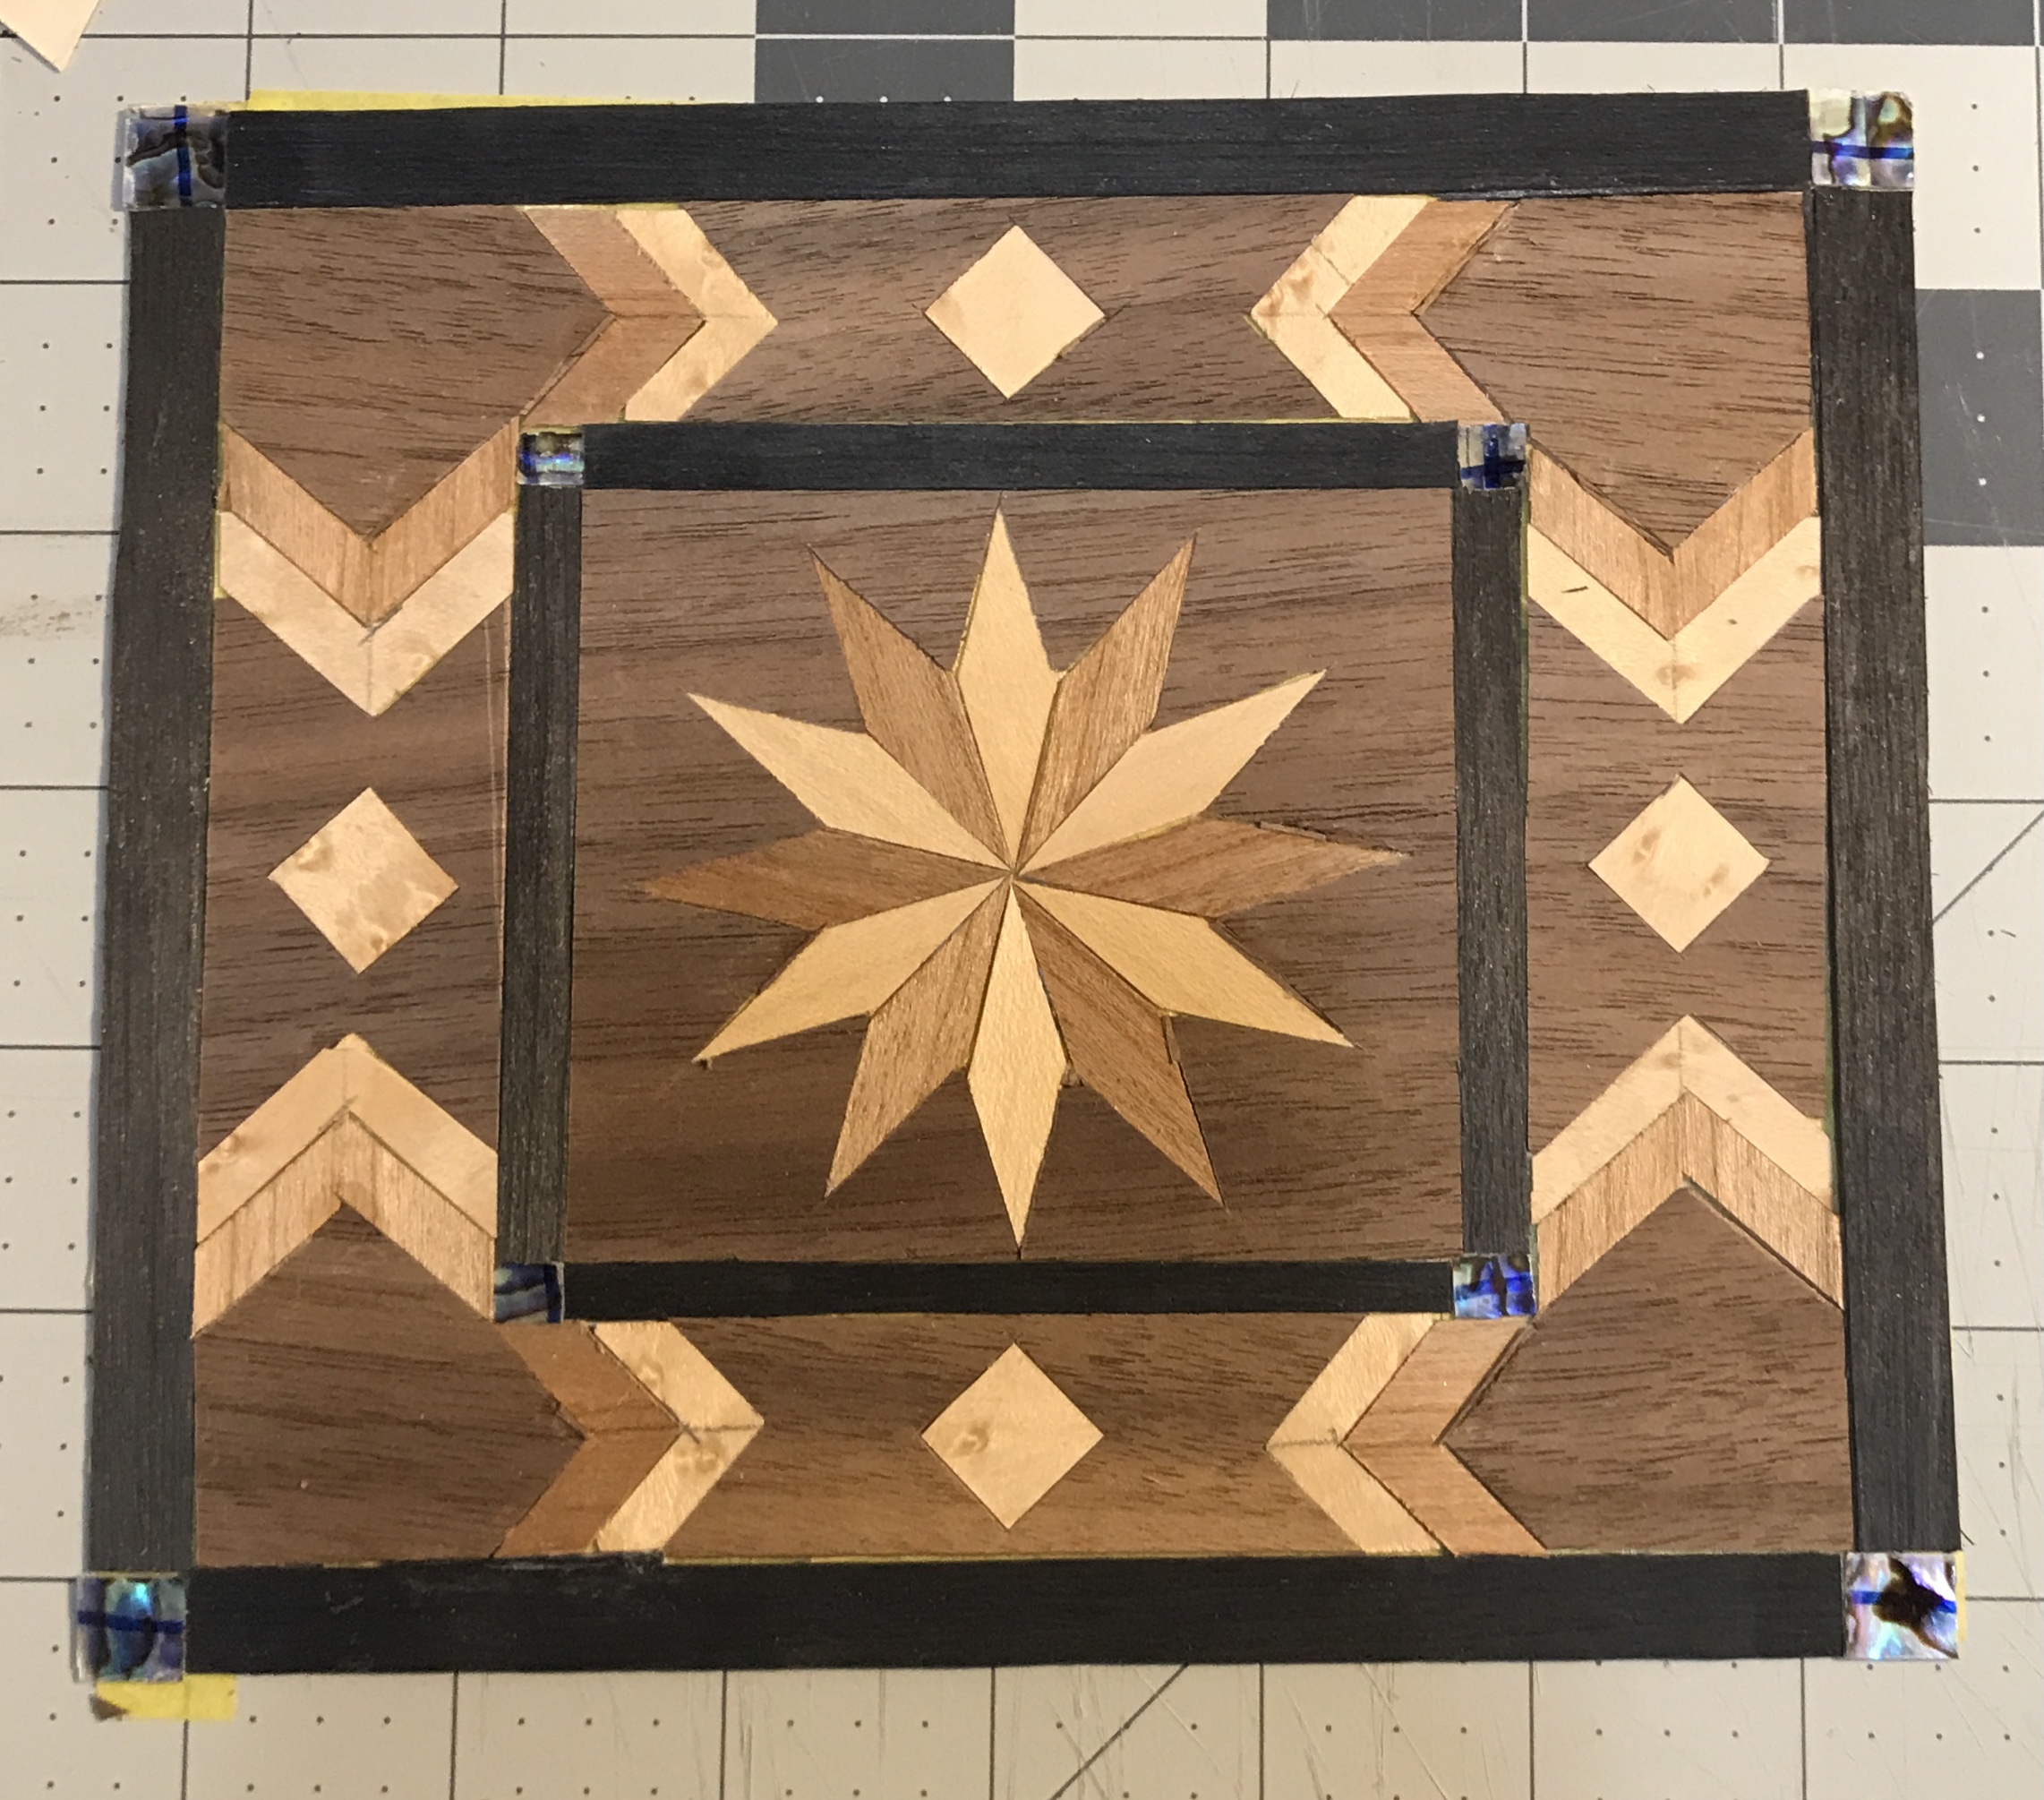
A new design was sketched out. After sleeping on it, an alternative was considered. The two alternatives are shown in the photo below. Should the chevrons point in to the Abalam (top and right) diamond our out away from it? The inward pointing diamonds looked best. A simple design, but hopefully interesting enough for this board. The design will be modified slightly from that seen below. The chevrons on the wide sides will be moved out to the corners to meet the adjacent chevrons at their corners.
A piece of the background veneer was cut to fit the starburst portion of the next inner face. The starburst pieces were laid out, taped and cut into this veneer. The starburst was taped in place in the background. A few gaps had bits of the background veneer glued in place. The black framing strips were cut as above.
A jig was set up to cut the chevrons, similar to the jigs for cutting the rhombi. Two pieces of scrap (one is the curly maple) were cut to 1 1/8" wide strips. The strips had lines drawn down the middle on both sides. The strips were aligned in the jig and a cut was made from the line to the edge. After cutting all the chevrons on this side the strip of veneer was flipped and the other side of each chevron was cut.
The next step is setting up the parts to get a feel for cutting out the background pieces. The first photo below shows this mocked up central portion. This mockup showed that the top and bottom need to be 1/4" thinner. The chevrons for the top and bottom had 1/8" removed from each end. This makes the bottom and top each 7/8" wide. The sides were fine at 1 1/8" wide. One wide and one narrow chevron were aligned on the corner of a piece of background veneer. The background was cut to fit the two chevrons. This is shown in the second photo where two background corners have been cut. This was repeated for the top two corners as shown in the third photo below.
The background for the central starburst and the surrounding black frames need some trimming to make everything fit. This was taken care of this morning. Only the central starburst was slightly trimmed. The four pieces that fit between the chevrons were cut to fit. The first photo below shows the first piece taped in place between the two corners and the four chevrons. The second photo shows the top and bottoms taped together. The third shows three sides done and the fourth shows all four sides completed. It is a tight fit all around and measures 5 3/16" X 6 1/8".


The photo below shows an idea to put square curly maple pieces centrally located in the side areas to break them up. I like this idea and will cut in the squares in this afternoon. The 1/4" square pieces of Abalam also need to be cut. The squares were cut in. The 1/4" squares of Abalam were cut to fit and taped in place. All Abalam pieces were marked with the bad side to be glued (or shown in the third photo below).
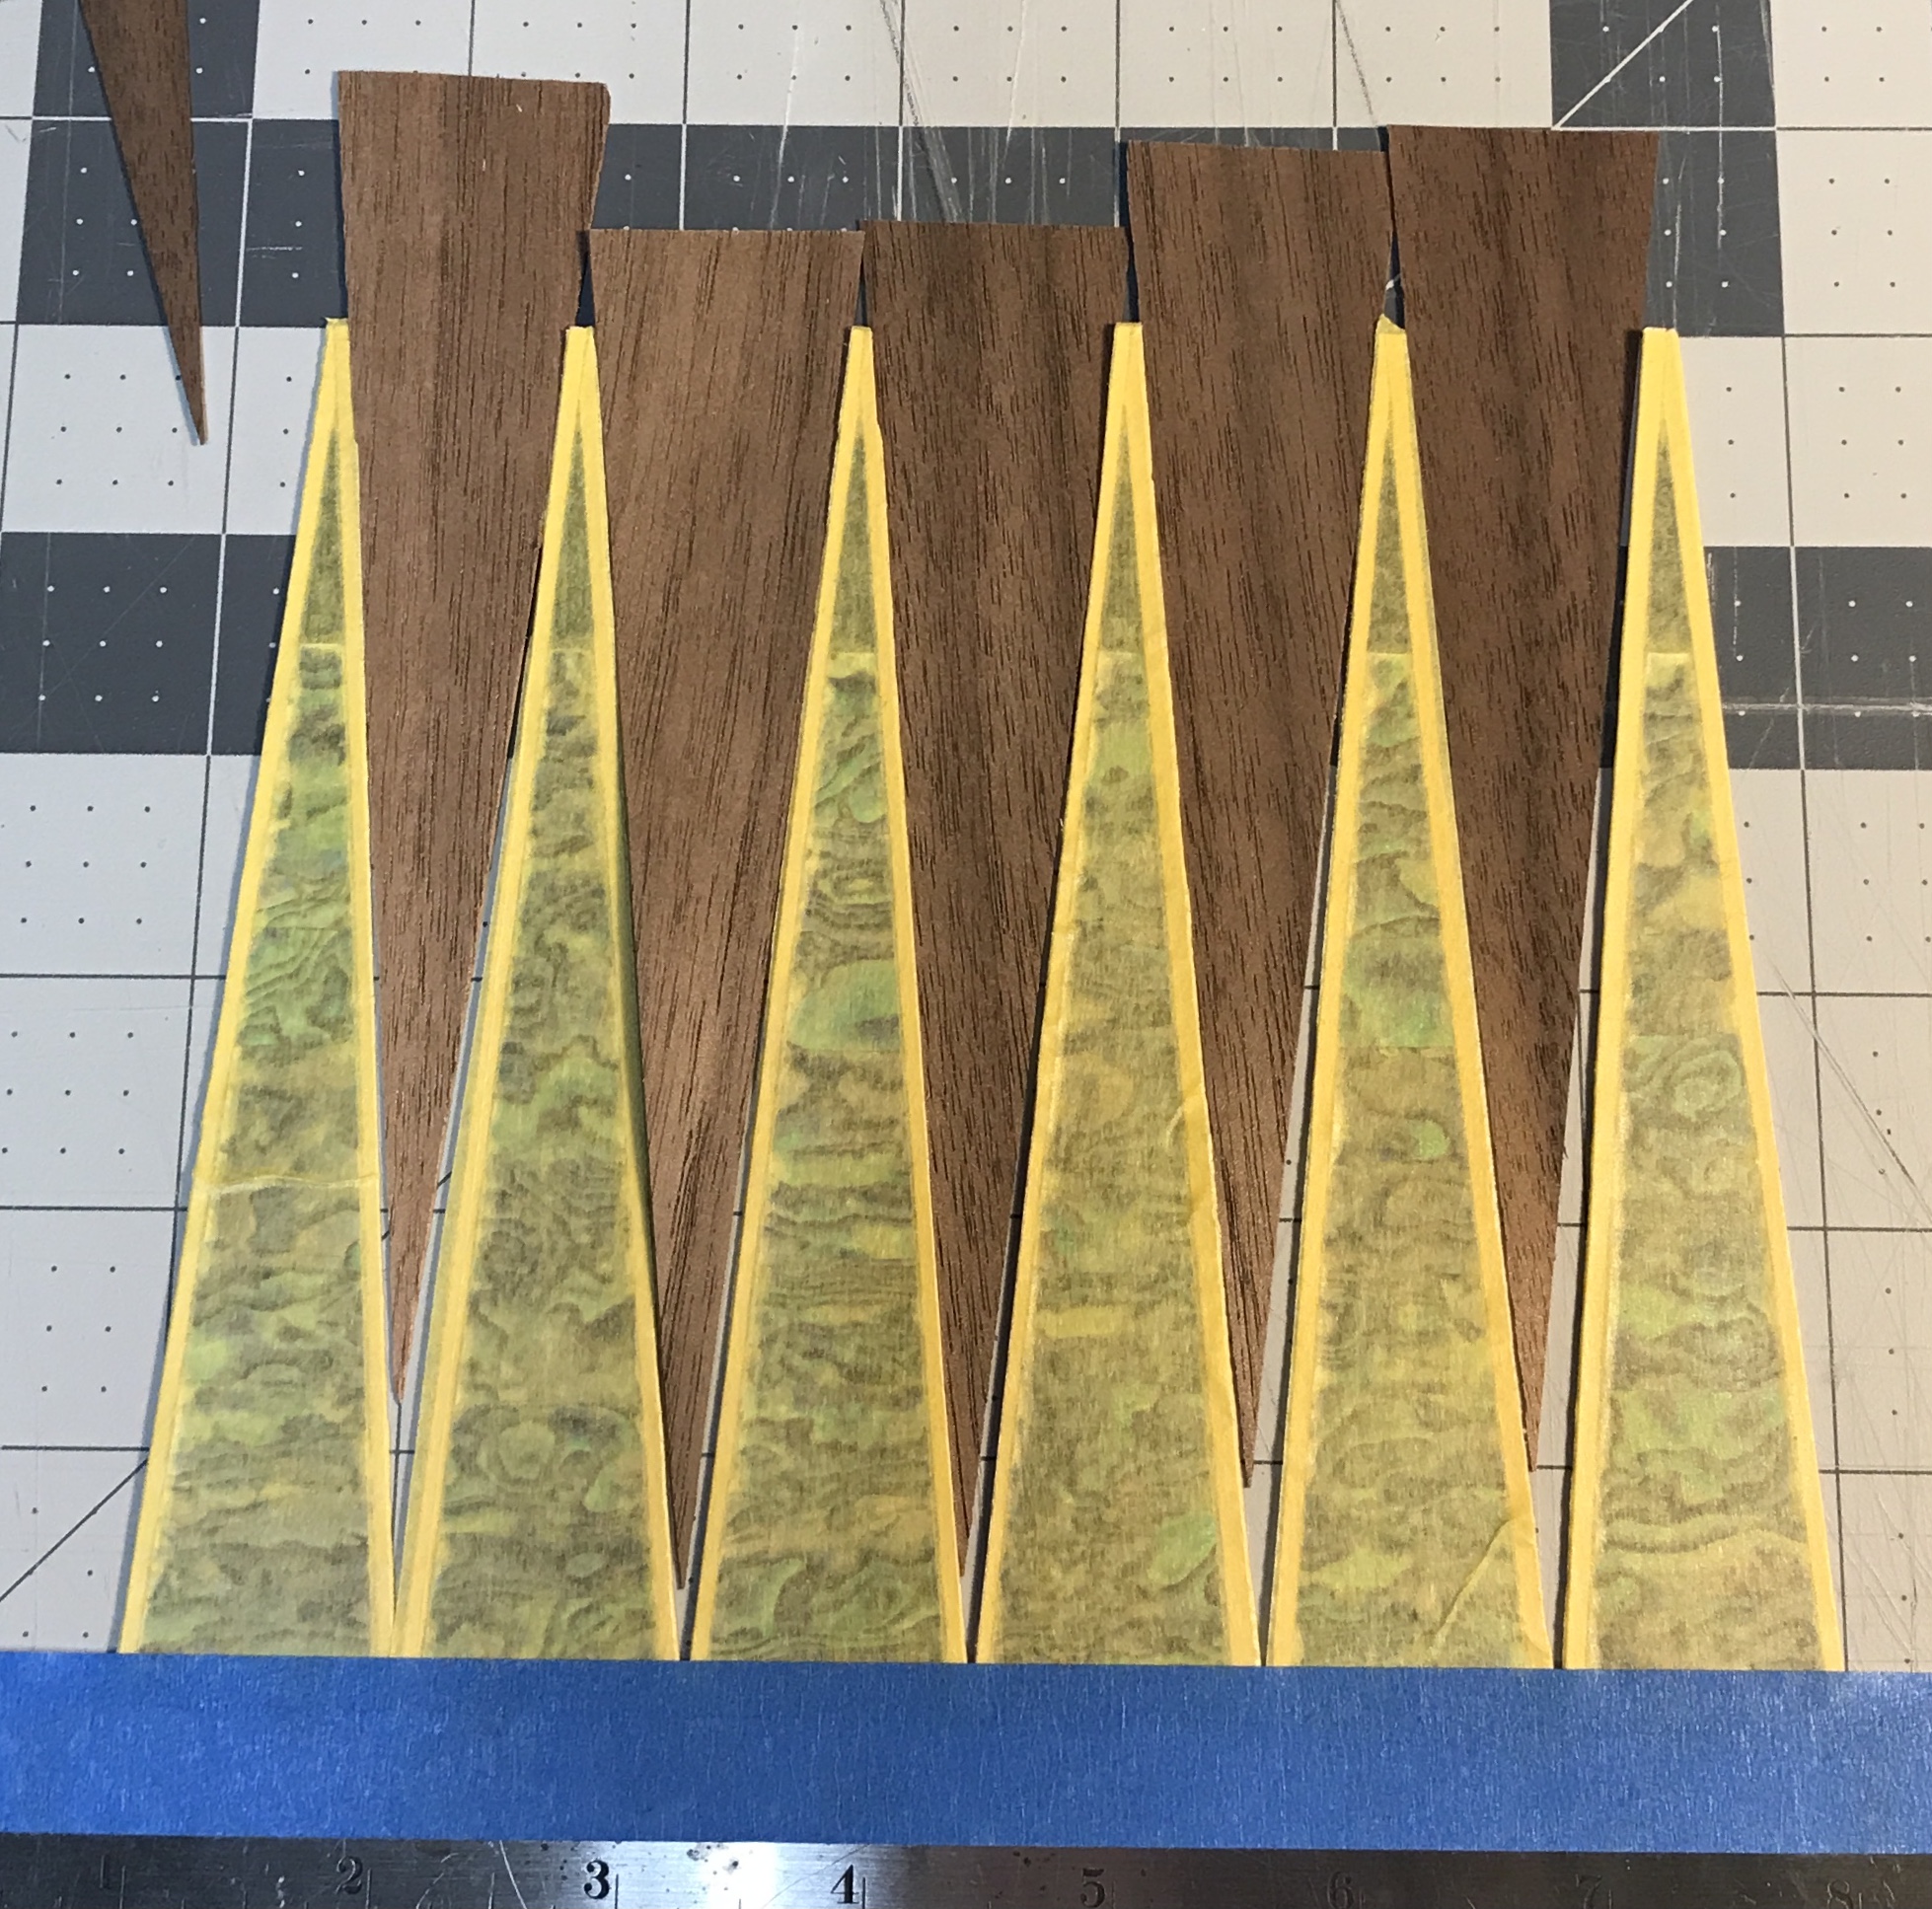
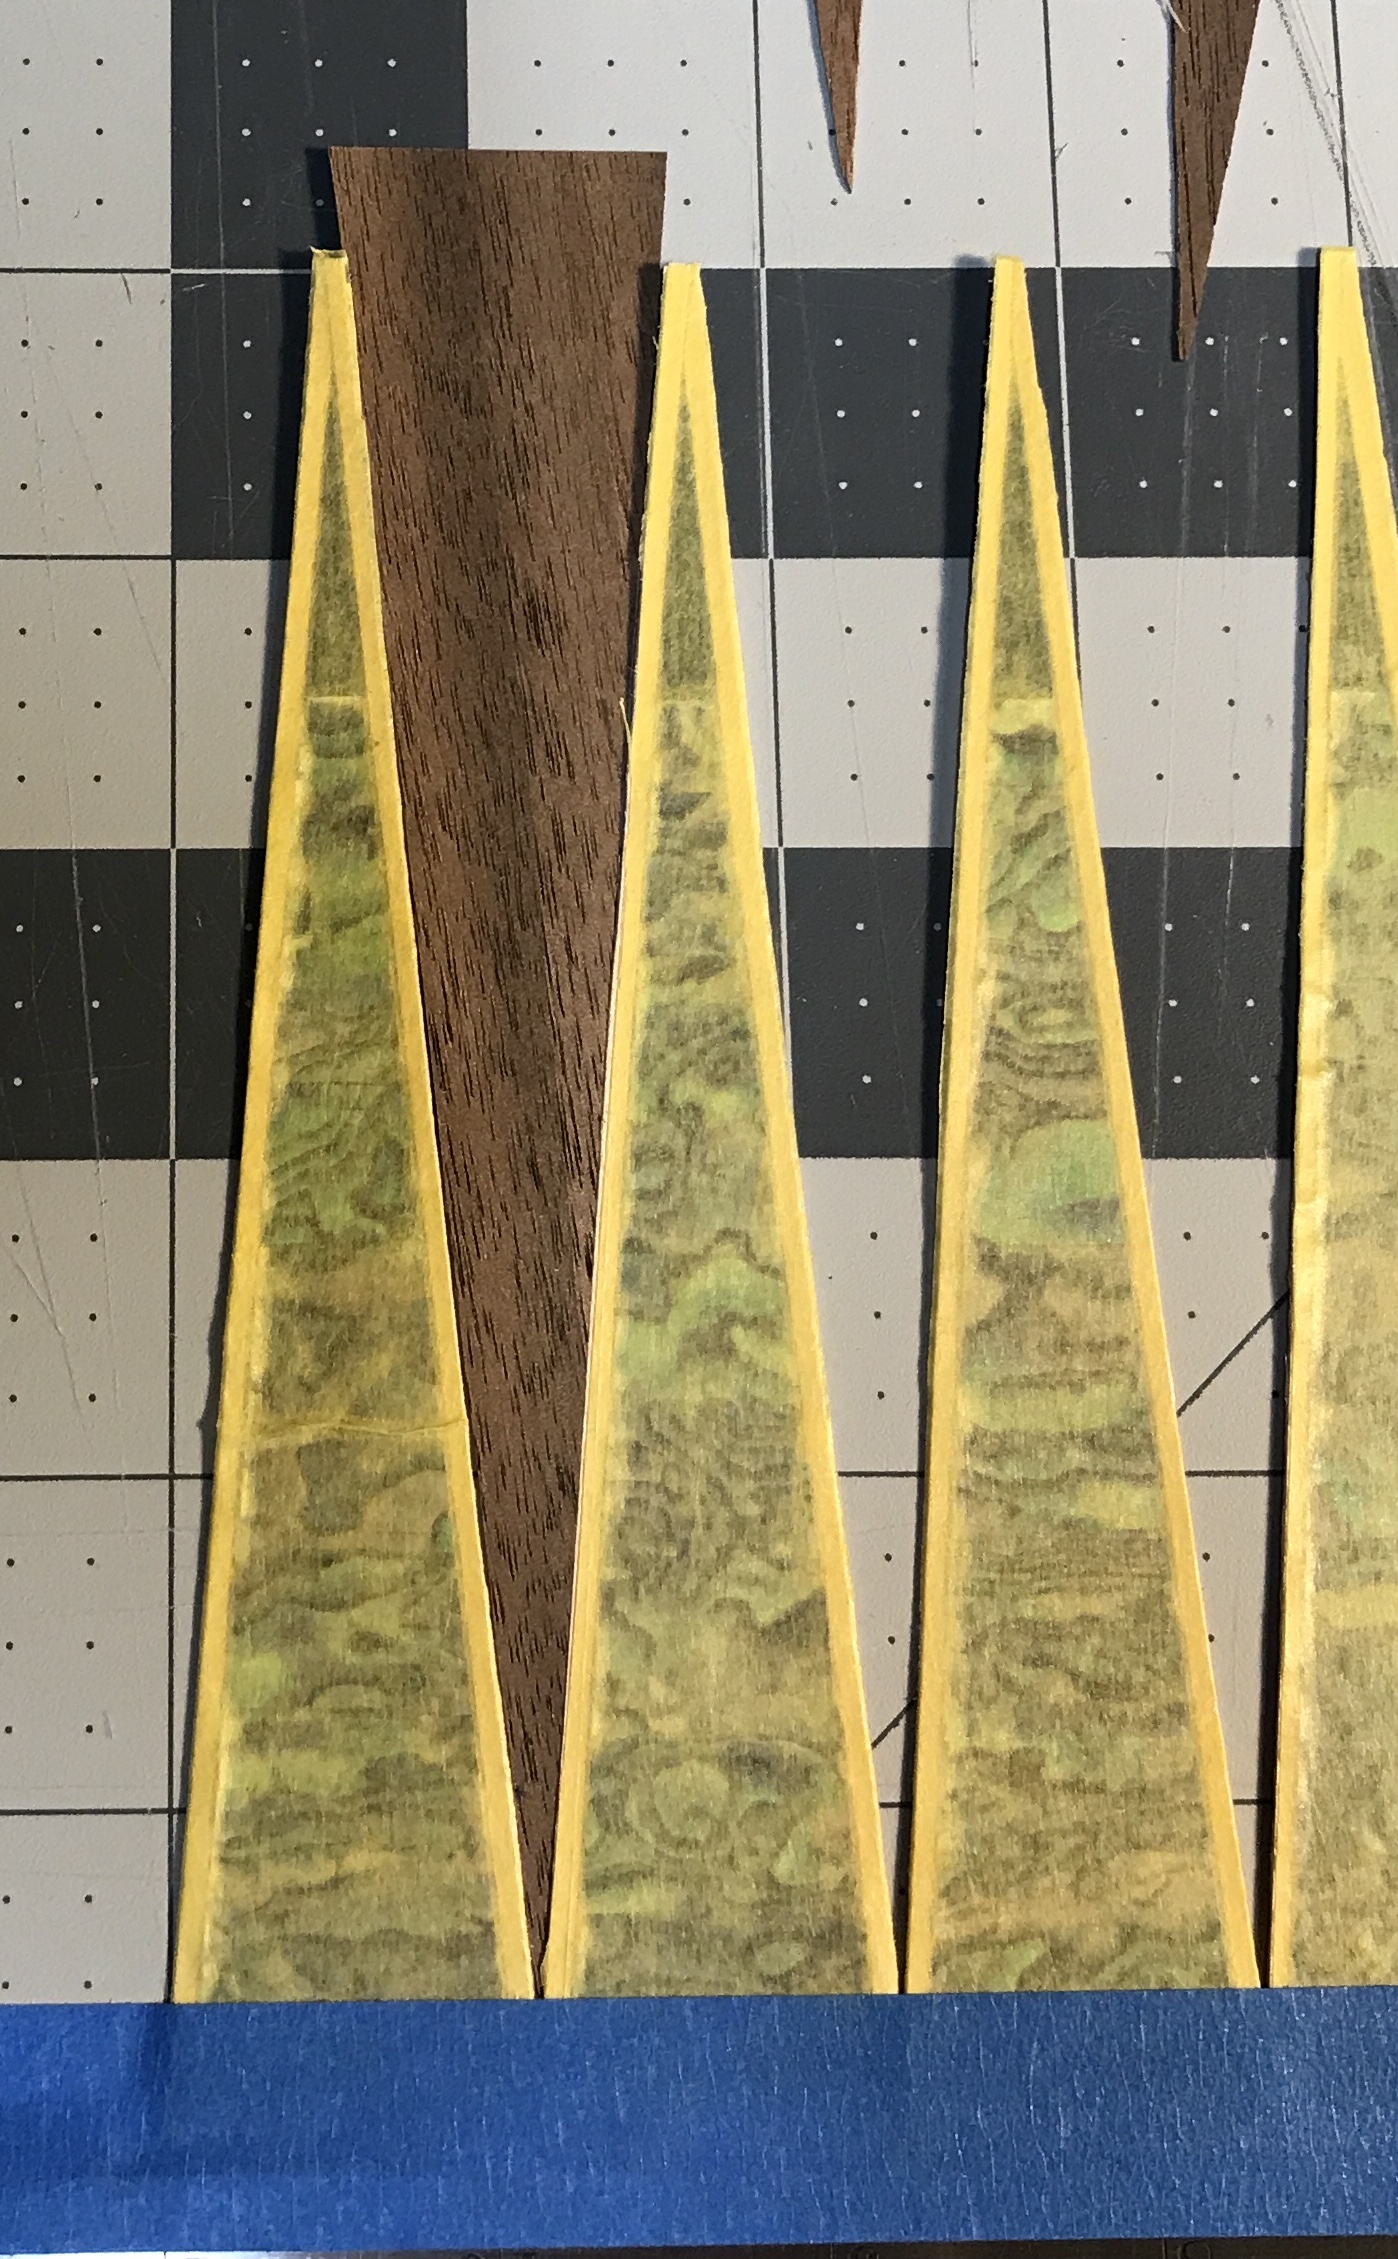
The rest of the second playing face was worked on next. Four triangles were cut from the remaining Abalam sheet. Eight more were cut from the new matching Abalam sheet. The triangles were cut to 4 1/2". A dozen 1/16" strips of the pale veneer were cut using the jig. These were cut to fit around the triangles. They were taped in place and the top was cut to fit the angle. The black triangle was trimmed as needed and added. The entire set of pieces was taped with yellow tape. The tape was trimmed around the resulting triangle. The first six triangles were trimmed at the bottom to reduce the width of the six to 6 3/4". The background six triangles were cut to fit. This set of twelve triangles along with two pieces of background for the sides was taped. The same process was repeated for the other six playing triangles.
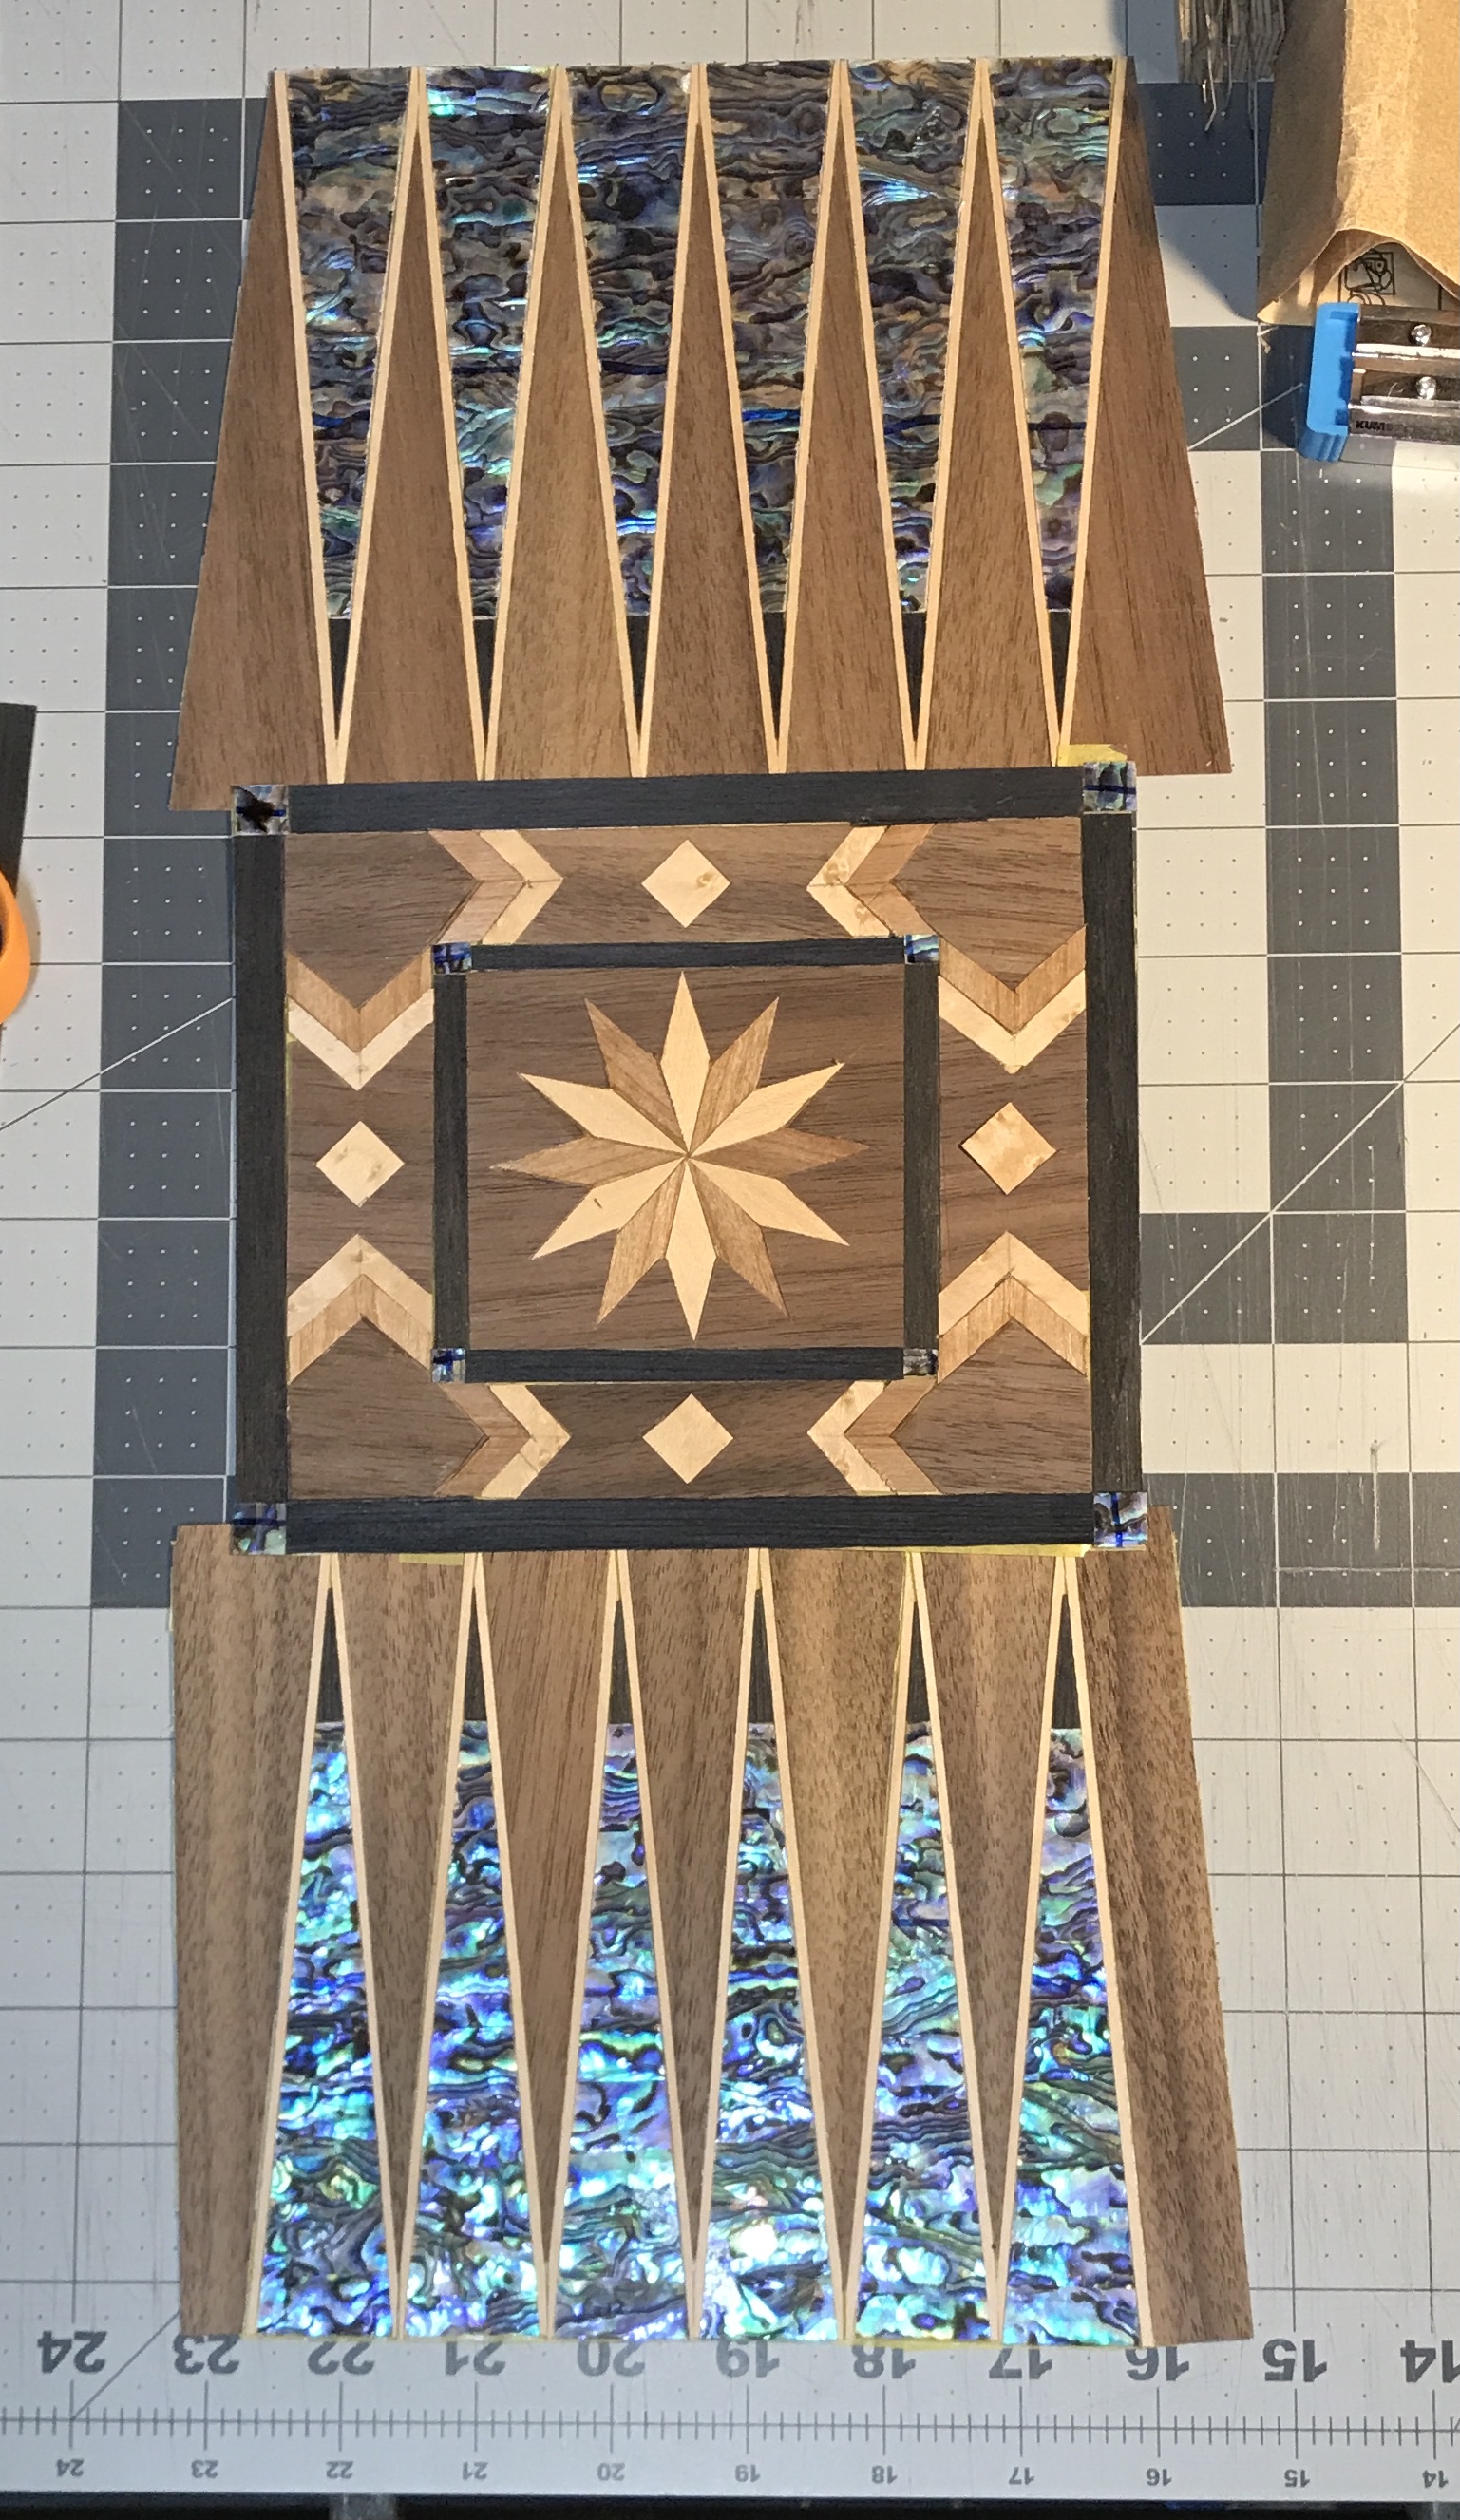
Nearing the end of January and the end of this project is in sight. The three parts of the playing surface were taped and readied for gluing. The three parts were all taped together. The wide ends of the background triangles were cut to length. After fitting and measuring a number of things were trimmed to fit within the inside of the box, 6 7/8" X 18 1/4". A number of gaps were filled, especially the tips of the triangles on one side.
Once all was ready glue was spread on the face. The taped parquetry was laid on the glue tape side up. Its location was carefully aligned with the wood under it. It was laid on the mesh lying on the torsion box. Waxed paper was laid on top of the parquetry and the vacuum press lid was placed over all. The vacuum was turned on and left on for 1.5 hours. The cycling seemed to be less frequent, though I didn't bother to time it. After releasing the vacuum the wax paper was removed. It was stuck in many places along the edges where glue leaked out. The piece was allowed to dry overnight before removing the tape. The first photo below shows the aligned three parts of this face. The second shows the assembled and almost completely cut-to-fit piece laying on the wood backing. The third shows the assembly in the vacuum press just after turning on the vacuum.
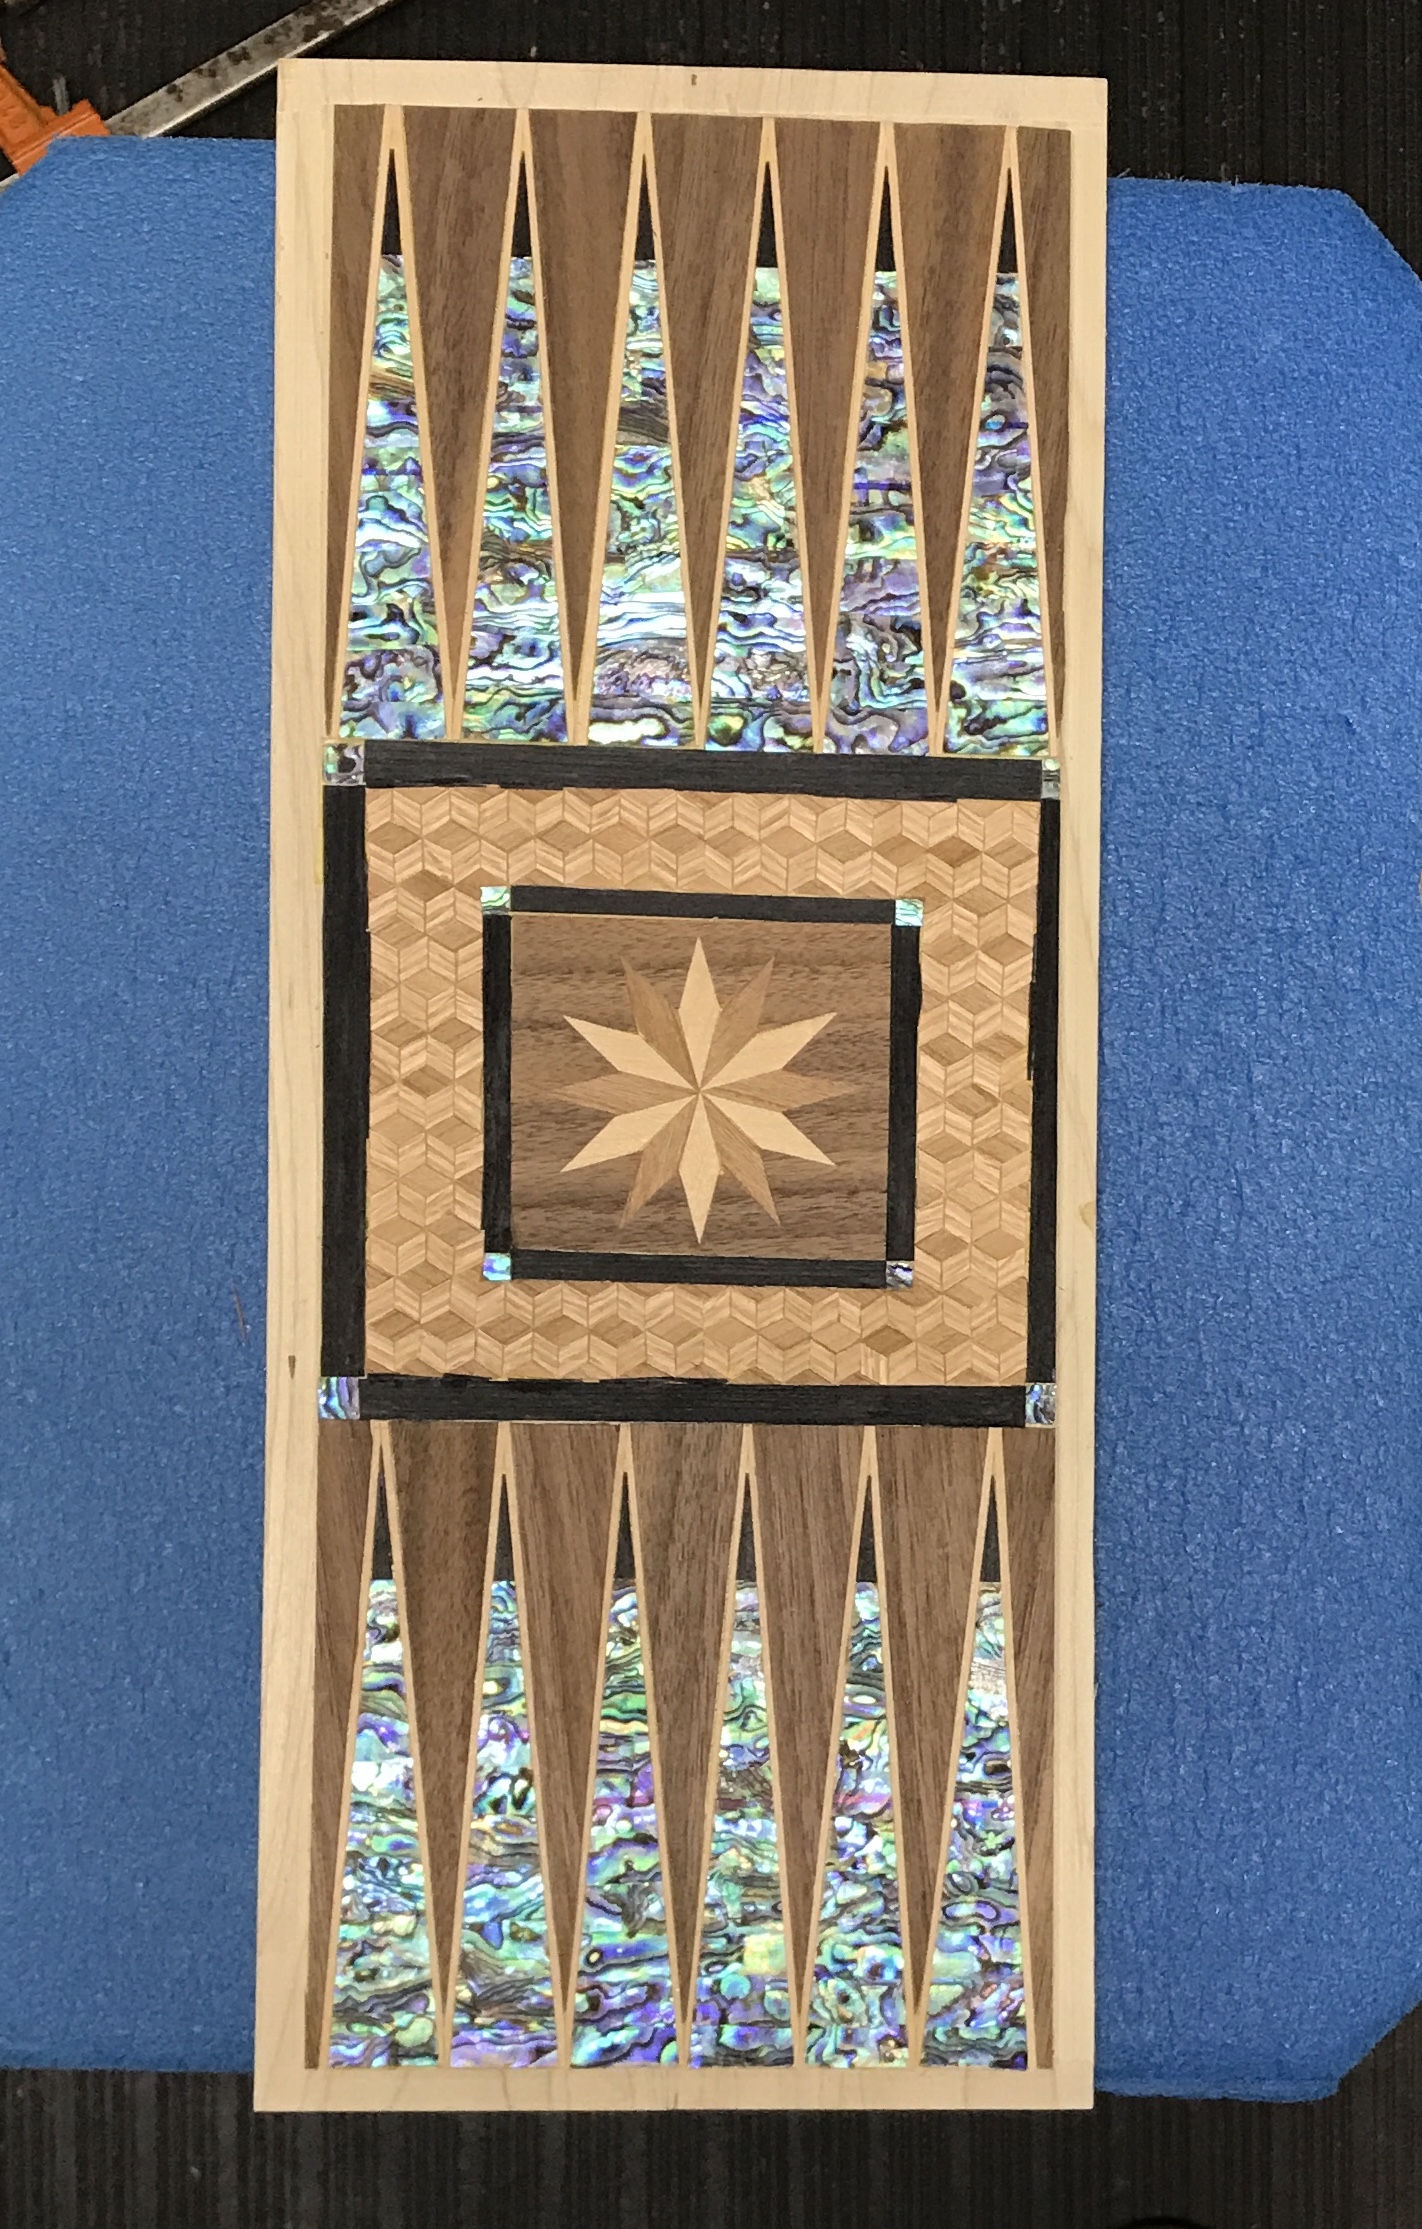
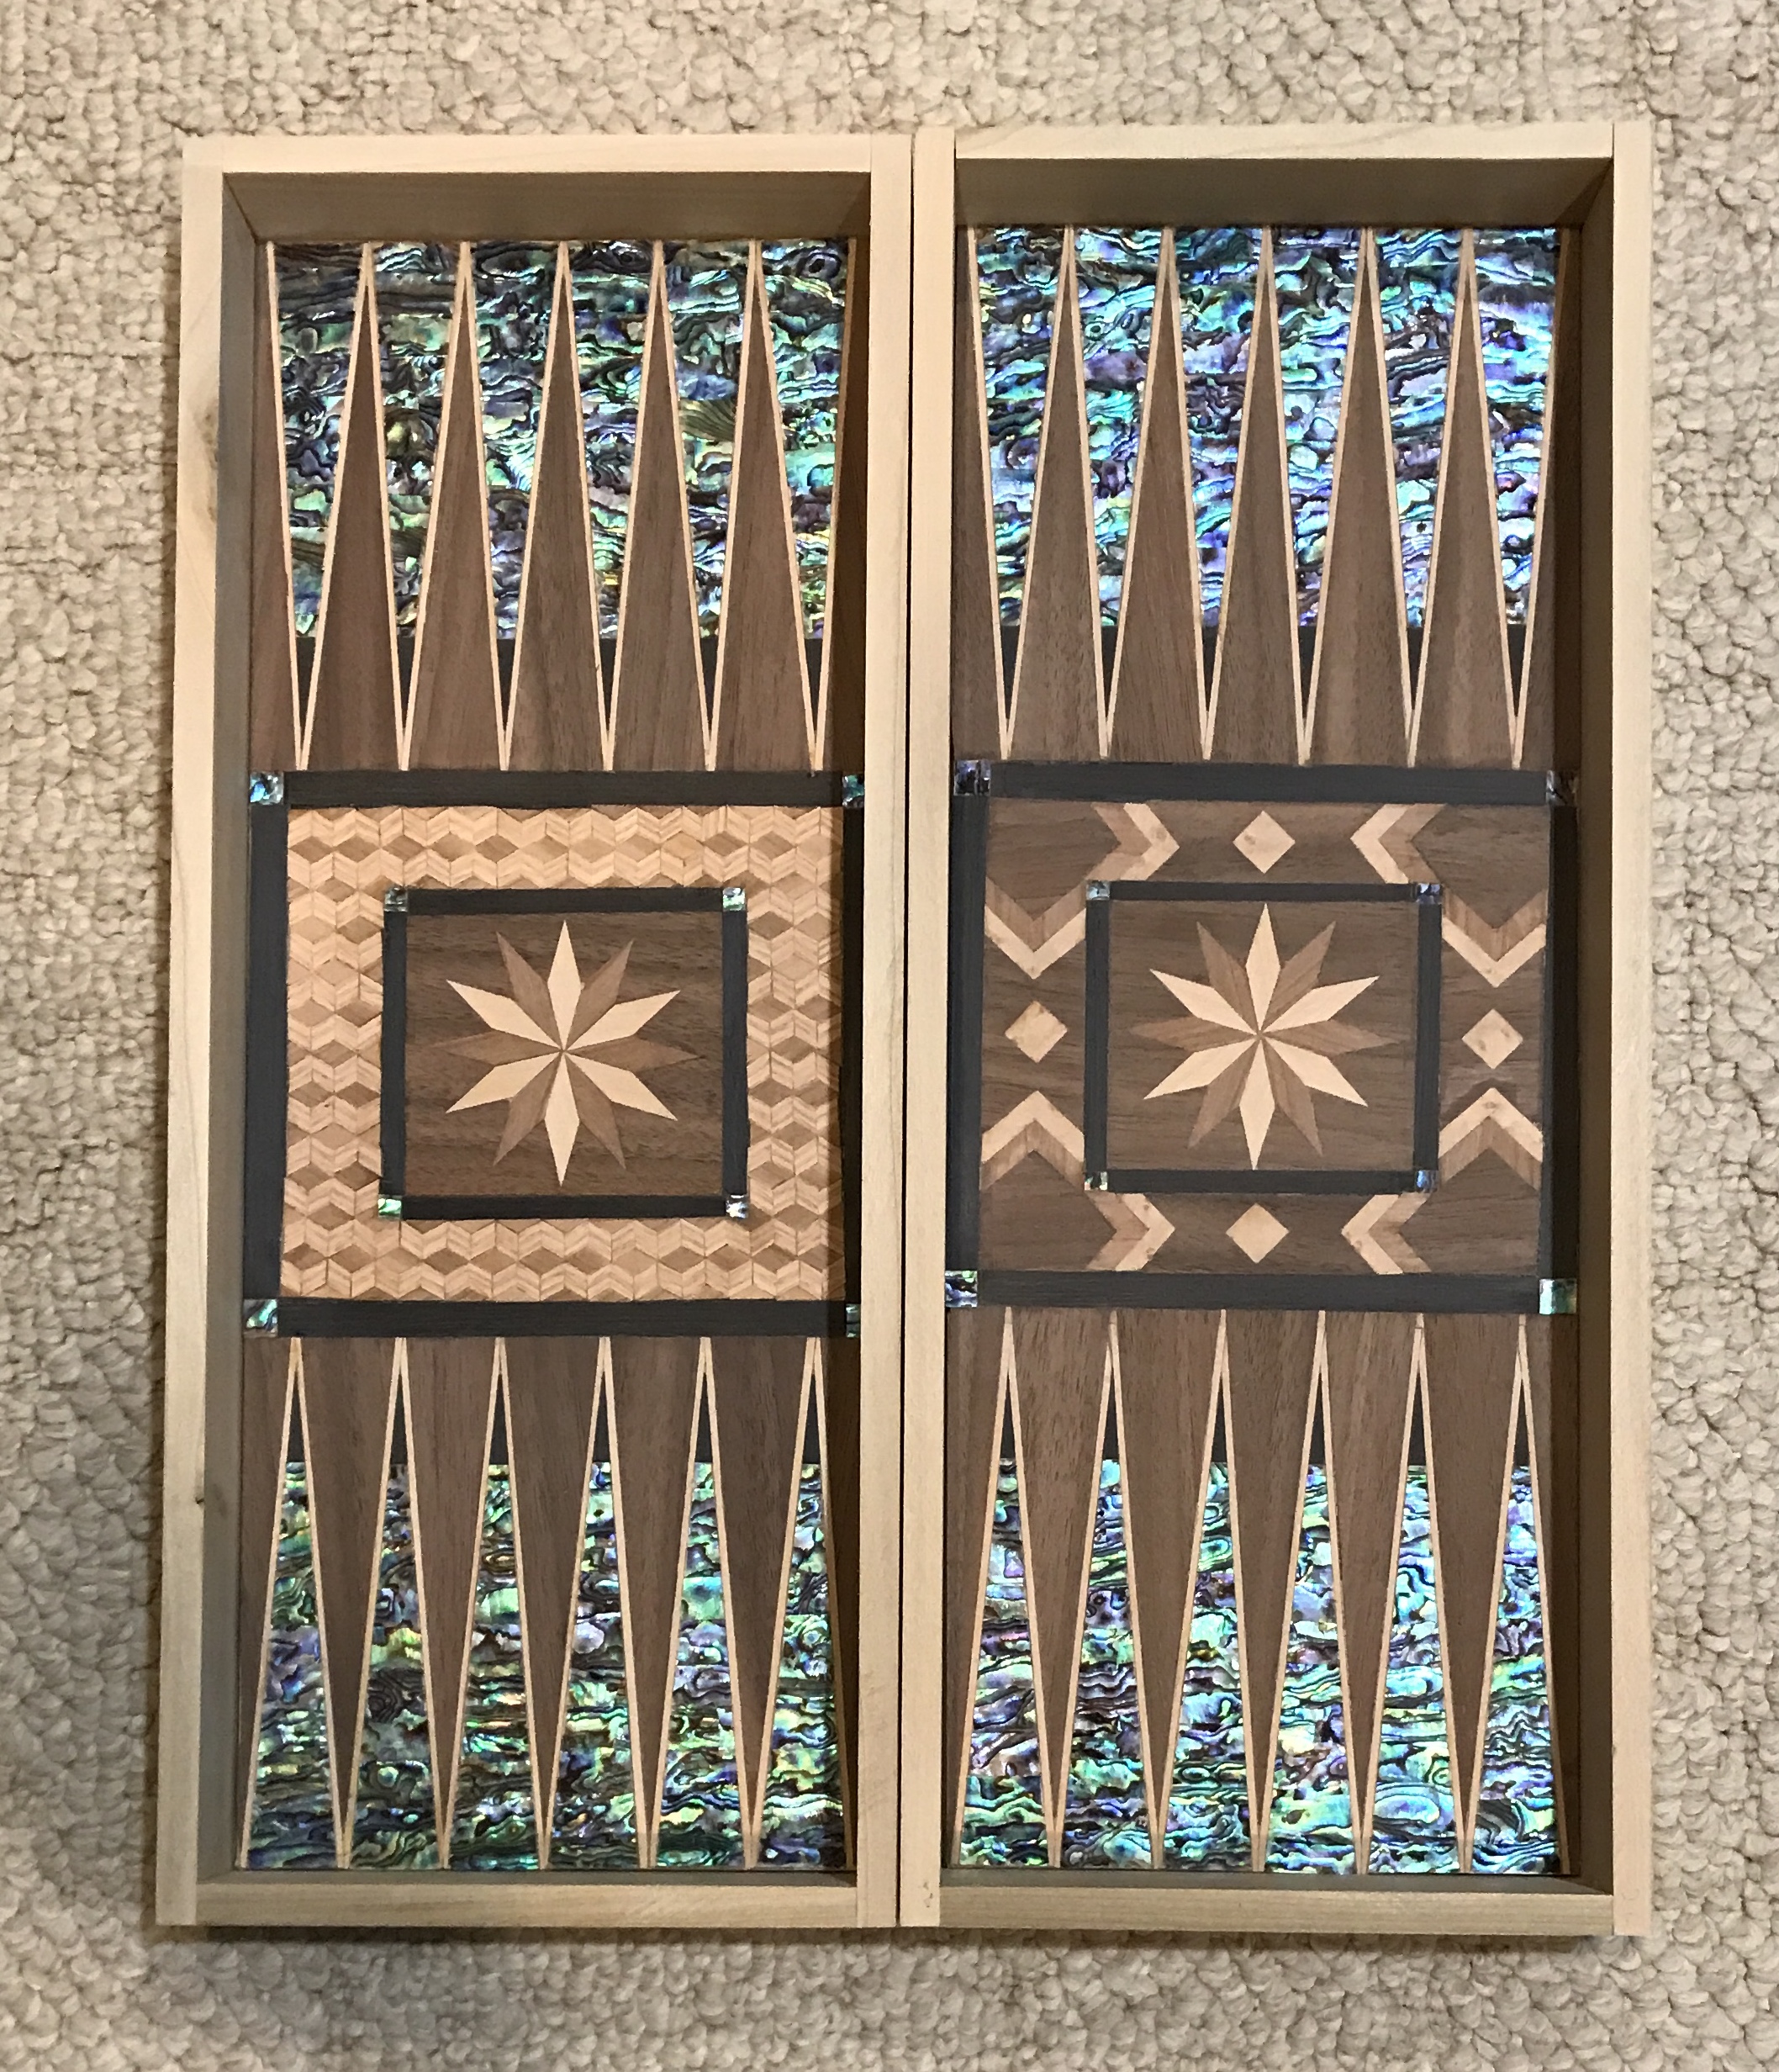
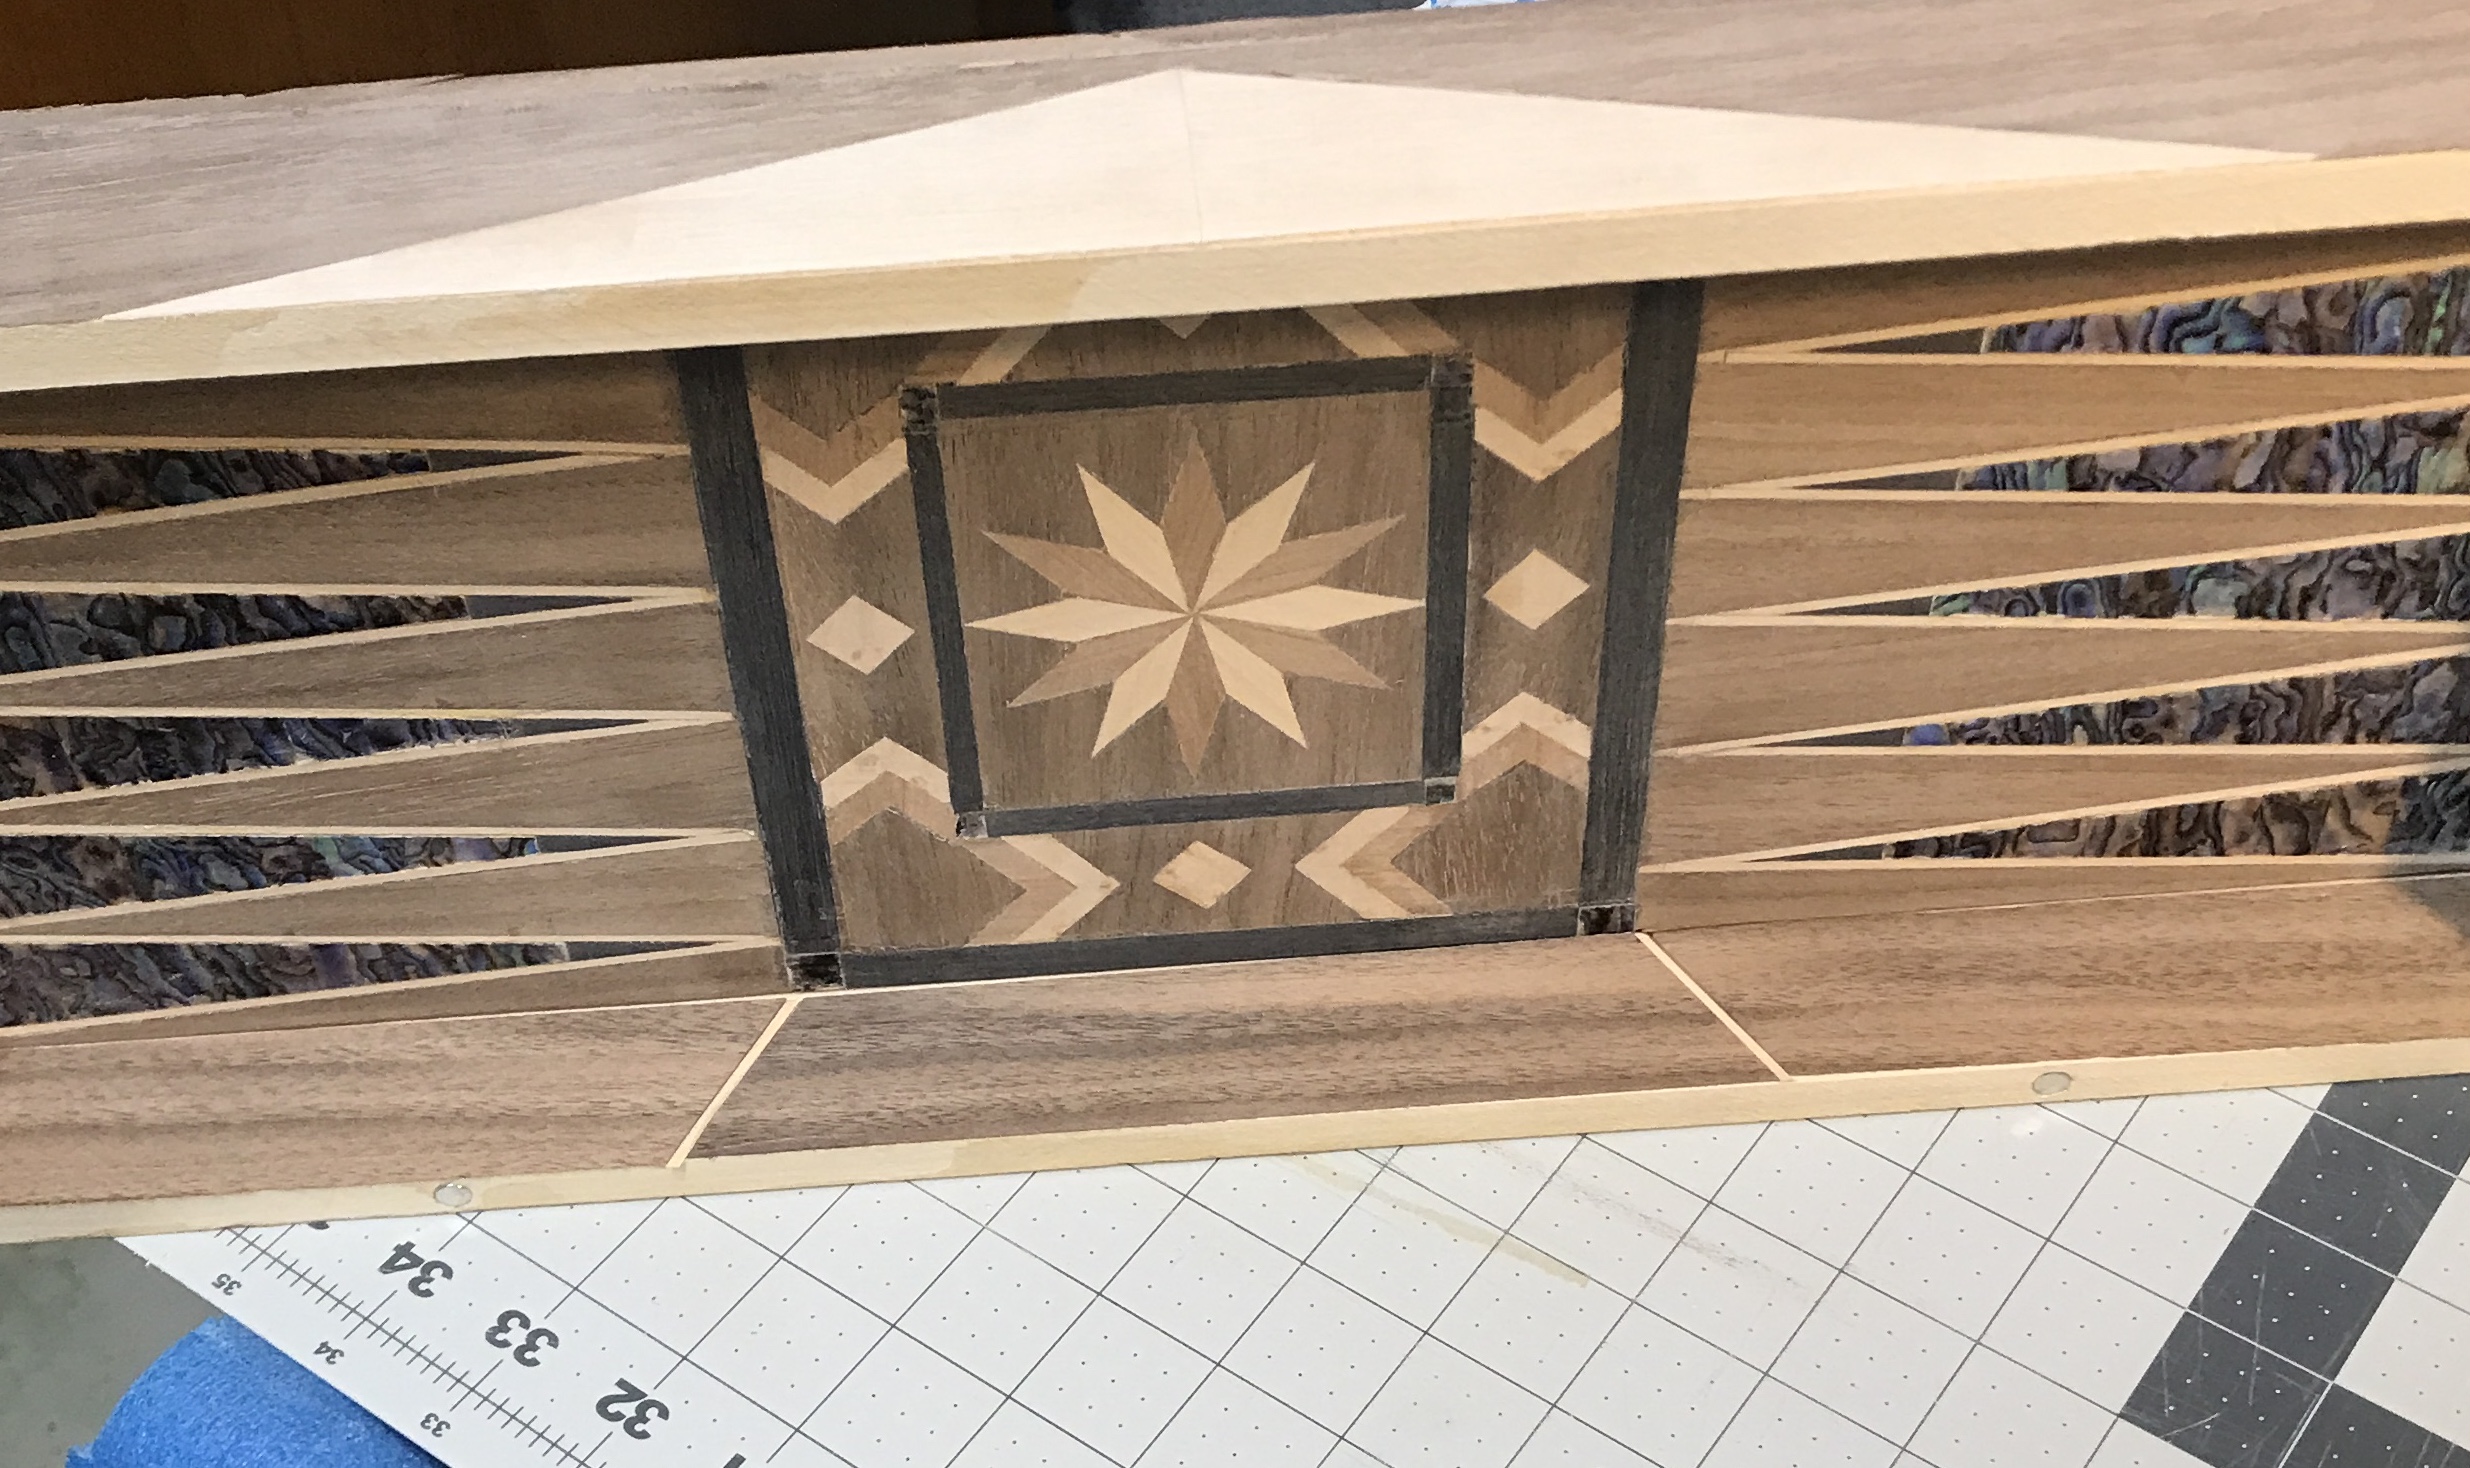
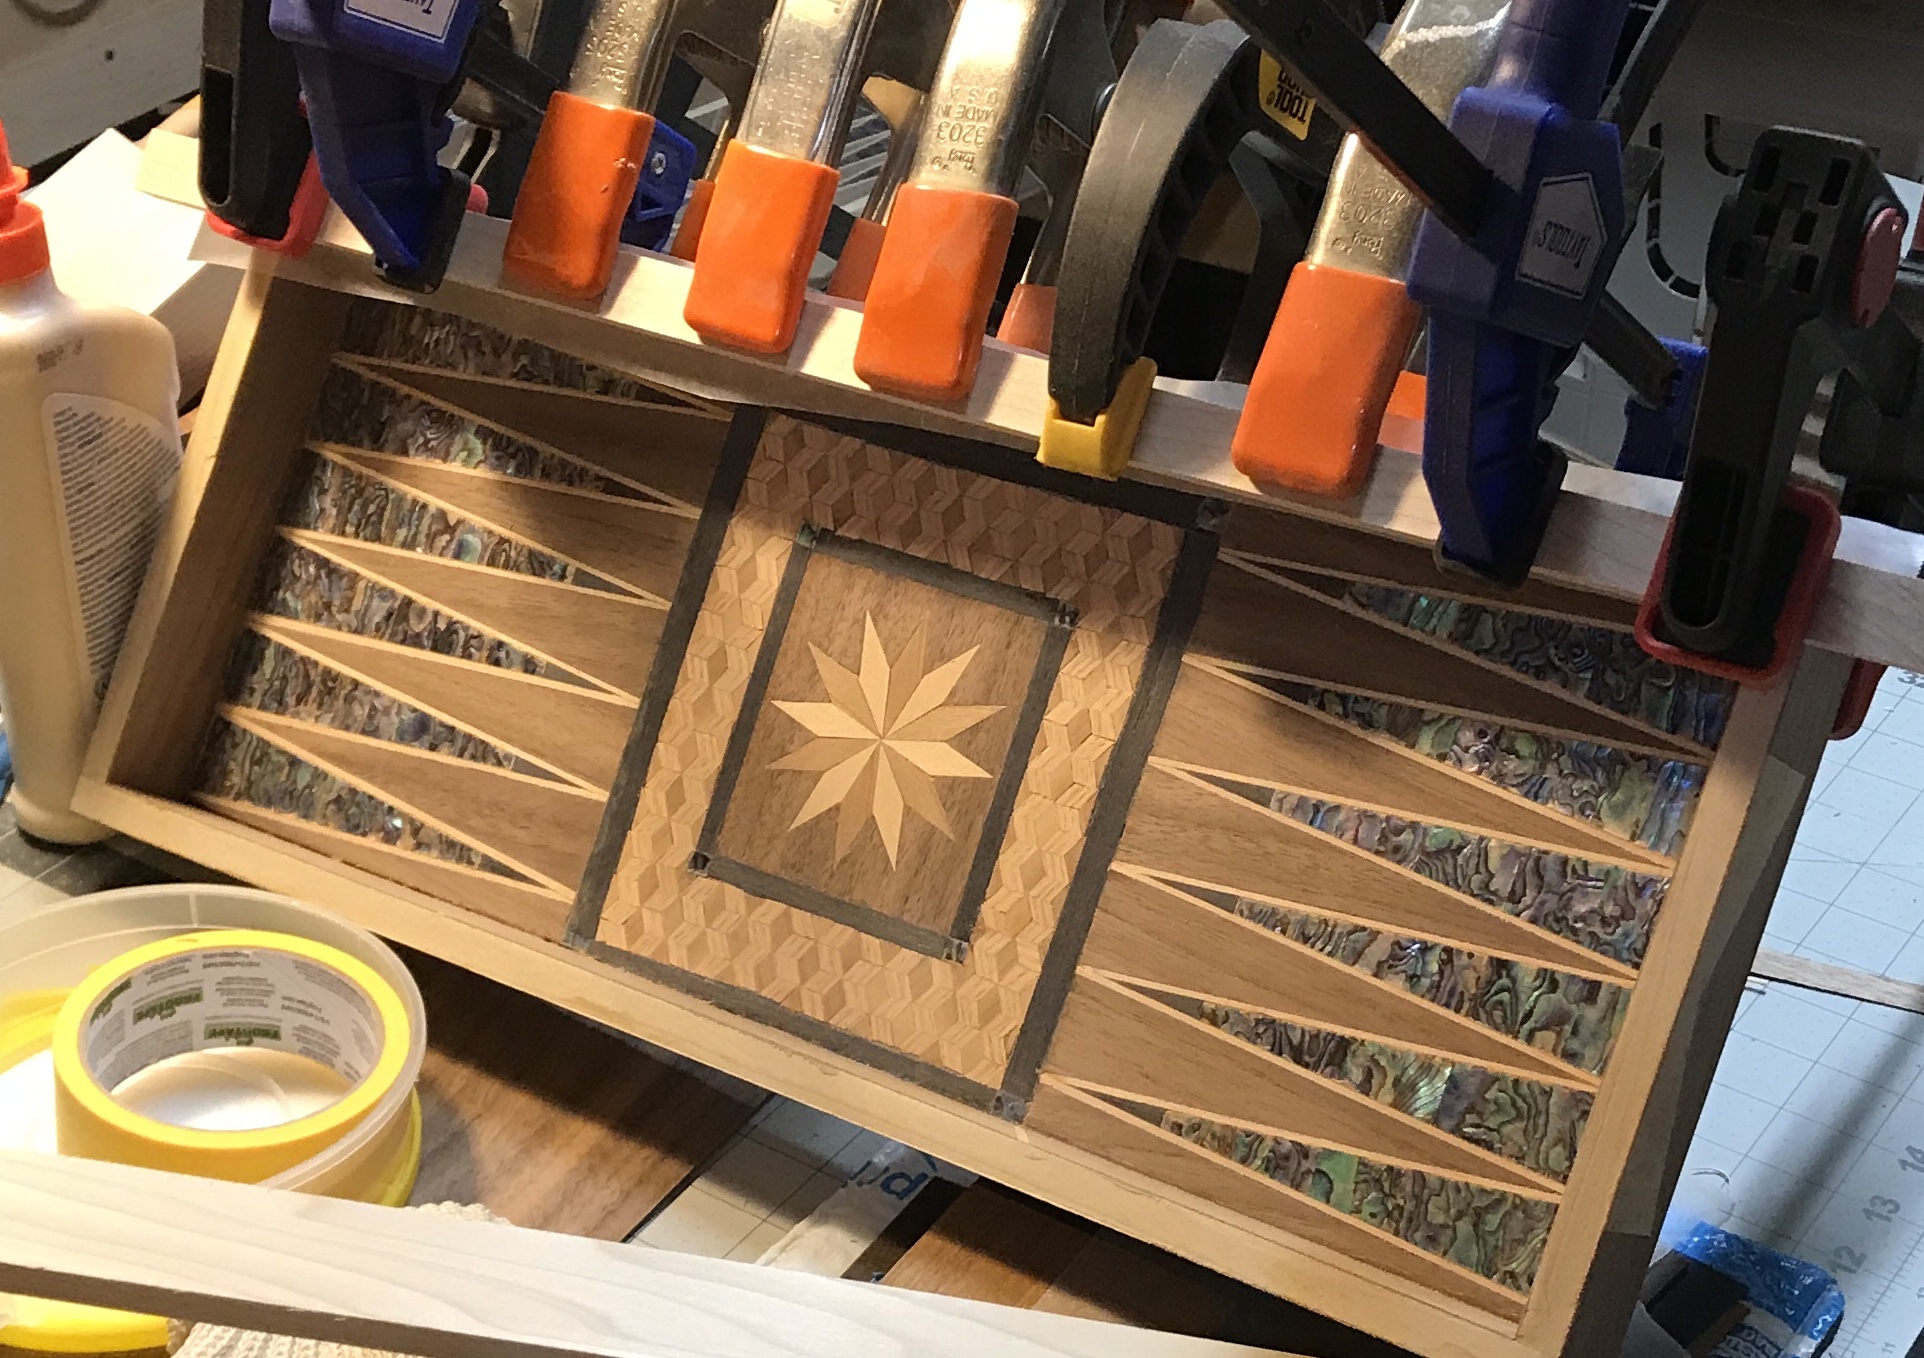
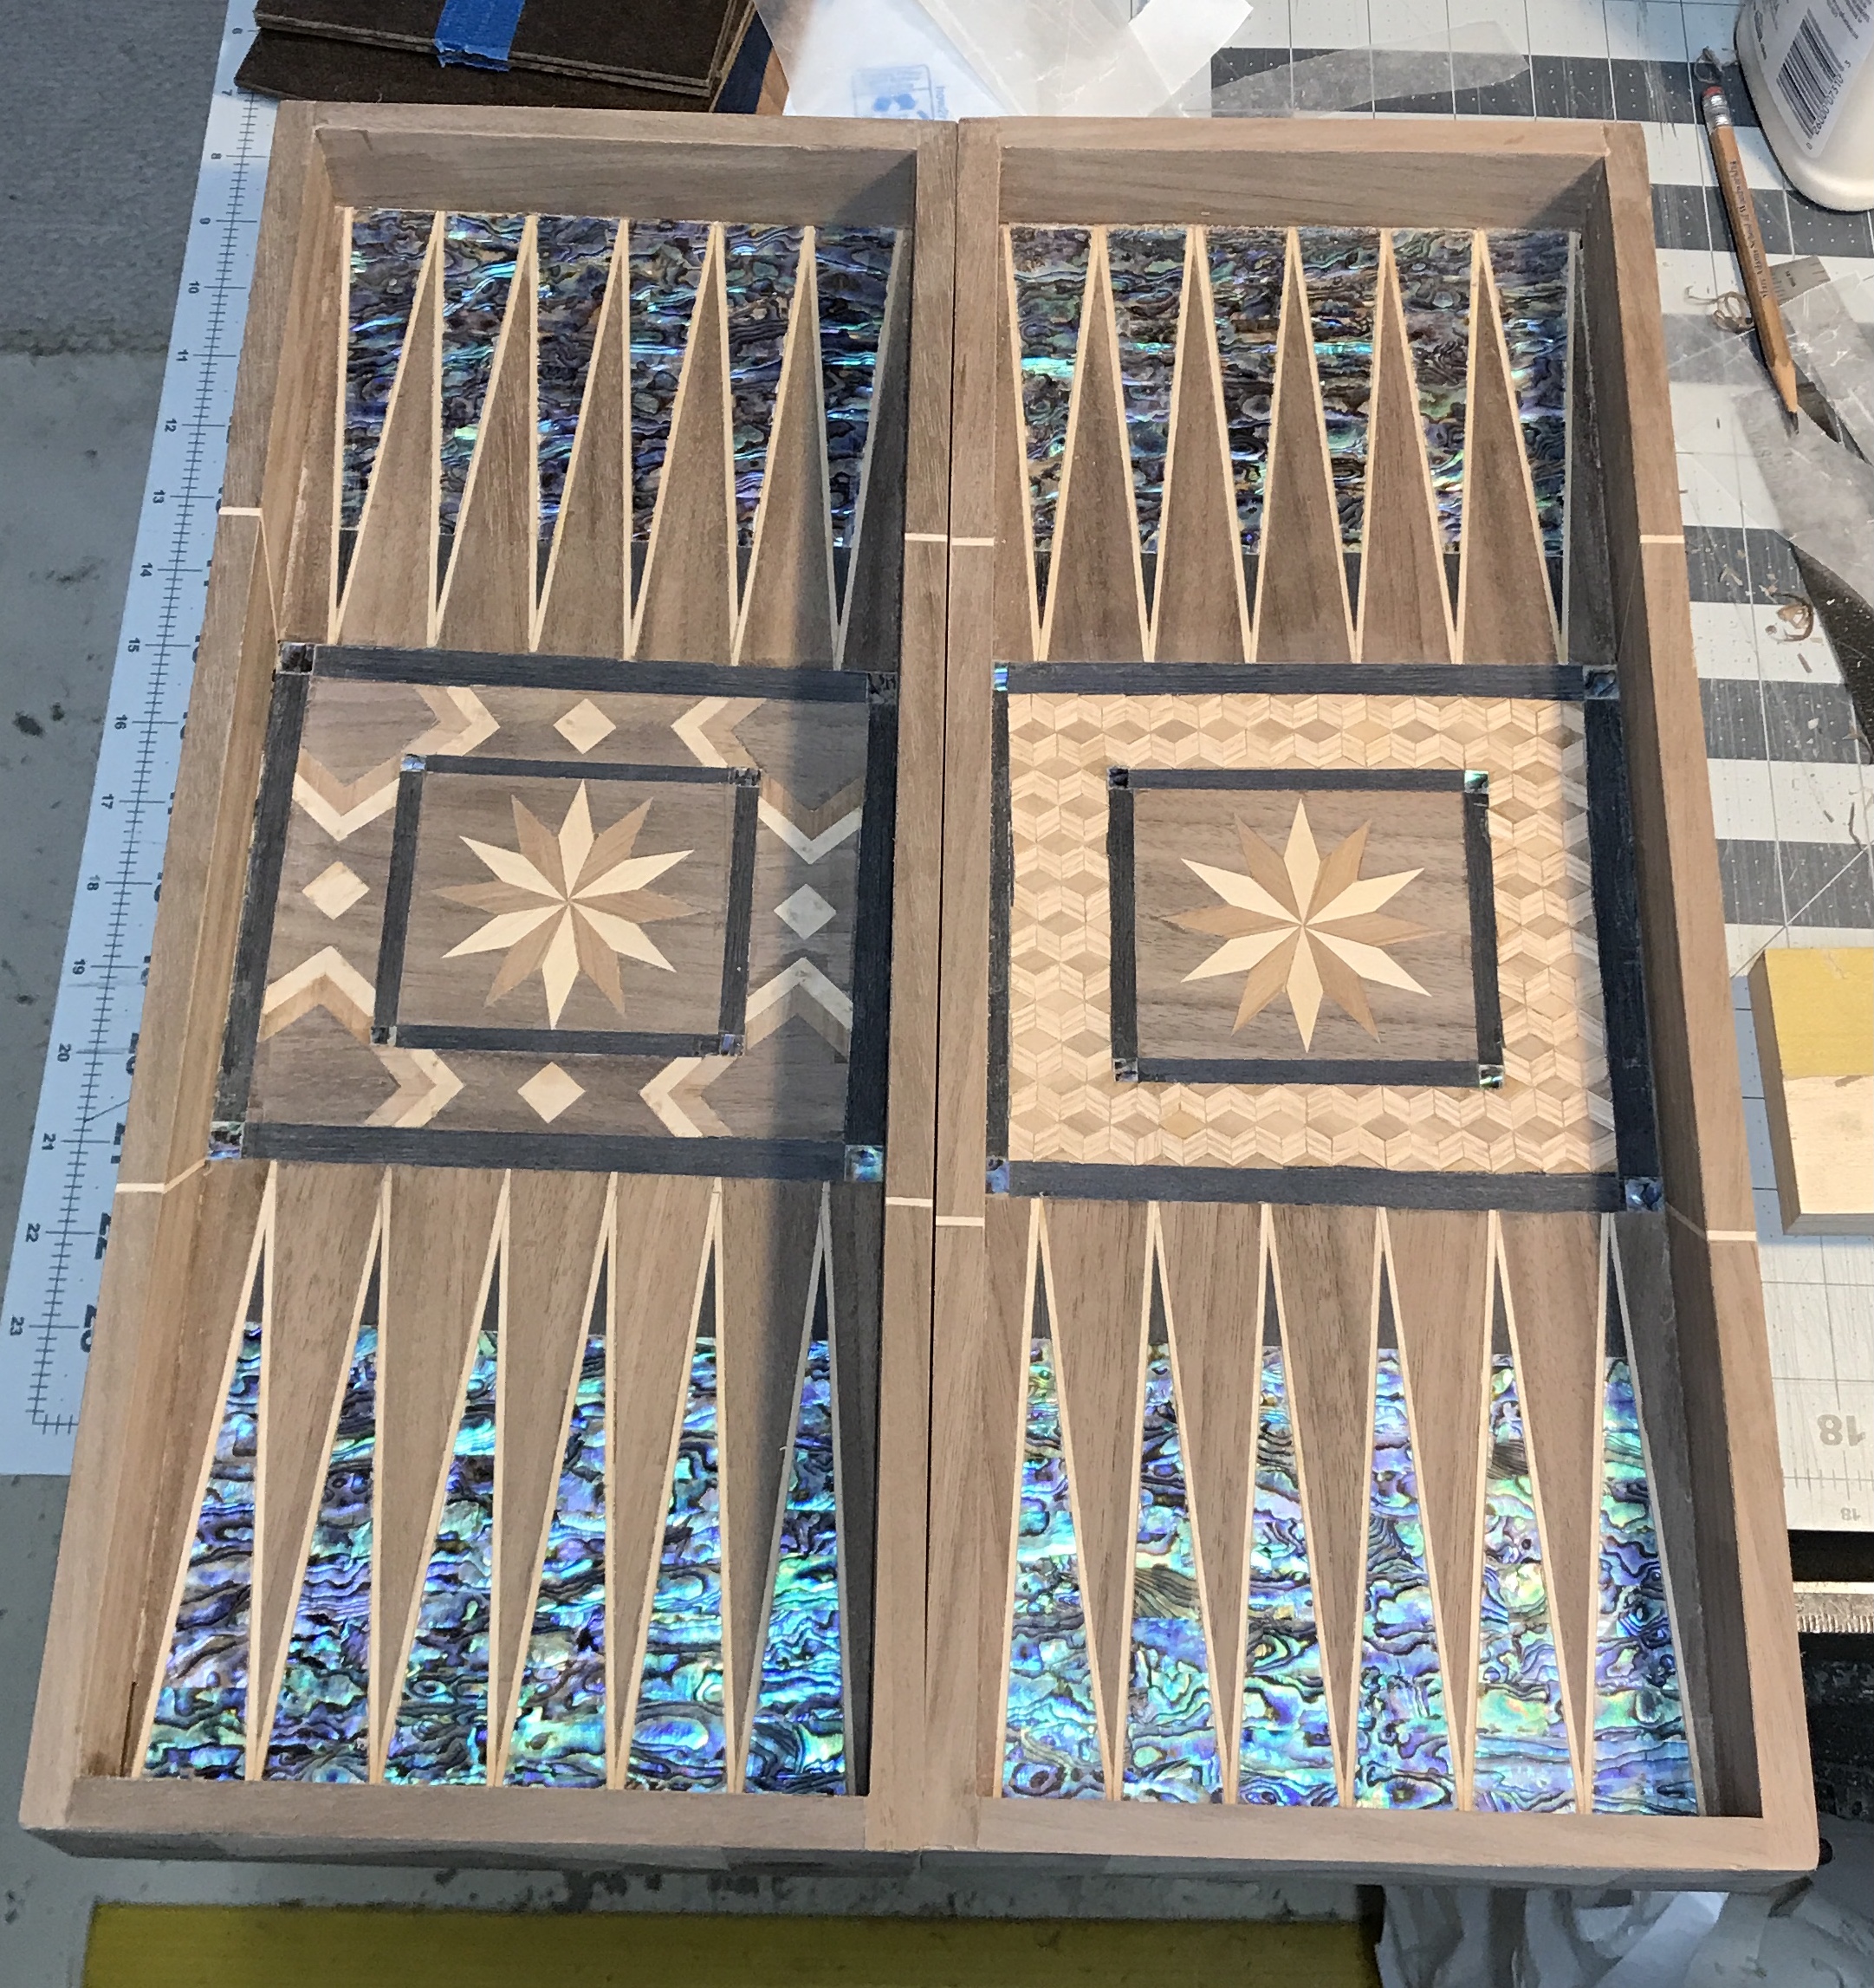
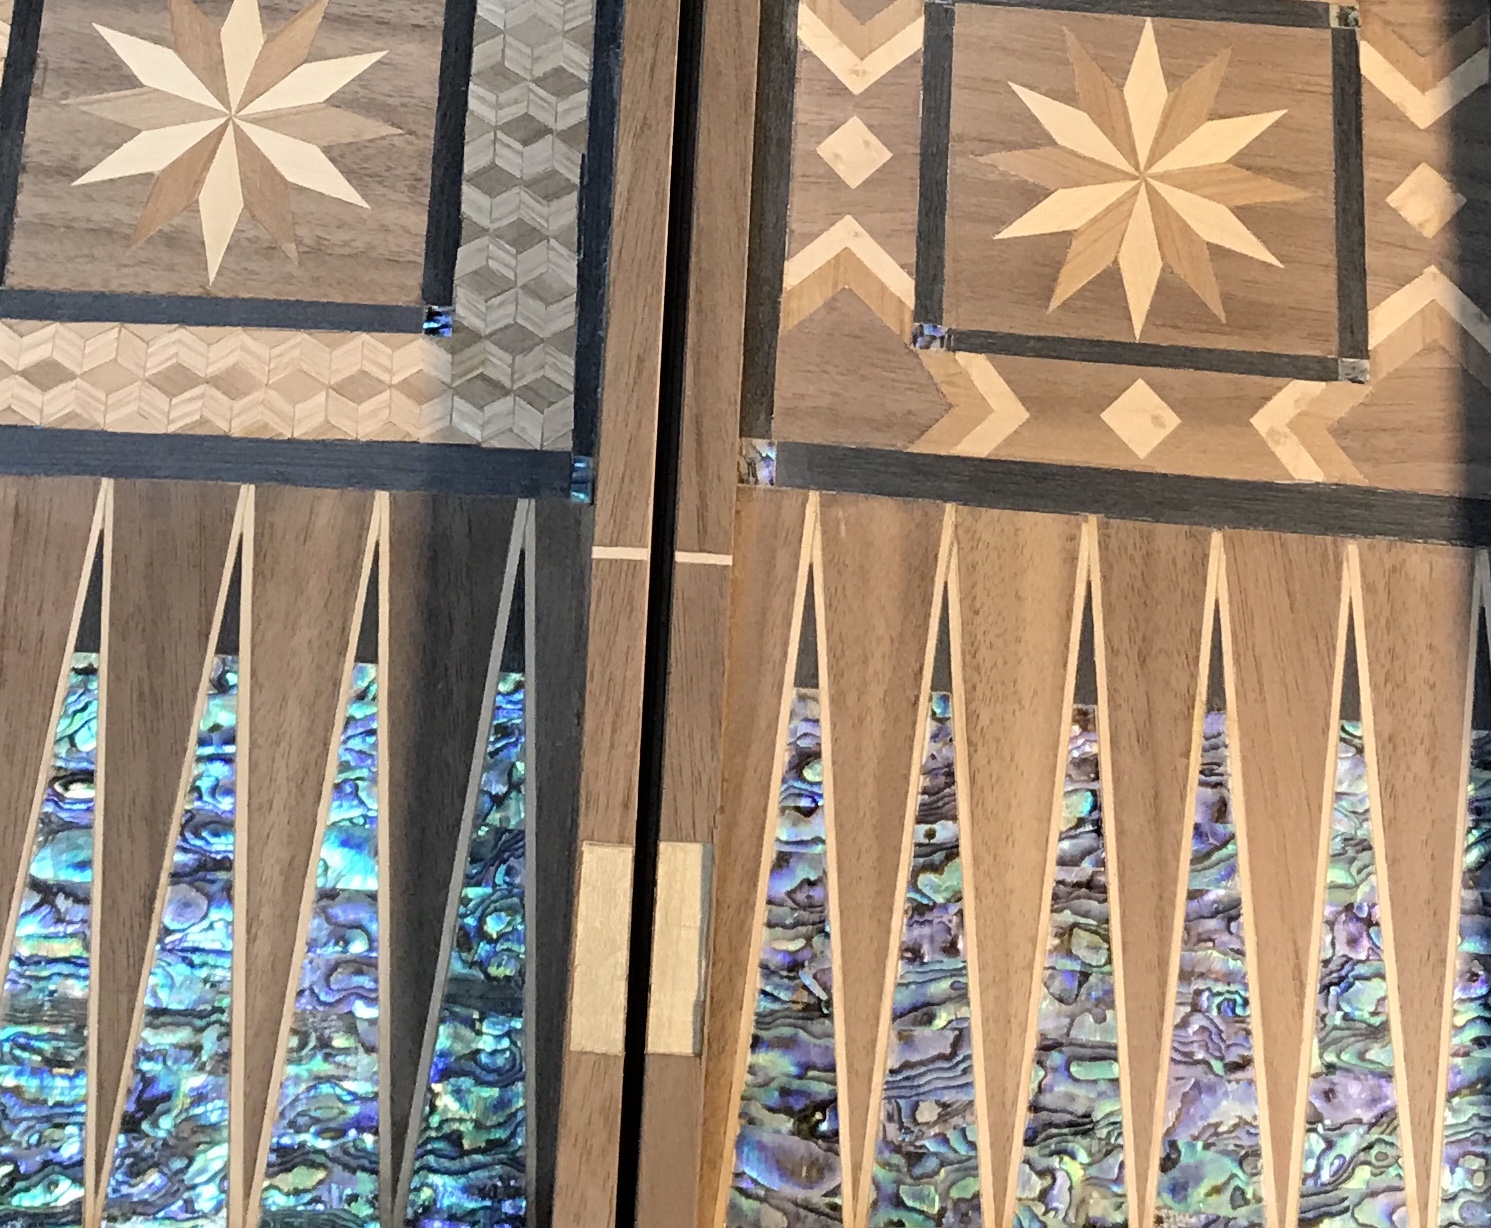
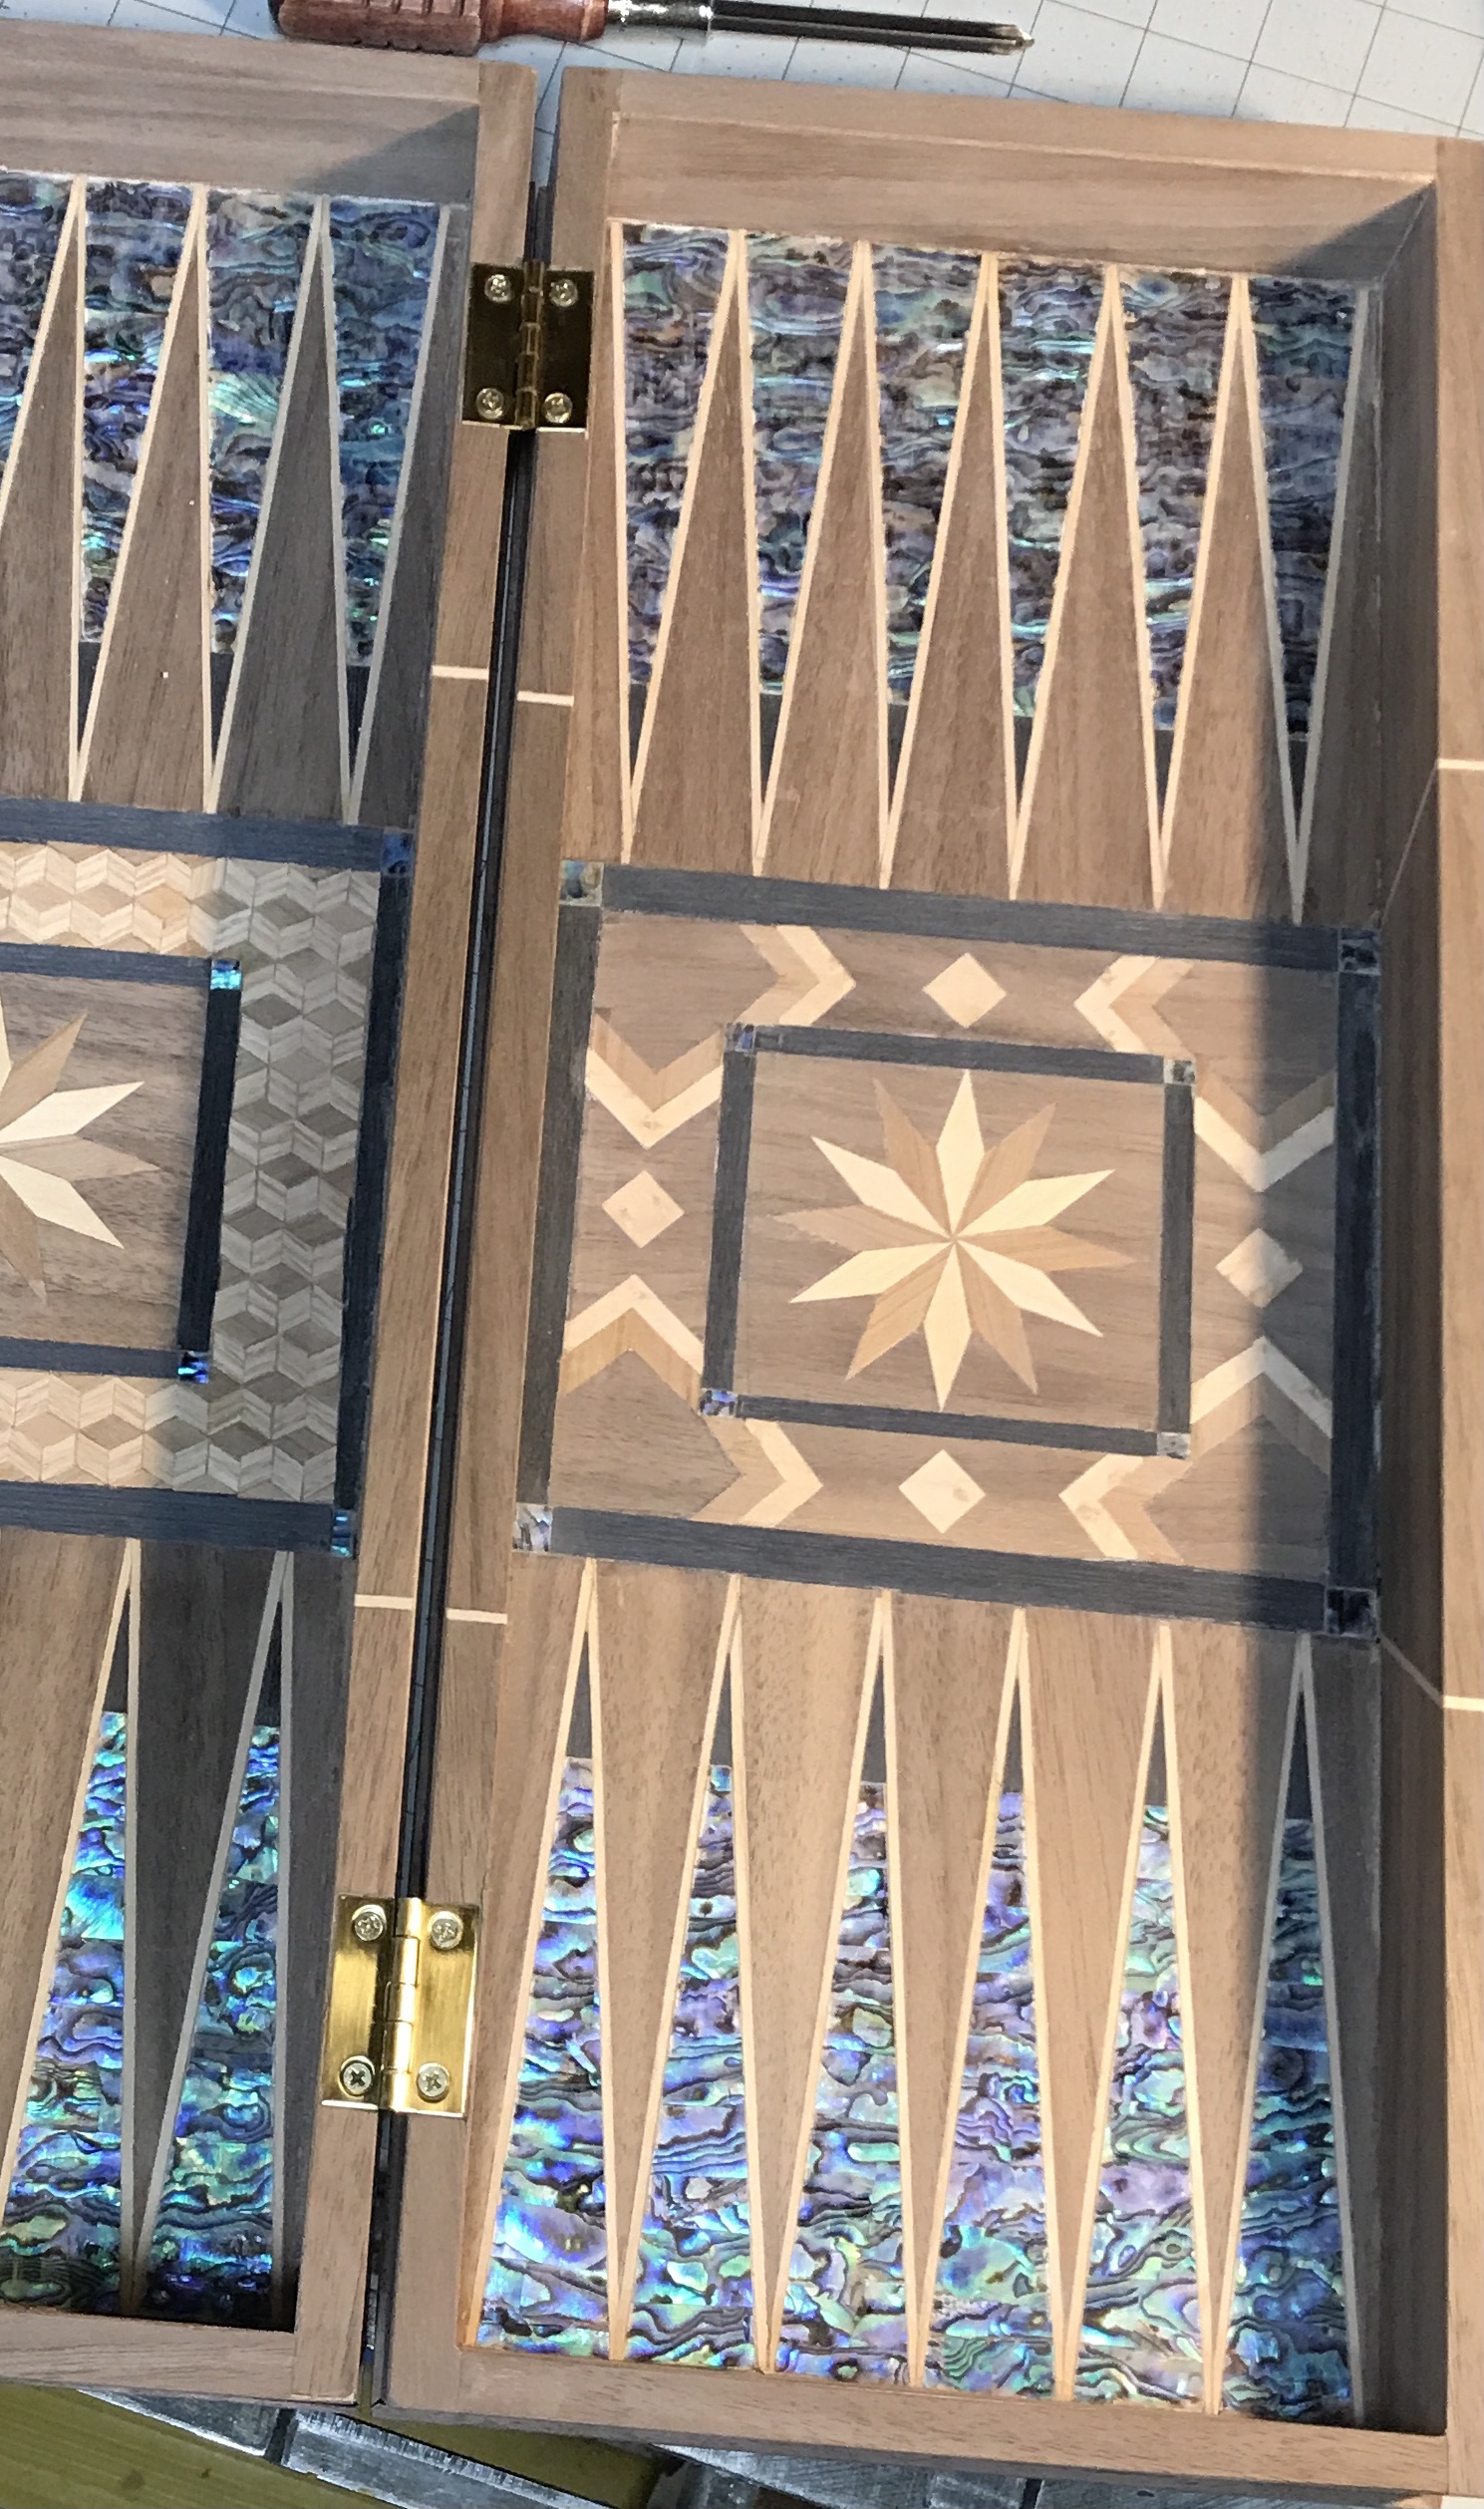
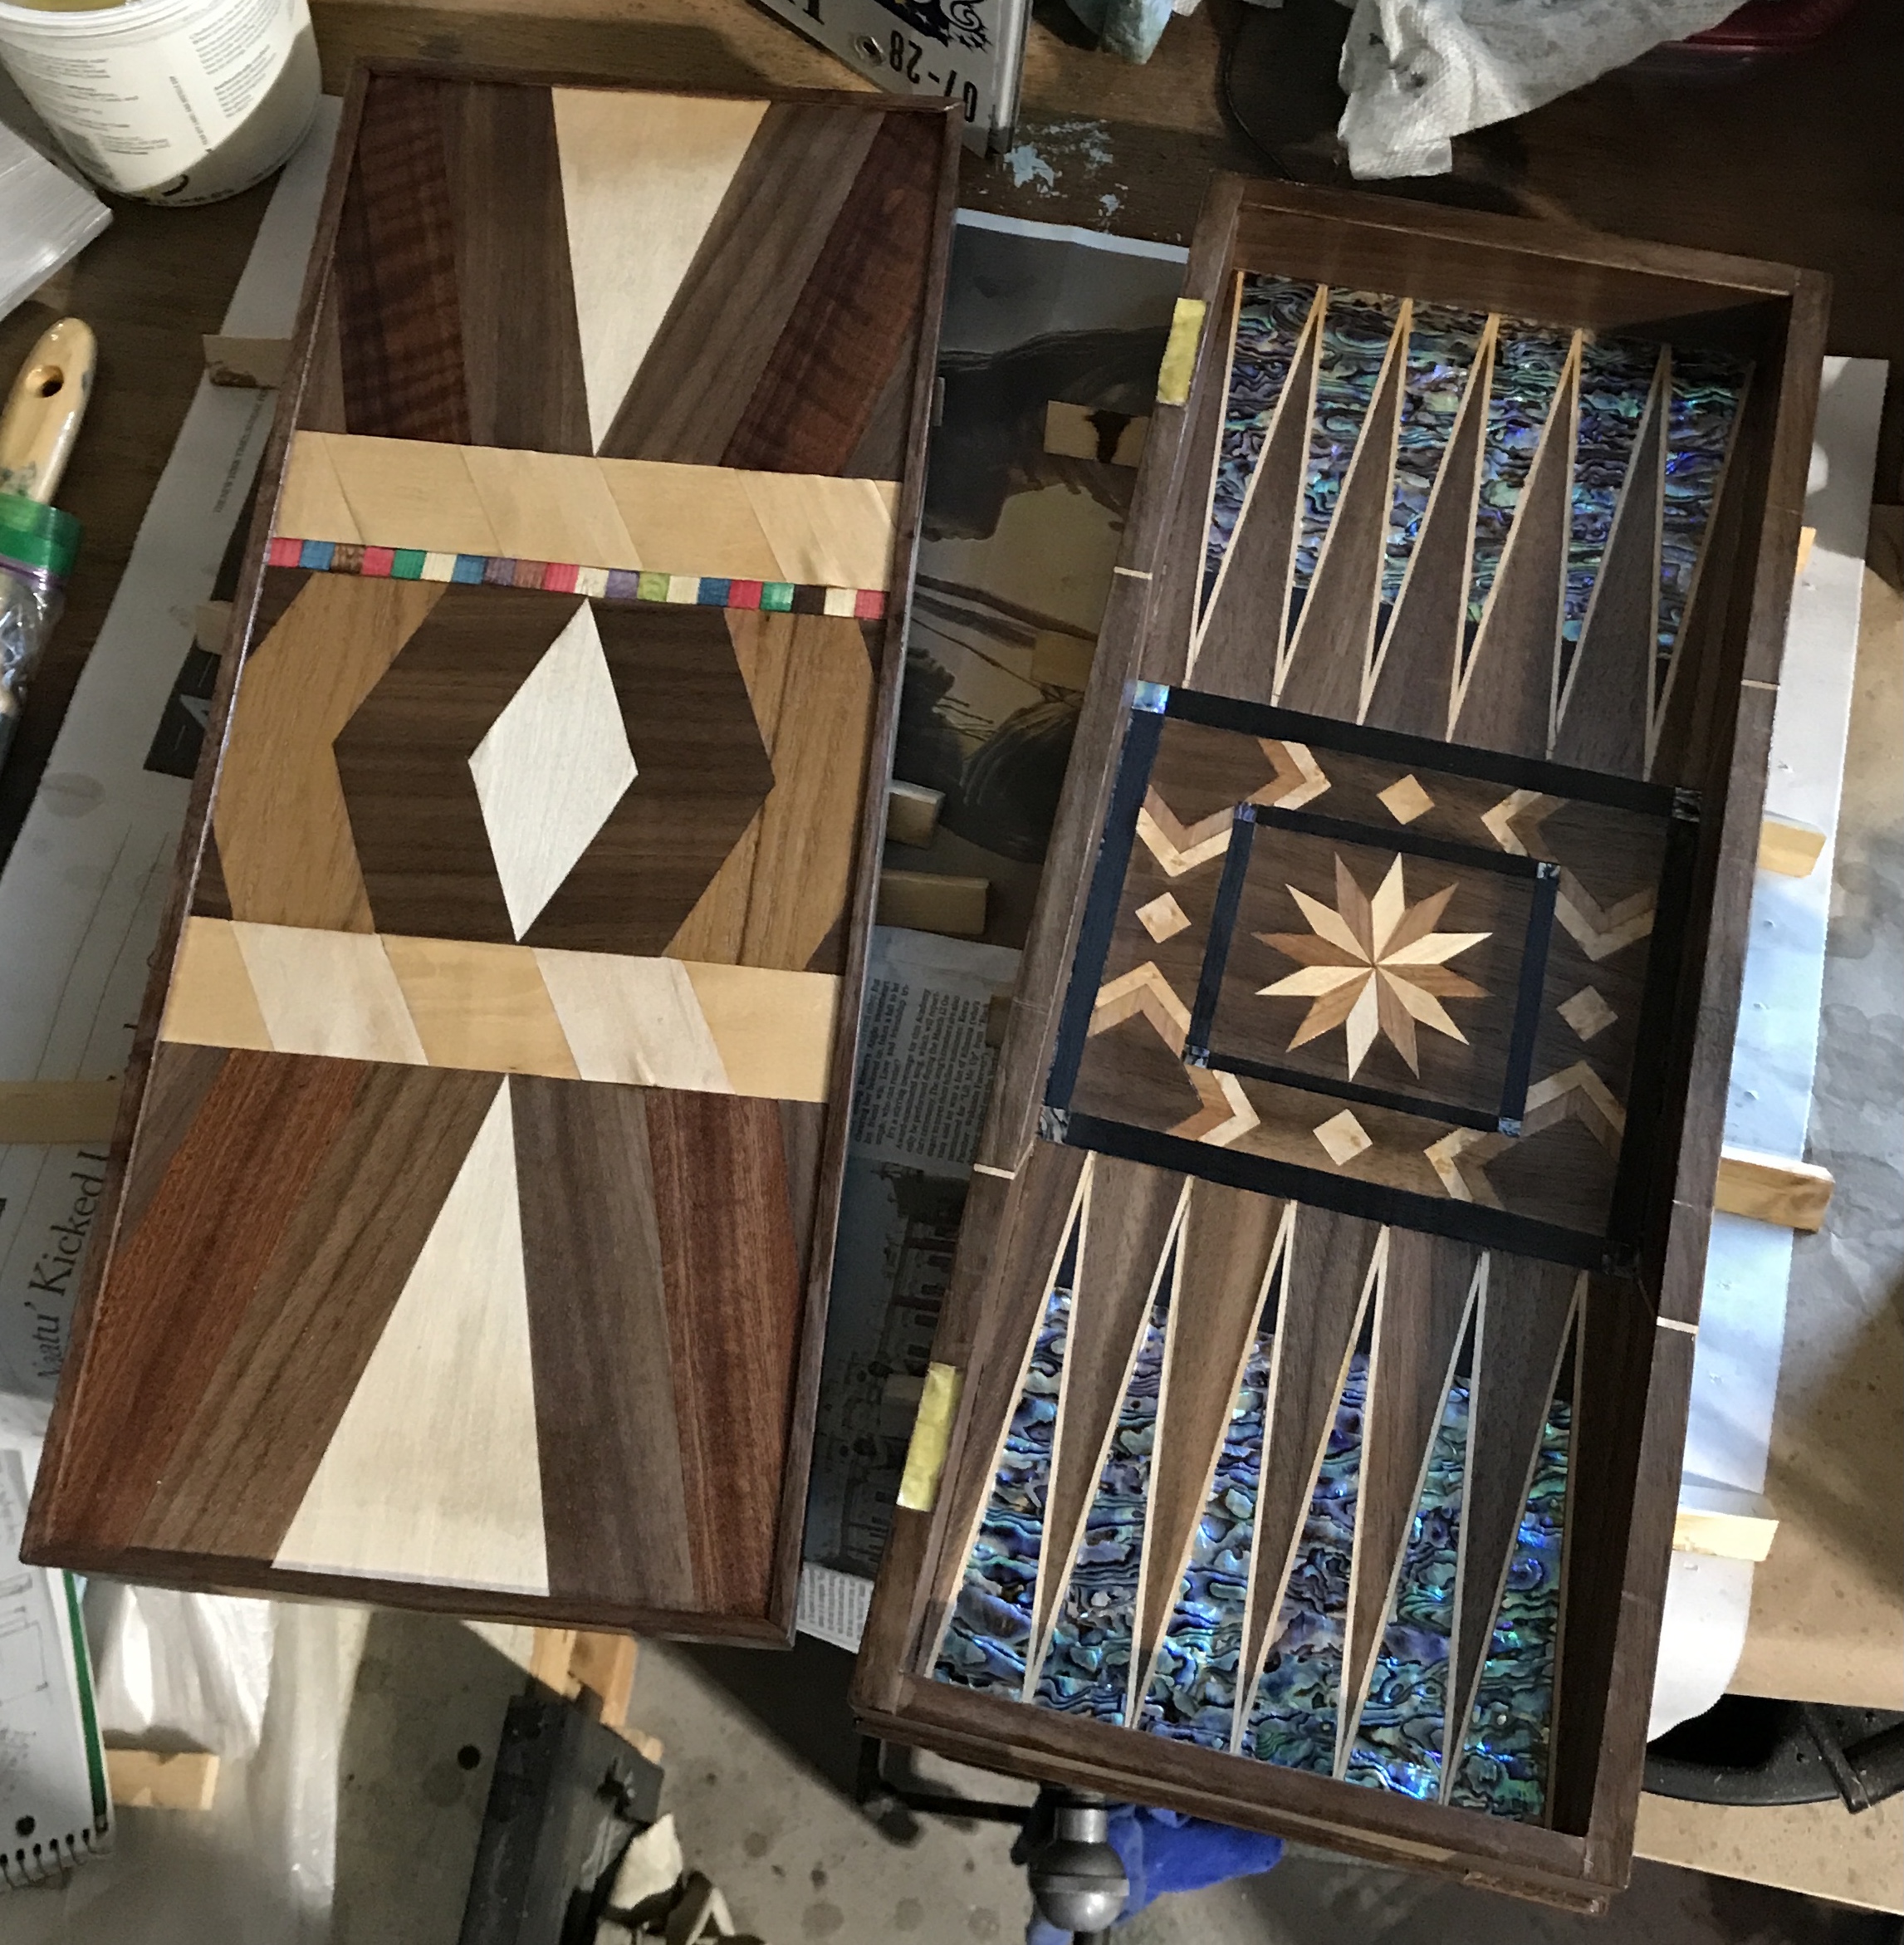
This morning the tape removal was tackled. About an hour after beginning all of the tape had been removed. There were a few glue spots here and there. Before sanding the Abalam was covered with tape. As before a template was made for the triangles and tape was cut to fit each triangle. The small squares in the central section were also covered. The entire surface was sanded with 220 grit paper by hand. The central section was sanded with the aid of a sanding block. The rest was sanded with folded paper. The photo shows the new playing surface adjacent to the previously finished one. Ready to play!
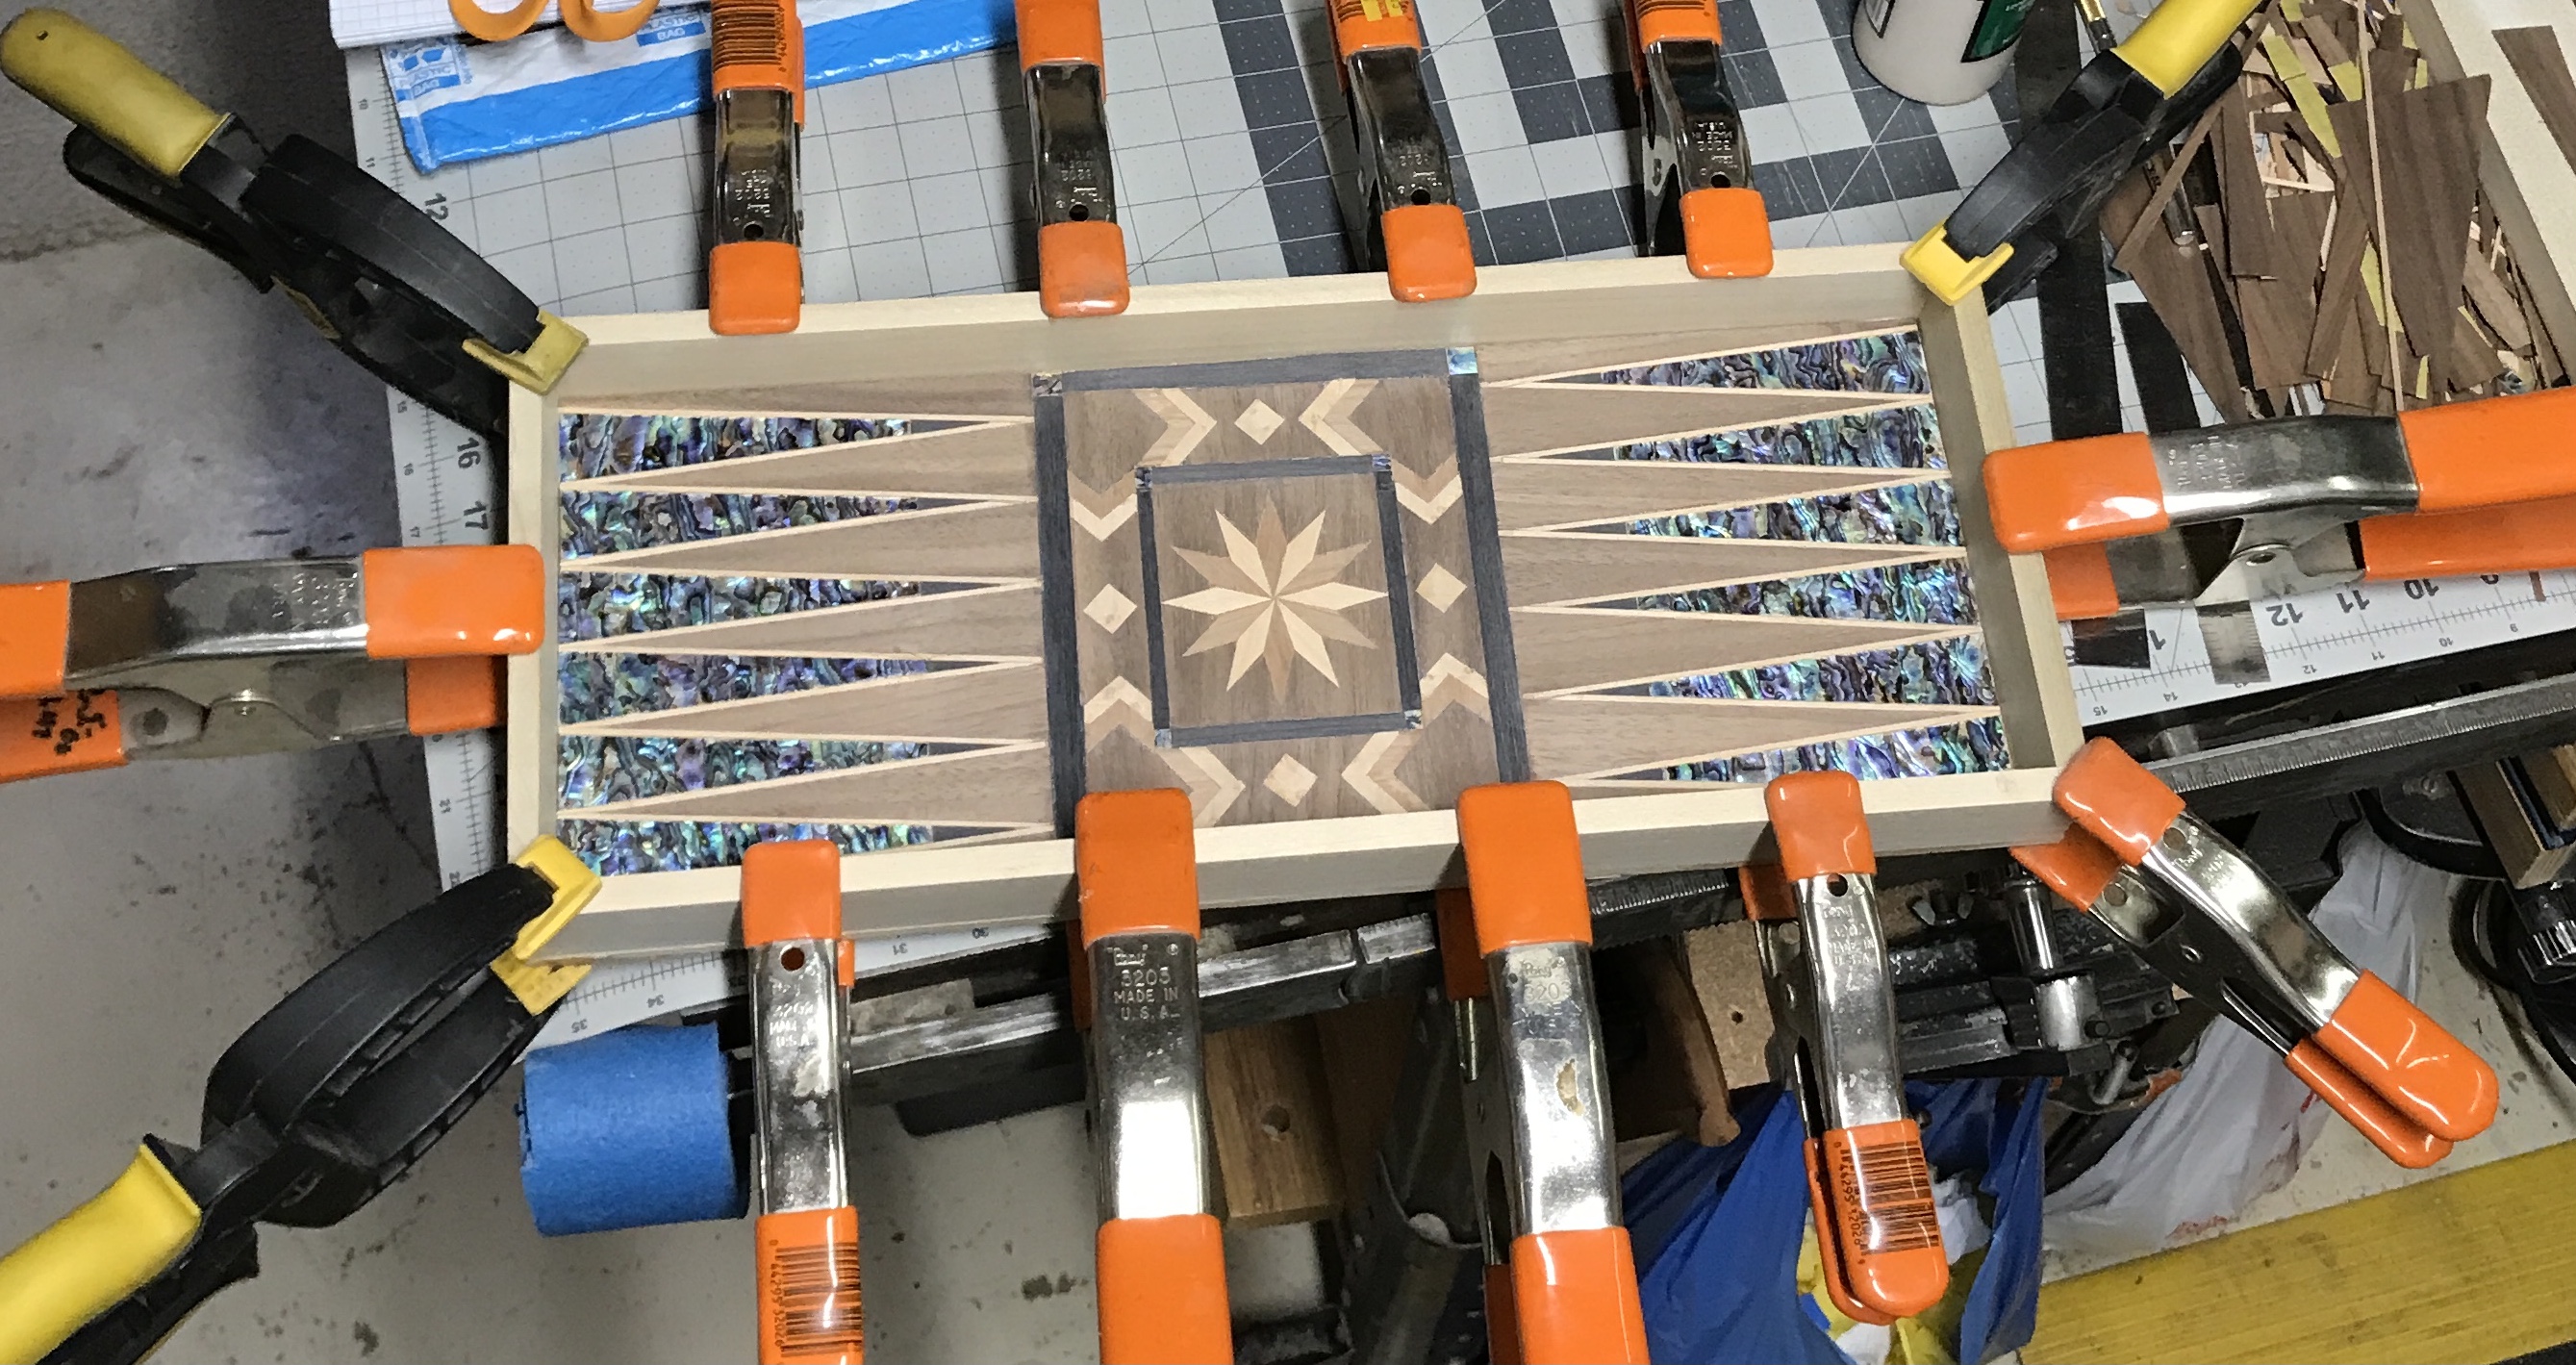
Covering the sides with veneer should have been straightforward, but the pieces made above are not wide enough to cover the width of the box, when assembled! They were cut to the width of the box sides not including the thickness of the faces. Time to be creative. Before that the two halves need to be assembled. Glue was applied to the rabbeted edges and the frames were clamped in place as shown below. After 45 minutes the clamps were removed and the second side was glued with my minimal set of clamps.
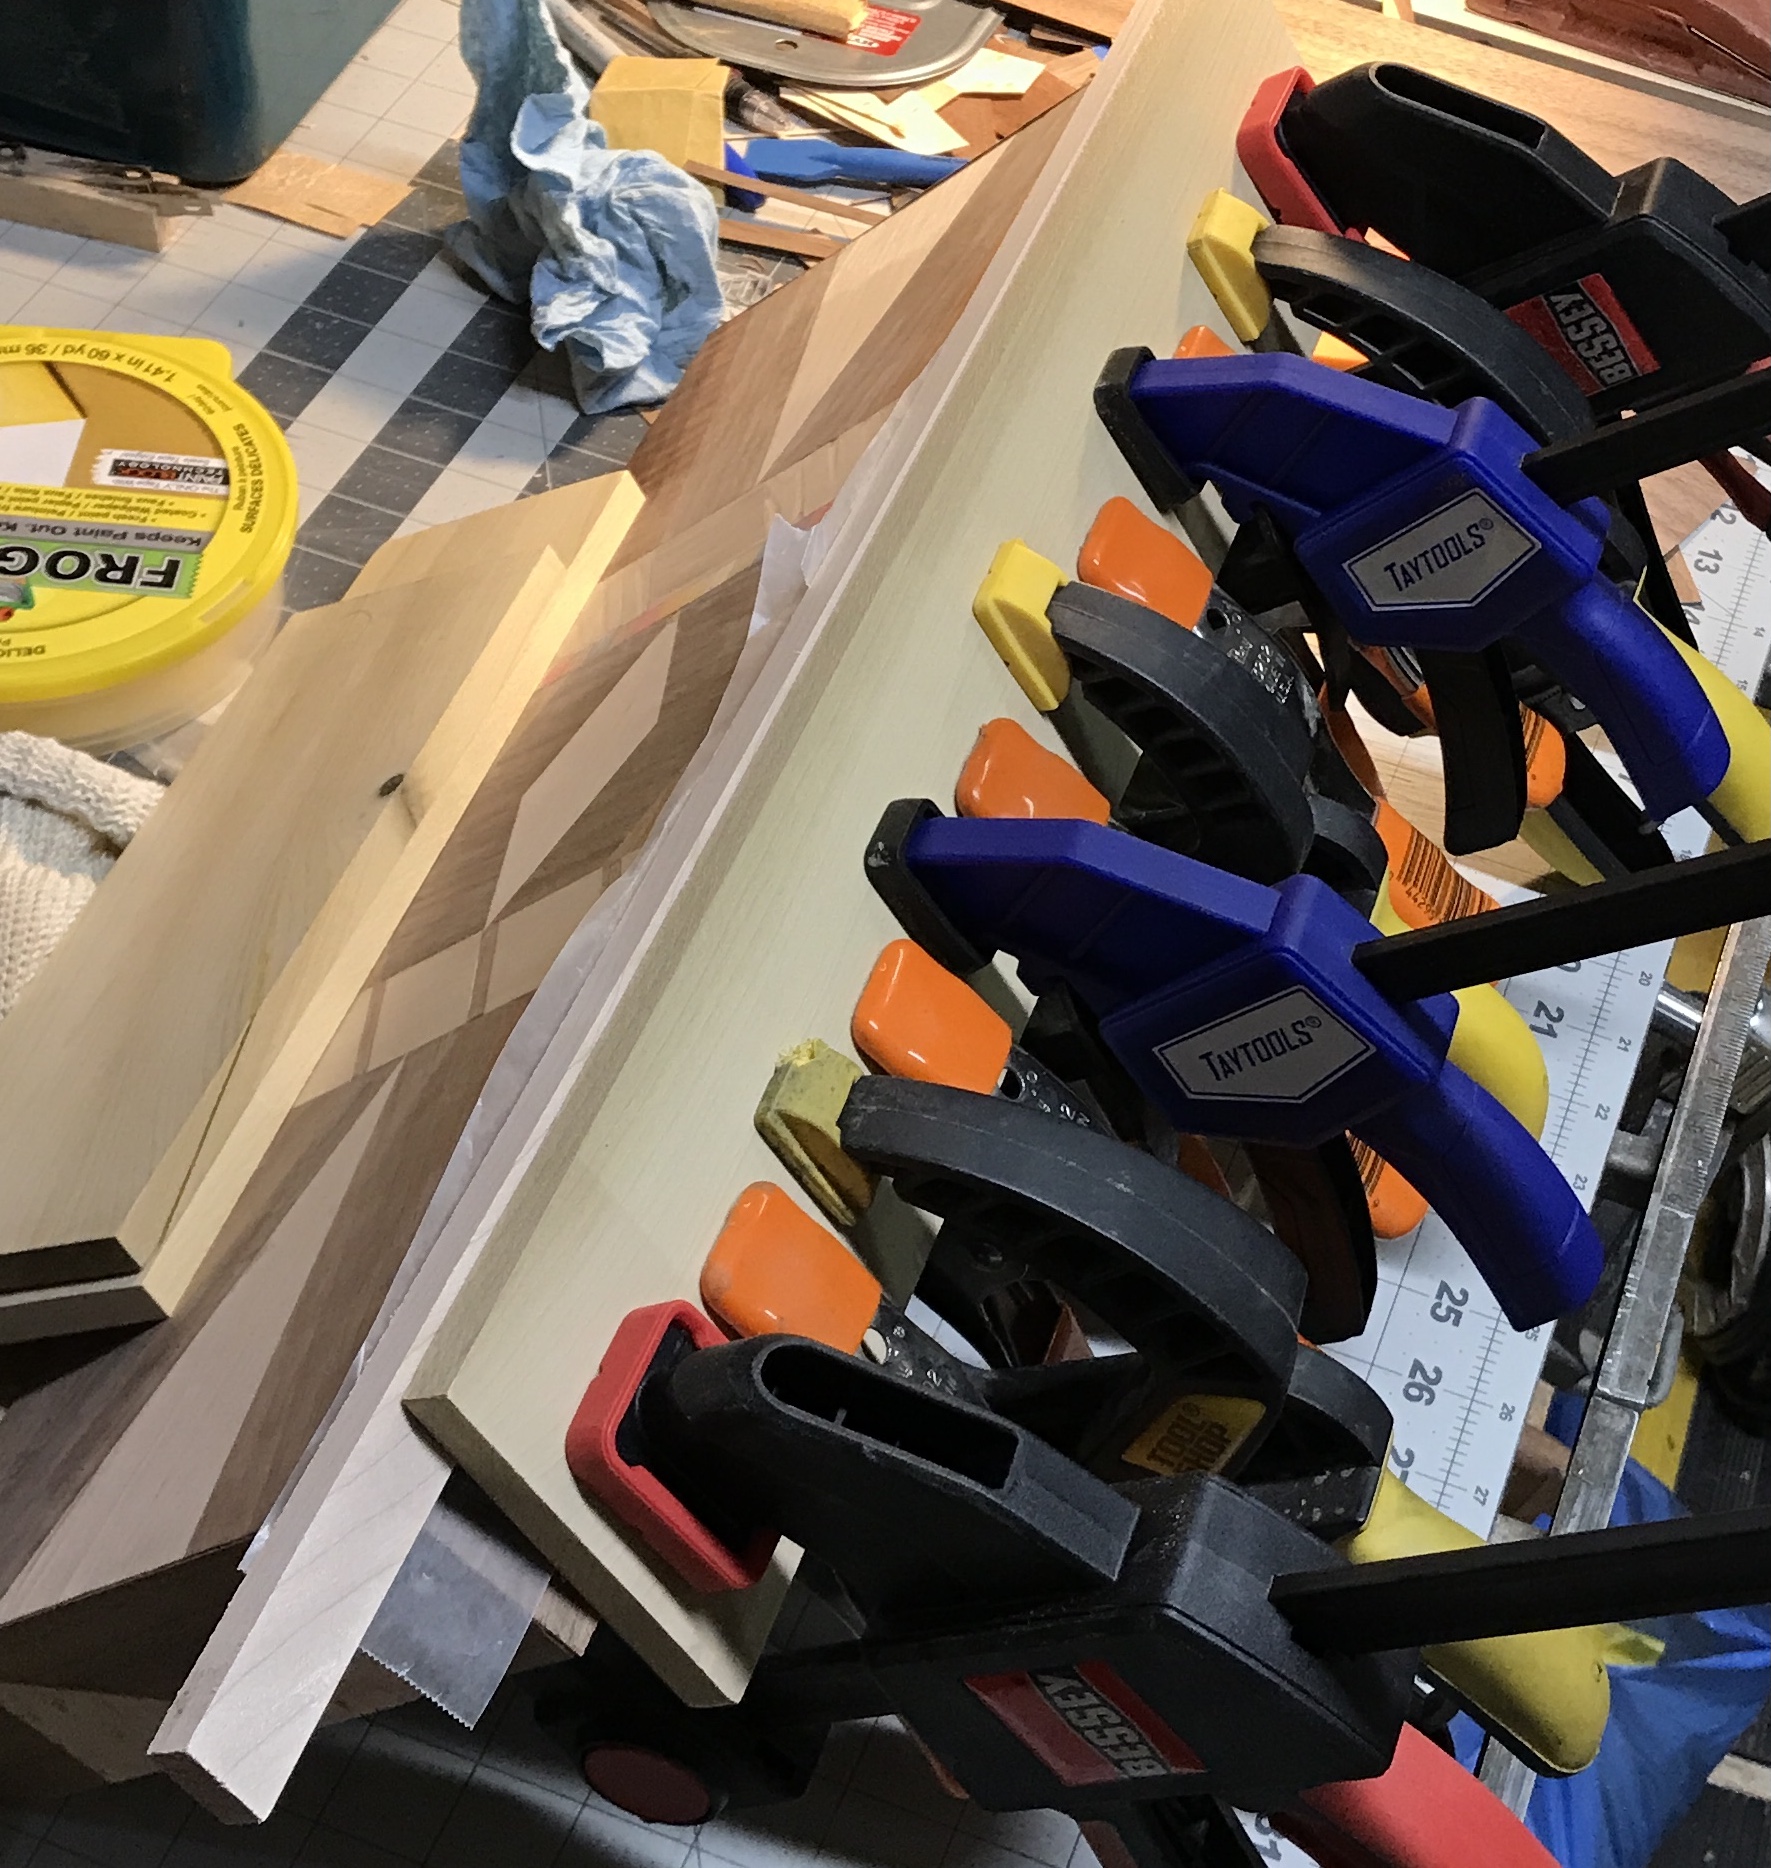
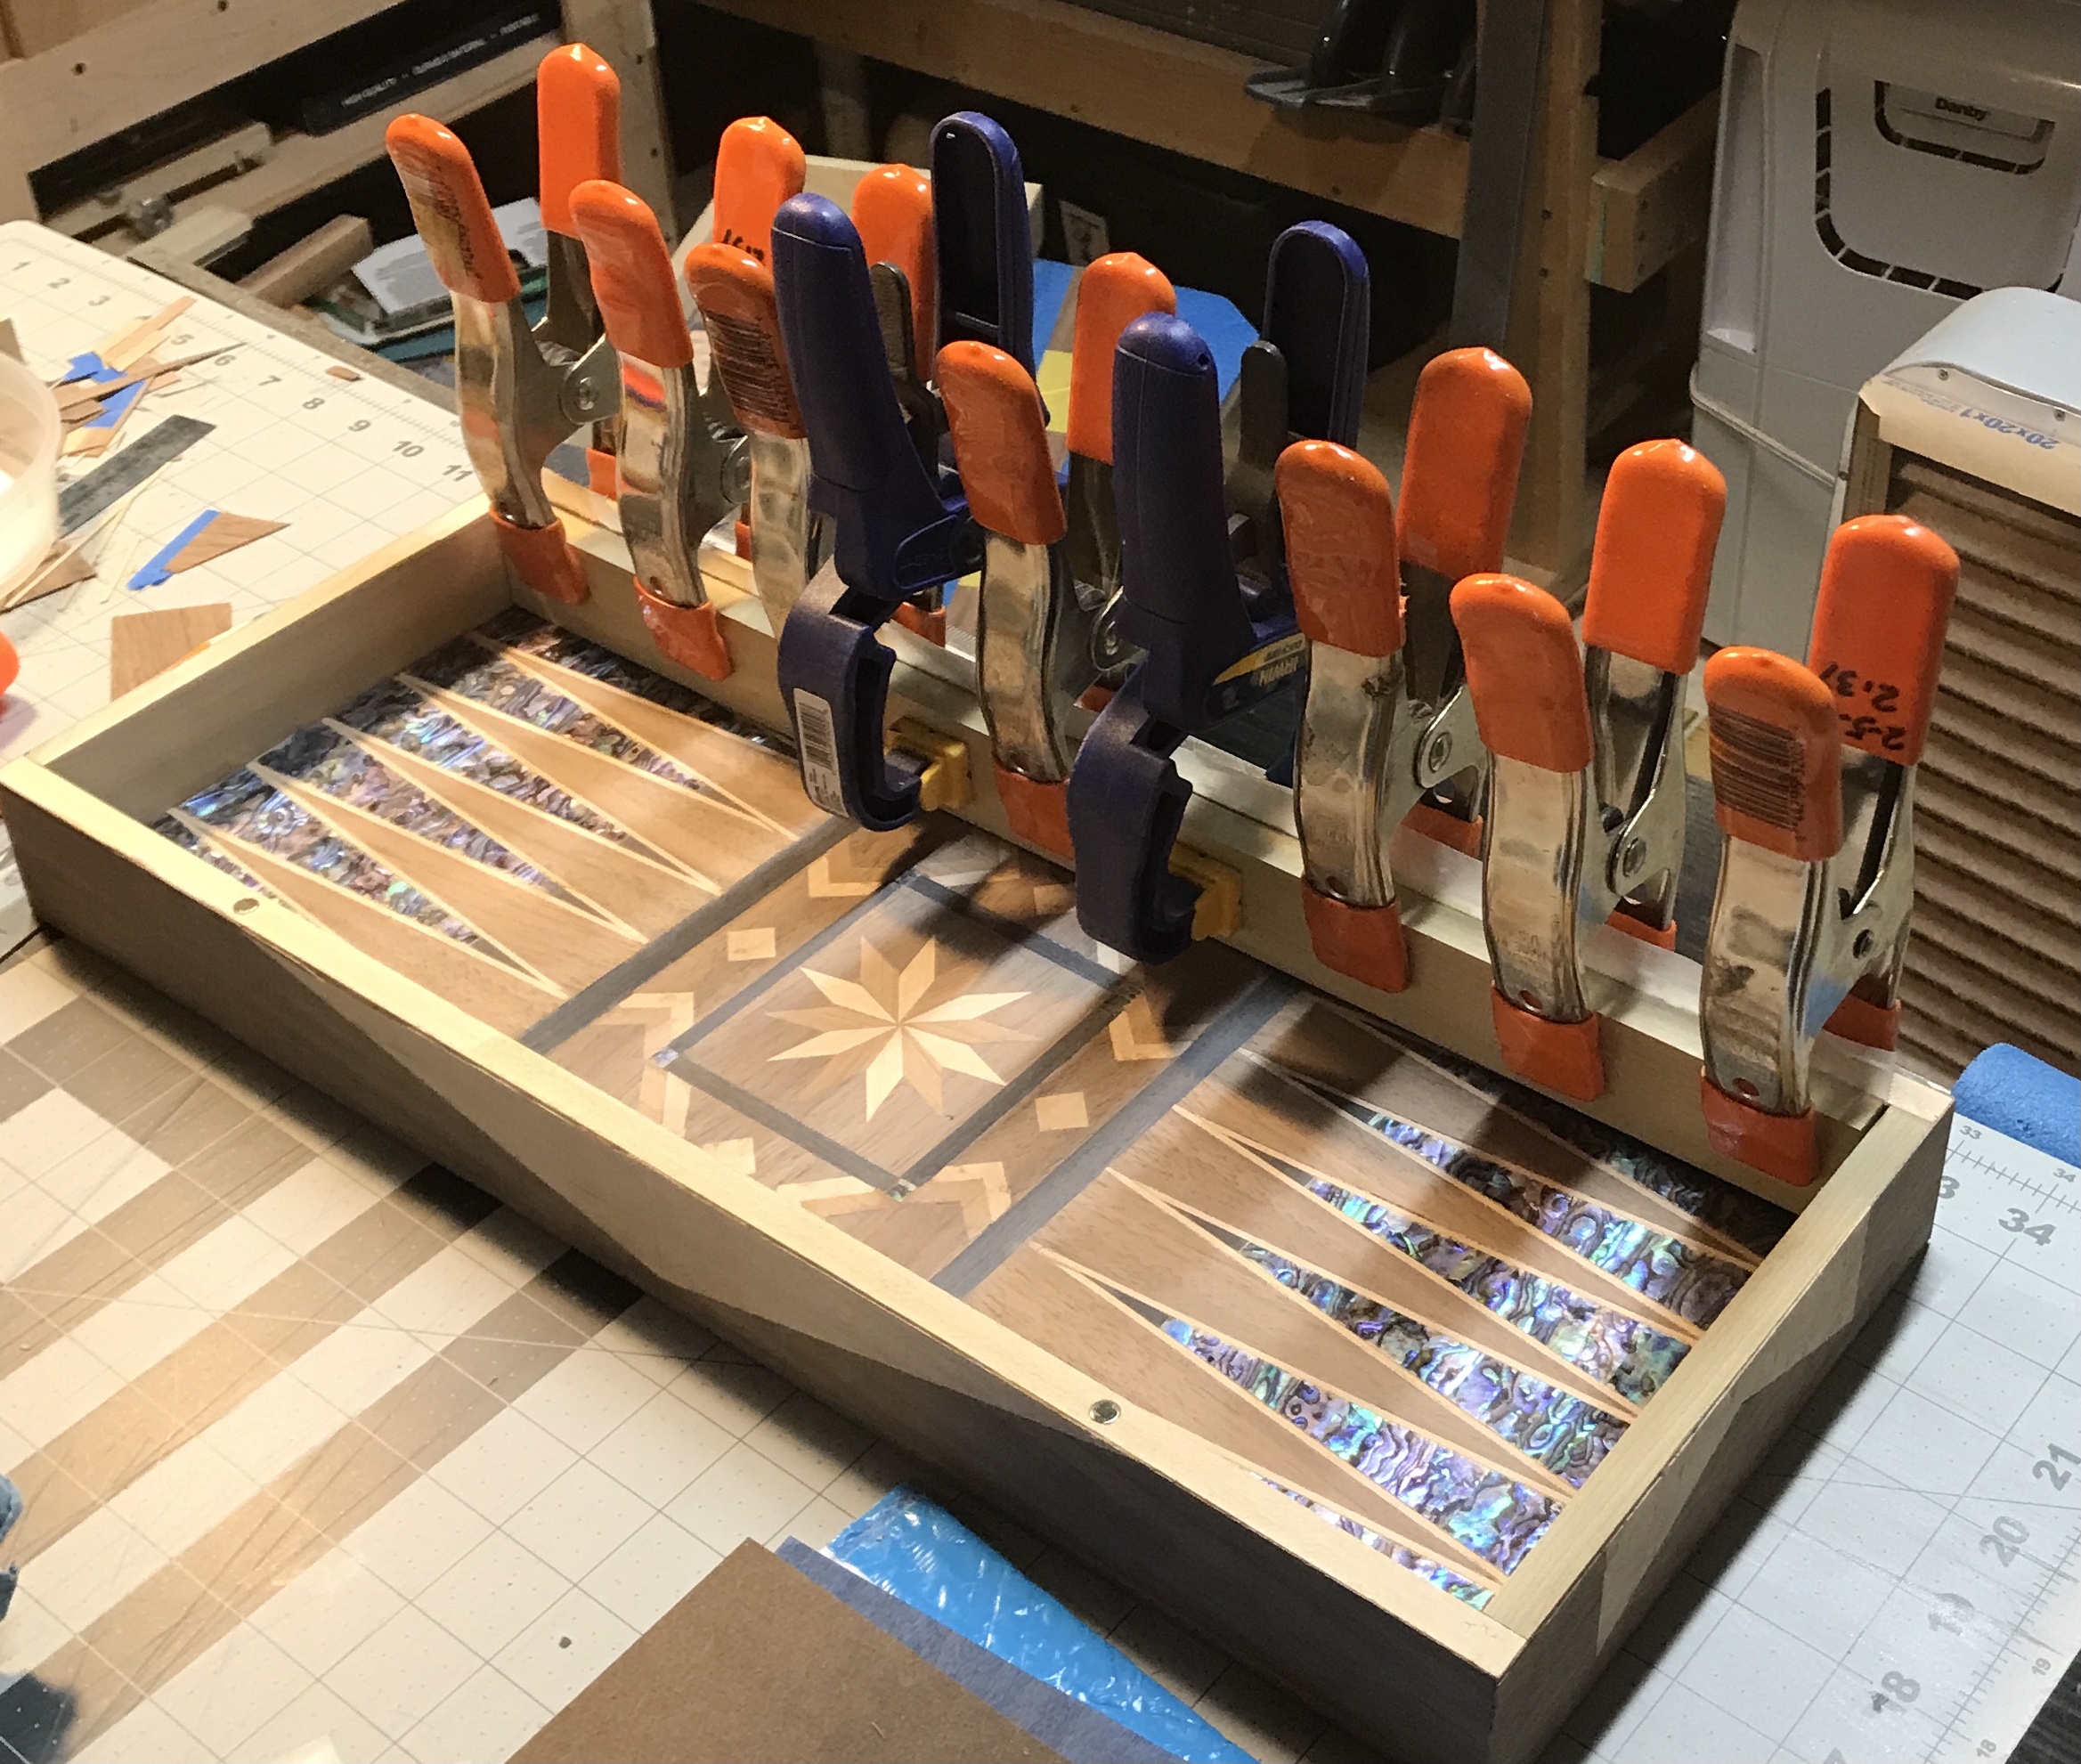
The sides of both boxes were sanded with the random orbit sander using 80 grit paper. The veneered edges were protected with blue tape, which did a reasonable job. A veneer side with the long diamond was cut in half lengthwise. The two pieces were both marked for length and the ends trimmed to fit the boxes. The veneer and the box sides were labeled. Glue was spread on the appropriate side and the veneer applied. This was covered with wax paper and then a long board. Many clamps were used to apply pressure during glue setting. I had just enough clamps to do both box sides at once. The picture below shows one of the sides clamped.
After gluing on all of the long outside pieces of veneer the ends were glued on as well. After cutting the ends in half lengthwise they were labeled to match the ends. The veneer assemblies were cut to fit the ends. Glue was spread with the silicone spreader and the veneer was clamped in place with a board. In order to get the ends tight enough long clamps were used to span the length of the box. One of the ends in clamps is shown below. The opposite ends were glued up in the afternoon.
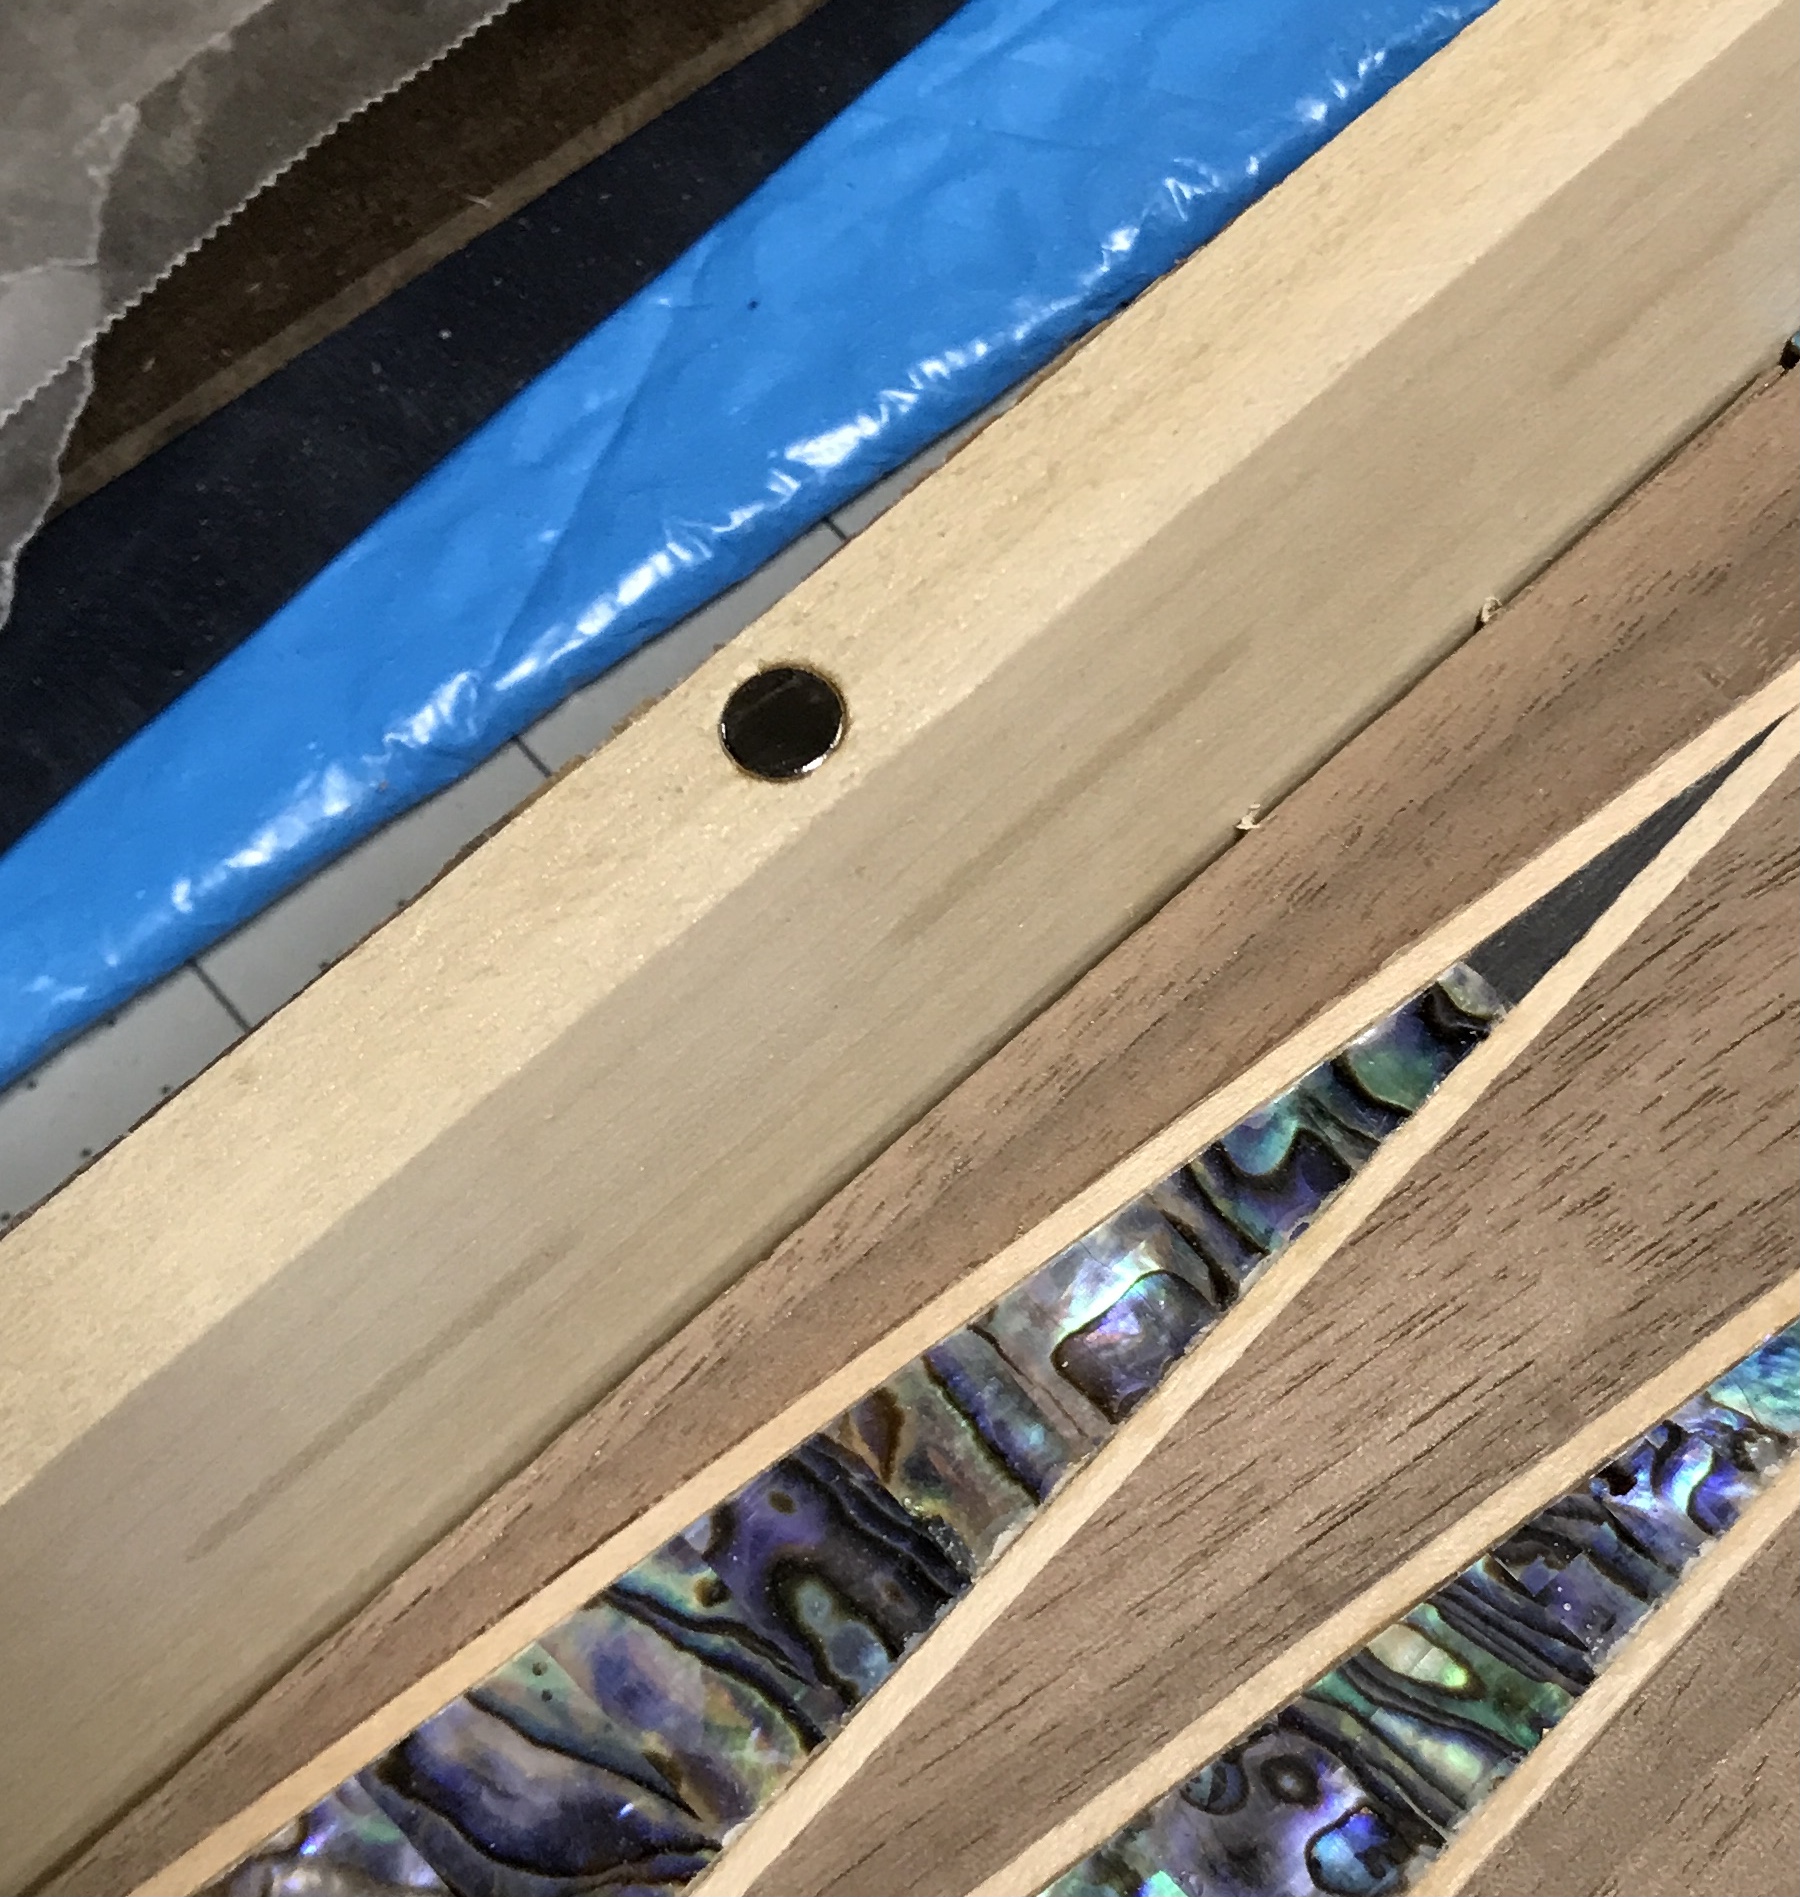
Before putting the veneer on the inside sides the box needs to be drilled and magnets installed. Below is a shot of the box at this stage. You can see the 1/4" gap on the right edge of the veneer. The smaller gap on the left may be fixed by the corner molding. The larger gap and the corresponding gap on the opposite edge were both fixed by clamping two mitered strips of veneer in place. The second photo shows the clamping setup in an effort to maximize pressure on just the glued veneer strip.
A few more repairs were taken care of this morning. In addition the magnets for holding the box closed were installed. Two holes were drilled in each of two matching sides. They were drilled on center 4" in from the ends. A 1/4" Forstner bit was used. It just happens to be 1/4" long, the length of the 1/4" diameter magnets. The depths were checked by inserting the magnets and drilled slightly deeper in two cases. Two part epoxy was put into each of the holes and the magnets were inserted taking care to orient them correctly. In two cases too much epoxy kept the magnets from seating deeply enough. A piece of steel was used to pull the magnet from the hole. Epoxy was removed and the magnets reinserted. The photo below shows one of the installed magnets.
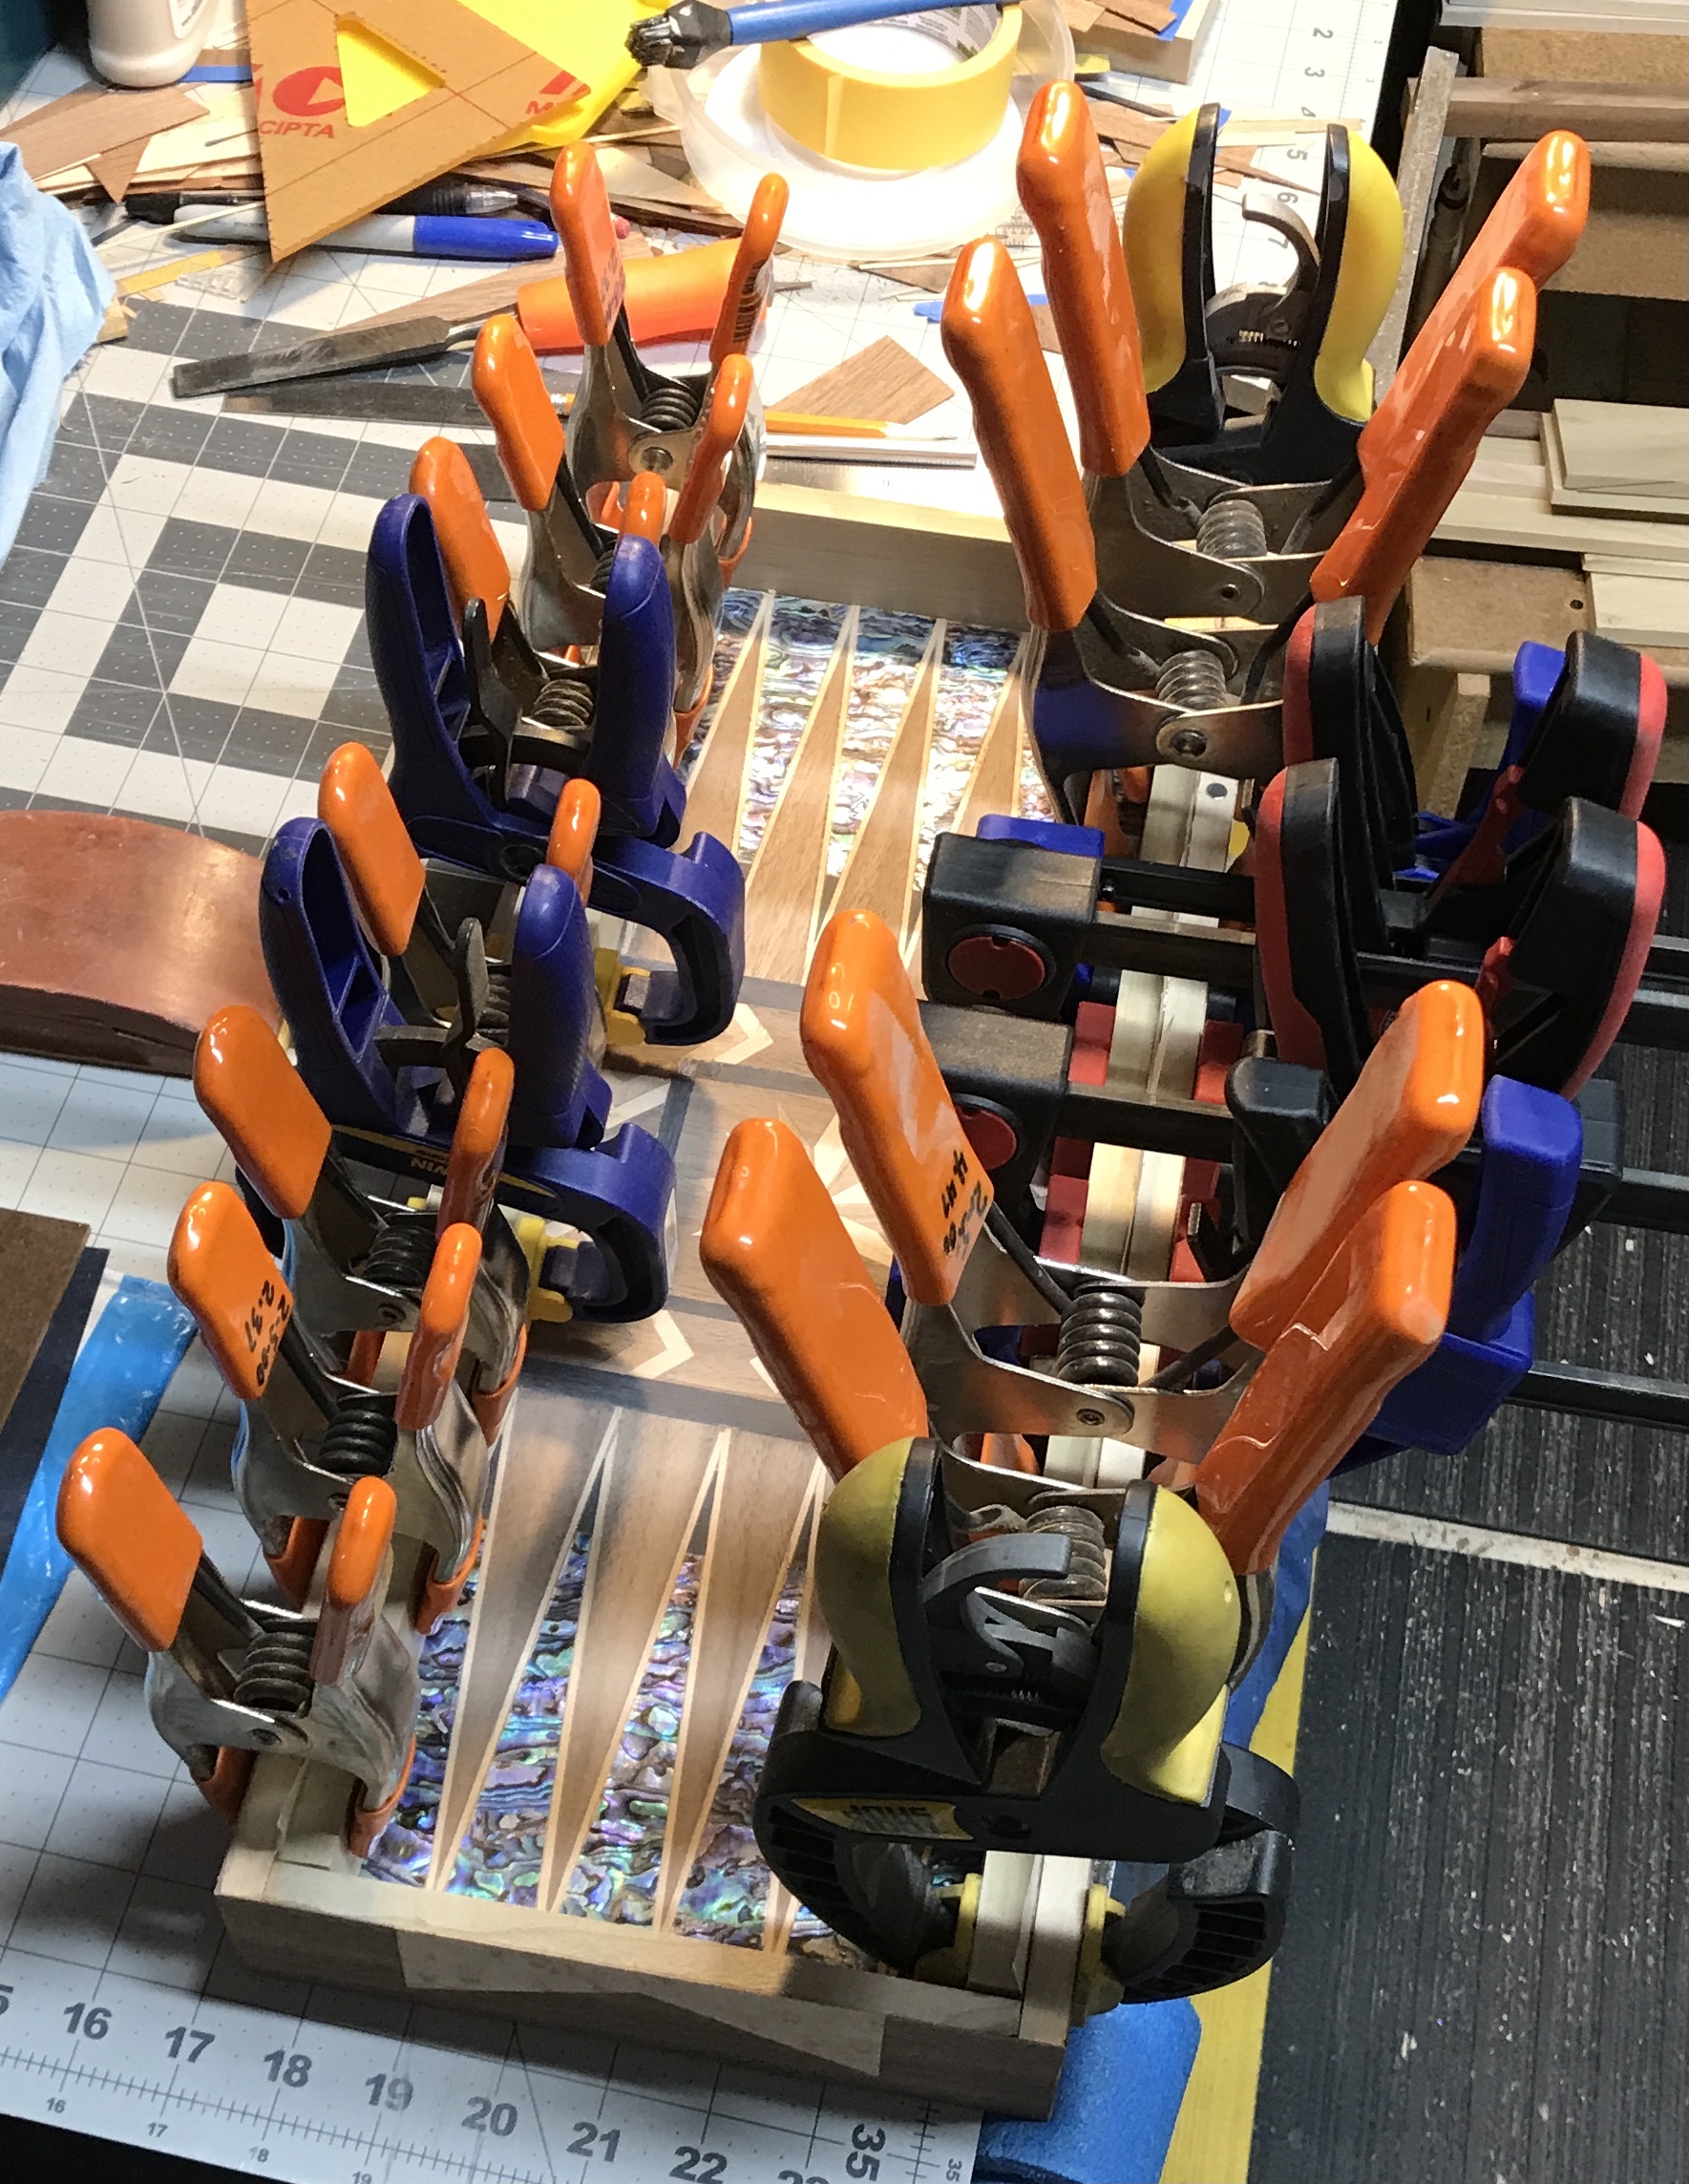
A few designs were considered for the inside side veneer. The plain background veneer needed to be broken up. The first photo below shows the chosen veneer design for these sides. The pieces were cut to fit and both sides labeled. The pieces were taped together. Two boards were cut to fit the inside length. They were left over from the box construction and are the perfect width. The second photo below shows one side clamped and the third photo shows both sides clamped. That's just about all of my clamps except for some wooden screw clamps and longer bar and pipe clamps. Thank-you Uncle Bob for the clamps. The two inside sides of the other half were completed in the afternoon. The fourth photo shows the veneer after clamp removal.
Sunday was spent with Ryan building a box for two subwoofers bound for the Prius. Veneering the four inside ends and the edges are all that is left from a veneer perspective. Two pieces of background veneer were cut to fit the ends of one side. Glue was applied, followed by veneer, waxed paper, and a piece of wood cut to fit. Five clamps per end as seen in the following photo.
The veneer for the edges was tackled this morning. Decided to continue the 1/16" wide insets around the edge from the inside. A long 1/2" wide strip of background was cut into three pieces to fit and align the insets correctly. The photo below shows the first side clamped after applying glue. Unfortunately, there are only a sufficient number of large clamps for one edge at a time.
A day later the veneering is complete, barring any repairs. All of the edges have been completed. The only things left before applying a finish are affixing the corner molding and the hinges. I am pleased with how it has turned out. The photo below shows the completely veneered box halves.
A few days have passed spent working on the piece holders and playing pieces. Today I explored attaching the box molding. Three pieces of the molding cut previously were used for the four outside edges of one box side. Two pieces were aligned on one corner and taped. One piece was marked and the miter was cut. The second piece was cut relative to the first and its miter was cut. This marking and cutting proceeded around the box. When the piece had to be cut precisely to length, it was first cut long and then carefully sanded to length. This resulted in pretty tight fits for the corners. The pieces so cut were taped in place as seen in the photo below.
The tape was removed from one piece of molding and glue applied. It was pressed into place between the pieces still taped in place. Yellow Frog tape was applied to hold the glued molding in place. All four pieces of molding were glued in place in this fashion as shown in the photo below. The second photo shows one end after the glue dried. The second box half was treated similarly.
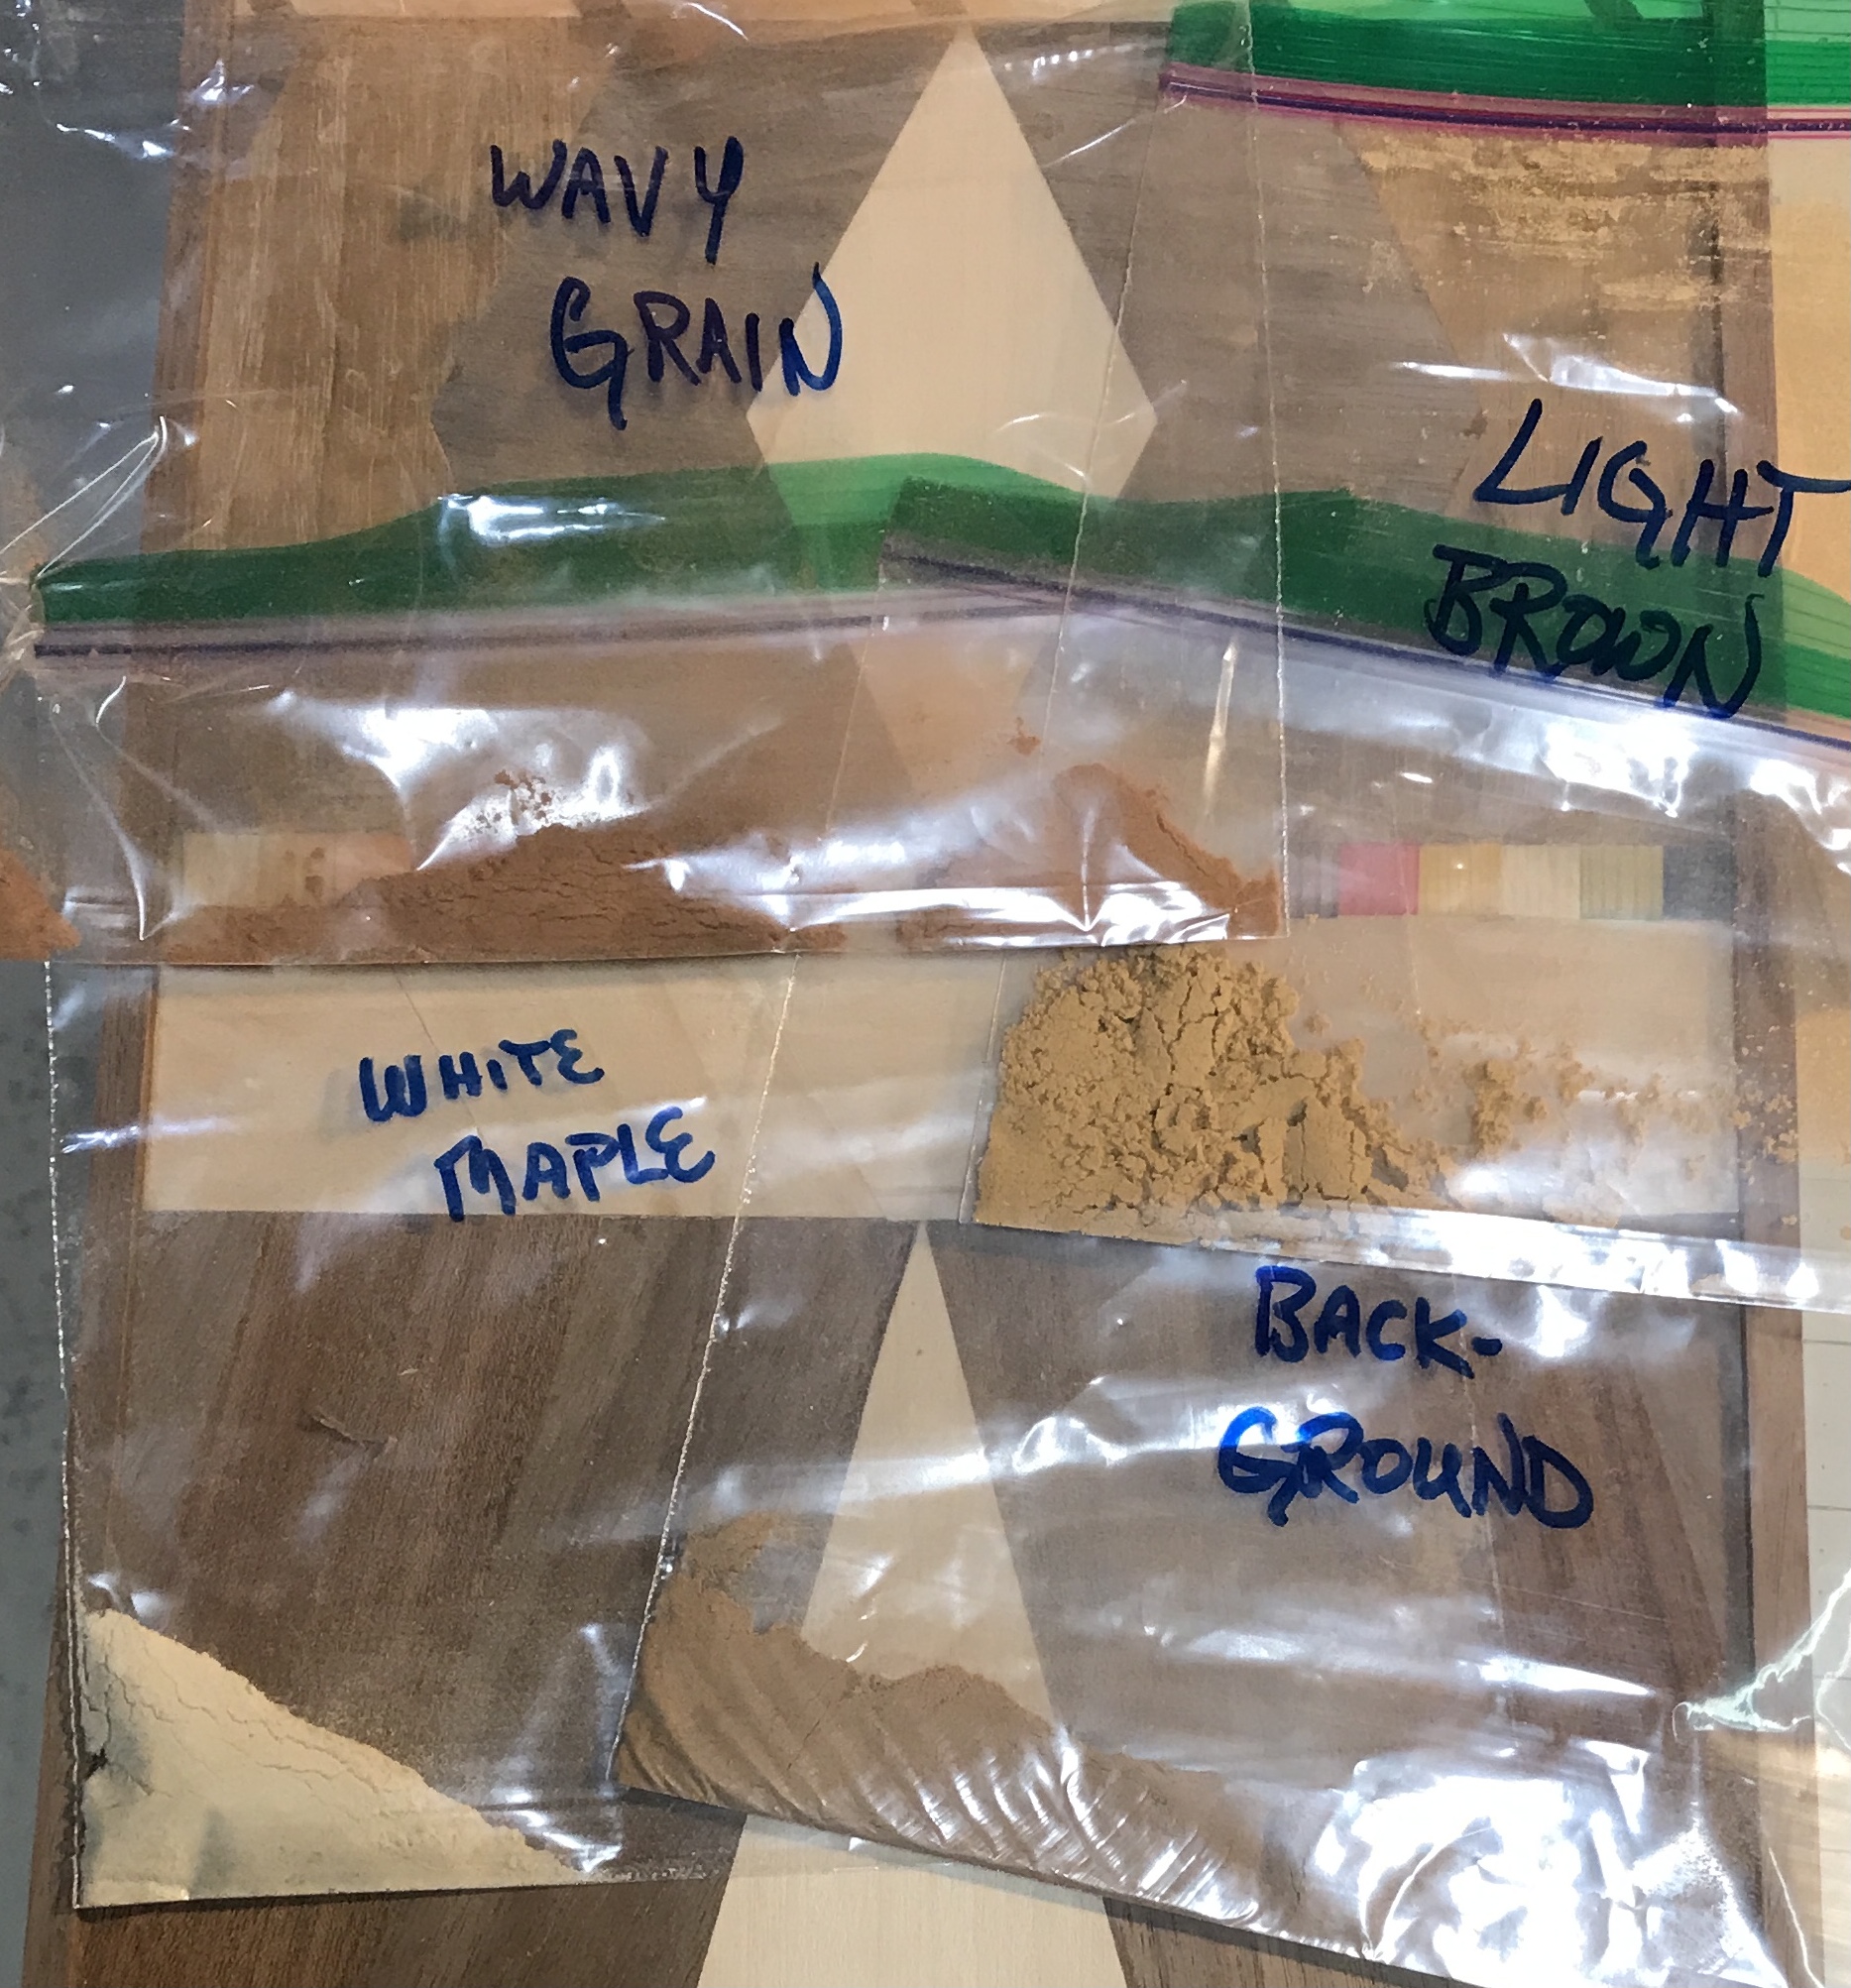
How did I spend m morning? Literally, making saw dust. The veneer scraps were cleaned up. Some larger pieces were saved and put in a Trader's Point Creamery box. Some of the smaller pieces were turned into sawdust. They were taped (with carpet tape) to a block of scrap and sanded. This is not a recommended method of collecting sawdust for repairs. The dust from four different veneers was saved in baggies as shown below.
The boxes were sanded all over. Numerous touch-ups were done using the sawdust prepared above. Glue spots were removed and all corners and edges were rounded off. The pieces of MOP were lightly sanded. All sanding was done with a block with 220 grit taped on. There are a few gaps inside in spots where bottom veneer meets side veneer. I have not decided whether to fill these or not. Other than that the sanding is done. Now I need to find some solid brass hinges.
Decided to fill the gaps in the inside where the sides meet the bottoms. This was done with glue, sawdust, and sanding. A few more places in the corners were resanded. After a trip to Woodcraft three different sets of solid brass hinges were in hand. The largest hinges were used after some effort. As the first picture shows the sides don't meet as the molding keeps them apart. A little is okay, but this was too much and the hinges weren't wide enough to span the gap. With some trepidation I put plane to molding. This actually went really well. The plane blade was very sharp and produced long curls. Care had to be taken wo work in from both sides to avoid blowing out the corners.
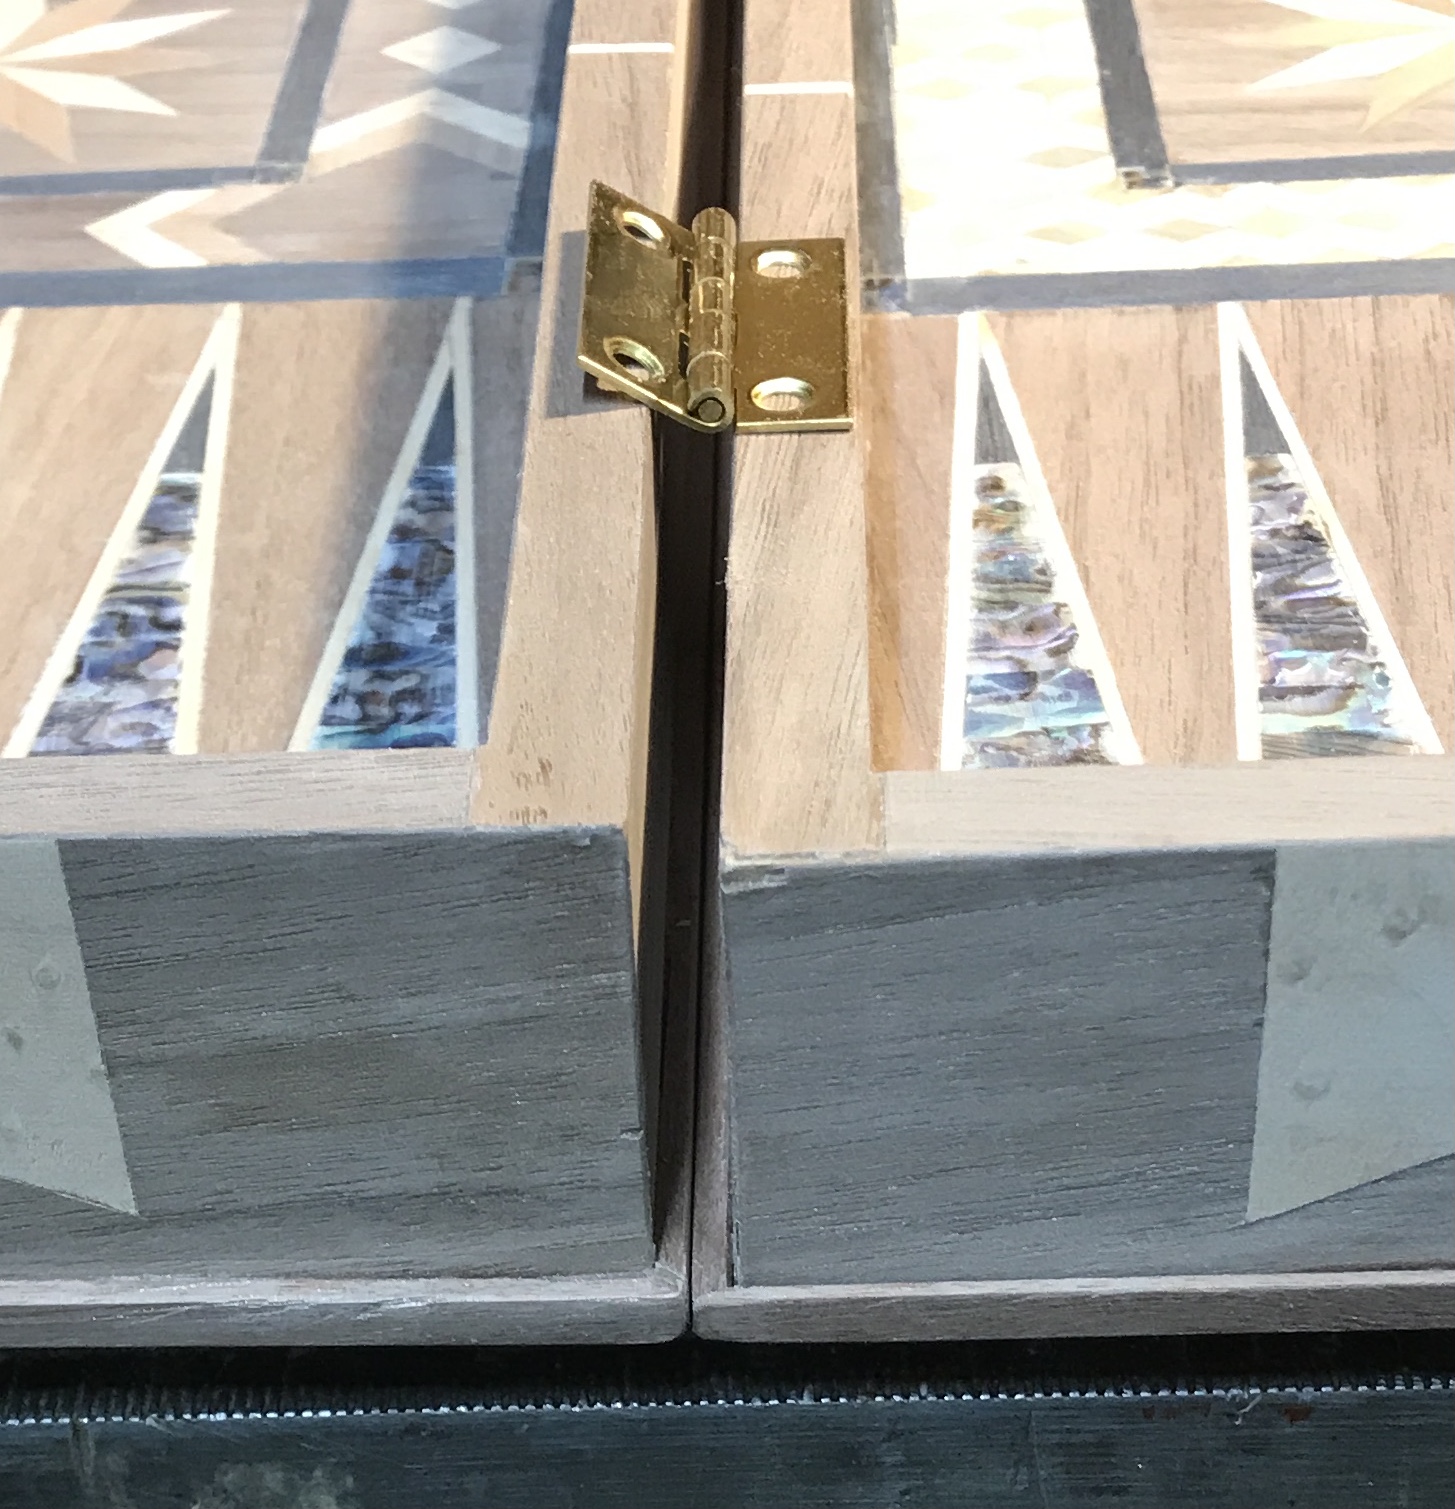
With that taken care of the hinges could be installed. The box halves were carefully aligned. The hinges were located 2" in from the ends. The outside edge of the hinges were marked. A box half was held between vice and dog on the workbench. A 3/4" wide chisel was used to carefully remove the waste material. This worked well and all four recesses were created. A few cleanup cuts and the hinges fit well. The box halves were realigned and the hinges held in place for marking the holes. Holes were drilled with a 5/64" drill bit using a hand drill. The screws were installed and the box closes easily and all sides are aligned. Two pictures record the hinge installation.
There is one other issue that was not addressed. The boxes are not the same height! The hinges were able to overcome this issue, thankfully.
It is now March 1 and the finishing begins. The board was sanded over the past few weeks and dust was removed with compressed air. The temp is above 60° today with low humidity. The board had the hinges removed and the hinge mortices were covered with tape. I am following a recipe for finishing with shellac from a woodworking chat room. The Zinsser Bullseye Shellac was diluted with two volumes of denatured ethanol. The resulting very thin shellac was slopped on with a brush. "If it is not dripping the brush is too dry." Both sides of both halves were covered. The boards were left to dry sitting on "triangles" with the open sides down. The first coat was allowed to dry for thirty minutes.
The dried shellac was sanded very lightly, just to get rid of the nubs, with 220 grit paper on a sanding block. The veneer bubbled up slightly in a few places on the outside. A second coat was painted on. After multiple hours the fifth coat was painted about 6 hours after starting. More may be required. Tomorrow will tell. The veneer bubbling has not gotten any worse. I am not pleased with the look of the board. The shellac even after five coats has not built up sufficiently. It is too cold to paint any more, so I will give it time before figuring out what to do next.
Back to the board after a week of shellac drying. There were a few veneer bubbles. These were slit parallel with the grain and glue was pushed under the veneer with the exacto knife. They were clamped and left to dry.
It is about a week later and time to finish this project. One end of the board was sanded lightly with 220 grit sandpaper. After removing the dust two coats of lacquer were applied with a brush over a two hour period. The finish looks very nice and smooth. The same sanding and lacquering were done to the rest of the box, inside and out. The three pictures below show the results of this work. It looks great and it is wonderful to finish this project after three months of work.